

Banana Chocolate Heaven Roll – just the name itself evokes a feeling of pure dessert bliss, doesn’t it? As an avid home baker and a connoisseur of delightful treats, I am absolutely thrilled to present a recipe that I believe will quickly become a cherished favorite in your culinary repertoire. This remarkable dessert isn’t just a simple roll; it’s an experience, a harmonious blend of comforting flavors and luxurious textures that captivates from the very first bite. Prepare to embark on a culinary journey that promises both indulgence and immense satisfaction.
While the exact historical genesis of the “Banana Chocolate Heaven Roll” as a specific named dish might be relatively modern, the enchanting combination of ripe bananas and rich chocolate has been a global phenomenon for centuries, cherished in countless desserts from pies to puddings and cakes across diverse cultures. This particular rendition elevates that classic pairing into a truly memorable masterpiece. People adore this dish for its incredible balance: the natural sweetness and creamy softness of ripe bananas perfectly complementing the deep, indulgent notes of high-quality chocolate. Its stunning presentation makes it a fantastic centerpiece, yet its surprisingly straightforward preparation means you don’t need to be a pastry chef to achieve perfection. Get ready to create a dessert that will undoubtedly earn you rave reviews and requests for more!

<h2>Ingredients:</h2>
<ul>
<li><strong>For the Chocolate Sponge Cake:</strong></li>
<ul>
<li>4 large eggs, at room temperature</li>
<li>½ cup (100g) granulated sugar, plus 2 tablespoons for dusting</li>
<li>½ cup (60g) all-purpose flour, sifted</li>
<li>¼ cup (25g) unsweetened cocoa powder, sifted</li>
<li>½ teaspoon baking powder</li>
<li>¼ teaspoon salt</li>
<li>2 tablespoons unsalted butter, melted and cooled (optional, but adds tenderness)</li>
<li>1 teaspoon vanilla extract</li>
</ul>
<li><strong>For the Banana Cream Filling:</strong></li>
<ul>
<li>2 ripe medium bananas, mashed very smoothly</li>
<li>1 ½ cups (360ml) heavy cream, very cold</li>
<li>¼ cup (30g) powdered sugar (confectioners’ sugar), sifted</li>
<li>½ teaspoon vanilla extract</li>
<li>1 tablespoon fresh lemon juice (to prevent bananas from browning)</li>
</ul>
<li><strong>For the Chocolate Ganache Glaze:</strong></li>
<ul>
<li>4 oz (113g) good quality semi-sweet chocolate, finely chopped</li&
<li>½ cup (120ml) heavy cream</li>
<li>1 tablespoon unsalted butter (optional, for extra shine)</li>
</ul>
<li><strong>Optional Garnishes:</strong></li>
<ul>
<li>Thinly sliced fresh banana rounds</li>
<li>Chocolate shavings or curls</li>
<li>A light dusting of powdered sugar or cocoa powder</li>
</ul>
</ul>
<h3>Preparing the Decadent Chocolate Sponge Cake</h3>
<ol>
<li>First things first, I preheat my oven to 375°F (190°C). Then, I line a 10×15-inch (25×38 cm) jelly roll pan with parchment paper, making sure the paper extends a little over the edges – this will be super helpful for lifting the cake later. I lightly grease the parchment paper with a tiny bit of butter or non-stick spray, just to be extra careful, ensuring our delicate chocolate sponge doesn’t stick. This meticulous prep is key for a seamless roll and the perfect base for our <strong>Banana Chocolate Heaven Roll</strong>.</li>
<li>In a medium bowl, I sift together the all-purpose flour, unsweetened cocoa powder, baking powder, and salt. Sifting is a step I never skip, as it ensures there are no lumps and that these dry ingredients are perfectly combined and aerated. This creates a lighter, more uniform texture in the finished cake, which is absolutely essential for a roll cake that won’t crack.</li>
<li>Now for the star of the show: the eggs and sugar. In the bowl of my stand mixer, fitted with the whisk attachment (or using a hand mixer), I combine the room temperature eggs and granulated sugar. I beat them on high speed for about 7-10 minutes. This is a crucial step! We’re looking for a mixture that is pale yellow, very thick, and fluffy – almost like a ribbon that falls slowly off the whisk when lifted. It should have significantly increased in volume. This aeration is what gives our sponge its beautiful, light texture, as it incorporates air instead of relying solely on chemical leaveners.</li&
<li>Once the egg mixture is perfectly fluffy, I gently fold in the sifted dry ingredients in two additions. I use a large rubber spatula and try to be as light-handed as possible, using a cutting and folding motion. The goal here is to incorporate the dry ingredients without deflating all that wonderful air we just whipped into the eggs. <strong>Gentleness is paramount</strong> at this stage to maintain the cake’s tenderness.</li>
<li>Next, I carefully fold in the melted and cooled butter (if using) and the vanilla extract. If adding butter, I take a small amount of the batter and mix it with the butter first to lighten it, then fold this back into the main batter. This tempering step helps prevent the butter from sinking and ensures it’s evenly distributed without deflating the batter. The vanilla adds a lovely warmth that complements the chocolate beautifully.</li>
<li>I pour the batter evenly into the prepared jelly roll pan and spread it gently with an offset spatula, making sure it reaches all corners. I then gently tap the pan on the counter a couple of times to release any large air bubbles. This helps create an even surface.</li>
<li>I bake the sponge cake for 10-12 minutes, or until it springs back when lightly touched in the center. Don’t overbake, as this will make it dry and prone to cracking when rolled. A toothpick inserted into the center should come out with moist crumbs, not wet batter.</li>
<li>As soon as the cake comes out of the oven, I immediately sprinkle 2 tablespoons of granulated sugar evenly over the top surface. Then, I place a clean kitchen towel (or another piece of parchment paper) over the sugared cake. With confidence, I invert the cake onto the towel/parchment. <strong>Carefully peel off the baking parchment</strong> that was on the bottom of the cake. While it’s still warm, I start rolling the cake, along with the towel/parchment, from one short end to the other. I roll it tightly but gently. I let it cool completely in this rolled-up position on a wire rack. This “training” of the cake is vital for achieving a beautiful roll without cracks later for our <strong>Banana Chocolate Heaven Roll</strong>.</li>
</ol>
<h3>Crafting the Velvety Banana Cream Filling</h3<
<ol start=”9″>
<li>While the cake is cooling, I prepare the delightful banana cream filling. In a small bowl, I mash the two ripe bananas very smoothly using a fork or a potato masher. I want them to be as lump-free as possible. Immediately, I stir in the fresh lemon juice. This tiny addition is a lifesaver, as it prevents the bananas from browning, keeping our filling looking fresh and appealing. Set this aside.</li>
<li>In a separate, very cold bowl (I often chill my bowl and whisk attachment in the freezer for 10-15 minutes beforehand), I pour the very cold heavy cream. I beat it on medium-high speed until soft peaks form. Then, I gradually add the sifted powdered sugar and vanilla extract, continuing to beat until firm peaks form. Be careful not to overbeat, or you’ll end up with butter! We’re aiming for a fluffy, stable whipped cream.</li>
<li>Now, with a rubber spatula, I gently fold the mashed bananas (with lemon juice) into the whipped cream. I do this slowly, ensuring everything is well combined without deflating the whipped cream too much. This creates a light, airy, and incredibly flavorful banana cream that will be the heart of our <strong>Banana Chocolate Heaven Roll</strong>. I resist the urge to taste test too much, though it’s hard!</li>
</ol>
<h3>Whipping Up the Glossy Chocolate Ganache</h3>
<ol start=”12″>
<li>For the luxurious chocolate ganache glaze, I place the finely chopped semi-sweet chocolate in a heatproof bowl. In a small saucepan, I heat the heavy cream over medium heat until it just begins to simmer around the edges – don’t let it boil vigorously.</li>
<li>Once the cream is hot, I immediately pour it over the chopped chocolate. I let it sit undisturbed for about 5 minutes to allow the heat from the cream to melt the chocolate. This passive melting technique ensures a smoother ganache.</li& <li>After 5 minutes, I gently whisk the mixture starting from the center and working my way outwards until it’s completely smooth and glossy. If I’m using the optional butter, I whisk it in now until it’s fully incorporated and melted, adding an extra sheen and richness to our ganache. I let the ganache cool for about 15-20 minutes at room temperature, stirring occasionally, until it thickens slightly to a spreadable consistency. It should be thick enough to coat the back of a spoon but still pourable. This perfect texture will drape beautifully over our <strong>Banana Chocolate Heaven Roll</strong>.</li>
</ol>
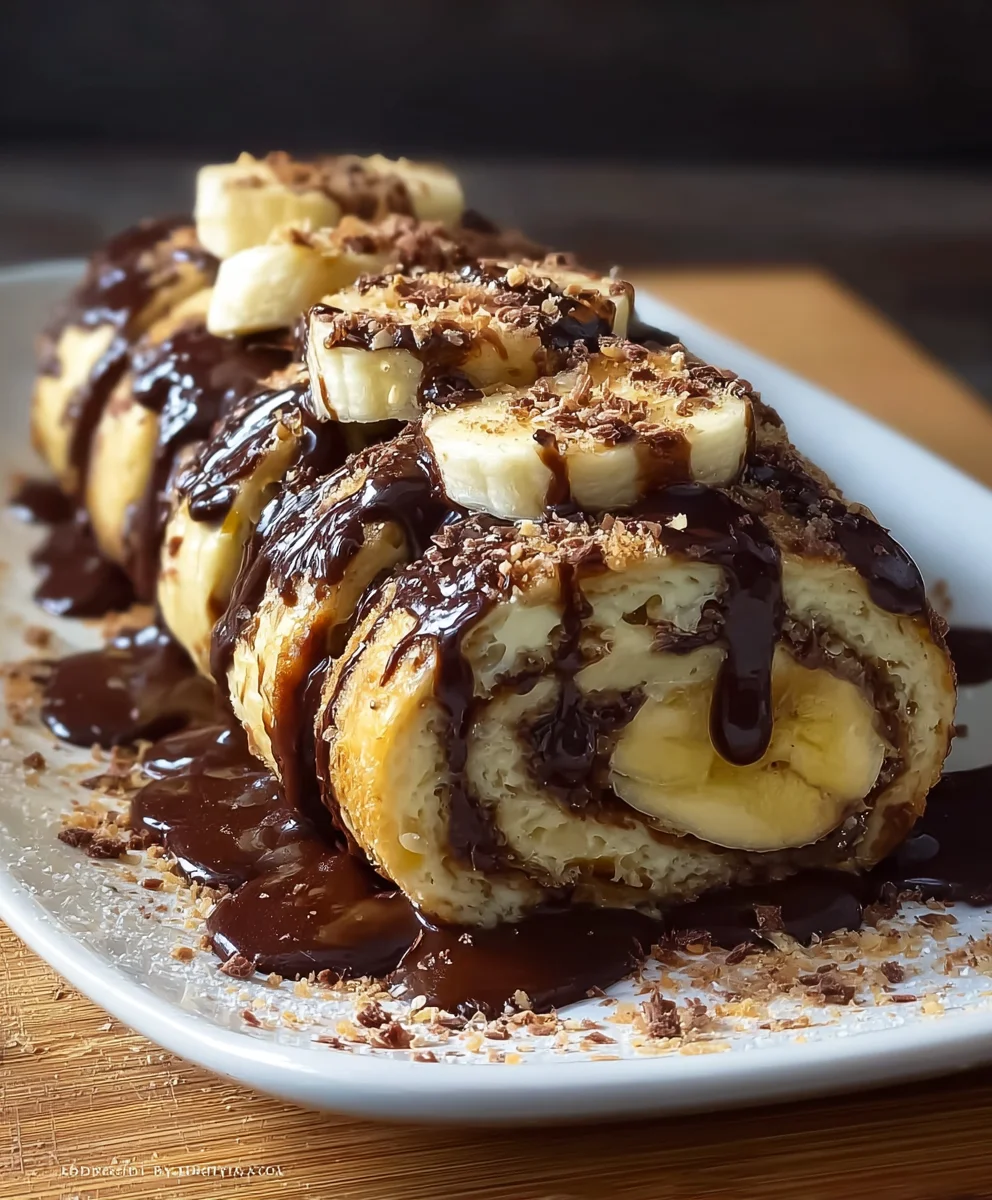
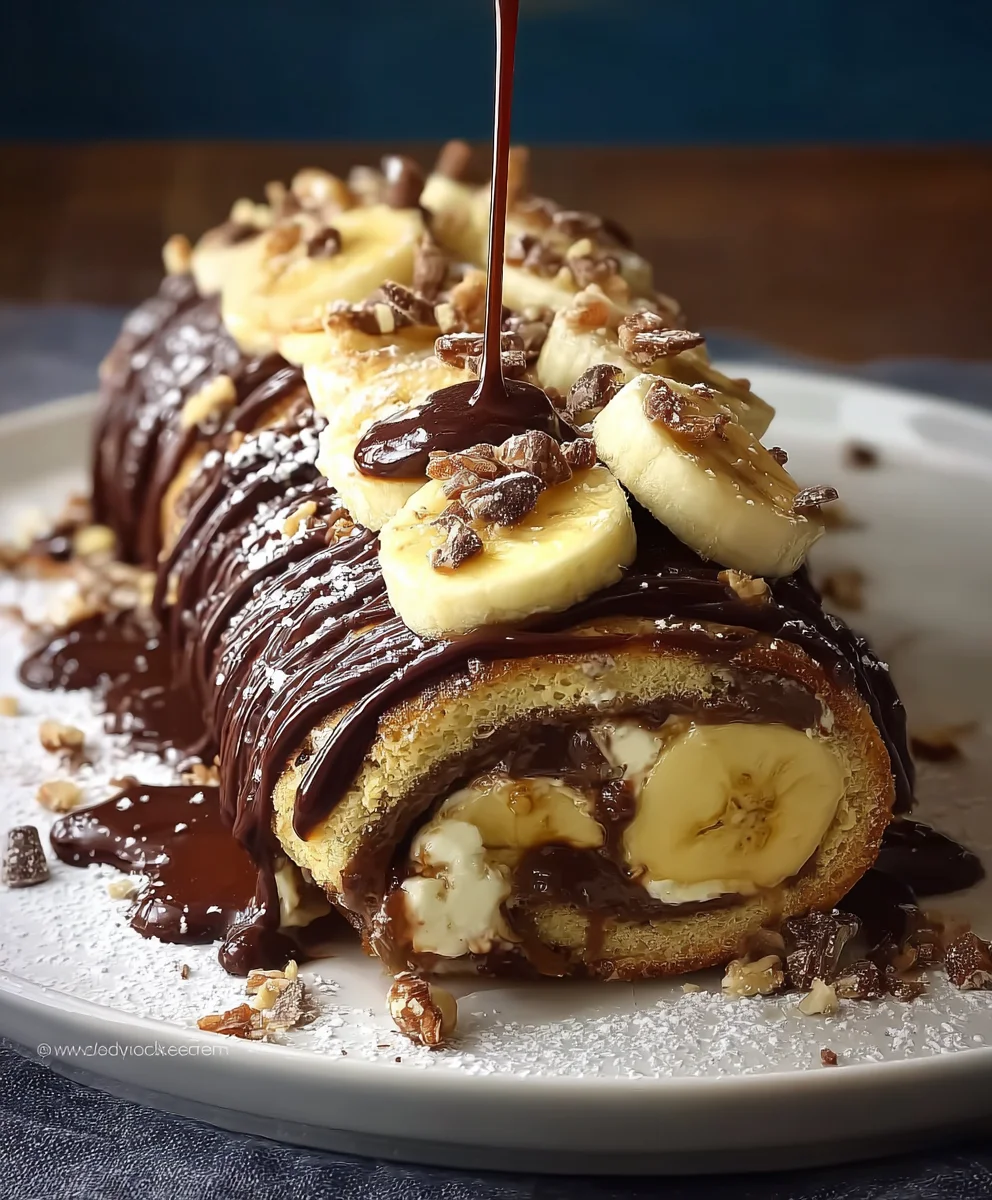
<h3>Assembling Your Magnificent Banana Chocolate Heaven Roll</h3>
<ol start=”15″>
<li>Once the chocolate sponge cake is completely cool, I gently unroll it from the towel/parchment paper. Be slow and deliberate here, as cold cake can be a bit stiff. Don’t worry if it has a few small cracks; the filling and final rolling will hide most imperfections. I lay the unfurled cake back onto a clean piece of parchment paper or a cutting board.</li>
<li>Now, I carefully spread the entire banana cream filling evenly over the surface of the chocolate sponge, leaving about a ½-inch border along one of the short edges uncovered. This border helps prevent the filling from squishing out excessively when you roll. I use an offset spatula to ensure a smooth, uniform layer, right to the edges, creating a wonderful contrast of textures and flavors.</li>
<li>Starting from the short end with the filling spread all the way to the edge, I begin to roll the cake back up, <strong>tightly but gently</strong>. The parchment paper underneath can assist you in lifting and rolling. Take your time, applying gentle pressure to ensure a compact roll without creating air pockets. Once rolled, I use the parchment paper to transfer the <strong>Banana Chocolate Heaven Roll</strong> seam-side down onto a serving platter or a wire rack set over a baking sheet (for easy ganache application and cleanup).</li>
<li>With the cake on the rack, I spoon or pour the slightly cooled and thickened chocolate ganache evenly over the top of the roll. I let it drip down the sides for that appealing, rustic look. If the ganache is too thick, warm it gently for a few seconds. If it’s too thin, let it cool a little longer. An offset spatula can help spread it smoothly if needed. I aim for full coverage to seal in the moisture and provide a decadent finish.</li>
<li>Before serving, I recommend chilling the <strong>Banana Chocolate Heaven Roll</strong> in the refrigerator for at least 30 minutes to an hour. This allows the ganache to set and the filling to firm up slightly, making for cleaner slices and an even more satisfying texture. The flavors also meld beautifully during this chilling time.</li>
</ol>
<h3>The Grand Finale: Garnish and Serve</h3>
<ol start=”20″>
<li>To truly elevate your <strong>Banana Chocolate Heaven Roll</strong> to dessert royalty, consider a few simple garnishes. Before serving, I like to decorate the top with a few thinly sliced fresh banana rounds. To prevent these from browning, you can brush them with a tiny amount of lemon juice or a clear glaze. A sprinkle of chocolate shavings or curls adds an elegant touch and extra chocolatey crunch. Sometimes, a light dusting of powdered sugar or cocoa powder over the top creates a lovely visual contrast, especially against the dark ganache.</li>
<li>When you’re ready to serve, use a sharp, thin knife to cut slices. For the cleanest cuts, I often wipe my knife clean between each slice. This ensures that each piece of your <strong>Banana Chocolate Heaven Roll</strong> looks as exquisite as it tastes. Serve it slightly chilled for the best experience, letting the creamy banana filling and rich chocolate flavors shine through. This dessert is perfect on its own or with a simple dollop of extra whipped cream on the side for those who truly can’t get enough of that luscious creaminess. Enjoy every single heavenly bite!</li>
</ol>
Conclusion:
And there you have it, my dear friends! We’ve journeyed through the simple steps, the delightful ingredients, and the promise of a truly extraordinary treat. I genuinely believe that once you’ve tasted the magic that happens when ripe bananas meet rich, melted chocolate in such a harmonious embrace, you’ll understand why this dish is destined to become a cherished staple in your home. This isn’t just another recipe; it’s an invitation to experience pure culinary joy. The way the tender, moist banana base subtly complements the deep, sometimes slightly bitter, notes of high-quality chocolate, all wrapped up in a delicate roll, is nothing short of spectacular. It’s a dessert that feels both incredibly indulgent and surprisingly comforting, striking that perfect balance that makes you reach for just one more slice. The blend of sweet fruitiness with the profound depth of chocolate creates a symphony of flavors that dances gracefully on your palate, leaving a lasting impression of warmth and pure satisfaction. It is, without a doubt, a dessert that speaks to the soul.
What makes this recipe an absolute must-try, in my humble opinion, is its uncanny ability to impress with minimal fuss. You don’t need to be a seasoned pastry chef to achieve stunning results. The process is forgiving, allowing even novice bakers to feel like culinary wizards. Imagine the gasps of delight from your family or dinner guests as you present a dessert that looks sophisticated yet tastes wonderfully homemade. It’s the kind of treat that evokes memories of warmth and happiness, making any occasion, big or small, feel a little more special. Every bite offers a textural delight – the soft, almost custardy interior, contrasted with the subtle chewiness of the edges, all contributing to an utterly satisfying experience. It’s truly a sensory feast, from the moment the aroma fills your kitchen with its inviting sweetness to the lingering, delightful taste on your tongue. This is a dessert that brings smiles, creates conversation, and most importantly, delivers on its promise of deliciousness every single time. It’s simplicity meets sophistication, and the result is truly a triumph.
Serving Suggestions to Elevate Your Experience:
While this delightful creation is absolutely divine served just as it is, perhaps dusted with a whisper of powdered sugar for an elegant finish, don’t hesitate to get creative with your presentation! For an extra touch of decadence, I adore serving a warm slice alongside a generous scoop of vanilla bean ice cream or a dollop of freshly whipped cream. The cool creaminess provides a beautiful contrast to the warm, rich dessert, creating a truly unforgettable mouthful. A sprinkle of toasted chopped nuts – pecans, walnuts, or almonds – can add a lovely crunch and depth of flavor, making each bite even more interesting. Think about a drizzle of homemade caramel sauce or a vibrant raspberry coulis for a burst of color and a tangy counterpoint to the sweetness. For a more sophisticated plating, arrange a slice on a plate with a few fresh berries, like raspberries or sliced strawberries, around it. This recipe is incredibly versatile, making it perfect for a cozy weeknight dessert, an impressive brunch centerpiece, or even as a unique and much-loved addition to a holiday spread. Its adaptability means it can fit seamlessly into any dining occasion, always leaving a lasting positive impression.
Creative Variations to Make It Your Own:
Now, let’s talk about making this recipe uniquely yours! The beauty of baking lies in experimentation, and this particular dish lends itself wonderfully to personalized twists. For those who adore a bit of spice, try adding a pinch of cinnamon or nutmeg to the banana mixture; it adds a subtle warmth that beautifully enhances the existing flavors, especially in cooler months. If you’re a fan of different types of chocolate, feel free to experiment with milk chocolate for a sweeter profile, dark chocolate with a higher cocoa percentage for more intensity, or even a mix of both for varying levels of sweetness and richness. You could even incorporate mini chocolate chips directly into the banana mixture itself for an extra burst of chocolatey goodness throughout the entire roll. For a more sophisticated touch, a splash of rum extract or a hint of orange zest can elevate the flavor profile, adding an unexpected layer of complexity that will surprise and delight your guests. Imagine a tropical twist with a whisper of coconut extract or a topping of toasted coconut flakes for an exotic touch! These simple additions can transform your creation into something entirely new, yet still wonderfully familiar and comforting. This flexibility is one of the many reasons why I’m so excited for you to try this particular recipe, the Banana Chocolate Heaven Roll, as it allows for endless culinary adventure and personal expression. It’s more than just a recipe; it’s a canvas for your creativity.
So, what are you waiting for? I urge you, with all the enthusiasm of a passionate baker, to set aside an afternoon soon and give this incredible recipe a try. You won’t regret it. The satisfaction of pulling this beautifully golden-brown, aromatic roll from your oven is truly unparalleled. It’s a moment of triumph, a testament to your culinary prowess, no matter your experience level. And once you’ve experienced the pure delight of that first bite, I truly hope you’ll come back and share your experience with me and with our vibrant community. Tell us what you loved most about it, what variations you tried, or what special occasion you made it for. Your stories, your tips, and your photos inspire us all to continue exploring the wonderful world of home baking! This isn’t just about following instructions; it’s about creating cherished memories, sharing joy with loved ones, and discovering new favorites that will grace your table for years to come. The pure magic of the Banana Chocolate Heaven Roll awaits you!
Banana Chocolate Heaven Roll
A delightful, easy-to-make no-bake dessert featuring ripe bananas rolled in a rich chocolate hazelnut mixture, garnished with chocolate chips. This recipe offers a harmonious blend of comforting flavors and luxurious textures, promising both indulgence and immense satisfaction.
Ingredients
-
2 ripe medium bananas
-
½ cup chocolate hazelnut spread (e.g., Nutella)
-
½ cup semi-sweet chocolate chips
-
2 tbsp unsalted butter, melted
-
2 tbsp granulated sugar
-
1 tsp ground cinnamon
Instructions
-
Step 1
Mash the 2 ripe bananas with 2 tbsp granulated sugar and 1 tsp ground cinnamon until very smooth. Spread this mixture evenly onto a piece of parchment paper, forming a rectangle (approx. 8×10 inches or 20×25 cm). -
Step 2
In a small bowl, combine ½ cup chocolate hazelnut spread with 2 tbsp melted unsalted butter. Stir until the mixture is smooth and easily spreadable. -
Step 3
Carefully spread the chocolate hazelnut mixture evenly over the banana layer, leaving about a ½-inch border along one of the short edges uncovered. Starting from the short end with the chocolate spread to the edge, gently but firmly roll the layered banana and chocolate mixture into a log, using the parchment paper to assist you. -
Step 4
Wrap the finished roll tightly in parchment paper or plastic wrap. Place it in the refrigerator and chill for at least 2 hours, or until it is firm enough to slice cleanly. This allows the flavors to meld and the roll to set properly. -
Step 5
Before serving, unwrap the Banana Chocolate Heaven Roll. Transfer it to a serving platter, slice with a sharp knife, and garnish generously with ½ cup semi-sweet chocolate chips. Enjoy chilled for the best experience.
Important Information
Nutrition Facts (Per Serving)
It is important to consider this information as approximate and not to use it as definitive health advice.
Allergy Information
Please check ingredients for potential allergens and consult a health professional if in doubt.

Leave a Comment