

Biscoff Cinnamon Rolls are more than just a sweet treat; they’re an experience, a delightful fusion that takes a beloved classic and elevates it to extraordinary heights. I vividly remember the first time I combined the warm, comforting spices of a traditional cinnamon roll with the distinctive caramel notes of Lotus Biscoff, and honestly, there was no turning back. While cinnamon rolls have a rich history rooted in Scandinavian baking traditions, evolving into the sticky, sweet American classic we adore, introducing Biscoff adds an intriguing, undeniably modern twist, drawing on the beloved Belgian spiced cookie’s unique flavor profile.
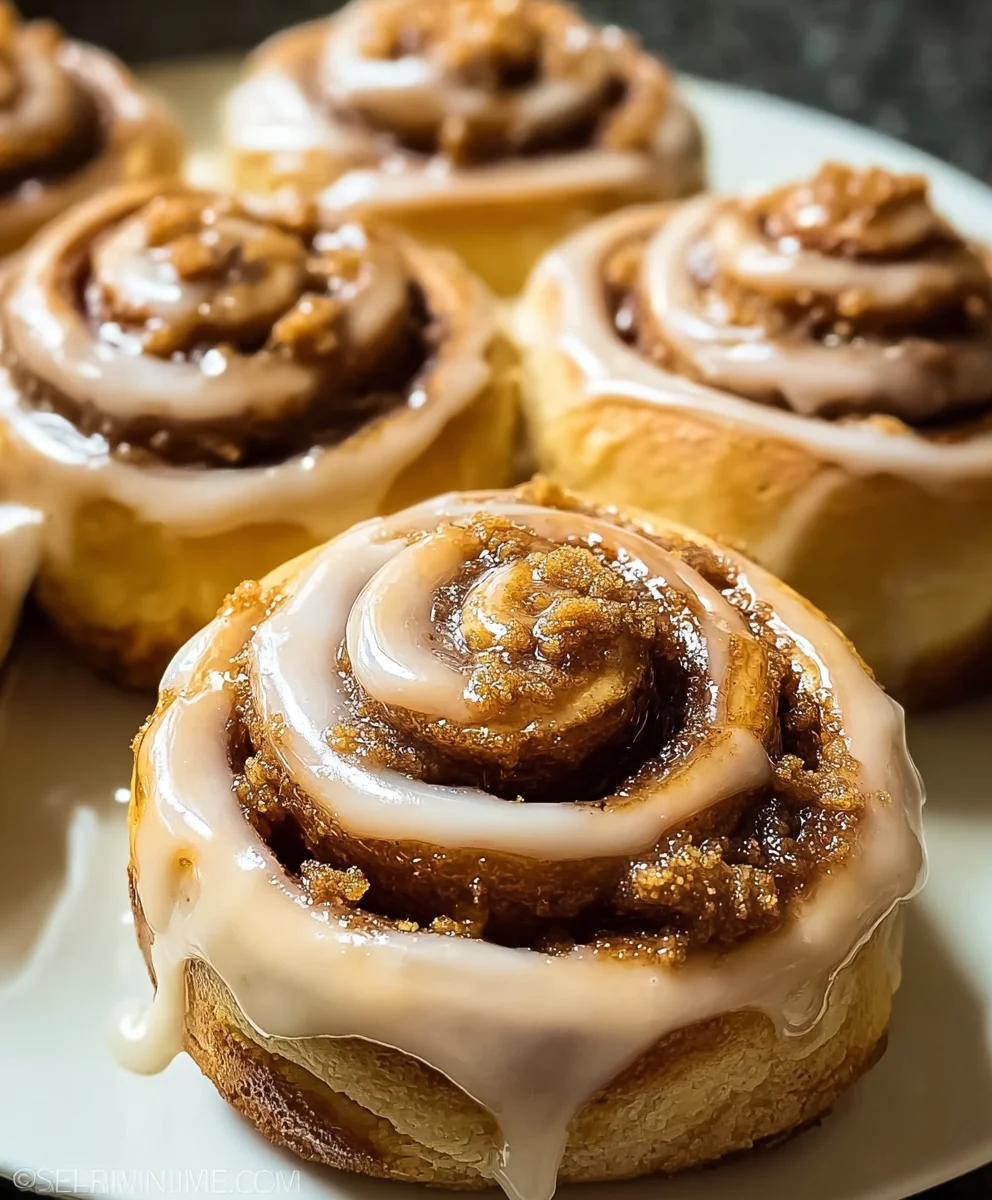
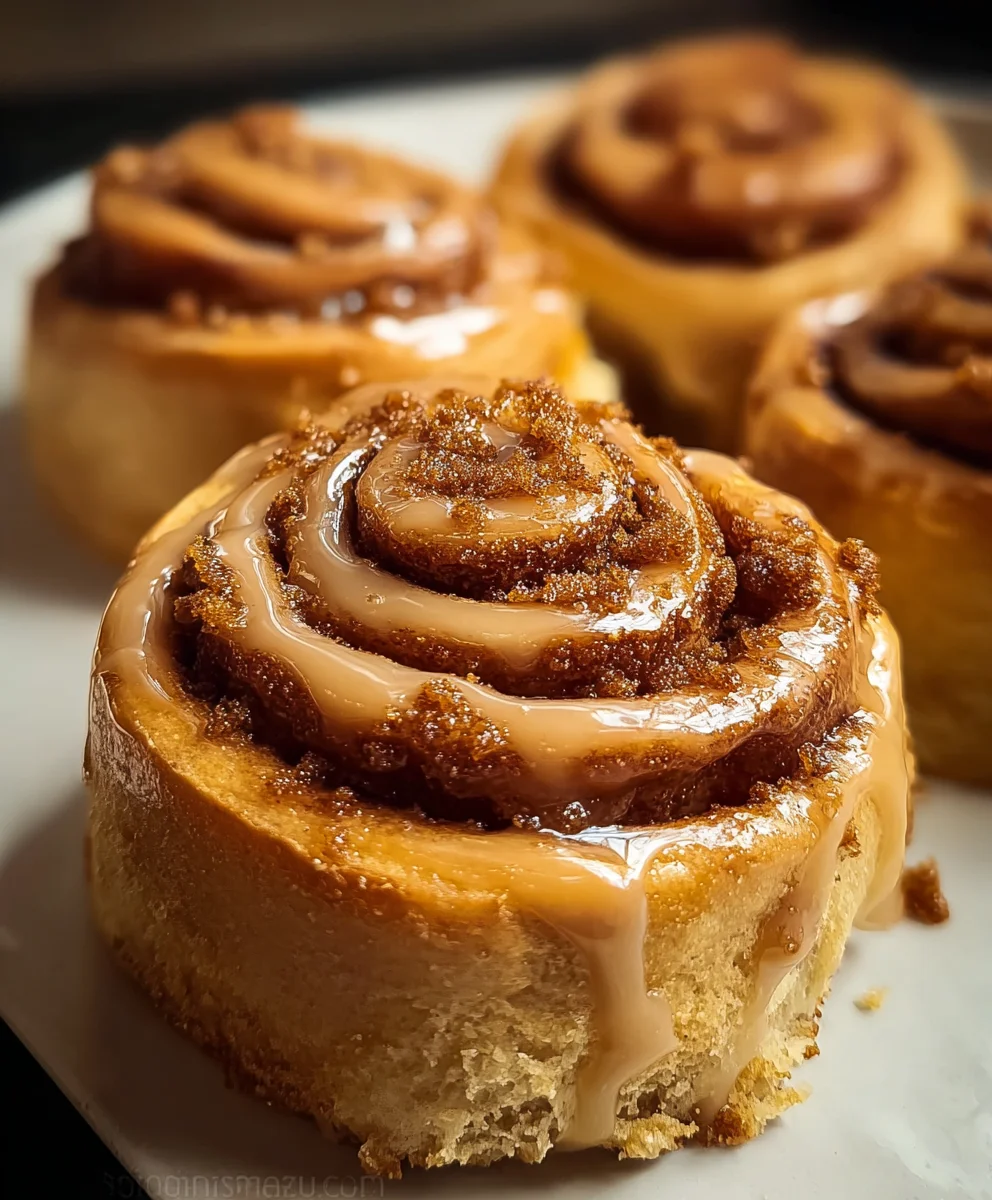
People absolutely adore these rolls for their incredibly soft, fluffy dough, the gooey, spiced Biscoff filling that melts in your mouth, and the luscious Biscoff cream cheese frosting, often finished with a sprinkle of crunchy Biscoff crumbs. It’s the perfect blend of familiar comfort and exciting new flavors, making these Biscoff Cinnamon Rolls an instant favorite for breakfast, brunch, or a decadent dessert. You’re not just baking; you’re creating edible joy that perfectly captures that cozy feeling with an irresistible, unique flair.

Ingredients:
- All-Purpose Flour: For the most tender and fluffy Biscoff Cinnamon Rolls, I always reach for good quality unbleached all-purpose flour. It provides the perfect structure without making the rolls too dense. When measuring, I recommend using a kitchen scale for accuracy or spooning the flour into your measuring cup and leveling it off, rather than scooping directly from the bag, which can compact the flour and lead to a heavier dough.
- Granulated Sugar: This provides the necessary sweetness to the dough, balancing the richness of the butter and eggs, and also acts as food for the yeast, helping it to activate and grow.
- Active Dry Yeast: The magical ingredient that makes our rolls light, airy, and wonderfully fluffy. Make sure your yeast is fresh and active; if it doesn’t foam up when proofed, your dough won’t rise. I always check the expiration date!
- Warm Milk: The ideal temperature for activating yeast is between 105°F and 115°F (40°C-46°C). If it’s too cold, the yeast won’t activate; too hot, and it will kill the yeast. I find whole milk gives the richest flavor and texture, but 2% milk works beautifully too.
- Melted Unsalted Butter: Butter adds incredible richness, flavor, and tenderness to the dough. Using unsalted butter allows me to control the salt content precisely in my recipe. Make sure it’s cooled slightly after melting so it doesn’t cook the eggs or kill the yeast.
- Large Eggs: Eggs contribute to the dough’s richness, color, and structure. They also help to bind the dough together and contribute to a softer crumb. I usually let them come to room temperature before mixing, as this helps them incorporate more smoothly into the other ingredients.
- Salt: A crucial ingredient in the dough, salt enhances all the other flavors and also helps to regulate yeast activity, preventing the dough from over-proofing too quickly.
- Biscoff Cookie Butter (creamy): The star of our show! This smooth, spiced cookie spread is what gives these Biscoff Cinnamon Rolls their unique and utterly irresistible flavor. I use the creamy variety for easy spreading.
- Ground Cinnamon: While Biscoff cookie butter has its own lovely spice, a little extra ground cinnamon in the filling really amplifies that warm, comforting flavor profile, marrying perfectly with the caramel notes of the Biscoff.
- Light Brown Sugar (packed): This sugar adds a deep, molasses-rich sweetness and moisture to the filling, which helps create that gooey, caramelized layer we all love in a cinnamon roll. I always pack it firmly into the measuring cup for accuracy.
- Cream Cheese (softened): The foundation of our luscious cream cheese icing. It needs to be properly softened to room temperature so it can whip up smooth and creamy without any lumps.
- Powdered Sugar (sifted): Also known as confectioners’ sugar, this provides the bulk of the sweetness and creates the smooth, velvety texture of our icing. Sifting is key to preventing lumps.
- Vanilla Extract: A touch of pure vanilla extract enhances the sweetness and adds depth of flavor to the cream cheese icing, making it even more delicious.
- Milk (or heavy cream): Used to thin the icing to the perfect drizzling or spreading consistency. Heavy cream will yield a richer, thicker icing, but regular milk works perfectly fine. I like to add it a tablespoon at a time to control the consistency.
- Pinch of Salt: Just a tiny amount in the icing works wonders to balance the sweetness and bring out the flavors of the cream cheese and vanilla, preventing the icing from tasting overly sugary.
For the Dough:
- Activate the Yeast: My first step is always to prepare the yeast. In a small bowl or measuring cup, I combine 1/2 cup of my warm milk (remember, 105°F-115°F is ideal!) with a teaspoon of granulated sugar and all of the active dry yeast. I gently stir it until the yeast dissolves, then I let it sit for 5-10 minutes. What I’m looking for is a frothy, foamy layer to appear on the surface – this tells me my yeast is alive and ready to make my rolls beautifully fluffy. If it doesn’t foam, your yeast might be expired or the milk temperature was off, and it’s best to start again with fresh yeast. This simple step is absolutely critical for a successful batch of Biscoff Cinnamon Rolls.
- Combine Wet Ingredients: In the bowl of my stand mixer fitted with the paddle attachment (or a large mixing bowl if I’m kneading by hand), I whisk together the remaining warm milk, the melted and slightly cooled unsalted butter, the large eggs (at room temperature are best for smooth incorporation), the remaining granulated sugar, and the salt. I give it a good whisk until everything is well combined and the sugar has largely dissolved. It’s important that the butter isn’t too hot, as it could scramble the eggs or kill the yeast we’re about to add.
- Mix Dry Ingredients: Now, I carefully pour the activated yeast mixture into my wet ingredients. I give it another gentle stir to combine. Then, I gradually add about half of my all-purpose flour to the wet mixture, mixing on low speed until just combined. This initial incorporation helps to prevent a cloud of flour dusting my kitchen!
- Form the Dough: Next, I switch from the paddle attachment to the dough hook on my stand mixer. If I’m working by hand, I’d switch to a sturdy spoon or my hands. I begin to add the remaining flour, about a cup at a time, mixing on low speed after each addition. I continue adding flour until the dough starts to come together into a shaggy ball and pulls away from the sides of the bowl. The exact amount of flour can vary slightly depending on humidity and how accurately I measured, so I use my judgment. The dough should be soft, slightly tacky, but not overly sticky.
- Knead the Dough: This is where the magic happens for developing the gluten that gives our Biscoff Cinnamon Rolls their characteristic chewiness and elasticity. I increase the mixer speed to medium-low and let it knead for 8-10 minutes. If I’m kneading by hand, I turn the dough out onto a lightly floured surface and knead vigorously for 10-15 minutes. The dough should become smooth, elastic, and pass the “windowpane test.” To check this, I take a small piece of dough, gently stretch it with my fingers, and if I can stretch it thin enough to see light through it without it tearing, it’s ready. This indicates that the gluten has properly developed. This step is key for achieving that soft, fluffy texture we all crave in a cinnamon roll.
- First Rise (Bulk Fermentation): Once the dough is beautifully kneaded, I lightly grease a large bowl with a little oil or non-stick spray. I place the dough ball into the bowl, turning it once to coat the top, then cover the bowl tightly with plastic wrap or a clean kitchen towel. I let it rise in a warm, draft-free place until it has doubled in size. This usually takes between 1 to 1.5 hours, depending on the warmth of my kitchen. A good trick is to place it in an oven that’s been turned off but previously heated for a minute or two, or simply next to a sunny window. This first rise develops incredible flavor and texture, so patience here is truly a virtue.
For the Biscoff Filling:
- Prepare the Filling: While the dough is on its first rise, I prepare the incredibly delicious Biscoff filling. In a medium bowl, I combine the creamy Biscoff cookie butter, the light brown sugar (packed), and the ground cinnamon. I stir these ingredients together until they are thoroughly combined and create a smooth, spreadable mixture. Sometimes, if my Biscoff cookie butter is a bit firm, I’ll gently warm it in the microwave for 15-20 seconds to make it easier to mix and spread. This filling is what will infuse our rolls with that signature warm, spiced, caramel-like Biscoff flavor, making these Biscoff Cinnamon Rolls truly irresistible. I set this aside, ready for when the dough has completed its first rise.
Assembling the Biscoff Cinnamon Rolls:
- Prepare Your Workspace: Once my dough has happily doubled in size, I gently punch it down to release the air. This step is important for an even crumb and to make the dough easier to handle. I then turn the dough out onto a lightly floured surface. I like to prepare my area by having a rolling pin ready and ensuring I have enough space to work.
- Roll Out the Dough: Using my rolling pin, I roll the dough into a large rectangle. My target dimensions are roughly 18 inches by 12 inches (approximately 45 cm by 30 cm). I aim for an even thickness across the entire rectangle, about 1/4 inch thick. This uniform thickness is essential for ensuring all my Biscoff Cinnamon Rolls bake consistently and have a beautiful, even spiral. If the dough springs back too much, I let it rest for a few minutes, covered, and then continue rolling.
- Spread the Filling: Now for the best part! I evenly spread my prepared Biscoff filling all over the rolled-out dough rectangle, leaving about a 1/2-inch border along one of the longer edges. This border will help seal the roll when I start to roll it up. I find an offset spatula works wonderfully for spreading the thick Biscoff mixture smoothly from edge to edge. I ensure every inch of the dough is covered, as this is where all that incredible Biscoff flavor comes from.
- Roll the Dough: Starting from the longer edge opposite the clean border, I carefully begin to roll the dough tightly into a log. The tighter I roll, the more spirals my Biscoff Cinnamon Rolls will have, and the less likely they are to unravel during baking. I take my time with this step, applying gentle, even pressure as I roll. Once I reach the border, I pinch the seam firmly to seal the log closed. This prevents the filling from escaping while baking and helps maintain the shape of my rolls.
- Cut the Rolls: Now it’s time to transform our log into individual rolls. I find the easiest way to get clean cuts is to use a sharp, unflavored dental floss or a very sharp serrated knife. If using floss, I slide a piece underneath the log, cross the ends over the top, and pull them to slice through the dough. For a knife, I use a gentle sawing motion rather than pressing straight down, which can squash the rolls. I typically aim for 12 equally sized rolls, each about 1.5 inches thick. This yields a nice, substantial cinnamon roll.
- Second Rise (Proofing): I generously grease a 9×13-inch baking dish. I then arrange my cut Biscoff Cinnamon Rolls in the prepared dish, making sure they are slightly spaced apart to allow for expansion. They’ll grow and touch during this second rise, creating that classic pull-apart texture. I cover the baking dish loosely with plastic wrap or a clean kitchen towel and let the rolls rise in a warm, draft-free place for another 30-45 minutes, or until they are visibly puffy and have nearly doubled in size. This final rise, known as proofing, is crucial for achieving that light, airy texture and helps ensure the rolls bake up soft and fluffy, rather than dense.
Baking the Rolls:
- Preheat Oven and Prepare Pan: As my rolls are finishing their second rise, I preheat my oven to 375°F (190°C). If I haven’t already, I ensure my 9×13-inch baking dish is lightly greased to prevent sticking. A little non-stick spray or butter works perfectly.
- Bake the Rolls: Once the oven is preheated and the rolls are perfectly proofed, I uncover the baking dish and carefully place it into the preheated oven. I bake for 20-25 minutes. What I’m looking for are Biscoff Cinnamon Rolls that are golden brown on top and cooked through in the center. If they start to brown too quickly, I sometimes loosely tent the dish with aluminum foil to prevent over-browning while the center finishes cooking. Every oven is a little different, so I always keep a close eye on them during the last few minutes. The aroma filling my kitchen at this point is absolutely divine!
- Cool Slightly: After they’re beautifully baked, I remove the Biscoff Cinnamon Rolls from the oven. While it’s tempting to ice them immediately, it’s best to let them cool in the pan for about 5-10 minutes. This short cooling period allows them to firm up slightly and helps the icing melt and spread beautifully without becoming too thin or greasy. This is the perfect time to start whipping up that delicious cream cheese icing!
For the Cream Cheese Icing:
- Prepare the Icing: While the rolls are cooling slightly, I get started on the velvety cream cheese icing. In a medium mixing bowl, I combine the softened cream cheese, the melted and cooled unsalted butter, the sifted powdered sugar, the vanilla extract, and the pinch of salt. I start by beating these ingredients together with an electric mixer (or a whisk and a lot of elbow grease!) on low speed until they are just combined, then increase the speed to medium-high. I beat for 2-3 minutes, scraping down the sides of the bowl occasionally, until the icing is completely smooth, fluffy, and lump-free. If the icing seems too thick for my liking, I add the milk (or heavy cream) one tablespoon at a time, mixing well after each addition, until I achieve my desired consistency – something that’s thick enough to cling to the rolls but still easily spreadable or drizzly. This icing is the perfect creamy counterpoint to the spiced Biscoff flavor of the rolls.
Finishing and Serving:
- Ice the Rolls: With my warm, slightly cooled Biscoff Cinnamon Rolls in the pan and my luscious cream cheese icing ready, it’s time for the grand finale! I generously spread the cream cheese icing over the tops of all the rolls in the pan. The warmth of the rolls will slightly melt the icing, allowing it to beautifully seep into all the nooks and crannies, creating an incredibly moist and flavorful experience. I don’t hold back; a thick layer of this icing is what makes these rolls truly indulgent.
- Serve Warm: These Biscoff Cinnamon Rolls are absolutely at their best when served warm, straight from the pan. The dough is tender, the Biscoff filling is gooey and aromatic, and the icing is perfectly melty. I love to pull them apart, marveling at the spirals of spiced Biscoff goodness. They make an irresistible treat for breakfast, brunch, or dessert. For a truly cozy experience, I pair them with a fresh cup of coffee or a comforting mug of tea. If I happen to have any leftovers (a rare occurrence!), I store them in an airtight container at room temperature for up to 2 days, or in the refrigerator for up to 4 days. A quick zap in the microwave for 15-20 seconds will bring them back to that glorious warm, gooey state.
Conclusion:
And there you have it, my friends! If you’ve journeyed through this recipe with me, you’re now armed with all the knowledge and inspiration needed to create something truly spectacular in your own kitchen. I genuinely believe that these aren’t just any ordinary baked goods; these are the kind of treats that create memories, fill your home with an intoxicating aroma, and bring pure, unadulterated joy with every single bite. This recipe for Biscoff Cinnamon Rolls is, without a doubt, a culinary adventure I wholeheartedly encourage everyone to embark upon.
Why are they an absolute must-try, you ask? Well, let me tell you! Imagine the perfect cinnamon roll: a dough that’s so incredibly soft and pillowy, it practically melts in your mouth. Now, elevate that experience by infusing it with the distinct, caramelized, and gently spiced magic of Biscoff. It’s a flavor combination that dances on your palate, offering a familiar comfort alongside an exciting, gourmet twist. The rich, gooey filling, bursting with cinnamon and that iconic cookie butter, is perfectly complemented by the velvety-smooth, tangy-sweet Biscoff cream cheese frosting that liberally coats each roll. It’s a symphony of textures and tastes, from the tender chew of the dough to the delightful crunch of optional Biscoff cookie crumbs sprinkled on top. This isn’t just baking; it’s crafting an experience, a moment of pure bliss that you can share, or, let’s be honest, savor entirely by yourself!
These magnificent Biscoff Cinnamon Rolls are incredibly versatile, making them perfect for almost any occasion. Picture them as the star of your weekend brunch, a show-stopping dessert after a family meal, or simply as a comforting treat with your morning coffee or afternoon tea. For an extra touch of decadence, try serving them warm, fresh out of the oven, with a scoop of vanilla bean ice cream melting deliciously over the top – it’s a dessert revelation! You could also drizzle a little extra warmed Biscoff spread over each roll before serving, or even sprinkle some toasted pecans or walnuts into the filling for an added layer of texture and nutty flavor. Feeling adventurous? Experiment with a pinch of cardamom in your filling alongside the cinnamon to further enhance that warm, spiced profile. And if you’re hosting a party, consider making smaller, mini versions; they’re irresistibly cute and perfectly portioned for guests to grab and enjoy.
I truly, truly hope you’ll take the plunge and give this recipe a go. Don’t let the thought of working with yeast intimidate you; the process, while requiring a little patience, is incredibly rewarding. There’s something so therapeutic about kneading dough, watching it rise, and then transforming it into these golden, fragrant spirals of deliciousness. The satisfaction you’ll feel when you pull that tray of perfectly baked rolls from the oven, their sweet aroma filling every corner of your home, is unparalleled. I encourage you to embrace the baking journey, trust the process, and prepare yourself for an absolutely delightful reward. Once you taste these homemade Biscoff Cinnamon Rolls, you’ll understand exactly what I mean – they’re truly unforgettable!
When you do bake them, please come back and tell me all about it! I absolutely love hearing your success stories, seeing your beautiful creations (tag me on social media if you share them!), and learning about any clever variations or serving suggestions you come up with. Your feedback and experiences are incredibly valuable and inspire me so much. So go forth, bake some magic, and share the Biscoff Cinnamon Rolls love with everyone around you!
FAQs about Biscoff Cinnamon Rolls
Q: Can I make Biscoff Cinnamon Rolls ahead of time?
A: Absolutely! This recipe is fantastic for preparing ahead. You can prepare the dough and assemble the rolls the night before, then cover them tightly and let them do their second rise slowly in the refrigerator overnight. In the morning, simply take them out, let them sit at room temperature for about 30-60 minutes while your oven preheats, and then bake as directed. This makes for a wonderfully fresh breakfast or brunch with minimal morning effort!
Q: How do I store leftover Biscoff Cinnamon Rolls?
A: If by some miracle you have any leftovers (it’s rare, I know!), store them in an airtight container at room temperature for up to 2-3 days, or in the refrigerator for up to 5 days. To enjoy them at their best, I highly recommend warming them gently in the microwave for 15-30 seconds, or in a preheated oven at 250°F (120°C) for about 5-10 minutes, until soft and gooey again.
Q: Can I substitute Biscoff spread with anything else?
A: While Biscoff spread is undeniably what gives these rolls their signature flavor and earns them the name “Biscoff Cinnamon Rolls,” you could technically use other cookie butters or even a nut butter like peanut butter or almond butter. However, be aware that the flavor profile will change significantly. For the authentic Biscoff experience, stick with Lotus Biscoff cookie butter!
Q: What makes Biscoff Cinnamon Rolls different from regular cinnamon rolls?
A: The key difference lies in the star ingredient: Lotus Biscoff cookie butter! Regular cinnamon rolls typically feature a filling made with butter, cinnamon, and sugar, and are topped with a cream cheese or vanilla glaze. Biscoff Cinnamon Rolls incorporate Biscoff spread directly into the filling, often using Biscoff cookie crumbs, and the frosting is typically a Biscoff-infused cream cheese frosting. This combination creates a unique caramelized, spiced, and deeply flavorful experience that sets them apart.
Q: Can I make these dairy-free or vegan?
A: Yes, you certainly can! To make them dairy-free or vegan, you’ll need to make a few substitutions:
- Milk: Use a plant-based milk like almond milk, soy milk, or oat milk.
- Butter: Substitute with a good quality vegan butter alternative.
- Cream Cheese (for frosting): Opt for a vegan cream cheese alternative.
- Biscoff Spread: Good news! Lotus Biscoff spread is already vegan!
Ensure all other ingredients like sugar and flour are also vegan-friendly.
Q: My rolls are dry after baking, what did I do wrong?
A: The most common reason for dry cinnamon rolls is overbaking. Keep a close eye on them during the last few minutes of baking. They should be lightly golden brown and feel soft to the touch, not firm. Another possible reason could be using too much flour in your dough, making it too stiff, or not kneading the dough enough to develop proper gluten structure, which contributes to tenderness.
Q: How do I know when the dough has risen enough?
A: For the first rise, the dough should roughly double in size. For the second rise (after shaping the rolls), a good indicator is the “poke test.” Gently press two fingers into the dough; if the indentation slowly springs back halfway, it’s ready. If it springs back immediately, it needs more time. If it doesn’t spring back at all, it might be over-proofed (though this is less common).
Q: Can I freeze Biscoff Cinnamon Rolls?
A: Yes, you can freeze them!
- Unbaked: After shaping the rolls and placing them in the baking dish, cover tightly with plastic wrap and then foil, and freeze for up to 2-3 weeks. When ready to bake, transfer to the refrigerator overnight to thaw and rise, then bake as usual.
- Baked: Once baked and cooled (before frosting), wrap individual rolls tightly in plastic wrap and then foil, or place in an airtight freezer-safe container. Freeze for up to 1 month. To reheat, thaw at room temperature, then warm in a microwave or oven until soft. Frost once reheated.
Biscoff Cinnamon Rolls: Irresistible Sweet Treat Recipe!
Biscoff Cookie Butter Cinnamon Rolls offer a delightful twist on the classic cinnamon roll. These rolls are made with a soft and fluffy dough, filled with a sweet and spiced Biscoff cookie butter center, and topped with a creamy, luscious icing. The Biscoff filling adds a warm, caramel-like flavor, making these rolls an irresistible treat for breakfast, brunch, or dessert. Originating from American comfort food, these rolls are perfect for cozy mornings or special gatherings. Serve warm for the best flavor. Pair with coffee or tea for a cozy breakfast.
Ingredients
-
All-Purpose Flour (amount not specified in source)
-
Granulated Sugar (1 teaspoon for yeast activation; total amount not specified in source)
-
Active Dry Yeast (amount not specified in source)
-
Warm Milk (1/2 cup for yeast activation; total amount not specified in source)
-
Melted Unsalted Butter (amount not specified in source for dough and icing)
-
Large Eggs (amount not specified in source)
-
Salt (amount not specified in source for dough)
-
Biscoff Cookie Butter, creamy (amount not specified in source)
-
Ground Cinnamon (amount not specified in source for filling)
-
Light Brown Sugar, packed (amount not specified in source)
-
Cream Cheese, softened (amount not specified in source)
-
Powdered Sugar, sifted (amount not specified in source)
-
Vanilla Extract (amount not specified in source)
-
Milk (or heavy cream) (added 1 tablespoon at a time; total amount not specified in source)
-
Pinch of Salt (for icing)
Instructions
-
Step 1
Combine 1/2 cup warm milk (105-115°F), 1 teaspoon granulated sugar, and active dry yeast. Stir, let sit 5-10 minutes until frothy. -
Step 2
In a stand mixer bowl, whisk remaining warm milk, melted/cooled unsalted butter, room temperature large eggs, remaining granulated sugar, and salt until combined. -
Step 3
Pour activated yeast into wet ingredients. Gradually add about half of the all-purpose flour, mixing on low. Switch to dough hook. Gradually add remaining flour until a shaggy, slightly tacky dough forms and pulls from bowl sides. -
Step 4
Knead with mixer on medium-low for 8-10 minutes (10-15 minutes by hand) until smooth, elastic, and passes windowpane test. -
Step 5
Lightly grease a large bowl, place dough, turn once, cover. Let rise in a warm, draft-free place for 1-1.5 hours until doubled in size. -
Step 6
While dough rises, combine creamy Biscoff cookie butter, packed light brown sugar, and ground cinnamon in a medium bowl. Stir until smooth and spreadable (gently warm Biscoff if too firm). -
Step 7
Gently punch down risen dough. On a lightly floured surface, roll into an 18×12-inch (45×30 cm) rectangle, about 1/4 inch thick. -
Step 8
Evenly spread Biscoff filling over dough, leaving a 1/2-inch border along one long edge. -
Step 9
Starting from the long edge opposite the border, tightly roll dough into a log. Pinch seam firmly to seal. -
Step 10
Use sharp dental floss or a serrated knife to cut log into 12 equally sized rolls, about 1.5 inches thick each. -
Step 11
Generously grease a 9×13-inch baking dish. Arrange rolls, spaced slightly. Cover loosely, let rise in a warm place for 30-45 minutes until puffy and nearly doubled. -
Step 12
Preheat oven to 375°F (190°C). Uncover rolls and bake for 20-25 minutes until golden brown (tent with foil if browning too quickly). -
Step 13
Remove from oven and cool in pan for 5-10 minutes. -
Step 14
In a medium bowl, beat softened cream cheese, melted/cooled unsalted butter, sifted powdered sugar, vanilla extract, and a pinch of salt with an electric mixer on low, then medium-high for 2-3 minutes until smooth and fluffy. Add milk/heavy cream 1 tablespoon at a time for desired consistency. -
Step 15
Generously spread icing over warm, slightly cooled rolls. Serve warm. Store leftovers in an airtight container at room temperature (up to 2 days) or refrigerator (up to 4 days); reheat in microwave for 15-20 seconds.
Important Information
Nutrition Facts (Per Serving)
It is important to consider this information as approximate and not to use it as definitive health advice.
Allergy Information
Please check ingredients for potential allergens and consult a health professional if in doubt.


Leave a Comment