

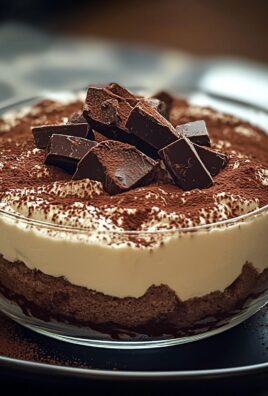
Chocolate Brownie Pizza isn’t just a dessert; it’s a celebration on a plate, a delightful culinary mash-up that promises to transform any gathering into an unforgettable sweet fiesta! Have you ever dreamt of a dessert that marries the rich, fudgy decadence of a classic brownie with the fun, shareable nature of a pizza? Well, prepare to have your dessert dreams come true. I’m absolutely thrilled to share with you a recipe that consistently brings smiles and gasps of delight to everyone who tries it, turning ordinary moments into extraordinary ones.
While traditional brownies boast a captivating history, rumored to have originated from a happy accident at Chicago’s Palmer House Hotel in the late 19th century, the concept of a brownie pizza is a more modern, ingenious invention. It takes everything we adore about that beloved chocolate square and elevates it into a grand, customizable centerpiece, perfect for sharing. People simply adore this dish for its incredible versatility and utterly irresistible combination of textures – from the slightly crisp edges to the warm, gooey center, often adorned with a medley of colorful, complementary toppings. It’s the ultimate crowd-pleaser, perfect for birthdays, potlucks, or simply a cozy night in when you crave something truly special. Get ready to bake a dessert that’s not just delicious, but also incredibly fun to make and share – your very own Chocolate Brownie Pizza masterpiece!

Ingredients:
My journey to crafting the ultimate Chocolate Brownie Pizza always begins with selecting the finest ingredients. For a truly unforgettable experience, I recommend high-quality cocoa powder and good chocolate chips, as these will truly elevate the flavor profile of our dessert. Here’s what we’ll need:
For the Fudgy Brownie Pizza Crust:
- 1 cup (226g) unsalted butter, melted
- 2 cups (400g) granulated sugar
- 4 large eggs, at room temperature
- 2 teaspoons pure vanilla extract
- 1 cup (90g) unsweetened cocoa powder, high-quality Dutch-processed for deep chocolate flavor
- 1 ½ cups (180g) all-purpose flour, spooned and leveled
- ½ teaspoon baking powder
- ½ teaspoon salt
- 1 cup (170g) semi-sweet chocolate chips, divided (½ cup for batter, ½ cup for topping on brownie)
For the Silky Chocolate Ganache ‘Sauce’:
- ½ cup (120ml) heavy cream
- 1 cup (170g) semi-sweet chocolate chips or finely chopped good quality chocolate
- 1 tablespoon unsalted butter
- ½ teaspoon pure vanilla extract
- Pinch of salt
For the Creamy Vanilla Drizzle & Assorted Toppings:
-
For the Vanilla Drizzle:
- 1 cup (120g) powdered sugar (confectioners’ sugar), sifted
- 2-3 tablespoons milk or heavy cream
- ½ teaspoon pure vanilla extract
-
For the Assorted Toppings:
- ½ cup mini marshmallows
- ½ cup white chocolate chips
- ¼ cup colorful sprinkles
- ¼ cup M&M’s candies, crushed or whole
- ½ cup fresh strawberries, sliced
- ½ cup fresh raspberries
- Optional: ¼ cup chopped toasted pecans or walnuts for extra crunch
Preparing Your Brownie Pizza Base
Let’s dive into creating the heart of our Chocolate Brownie Pizza – the incredibly fudgy and delicious brownie crust. This isn’t just any brownie; we’re aiming for a base that’s rich, dense, and perfectly capable of holding all our amazing toppings. Trust me, getting this part right sets the stage for a show-stopping dessert.
- Preheat and Prepare: First things first, I always preheat my oven to 350°F (175°C). While the oven is warming up, I take out a 12-inch round pizza pan or a similar round baking pan with a slight lip. If you don’t have a dedicated pizza pan, a round cake pan of a similar size will work, though the edges might be a bit thicker. I like to lightly grease my pan and then line it with parchment paper, allowing some overhang on the sides. This parchment paper is my secret weapon; it makes lifting the brownie out of the pan so much easier after it’s baked, ensuring a clean, perfect circle. I also like to give the parchment paper a light spray of non-stick cooking spray for extra assurance.
- Melt the Butter: In a large, microwave-safe bowl or a saucepan over low heat, I melt my unsalted butter. It’s crucial not to let it brown, just melt until it’s liquid and shimmering. Once melted, I remove it from the heat if using a saucepan or from the microwave. The warmth of the butter is essential for dissolving the sugars later on.
- Combine Wet Ingredients: Into the bowl with the melted butter, I add the granulated sugar and light brown sugar. I whisk these vigorously for about a minute. This step is more important than you might think; it helps to create those crinkly tops we all love on brownies. Next, I crack in the four large eggs, one at a time, whisking well after each addition until thoroughly combined. The mixture should become glossy and slightly thickened. Finally, I stir in the pure vanilla extract. Using good quality vanilla really makes a difference here, adding depth to the chocolate flavor.
- Sift Dry Ingredients: In a separate medium-sized bowl, I combine the all-purpose flour, high-quality Dutch-processed cocoa powder, baking powder, and salt. I always take the extra step to sift these dry ingredients together. Sifting ensures there are no lumps of cocoa or flour, leading to a smoother batter and a more uniform brownie texture. Dutch-processed cocoa, by the way, is my choice for this recipe because it gives a darker, less acidic, and richer chocolate flavor, which is perfect for a decadent brownie.
- Combine Wet and Dry: Now, it’s time to bring our wet and dry mixtures together. I gradually add the dry ingredients to the wet ingredients, mixing with a wooden spoon or spatula until just combined. This is a critical point: I am careful not to overmix! Overmixing develops the gluten in the flour too much, which can lead to a tough, cakey brownie instead of the fudgy, dense texture we’re after for our pizza crust. A few streaks of flour are perfectly fine; they’ll disappear during baking.
- Fold in Chocolate Chips: Once the batter is nearly combined, I fold in ½ cup of the semi-sweet chocolate chips. These little pockets of melting chocolate contribute to the overall fudginess and provide delightful bursts of chocolatey goodness in every bite. I gently incorporate them, ensuring they are evenly distributed throughout the batter.
- Bake the Brownie Crust: I pour the rich brownie batter into my prepared 12-inch pizza pan, spreading it evenly with an offset spatula or the back of a spoon to create a uniform layer. Then, I sprinkle the remaining ½ cup of semi-sweet chocolate chips over the top of the raw brownie batter. As the brownie bakes, these chips will melt slightly and create a beautiful, glossy chocolate layer on the surface. I place the pan into the preheated oven and bake for 25-30 minutes. Baking times can vary, so I start checking around 25 minutes. The brownie is done when a toothpick inserted into the center comes out with moist crumbs, but not wet batter. We want it fudgy, not raw!
- Cool Completely: Once baked, I carefully remove the brownie crust from the oven. This is a tough waiting game, but it’s essential. I let it cool completely in the pan on a wire rack. Seriously, resist the urge to touch it! A fully cooled brownie is much easier to handle and will hold its shape perfectly when we start decorating. This cooling process can take at least 1 to 2 hours, or even longer if your kitchen is warm. Sometimes, if I’m short on time, I’ll even pop it into the fridge for 30 minutes to speed up the cooling.
Crafting the Silky Chocolate Ganache ‘Sauce’
While our brownie crust cools, we can move on to preparing our decadent chocolate ganache. This ganache will serve as the rich, glossy “sauce” for our brownie pizza, much like tomato sauce on a savory pizza. It’s surprisingly easy to make and adds a luxurious touch.
- Prepare Chocolate: I ensure my semi-sweet chocolate chips (or finely chopped chocolate) are ready in a heatproof bowl. Chopping good quality chocolate into small, uniform pieces ensures it melts evenly and quickly.
- Heat the Cream: In a small saucepan, I gently heat the heavy cream over medium-low heat until it just begins to simmer around the edges. I keep a close eye on it, as we don’t want it to boil vigorously. The goal is to get it hot enough to melt the chocolate.
- Pour and Rest: Once the cream is simmering, I immediately pour the hot cream over the chocolate chips in the heatproof bowl. This is a crucial step! I resist the urge to stir right away. Instead, I let it sit undisturbed for about 5 minutes. This allows the hot cream to slowly melt the chocolate, ensuring a smooth, lump-free ganache.
- Whisk to Perfection: After 5 minutes, I start whisking the mixture gently from the center outwards. As I whisk, the chocolate and cream will emulsify, transforming into a beautiful, smooth, and glossy ganache. I continue whisking until there are no visible lumps of chocolate.
- Add Finishing Touches: Once smooth, I whisk in the tablespoon of unsalted butter and the ½ teaspoon of pure vanilla extract. The butter adds extra richness and a beautiful sheen to the ganache, while the vanilla extract enhances the chocolate flavor. A tiny pinch of salt can also boost the chocolate’s natural taste. I whisk until everything is fully incorporated and the ganache is utterly silky.
- Cool Slightly: I set the ganache aside to cool for about 10-15 minutes at room temperature. We want it to be spreadable but not too runny. It should thicken slightly as it cools. If it gets too thick, you can gently warm it for a few seconds in the microwave or over a double boiler. If it’s too thin, a few minutes in the fridge can help.
Crafting the Creamy Vanilla Drizzle
While the ganache cools, I prepare the vanilla drizzle. This bright, contrasting drizzle adds a wonderful visual element and a delightful touch of vanilla sweetness to our rich chocolate pizza.
- Prepare the Icing: In a small bowl, I combine the sifted powdered sugar, 2 tablespoons of milk or heavy cream, and the ½ teaspoon of pure vanilla extract. I start with 2 tablespoons of liquid and whisk thoroughly.
- Adjust Consistency: I’m looking for a consistency that’s thick enough to hold its shape when drizzled but thin enough to flow smoothly. If it’s too thick, I add the remaining tablespoon of milk or cream, a tiny bit at a time, until I reach the desired consistency. If it accidentally becomes too thin, I can always sift in a little more powdered sugar.
- Prepare for Drizzling: Once the consistency is perfect, I transfer the vanilla drizzle into a small piping bag, a zip-top bag with the corner snipped off, or even just use a spoon for a rustic look. I set this aside, ready for assembly.
Assembling Your Chocolate Brownie Pizza Masterpiece
This is where the real fun begins! With our cooled brownie crust, silky ganache, and vibrant toppings ready, it’s time to transform them into a dazzling Chocolate Brownie Pizza. This step is all about creativity and making it your own.
- Transfer the Brownie Crust: Once the brownie crust is completely cooled, I carefully lift it out of the pizza pan using the parchment paper overhang and transfer it to a serving plate or a clean cutting board. A large, flat spatula can help support it if needed. Removing it from the pan before decorating prevents a mess and makes cutting easier later.
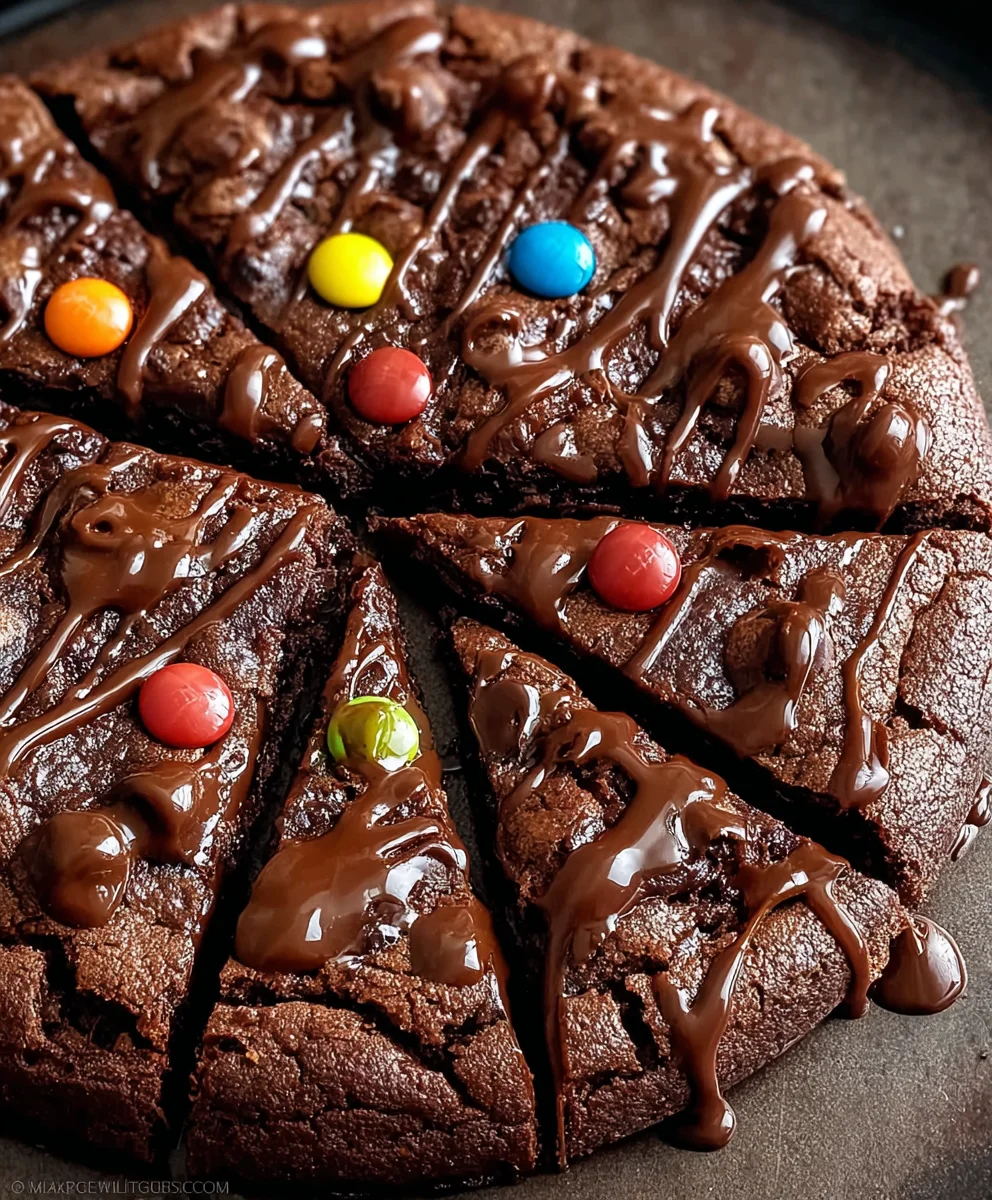
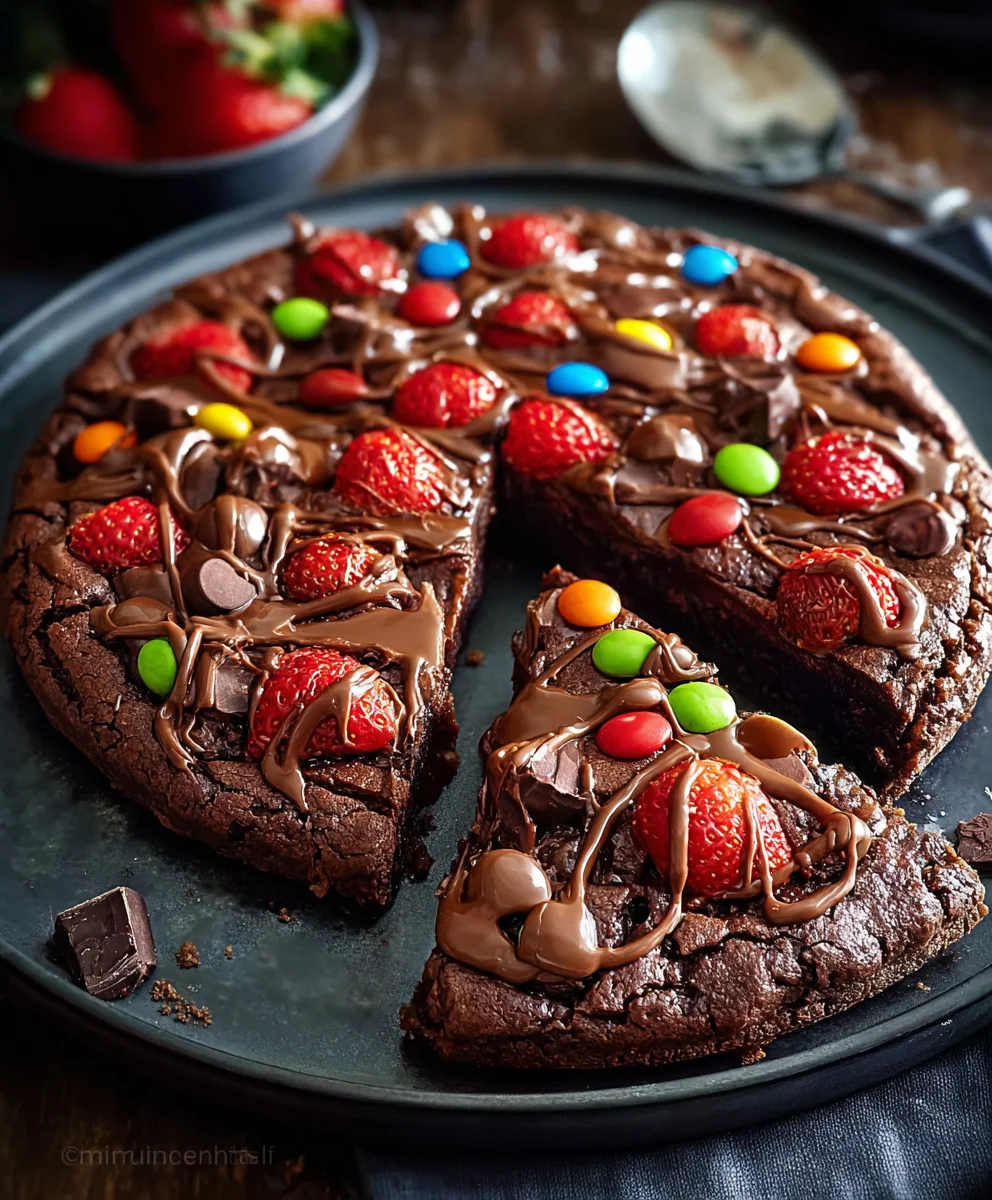
- Spread the Ganache ‘Sauce’: Using an offset spatula or the back of a spoon, I generously spread the slightly cooled chocolate ganache evenly over the entire surface of the brownie crust, leaving about a half-inch border around the edge if I want it to look more like a traditional pizza crust. The ganache should be glossy and inviting, a perfect foundation for our toppings. This rich layer truly is the “sauce” of our dessert pizza, making every bite incredibly decadent.
-
Arrange the Toppings: Now for the most exciting part – decorating! This is where you can let your imagination run wild. I like to arrange my toppings in a visually appealing way, often creating sections or patterns.
- I start by sprinkling the mini marshmallows over a section, or all over for a whimsical touch.
- Next, I scatter the white chocolate chips and the remaining milk chocolate chips. The contrast in colors and textures is wonderful.
- Then come the colorful sprinkles – they add instant festivity! I’m usually quite liberal with these.
- I carefully place the sliced fresh strawberries and fresh raspberries around the pizza. Their vibrant colors and slight tartness provide a lovely counterpoint to the sweetness of the chocolate. I try to make sure they are evenly distributed so everyone gets a taste of the fresh fruit.
- Finally, if I’m using them, I sprinkle the crushed M&M’s candies and any chopped toasted nuts for an extra layer of crunch and flavor.
The key here is to have fun with it! There’s no wrong way to top a brownie pizza.
- Drizzle with Vanilla: To complete the masterpiece, I take my piping bag or zip-top bag with the vanilla drizzle and artfully drizzle it back and forth over the assembled pizza. You can create a zigzag pattern, concentric circles, or random swirls – whatever looks appealing to you. The white drizzle against the dark chocolate and colorful toppings is visually stunning.
Serving and Storing Your Delicious Creation
The moment of truth! After all that fun assembly, it’s time to enjoy the fruits of our labor.
- Serve Immediately: The Chocolate Brownie Pizza is absolutely best when served fresh, especially with the fruit vibrant and the ganache perfectly set. I typically use a sharp pizza cutter or a large chef’s knife to slice it into wedges, just like a traditional pizza. This makes it easy for everyone to grab a slice. It’s truly a delight to watch friends and family enjoy this creative dessert.
- Storage: If by some miracle there are leftovers (it rarely happens in my house!), I store the Chocolate Brownie Pizza in an airtight container in the refrigerator. Due to the fresh fruit and ganache, it’s best consumed within 2-3 days. The brownie itself will remain fudgy, though the fruit might soften a little. You can gently bring it to room temperature before serving again, or enjoy it chilled – both are delicious!
- Creative Variations: One of the things I love most about this Chocolate Brownie Pizza is its versatility. Feel free to experiment with different toppings! Caramel drizzle, crushed cookies, different types of berries, mini chocolate candy bars, or even a sprinkle of sea salt can all create unique and exciting flavor combinations. It’s a fantastic recipe to personalize for holidays or special occasions. For example, for a festive touch, I might add red and green M&M’s for Christmas or orange and black sprinkles for Halloween. This recipe truly is a canvas for your dessert imagination!
So there you have it, my friends! We’ve journeyed through the simple steps to create a dessert that truly transcends expectations. This isn’t just any brownie; it’s a celebration, a canvas of pure deliciousness, baked into a format that’s inherently fun and shareable. I genuinely believe that once you pull this magnificent creation from your oven, you’ll understand exactly why I call it a must-try recipe. It’s the kind of treat that brings smiles, ignites conversations, and quite frankly, disappears faster than you can say ‘another slice, please!’
What makes this recipe an absolute winner, an undisputed champion in the dessert arena? First off, it’s the sheer joy of presentation. Forget fiddly individual desserts; this Chocolate Brownie Pizza arrives at the table with a grand entrance, ready to be adorned and devoured. It’s perfect for parties, movie nights, potlucks, or even just a particularly indulgent Tuesday evening. The rich, fudgy brownie base, crispy edges meeting a tender, gooey center, provides the perfect foundation. It’s a symphony of textures and flavors even before we start piling on the good stuff. You control the decadence, tailoring it to your personal cravings or your guests’ preferences, making each iteration uniquely yours. The process itself is wonderfully therapeutic – the aroma filling your kitchen is a promise of the delightful experience to come.
Now, let’s talk about taking this masterpiece to the next level. While truly delicious on its own, a little creativity with toppings can transform your Chocolate Brownie Pizza into a bespoke dessert experience every single time. Imagine a scoop of luscious vanilla bean ice cream melting ever so slightly onto a warm slice – pure heaven! Or perhaps a vibrant contrast with fresh berries like plump strawberries, tangy raspberries, or sweet blueberries, offering a refreshing counterpoint to the rich chocolate. A drizzle of homemade caramel sauce or a generous swirl of white chocolate ganache can add another layer of sophisticated sweetness. Don’t shy away from texture either! A sprinkle of toasted chopped nuts – pecans, walnuts, or almonds – can introduce a delightful crunch, while mini marshmallows, lightly toasted under the broiler for a few seconds, create a s’mores-like sensation. For the ultimate indulgence, consider crushed candy bars, colorful M&M’s, or even a dusting of cocoa powder for an elegant touch. The possibilities are truly endless, and that’s what makes this recipe so incredibly versatile and exciting. Think of it as your blank canvas, waiting for your artistic touch. You can cut it into traditional pizza-style wedges for casual sharing, or into smaller squares if you’re serving it as part of a larger dessert spread. For a truly show-stopping display, consider arranging different toppings in segments, allowing everyone to pick their favorite ‘slice’ of customized deliciousness.
I genuinely cannot wait for you to experience the magic of this recipe. It’s more than just a dessert; it’s an invitation to gather, celebrate, and create unforgettable sweet memories. So, roll up your sleeves, preheat your oven, and prepare to embark on a delightful baking adventure. When you do try this incredible Chocolate Brownie Pizza, please, please, please come back and share your experience with me! What toppings did you choose? Who did you share it with? Did it disappear as quickly as I promised? I absolutely adore hearing about your culinary triumphs and seeing your beautiful creations. Snap a picture, tag me, or drop a comment below. Your feedback and personal touches inspire me and countless others in our baking community. Happy baking, my friends – may your kitchens be filled with warmth, your hearts with joy, and your tables with truly extraordinary treats!
Frequently Asked Questions About Chocolate Brownie Pizza
Can I make Chocolate Brownie Pizza ahead of time?
Yes, absolutely! The brownie base can be baked a day or two in advance. Once completely cooled, wrap it tightly in plastic wrap or aluminum foil and store at room temperature. You can then add your toppings just before serving for maximum freshness and visual appeal. Some toppings, like fresh fruit, are best added right before serving, while others, like chocolate drizzles or nuts, can be added earlier.
How do I store leftover Chocolate Brownie Pizza?
If by some miracle you have leftovers (it’s rare, trust me!), store them in an airtight container at room temperature for up to 2-3 days. If your toppings include fresh cream or fruit, it’s best to refrigerate it, but be aware that refrigeration can alter the texture of the brownie, making it a bit firmer. For optimal fudginess, room temperature is usually preferred for the brownie itself.
What kind of chocolate is best for the brownie base?
For the most decadent and rich brownie, I highly recommend using good quality unsweetened or bittersweet chocolate (60-70% cocoa solids) along with cocoa powder. This combination gives a deep, complex chocolate flavor. However, semi-sweet chocolate chips or chopped baking chocolate also work beautifully. The key is to use a chocolate you enjoy eating on its own!
Can I make this recipe gluten-free or vegan?
Yes, with some adjustments! For a gluten-free version, simply substitute the all-purpose flour with a 1:1 gluten-free baking flour blend that contains xanthan gum. For a vegan version, you’d need to use a flax egg or other egg replacer, a plant-based butter alternative, and ensure your chocolate is dairy-free. There are many excellent vegan brownie recipes out there that can be adapted into a pizza form.
What are some creative topping ideas for my Chocolate Brownie Pizza?
Beyond the classics like ice cream, berries, and drizzles, consider: chopped candy bars (Snickers, Kit Kat, Reese’s), crushed cookies (Oreos, Biscoff), mini chocolate chips (milk, dark, white, peanut butter), coconut flakes (toasted or raw), a swirl of peanut butter, candied nuts, or even a sprinkle of sea salt to enhance the chocolate flavor. Let your imagination run wild!
Is Chocolate Brownie Pizza hard to cut?
Not at all! Once your brownie pizza has completely cooled, it should be firm enough to slice easily. A sharp chef’s knife or even a pizza cutter works perfectly. If your brownie is still warm, it might be a bit gooey and harder to get clean slices, but it will still be delicious! For the cleanest cuts, ensure the brownie is at room temperature.
Easy Chocolate Brownie Pizza Recipe for Sweet Indulgence!
Indulge in this easy-to-make Chocolate Brownie Pizza featuring a fudgy brownie crust, silky chocolate ganache sauce, creamy vanilla drizzle, and a variety of delightful toppings for a truly unforgettable dessert experience.
Ingredients
-
1 cup (226g) unsalted butter, melted
-
2 cups (400g) granulated sugar
-
4 large eggs, room temperature
-
2 tsp pure vanilla extract
-
1 cup (90g) unsweetened cocoa powder (Dutch-processed)
-
1 ½ cups (180g) all-purpose flour
-
½ tsp baking powder
-
½ tsp salt
-
1 cup (170g) semi-sweet chocolate chips, divided
-
½ cup (120ml) heavy cream
-
1 cup (170g) semi-sweet chocolate chips or chopped chocolate
-
1 tbsp unsalted butter
-
½ tsp pure vanilla extract
-
Pinch of salt
-
1 cup (120g) powdered sugar, sifted
-
2-3 tbsp milk or heavy cream
-
½ cup mini marshmallows
-
½ cup white chocolate chips
-
¼ cup colorful sprinkles
-
¼ cup M&M’s candies, crushed or whole
-
½ cup fresh strawberries, sliced
-
½ cup fresh raspberries
-
Optional: ¼ cup chopped toasted pecans or walnuts
Instructions
-
Step 1
Preheat oven to 350°F (175°C). Grease and line a 12-inch round pizza pan with parchment paper, leaving an overhang. -
Step 2
Melt 1 cup unsalted butter. Whisk with 2 cups granulated sugar for 1 minute. Whisk in eggs one at a time, then 2 tsp vanilla extract. -
Step 3
In a separate bowl, sift together flour, cocoa powder, baking powder, and ½ tsp salt. -
Step 4
Gradually add dry ingredients to wet, mixing until just combined. Fold in ½ cup semi-sweet chocolate chips. -
Step 5
Pour batter into prepared pan, spreading evenly. Sprinkle with remaining ½ cup semi-sweet chocolate chips. Bake for 25-30 minutes, until a toothpick inserted into the center comes out with moist crumbs. -
Step 6
Cool brownie completely in the pan on a wire rack for at least 1-2 hours. -
Step 7
For ganache: Heat ½ cup heavy cream until simmering. Pour over 1 cup chocolate chips/chopped chocolate in a heatproof bowl. Let sit for 5 minutes, then whisk until smooth. Whisk in 1 tbsp unsalted butter, ½ tsp vanilla extract, and a pinch of salt. Cool slightly for 10-15 minutes until spreadable. -
Step 8
For vanilla drizzle: Whisk 1 cup sifted powdered sugar, 2-3 tbsp milk or heavy cream, and ½ tsp vanilla extract until a smooth, drizzling consistency is reached. Transfer to a piping bag or zip-top bag. -
Step 9
Once brownie is cooled, carefully transfer it to a serving plate. Spread the slightly cooled chocolate ganache evenly over the brownie crust. -
Step 10
Arrange toppings: Scatter mini marshmallows, white chocolate chips, colorful sprinkles, M&M’s, sliced fresh strawberries, fresh raspberries, and optional chopped toasted nuts over the ganache. -
Step 11
Artfully drizzle the vanilla icing back and forth over the assembled pizza. -
Step 12
Slice into wedges and serve immediately. Store any leftovers in an airtight container in the refrigerator for 2-3 days.
Important Information
Nutrition Facts (Per Serving)
It is important to consider this information as approximate and not to use it as definitive health advice.
Allergy Information
Please check ingredients for potential allergens and consult a health professional if in doubt.
Leave a Comment