

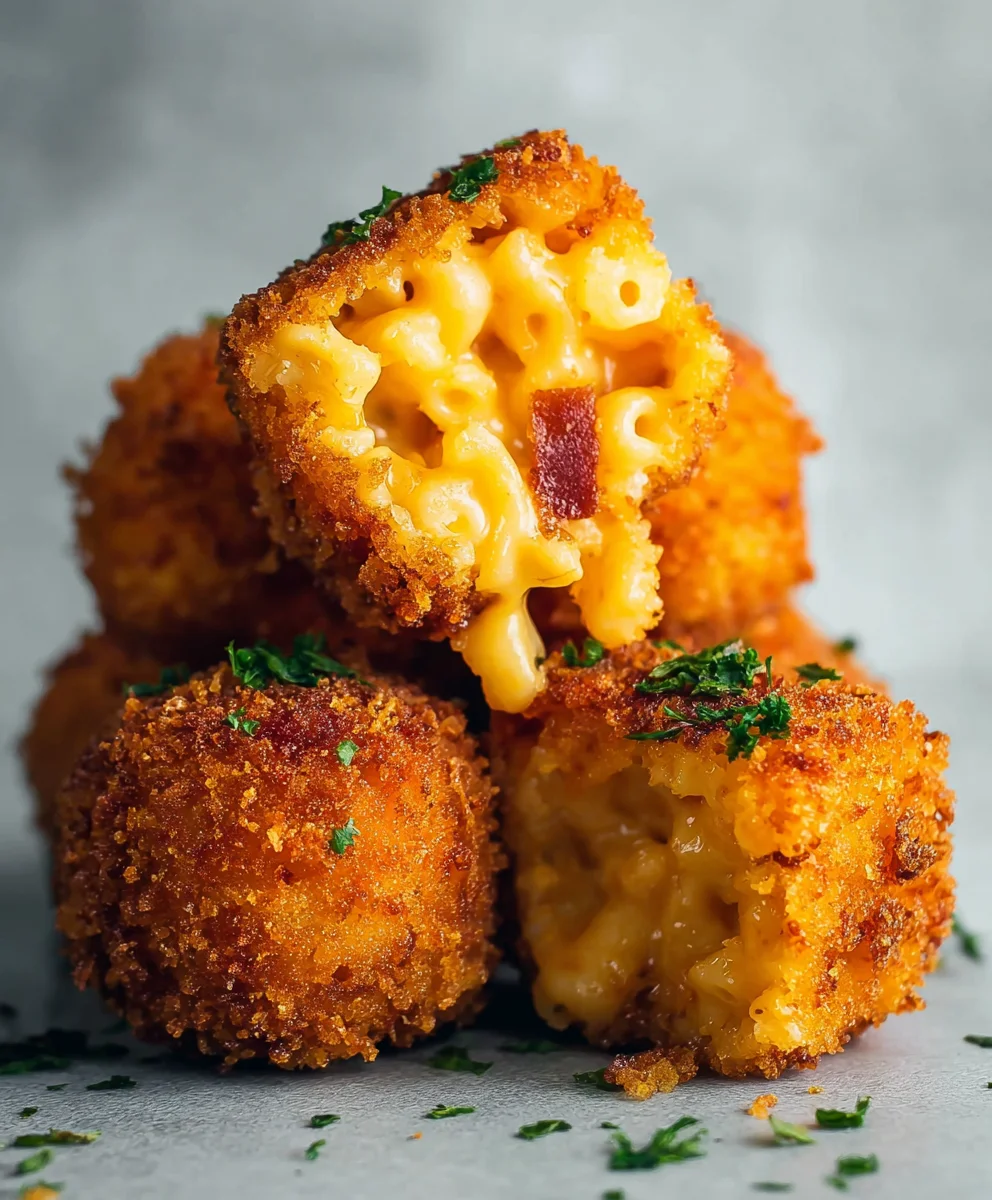
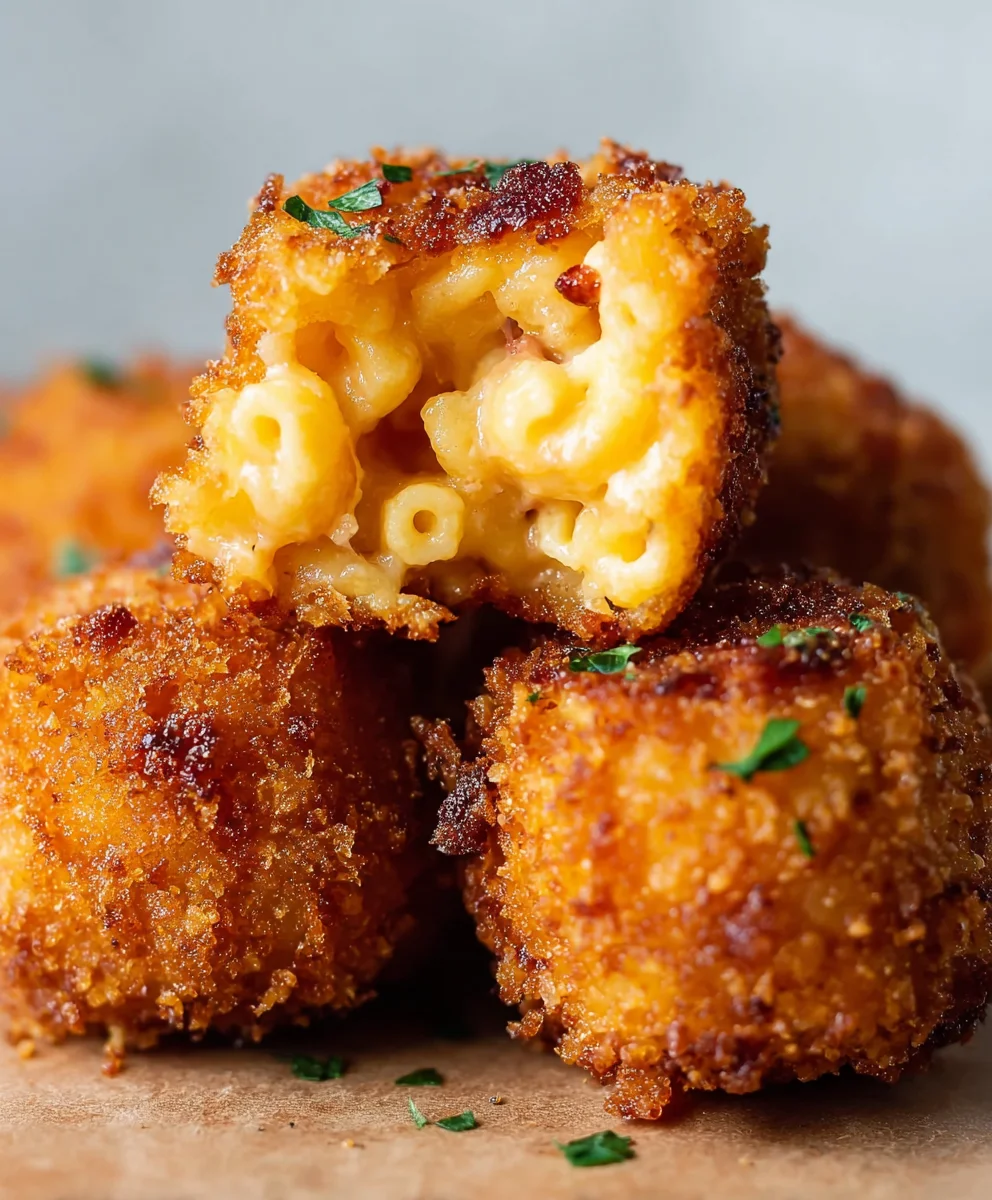
Crispy Fried Mac And Cheese Balls – just uttering those words conjures up images of pure comfort food bliss, doesn’t it? As someone who cherishes the simple yet profound joy of classic macaroni and cheese, I’ve always been captivated by innovative ways to elevate this beloved dish. While the origins of mac and cheese trace back centuries, eventually becoming a staple of American cuisine, the concept of transforming it into delightful, golden-fried orbs is a more recent, brilliant culinary evolution, often seen as an elevated pub favorite or a sophisticated party appetizer.
What makes these golden nuggets so utterly irresistible? It’s the masterful symphony of textures and flavors. Imagine: a perfectly golden, undeniably crispy exterior that gives way to a molten, creamy, and gloriously cheesy macaroni interior. This dish isn’t just a snack; it’s an experience, a gourmet twist on a humble classic that excites the palate and warms the soul. Perfect as an appetizer for a gathering, a decadent side dish, or simply an indulgent treat, these Crispy Fried Mac And Cheese Balls are guaranteed to be a showstopper. They encapsulate everything we adore about comfort food – rich flavor, satisfying texture, and a touch of playful innovation. Get ready to dive into the ultimate cheesy delight!

Ingredients:
- For the Macaroni and Cheese Base:
- 1 pound (about 450g) elbow macaroni or other small pasta shapes
- 1/2 cup (113g) unsalted butter
- 1/2 cup (60g) all-purpose flour
- 4 cups (960ml) whole milk, warmed
- 1 teaspoon dry mustard powder
- 1 teaspoon garlic powder
- 1/2 teaspoon onion powder
- 1/2 teaspoon black pepper, freshly ground
- 1/4 teaspoon cayenne pepper (optional, for a subtle kick)
- 1 teaspoon salt, or to taste
- 4 cups (about 450g) shredded sharp cheddar cheese
- 2 cups (about 225g) shredded Gruyere or Monterey Jack cheese (for extra meltiness)
- For the Breading Station:
- 1 1/2 cups (180g) all-purpose flour, seasoned with 1 teaspoon salt and 1/2 teaspoon black pepper
- 4 large eggs, whisked with 2 tablespoons milk or water
- 4 cups (about 200g) panko breadcrumbs
- For Frying:
- 6-8 cups (about 1.5-2 liters) high smoke point oil, such as canola, vegetable, or peanut oil, for deep frying
- Optional Garnishes/Dipping Sauces:
- Fresh parsley, chopped
- Marinara sauce
- Ranch dressing
- Sriracha mayo
Crafting the Creamy Mac and Cheese Base
- Cook the Macaroni: First things first, let’s get our pasta ready. Bring a large pot of salted water to a rolling boil. Add your elbow macaroni and cook according to package directions until it’s al dente. We don’t want mushy pasta, as it will continue to cook slightly when we deep fry it later. Once cooked, drain the macaroni thoroughly and set it aside in a large bowl. I like to drizzle a tiny bit of olive oil over it and toss to prevent sticking, but that’s totally optional.
- Prepare the Béchamel Sauce: Now for the heart of our mac and cheese – the glorious cheese sauce! In a large, heavy-bottomed pot or Dutch oven, melt the 1/2 cup of unsalted butter over medium heat. Once the butter is fully melted and slightly shimmering, gradually whisk in the 1/2 cup of all-purpose flour. Continue to whisk constantly for about 1-2 minutes, creating a smooth roux. It should smell a little nutty, a sign that the flour has cooked out its raw flavor. This roux is the foundation that will thicken our sauce beautifully.
- Incorporate the Milk and Seasonings: Slowly, and I mean slowly, whisk in the 4 cups of warmed whole milk, adding just about a cup at a time. Make sure to fully incorporate each addition before adding the next to avoid lumps. Keep whisking continually until the sauce begins to thicken and coats the back of a spoon, usually taking about 5-7 minutes. Once it reaches that lovely, thick consistency, reduce the heat to low. Stir in the dry mustard powder, garlic powder, onion powder, black pepper, cayenne pepper (if you’re using it for that little kick), and salt. Give it a good stir to ensure all those wonderful flavors are well distributed.
- Melt the Cheeses: This is where the magic happens! Remove the pot from the heat. Gradually add your shredded sharp cheddar cheese and Gruyere (or Monterey Jack) to the béchamel sauce, a handful at a time, stirring continuously until each addition is completely melted and smooth before adding more. The residual heat from the sauce will be enough to melt the cheese perfectly, giving us an incredibly creamy and luscious cheese sauce. Don’t rush this step; patience results in the silkiest sauce. Taste and adjust seasonings if needed – sometimes it needs a little more salt depending on the cheese you use.
- Combine and Cool: Pour the warm, cheesy sauce over your drained elbow macaroni in the large bowl. Stir gently but thoroughly until every single piece of pasta is coated in that decadent cheese sauce. Now, and this is absolutely critical for perfect Crispy Fried Mac And Cheese Balls, we need to cool this mixture completely. Transfer the mac and cheese to a shallow baking dish or a large tray. Spread it out evenly so it cools faster. Cover it tightly with plastic wrap, pressing the wrap directly onto the surface of the mac and cheese to prevent a skin from forming. Refrigerate for a minimum of 4 hours, or ideally, overnight. The mac and cheese must be very firm and cold; this is non-negotiable for forming balls that hold their shape. If it’s not cold enough, your “Crispy Fried Mac And Cheese Balls” will likely fall apart when you try to bread and fry them.
Shaping and Preparing the Crispy Fried Mac And Cheese Balls
- Form the Mac and Cheese Balls: Once your mac and cheese is thoroughly chilled and firm, it’s time to transform it into individual balls. I find a 1.5 to 2-tablespoon cookie scoop works perfectly for uniform size, but you can also use your hands. Scoop out a portion of the cold mac and cheese and gently, but firmly, roll it between your palms to form a compact ball. The firmness of the chilled mac and cheese will make this task relatively easy. Place the formed balls onto a baking sheet lined with parchment paper. Continue until all the mac and cheese mixture has been used.
- Chill Again for Firmness: For an extra layer of insurance against breakage during frying, pop the baking sheet with your formed mac and cheese balls back into the refrigerator for at least 30 minutes. This additional chill time helps them firm up even more, making them much more resilient for the breading process and ensuring your “Crispy Fried Mac And Cheese Balls” maintain their perfect spherical shape.
Setting Up the Breading Station for Ultimate Crispiness
-
Prepare Your Breading Stations: This part is key to achieving that gloriously crispy exterior on our “Crispy Fried Mac And Cheese Balls”. Set up three shallow dishes or plates in a row:
- Dish 1 (Flour): Place the 1 1/2 cups of all-purpose flour, seasoned with 1 teaspoon salt and 1/2 teaspoon black pepper. Whisk it together well.
- Dish 2 (Egg Wash): In a second dish, whisk together the 4 large eggs with 2 tablespoons of milk or water until smooth.
- Dish 3 (Panko): In the third dish, spread out the 4 cups of panko breadcrumbs. I highly recommend panko over regular breadcrumbs here; its flaky texture is superior for creating that incredibly light and airy crispness we’re aiming for.
-
The Double Breading Technique: This is a crucial step for truly crispy and secure “Crispy Fried Mac And Cheese Balls”. Take one chilled mac and cheese ball and roll it thoroughly in the seasoned flour, ensuring it’s completely coated. Gently shake off any excess flour. Next, dip the floured ball into the egg wash, allowing any extra to drip off. Finally, roll the egg-washed ball in the panko breadcrumbs, pressing gently to make sure the panko adheres well to all sides.
For an even thicker, more durable, and extra crispy coating, we’re going to double bread! Once the first layer of panko is on, dip the ball back into the egg wash, then back into the panko breadcrumbs, pressing again. This double layer is what gives these “Crispy Fried Mac And Cheese Balls” their incredible crunch and helps prevent the cheese from oozing out during frying. Place the double-breaded ball back onto the parchment-lined baking sheet. Repeat this process with all the remaining mac and cheese balls. - Final Chill (Optional but Recommended): Once all the balls are breaded, I highly recommend placing the baking sheet back into the refrigerator for at least 30 minutes, or even up to an hour. This helps the breading adhere firmly and prevents it from falling off during frying, ensuring your “Crispy Fried Mac And Cheese Balls” come out perfectly golden and crisp. You can also freeze them at this stage for later.
Deep Frying Our Crispy Fried Mac And Cheese Balls
- Heat the Frying Oil: In a large, heavy-bottomed pot, Dutch oven, or deep fryer, pour in your high smoke point oil (canola, vegetable, or peanut oil) to a depth of about 3-4 inches. Attach a deep-fry thermometer to the side of the pot, making sure it doesn’t touch the bottom. Heat the oil over medium-high heat until it reaches a temperature of 350-375°F (175-190°C). Maintaining a consistent oil temperature is key for beautifully golden and evenly cooked Crispy Fried Mac And Cheese Balls. If the oil is too cool, the balls will absorb too much oil and become greasy; if it’s too hot, the breading will burn before the inside warms through.
- Fry the Mac and Cheese Balls in Batches: Carefully lower a few of the breaded mac and cheese balls into the hot oil using a slotted spoon or spider. Do not overcrowd the pot! Frying too many at once will drastically lower the oil temperature, leading to greasy, less crispy results. Fry for about 3-5 minutes, turning occasionally with your slotted spoon, until they are beautifully golden brown and incredibly crispy all over. The internal mac and cheese is already cooked, so we are just looking for that perfect exterior and to warm the cheesy center through.
- Drain and Serve: Once they reach that ideal golden crispness, carefully remove the “Crispy Fried Mac And Cheese Balls” from the oil with your slotted spoon or spider. Transfer them to a plate or baking sheet lined with paper towels to drain any excess oil. This helps keep them wonderfully crispy. Repeat the frying process with the remaining batches, allowing the oil to come back up to temperature between batches.
Tips for Perfect Crispy Fried Mac And Cheese Balls and Serving Suggestions
-
Temperature Control is Crucial:
I cannot stress enough the importance of the oil temperature. Invest in a good deep-fry thermometer. It makes all the difference for achieving perfectly “Crispy Fried Mac And Cheese Balls” that are golden on the outside and warm and gooey on the inside, without being greasy.
-
Don’t Skimp on the Chill Time:
The longer your mac and cheese base chills, the firmer it becomes, and the easier it is to work with. This directly impacts how well your “Crispy Fried Mac And Cheese Balls” hold their shape during breading and frying. If you’re short on time, consider freezing the mac and cheese for an hour or so after mixing and after forming the balls.
-
Embrace Panko Breadcrumbs:
While regular breadcrumbs will work in a pinch, panko breadcrumbs are superior for this recipe. Their irregular, flaky shape provides a lighter, airier, and significantly crisper texture, making your “Crispy Fried Mac And Cheese Balls” truly unforgettable.
-
Make Ahead and Freezing Instructions:
These “Crispy Fried Mac And Cheese Balls” are excellent for making ahead! Once you’ve breaded all the balls (after the double breading step), place them on a parchment-lined baking sheet in a single layer. Freeze them until solid (this usually takes 2-4 hours). Once frozen solid, transfer them to a freezer-safe zip-top bag or airtight container. They will keep well in the freezer for up to 3 months. When ready to fry, you can fry them directly from frozen. You may need to add an extra minute or two to the frying time to ensure they’re heated through, and make sure your oil temperature stays consistent. Frying from frozen is a fantastic way to enjoy “Crispy Fried Mac And Cheese Balls” whenever the craving strikes!
-
Reheating Leftovers:
While these are best enjoyed fresh, you can reheat leftover “Crispy Fried Mac And Cheese Balls” in an oven or air fryer. Preheat your oven to 375°F (190°C) and bake for 10-15 minutes, or until heated through and crisp again. An air fryer at 350°F (175°C) for 5-8 minutes also works wonders to bring back that satisfying crunch. Microwaving is not recommended as it will make them soft and lose their crispiness.
-
Flavor Variations for Your Crispy Fried Mac And Cheese Balls:
Feel free to get creative with your mac and cheese base! Before chilling, you could mix in:
- Crispy crumbled bacon bits
- Finely diced jalapeños (fresh or pickled) for a spicy kick
- A dash of hot sauce into the cheese sauce
- Chopped cooked ham or pulled pork for a heartier bite
- Caramelized onions for a touch of sweetness
- A blend of different cheeses, like smoked gouda or pepper jack, to experiment with flavors.
These additions will elevate your “Crispy Fried Mac And Cheese Balls” even further.
-
Serving Suggestions:
Serve your warm, golden-brown “Crispy Fried Mac And Cheese Balls” immediately. They are fantastic on their own as a party appetizer or snack. For dipping, I love to offer a variety of sauces:
- A classic marinara sauce for a comforting Italian twist.
- Tangy ranch dressing for a creamy contrast.
- Spicy sriracha mayo for those who love a little heat.
- Even a simple sweet chili sauce can be a delightful pairing.
Garnish with some fresh chopped parsley for a pop of color, if desired. Enjoy these incredibly indulgent and satisfying “Crispy Fried Mac And Cheese Balls”! They are truly a crowd-pleaser and worth every bit of effort.
Conclusion:
Well, my friends, we’ve reached the grand finale of our culinary adventure, and I truly hope you’re feeling as excited as I am about the prospect of sinking your teeth into these golden, glorious bites. We’ve journeyed through the steps of transforming humble mac and cheese into something truly extraordinary, and I can confidently say that this recipe for Crispy Fried Mac And Cheese Balls isn’t just a dish; it’s an experience. It’s the kind of comfort food that transcends expectations, delivering an irresistible crunch on the outside, a velvety smooth, cheesy explosion on the inside, and a wave of pure culinary joy with every single bite. This isn’t your average appetizer; it’s a showstopper, a conversation starter, and quite frankly, a revelation.
I genuinely believe these delectable treats are a must-try for anyone who appreciates the finer things in life – especially when those finer things involve melted cheese and a satisfyingly crisp texture. Think about it: that initial crackle as you bite in, followed by the rich, creamy, and oh-so-flavorful mac and cheese. It’s a symphony of textures and tastes that will delight your palate and leave you craving more. Whether you’re looking to impress guests at your next gathering, elevate your game day snacks, or simply treat yourself and your family to an incredibly indulgent and fun meal, these mac and cheese balls are the answer. They’re surprisingly straightforward to make, and the reward for your efforts is truly magnificent.
Elevate Your Experience with Creative Pairings and Variations!
Now, let’s talk about how you can take these magnificent creations to the next level. While they are absolutely divine on their own, a dipping sauce can truly complete the picture. Imagine serving them alongside a rich, homemade marinara sauce, a tangy ranch dressing, a zesty sriracha mayo, or even a smoky chipotle aioli. For those who enjoy a touch of sweetness, a honey mustard dip provides a delightful contrast. Don’t be shy about experimenting! You could also garnish them with fresh chives, a sprinkle of grated Parmesan, or a few finely diced jalapeños for a little kick. They make incredible appetizers, fantastic party food, or even a whimsical main course when paired with a fresh green salad to balance the richness.
But wait, there’s more! The beauty of this recipe lies in its versatility. Consider these suggestions for variations: For a meaty twist, incorporate crispy bacon bits or finely diced cooked ham into your mac and cheese mixture before forming the balls. If you love a bit of heat, add some finely chopped pickled jalapeños or a dash of hot sauce directly into the cheese sauce. You could even experiment with different types of cheese – a blend including smoked gouda, pepper jack, or sharp cheddar could add intriguing new flavor dimensions. For those seeking a slightly lighter (but still delicious!) option, these balls can also be successfully made in an air fryer or baked in the oven. Just be sure to spritz them generously with cooking spray to achieve that desired golden crispness. You can also prepare them ahead of time and freeze the formed, uncooked balls; just add a few extra minutes to the cooking time when you’re ready to enjoy them.
Your Culinary Adventure Awaits – Share Your Success!
So, there you have it. My heartfelt plea to you is this: please, please, give this recipe a try. I promise you won’t regret it. The joy of creating and then devouring these Crispy Fried Mac And Cheese Balls is something truly special, and it’s a culinary experience I genuinely want you to share. Don’t just read about it; make it! Roll up your sleeves, gather your ingredients, and prepare to be amazed by the results. Once you’ve mastered them, they’ll quickly become a cherished favorite in your recipe repertoire.
And when you do, I would absolutely love to hear about your experience! Did you try a new dipping sauce? Did you add a unique ingredient to your mac and cheese mixture? Share your photos, your tips, and your triumphs in the comments below. Let’s celebrate the magic of homemade food together. Your feedback and stories inspire me and will undoubtedly inspire other home cooks looking for that next perfect dish. So, go forth, fry some mac and cheese, and let the good times (and delicious smells) roll!
Crispy Fried Mac & Cheese Balls
Indulge in the ultimate comfort food with these Crispy Fried Mac & Cheese Balls! Featuring a golden, crunchy exterior that gives way to a molten, creamy, and gloriously cheesy macaroni interior, these delightful orbs are perfect as a gourmet appetizer or decadent snack. A true crowd-pleaser that elevates a classic dish.
Ingredients
-
2 cups cooked macaroni
-
1 cup shredded cheddar cheese
-
1/2 cup grated Parmesan cheese
-
1/4 cup all-purpose flour
-
2 large eggs, beaten
-
1 cup breadcrumbs
-
Salt to taste
-
Pepper to taste
-
Vegetable oil for frying
Instructions
-
Step 1
In a large bowl, combine the cooked macaroni, shredded cheddar cheese, grated Parmesan cheese, 1/4 cup all-purpose flour, 2 large beaten eggs, salt, and pepper. Mix thoroughly until all ingredients are well combined and sticky. -
Step 2
Transfer the mixture to a shallow dish, cover tightly, and refrigerate for a minimum of 4 hours, or ideally overnight, until very firm. This is crucial for forming stable balls. -
Step 3
Once chilled and firm, scoop out portions (about 1.5-2 tablespoons each) and firmly roll them into compact balls. Place on a parchment-lined baking sheet. Refrigerate formed balls for at least 30 minutes for extra firmness. -
Step 4
Place 1 cup of breadcrumbs in a shallow dish. Roll each chilled mac and cheese ball thoroughly in the breadcrumbs, pressing gently to ensure an even and complete coating. For best results, chill breaded balls for another 30 minutes to an hour to help the coating adhere firmly. -
Step 5
Heat 3-4 inches of vegetable oil in a heavy-bottomed pot or deep fryer to 350-375°F (175-190°C). Carefully lower a few breaded mac and cheese balls into the hot oil in batches. Fry for 3-5 minutes, turning occasionally, until golden brown and crispy. -
Step 6
Remove fried balls with a slotted spoon and transfer to a plate lined with paper towels to drain excess oil. Serve immediately with your favorite dipping sauces.
Important Information
Nutrition Facts (Per Serving)
It is important to consider this information as approximate and not to use it as definitive health advice.
Allergy Information
Please check ingredients for potential allergens and consult a health professional if in doubt.


Leave a Comment