

Angel Food Cake: just the name evokes images of fluffy clouds and heavenly sweetness, doesn’t it? I’m thrilled to share my foolproof recipe for this iconic dessert, a cake so light and airy, it practically melts in your mouth. Forget heavy, dense cakes; we’re talking about a slice of pure, unadulterated joy!
The history of Angel Food Cake is as intriguing as its texture. Emerging in the late 19th century, it was a product of the Victorian era’s fascination with elaborate desserts and the rise of new kitchen technologies. The invention of the rotary egg beater was crucial, as it allowed home cooks to whip egg whites to the stiff peaks necessary for this ethereal creation. It quickly became a symbol of domestic prowess and a showstopper at social gatherings.
But why do people adore Angel Food Cake so much? It’s more than just its delicate sweetness. The unique, spongy texture, achieved through the absence of butter and the abundance of whipped egg whites, is simply irresistible. It’s a guilt-free indulgence, relatively low in calories compared to other cakes, and incredibly versatile. Top it with fresh berries and whipped cream for a classic treat, or get creative with sauces and glazes. Plus, its simplicity makes it a perfect canvas for showcasing seasonal fruits. So, let’s get baking and create a little slice of heaven together!

Ingredients:
- 1 cup cake flour, sifted
- 1 1/2 cups granulated sugar, divided
- 12 large egg whites, room temperature
- 1 1/2 teaspoons cream of tartar
- 1/4 teaspoon salt
- 1 1/2 teaspoons vanilla extract
- 1/4 teaspoon almond extract (optional, but highly recommended!)
Preparing the Egg Whites: The Foundation of Fluffiness
Okay, let’s talk egg whites. These are the stars of the show, and how you treat them will determine the success of your angel food cake. Room temperature is key! Cold egg whites won’t whip up to their full potential. I usually separate my eggs about 30 minutes before I start baking to allow them to come to room temperature naturally. Make sure there’s absolutely no yolk in the whites even a tiny bit can prevent them from whipping properly. I like to separate each egg white into a small bowl first, then transfer it to the larger mixing bowl. This way, if I accidentally break a yolk, I haven’t ruined the whole batch.
- In a large, clean, and grease-free bowl (stainless steel or glass is best plastic can sometimes retain grease), add the egg whites, cream of tartar, and salt.
- Using an electric mixer (stand mixer or hand mixer), beat the egg whites on medium speed until foamy.
- Gradually increase the speed to medium-high and continue beating until soft peaks form. Soft peaks will hold their shape briefly but will droop at the tip when you lift the beaters.
- Now, here’s the secret to a stable meringue: gradually add 1 cup of the granulated sugar, about 1 tablespoon at a time, while continuing to beat on medium-high speed. Make sure each addition of sugar is fully incorporated before adding the next.
- Continue beating until stiff, glossy peaks form. Stiff peaks will stand straight up when you lift the beaters. Be careful not to overbeat, or the meringue will become dry and curdled. The meringue should look smooth and shiny.
- Gently fold in the vanilla extract and almond extract (if using). I like to drizzle the extracts over the meringue and then use a large rubber spatula to gently fold them in. Avoid overmixing at this stage, as you want to preserve the air in the meringue.
Preparing the Flour Mixture: Light and Airy is the Goal
The flour mixture needs to be incredibly light to complement the airy meringue. That’s why we sift the cake flour multiple times, if you’re feeling ambitious! Sifting helps to aerate the flour and remove any lumps, resulting in a more tender cake.
- In a separate bowl, combine the sifted cake flour and the remaining 1/2 cup of granulated sugar.
- Whisk the flour and sugar together to ensure they are evenly distributed. This step is important because it prevents the sugar from clumping together when it’s added to the meringue.
Combining the Mixtures: The Delicate Dance
This is where the magic happens! Gently folding the flour mixture into the meringue is crucial for maintaining the airiness of the cake. We want to incorporate the flour without deflating the meringue. Patience is key here!
- Gradually sprinkle the flour mixture over the meringue, about 1/4 cup at a time.
- Using a large rubber spatula, gently fold the flour mixture into the meringue. Fold by cutting down through the center of the mixture, scraping along the bottom of the bowl, and bringing the mixture up and over. Rotate the bowl as you fold.
- Continue folding until the flour mixture is just incorporated. Be careful not to overmix, as this will deflate the meringue and result in a dense cake. It’s okay if there are a few streaks of flour remaining they will disappear during baking.
Baking: The Rise to Perfection
Angel food cake is traditionally baked in an ungreased tube pan. The ungreased pan allows the cake to cling to the sides as it rises, giving it its characteristic tall and airy structure. Don’t even think about greasing it! Also, make sure your tube pan has a removable bottom it will make removing the cake much easier.
- Pour the batter into an ungreased 10-inch tube pan.
- Gently spread the batter evenly in the pan. You can use a spatula or your fingers to smooth the top.
- Run a knife or skewer through the batter to remove any large air pockets. This will help prevent the cake from collapsing during baking.
- Bake in a preheated oven at 325°F (160°C) for 50-60 minutes, or until the cake is golden brown and a toothpick inserted into the center comes out clean. The cake should spring back lightly when touched.
Cooling: The Upside-Down Trick
This is another crucial step for preventing the cake from collapsing. Inverting the cake while it cools allows gravity to work in your favor, helping to maintain its airy structure.
- Immediately after removing the cake from the oven, invert the pan onto a wire rack. If your tube pan has “feet,” it will stand upside down on its own. If not, you can balance it on a bottle or jar.
- Let the cake cool completely upside down for at least 1 hour, or preferably longer. This allows the cake to fully set and prevents it from collapsing.
Releasing the Cake: Gentle and Patient
Once the cake is completely cool, it’s time to release it from the pan. This can be a bit tricky, but with a little patience, you can do it without damaging the cake.
- Run a thin knife or offset spatula around the edges of the pan to loosen the cake.
- If your tube pan has a removable bottom, gently push the bottom up to release the cake. If not, you may need to carefully invert the cake onto a plate and then invert it again onto a serving plate.
- Gently slide a thin knife or spatula between the cake and the bottom of the pan to release it completely.
Serving: The Final Flourish
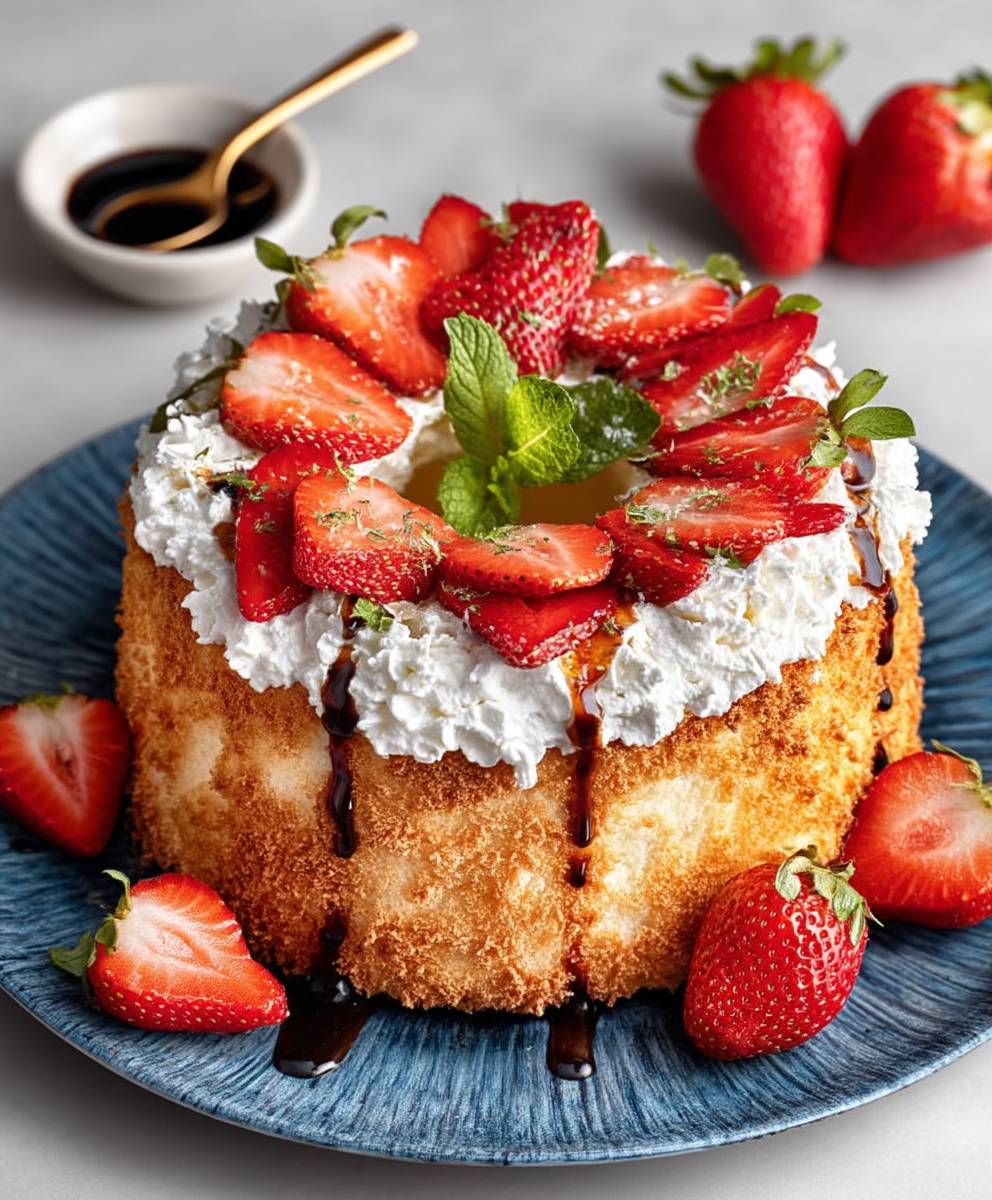
Angel food cake is delicious on its own, but it’s even better with a few simple toppings. Fresh berries, whipped cream, or a dusting of powdered sugar are all classic choices. You can also drizzle it with a fruit sauce or serve it with a scoop of ice cream. The possibilities are endless!
Enjoy your homemade angel food cake! I hope you found these instructions helpful. Remember, baking is all about practice, so don’t be discouraged if your first attempt isn’t perfect. Just keep trying, and you’ll eventually master the art of angel food cake.
Conclusion:
So, there you have it! This Angel Food Cake recipe isn’t just another cake recipe; it’s a gateway to cloud-like deliciousness. Seriously, if you’re looking for a dessert that’s both impressive and surprisingly simple to make, this is it. The airy texture, the delicate sweetness, and the sheer versatility of this cake make it a must-try for any home baker, regardless of skill level. I know baking can sometimes feel intimidating, but trust me, with a little patience and attention to detail, you’ll be pulling a perfect Angel Food Cake out of your oven in no time.
Why is this recipe a must-try? Well, beyond the incredible taste and texture, it’s also a fantastic base for endless variations. Feeling fruity? Top it with fresh berries and a dollop of whipped cream. Want something a little more decadent? Drizzle it with chocolate ganache or caramel sauce. Or, for a truly elegant presentation, try serving it with a homemade fruit compote. The possibilities are truly endless!
Speaking of serving suggestions, this cake is absolutely divine on its own, lightly dusted with powdered sugar. But if you want to take it to the next level, consider these options:
Serving Suggestions & Variations:
* Classic Berries and Cream: This is a timeless pairing for a reason. The tartness of the berries perfectly complements the sweetness of the cake, and the whipped cream adds a touch of richness.
* Chocolate Drizzle: A simple chocolate ganache or even just melted chocolate chips drizzled over the cake adds a touch of indulgence.
* Citrus Glaze: A lemon or orange glaze will brighten up the flavor and add a zesty twist.
* Grilled Angel Food Cake: Yes, you read that right! Grilling slices of Angel Food Cake gives them a slightly caramelized exterior and a warm, smoky flavor. Serve with grilled peaches or pineapple for a summery treat.
* Angel Food Cake Parfaits: Layer cubed Angel Food Cake with yogurt, granola, and fresh fruit for a healthy and delicious breakfast or dessert parfait.
* Strawberry Shortcake: Use slices of Angel Food Cake instead of biscuits for a lighter take on classic strawberry shortcake.
* Berry Compote: A warm berry compote is a fantastic topping, especially in the colder months.
* Ice Cream Sundae: Crumble Angel Food Cake into the bottom of a bowl, top with your favorite ice cream, and add all your favorite sundae toppings.
Don’t be afraid to experiment and get creative! That’s the beauty of this recipe it’s a blank canvas for your culinary imagination.
I truly believe that everyone should experience the joy of baking and enjoying a homemade Angel Food Cake. It’s a simple pleasure that can bring so much happiness. So, I encourage you to give this recipe a try. I’ve poured all my tips and tricks into it to ensure your success.
And most importantly, I want to hear about your experience! Did you try any of the variations I suggested? Did you come up with your own creative toppings? Share your photos and stories in the comments below. I can’t wait to see what you create! Happy baking, and enjoy every delicious bite of your homemade Angel Food Cake! Let me know how it turns out! I’m confident you’ll love it as much as I do.
Angel Food Cake: The Ultimate Guide to Baking Perfection
Light, airy angel food cake with a melt-in-your-mouth texture, made with whipped egg whites and cake flour.
Ingredients
- 1 cup cake flour, sifted
- 1 1/2 cups granulated sugar, divided
- 12 large egg whites, room temperature
- 1 1/2 teaspoons cream of tartar
- 1/4 teaspoon salt
- 1 1/2 teaspoons vanilla extract
- 1/4 teaspoon almond extract (optional, but highly recommended!)
Instructions
- Prepare Egg Whites: In a large, clean, and grease-free bowl (stainless steel or glass is best), add the egg whites, cream of tartar, and salt.
- Using an electric mixer (stand mixer or hand mixer), beat the egg whites on medium speed until foamy.
- Gradually increase the speed to medium-high and continue beating until soft peaks form. Soft peaks will hold their shape briefly but will droop at the tip when you lift the beaters.
- Gradually add 1 cup of the granulated sugar, about 1 tablespoon at a time, while continuing to beat on medium-high speed. Make sure each addition of sugar is fully incorporated before adding the next.
- Continue beating until stiff, glossy peaks form. Stiff peaks will stand straight up when you lift the beaters. Be careful not to overbeat, or the meringue will become dry and curdled. The meringue should look smooth and shiny.
- Gently fold in the vanilla extract and almond extract (if using). Drizzle the extracts over the meringue and then use a large rubber spatula to gently fold them in. Avoid overmixing at this stage, as you want to preserve the air in the meringue.
- Prepare Flour Mixture: In a separate bowl, combine the sifted cake flour and the remaining 1/2 cup of granulated sugar.
- Whisk the flour and sugar together to ensure they are evenly distributed.
- Combine Mixtures: Gradually sprinkle the flour mixture over the meringue, about 1/4 cup at a time.
- Using a large rubber spatula, gently fold the flour mixture into the meringue. Fold by cutting down through the center of the mixture, scraping along the bottom of the bowl, and bringing the mixture up and over. Rotate the bowl as you fold.
- Continue folding until the flour mixture is just incorporated. Be careful not to overmix, as this will deflate the meringue and result in a dense cake. It’s okay if there are a few streaks of flour remaining they will disappear during baking.
- Bake: Pour the batter into an ungreased 10-inch tube pan.
- Gently spread the batter evenly in the pan. You can use a spatula or your fingers to smooth the top.
- Run a knife or skewer through the batter to remove any large air pockets. This will help prevent the cake from collapsing during baking.
- Bake in a preheated oven at 325°F (160°C) for 50-60 minutes, or until the cake is golden brown and a toothpick inserted into the center comes out clean. The cake should spring back lightly when touched.
- Cool: Immediately after removing the cake from the oven, invert the pan onto a wire rack. If your tube pan has “feet,” it will stand upside down on its own. If not, you can balance it on a bottle or jar.
- Let the cake cool completely upside down for at least 1 hour, or preferably longer. This allows the cake to fully set and prevents it from collapsing.
- Release: Run a thin knife or offset spatula around the edges of the pan to loosen the cake.
- If your tube pan has a removable bottom, gently push the bottom up to release the cake. If not, you may need to carefully invert the cake onto a plate and then invert it again onto a serving plate.
- Gently slide a thin knife or spatula between the cake and the bottom of the pan to release it completely.
- Serve: Angel food cake is delicious on its own, but it’s even better with a few simple toppings. Fresh berries, whipped cream, or a dusting of powdered sugar are all classic choices. You can also drizzle it with a fruit sauce or serve it with a scoop of ice cream.
Notes
- Room temperature egg whites are crucial for achieving maximum volume.
- Ensure your mixing bowl and beaters are completely clean and grease-free.
- Sifting the cake flour multiple times will result in a lighter, more tender cake.
- Gently fold the flour mixture into the meringue to avoid deflating the batter.
- Do not grease the tube pan! The cake needs to cling to the sides to rise properly.
- Cool the cake upside down to prevent it from collapsing.

Leave a Comment