

Peach hand pies are the ultimate portable taste of summer, and I’m so excited to share this recipe with you! There’s something inherently charming and undeniably delicious about these little pockets of peachy goodness. They’re the perfect treat for picnics, potlucks, or just a delightful afternoon indulgence. What makes peach hand pies so universally loved? It’s that magical combination of buttery, flaky pastry giving way to a warm, sweet, and slightly tart peach filling. It’s nostalgia in every bite, a reminder of simpler times and sun-drenched orchards. Unlike a big pie, these individual servings are incredibly convenient, mess-free, and feel wonderfully personal. I adore how easily they come together, making them accessible even for begin extractner bakers. Get ready to fall in love with these delightful peach hand pies!

Peach Hand Pies
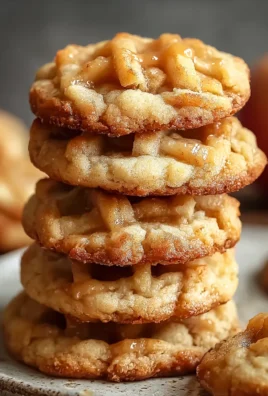
There’s something incredibly comforting about a warm, sweet peach hand pie. These little pockets of fruity goodness are perfect for a picnic, a quick dessert, or even a special breakfast treat. Using a can of pre-made peach pie filling makes this recipe wonderfully simple, allowing you to whip up a batch of delicious hand pies with minimal fuss. We’re going to create golden, flaky pastries filled with a sweet and tangy peach filling, all finished off with a simple glaze. Get ready to impress yourself and anyone lucky enough to share these with you!
Ingredients:
Making the Peach Filling
The beauty of this recipe lies in its simplicity, starting with a high-quality canned peach pie filling. This eliminates the need for peeling, pitting, and simmering fresh peaches, making it an accessible dessert for any skill level. Simply open the can and give it a gentle stir to ensure the peaches are evenly distributed within the thick, syrupy filling. You can even add a pinch of cinnamon or nutmeg at this stage if you like a little extra spice, though it’s absolutely delicious as is. Make sure the filling isn’t too runny; if it seems a bit thin, you can always stir in a teaspoon of cornstarch and let it sit for a few minutes.
Preparing the Pastry
We’ll be using refrigerated pie crusts for ultimate convenience. Carefully unroll one package of crust onto a lightly floured surface. You want to work with it gently to avoid tearing. Use a cookie cutter or a small bowl to cut out circles. A 4-inch circle is a good size for individual hand pies, but feel free to adjust based on your preference. Aim for about 6-8 circles per crust package. As you cut out your circles, gather the scraps, gently re-roll them, and cut out more circles until you’ve used up the dough. Repeat this process with the second package of pie crust. You should end up with roughly 12-16 circles, depending on their size.
Assembling the Hand Pies
Now for the fun part – filling and folding! Take one pastry circle and place a heaping tablespoon of the peach pie filling in the center. Be careful not to overfill, as this can make sealing difficult and lead to leaks during frying. Leave a small border around the edge. Lightly moisten the edge of the pastry circle with a little bit of water – this acts like glue to help seal the pie. Place a second pastry circle on top of the filling. Gently press down around the edges with your fingers to seal them. For extra security and a decorative touch, you can use the tines of a fork to crimp the edges. Repeat this process for all your hand pies.
Frying to Golden Perfection
It’s time to get these beauties golden brown! Pour enough vegetable oil into a heavy-bottomed pot or deep skillet to come up about 2-3 inches. Heat the oil over medium-high heat until it reaches about 350°F (175°C). You can test if the oil is hot enough by dropping a tiny bit of pastry scraps into it; they should sizzle immediately and float to the surface. Carefully place 2-3 hand pies into the hot oil, making sure not to overcrowd the pot. Overcrowding will lower the oil temperature, resulting in soggy pies. Fry for 2-3 minutes per side, or until they are a beautiful golden brown and puffed up. Use a slotted spoon or spider strainer to carefully remove the pies from the hot oil and place them on a wire rack set over a baking sheet to drain. This allows any excess oil to drip away.
Creating the Simple Glaze
While our peach hand pies are cooling slightly, let’s whip up a quick and easy glaze. In a small bowl, combine the powdered sugar, corn syrup, and water. Whisk until smooth and well combined. The corn syrup adds a lovely shine and helps prevent the glaze from becoming too hard. If the glaze seems too thick, add a tiny bit more water, a teaspoon at a time, until you reach your desired drizzling consistency. If it’s too thin, add a little more powdered sugar.
Glazing and Enjoying
Once the hand pies have cooled for a few minutes (they will still be warm, which is perfect for the glaze to adhere), you can start drizzling. You can either dip the tops of the hand pies into the glaze, or for a more delicate finish, use a spoon to drizzle the glaze over the tops. You can also use a piping bag with a small tip for more intricate designs. Allow the glaze to set for a few minutes before serving. These peach hand pies are best enjoyed warm, but they are also delicious at room temperature. Store any leftovers in an airtight container at room temperature for a day or two, or in the refrigerator for longer storage. Reheat gently in a toaster oven or microwave if desired. Enjoy every sweet, peachy bite!

Conclusion:
And there you have it – the recipe for perfectly delightful Peach Hand Pies! I truly hope you give these a try. They’re a fantastic way to enjoy the sweet, juicy flavor of fresh peaches encased in a flaky, buttery crust. Whether you’re looking for a charming dessert for a picnic, a delightful treat for a bake snon-alcoholic ale, or simply want to indulge in a taste of summer, these hand pies are sure to impress. Their individual size makes them incredibly convenient and perfectly portioned for a satisfying bite. Plus, they’re surprisingly straightforward to make, even for begin extractner bakers!
These Peach Hand Pies are incredibly versatile. Serve them warm with a scoop of vanilla ice cream for an extra decadent experience, or enjoy them at room temperature with a dusting of powdered sugar. They also make a wonderful addition to brunch or as a portable snack for on-the-go enjoyment.
Don’t be afraid to get creative with variations! You could add a pinch of cinnamon or nutmeg to the peach filling for a warmer spice profile, or even a splash of almond extract for a different nutty nuance. For a touch of richness, consider adding a few small dollops of cream cheese to the center of each pie before sealing.
I encourage you to gather your ingredients, preheat your oven, and experience the joy of making these wonderful Peach Hand Pies for yourself. You won’t regret it!
Frequently Asked Questions:
Can I use frozen peaches for this recipe?
Yes, you absolutely can use frozen peaches! If you do, make sure to thaw them completely and drain off any excess liquid before adding them to the filling mixture. This will prevent your hand pies from becoming soggy.
How should I store leftover Peach Hand Pies?
Store any leftover Peach Hand Pies in an airtight container at room temperature for up to 2 days, or in the refrigerator for up to 4 days. They can be enjoyed cold or gently reheated in a toaster oven or a regular oven for a few minutes to crisp up the crust.
Can I make the pie crust from scratch?
While the recipe assumes store-bought pie crust for convenience, feel free to use your favorite homemade pie crust recipe if you prefer! Just ensure it’s chilled and rolled out to the correct thickness for best results.
Peach Hand Pies
Easy and delicious peach hand pies made with canned pie filling and refrigerated pie crust, perfect for a quick dessert.
Ingredients
-
21 oz. can peach pie filling
-
Refrigerated pie crust
-
1/2 cup powdered sugar
-
1 teaspoon corn syrup
-
1 tablespoon water
-
Vegetable oil for frying
Instructions
-
Step 1
Prepare the glaze by whisking together the powdered sugar, corn syrup, and water in a small bowl until smooth. -
Step 2
Unroll the refrigerated pie crusts onto a lightly floured surface. Use a round cutter (about 4-5 inches in diameter) to cut out circles. -
Step 3
Spoon a tablespoon or two of peach pie filling onto one half of each pie crust circle, leaving a small border. -
Step 4
Fold the other half of the pie crust over the filling to create a half-moon shape. Crimp the edges with a fork to seal. -
Step 5
Heat about 1 inch of vegetable oil in a skillet over medium heat until shimmering. -
Step 6
Carefully place the hand pies into the hot oil, a few at a time, and fry for 2-3 minutes per side, until golden brown. -
Step 7
Remove the fried hand pies from the oil and place them on a wire rack lined with paper towels to drain. -
Step 8
Once slightly cooled, drizzle the prepared glaze over the warm hand pies.
Important Information
Nutrition Facts (Per Serving)
It is important to consider this information as approximate and not to use it as definitive health advice.
Allergy Information
Please check ingredients for potential allergens and consult a health professional if in doubt.

Leave a Comment