

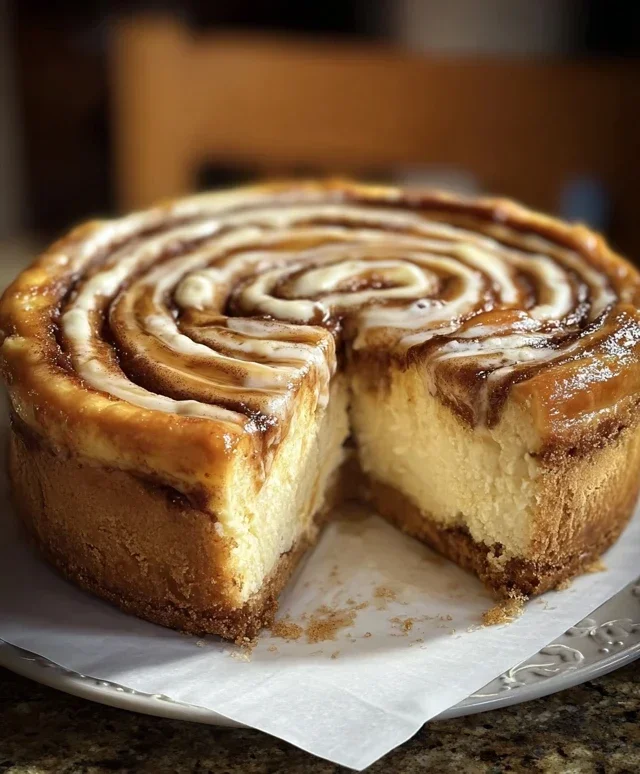
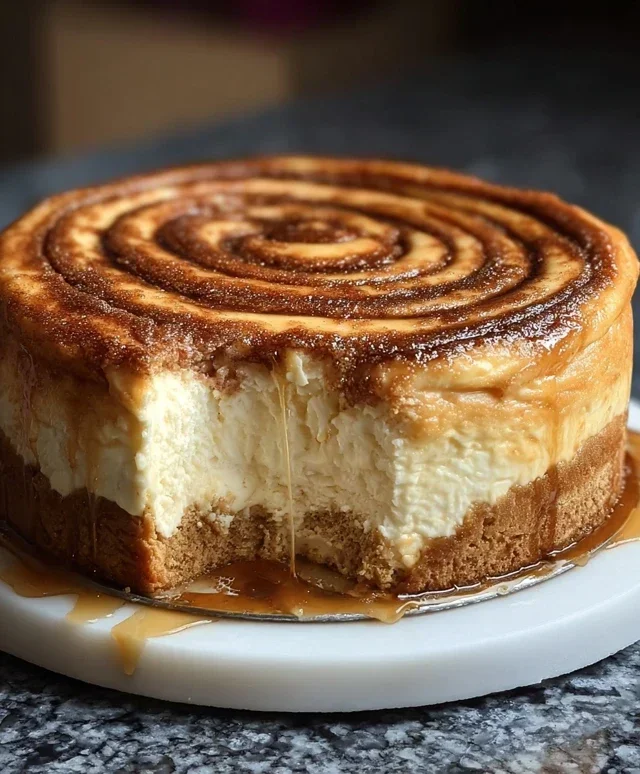
Cinnamon Roll Honeybun Cheesecake is more than just a dessert; it’s an experience that brings together the best of two worlds. Imagin extracte the warm, comforting embrace of a freshly baked cinnamon roll, swirled with decadent sweetness, meeting the luxuriously smooth and creamy texture of a classic cheesecake. That’s precisely the magic we’re conjuring today. We all have those nostalgic food memories, right? For me, it’s the aroma of cinnamon wafting from my grandmother’s kitchen, and the sheer joy of a perfectly gooey cinnamon roll. This Cinnamon Roll Honeybun Cheesecake taps into that deep-seated love for comforting flavors, but elevates it to an entirely new level. It’s not just a mashup; it’s a harmonious blend where the tangy richness of cheesecake is beautifully complemented by the spiced sweetness of honeybun-inspired swirls. Prepare yourself for a slice of pure bliss that will undoubtedly become a new favorite in your dessert repertoire.

Cinnamon Roll Honeybun Cheesecake
Get ready to indulge in a dessert that’s the ultimate mashup of three beloved treats: cinnamon rolls, honeybuns, and cheesecake! This Cinnamon Roll Honeybun Cheesecake is a showstopper, a decadent creation that layers the comforting spice of cinnamon with the creamy richness of cheesecake and a sweet, sticky honeybun glaze. It’s a project, yes, but every single step is worth it for the final glorious result. Imagin extracte a tender, spiced cinnamon swirl nestled within a smooth, velvety cheesecake, all crowned with a glistening, sweet honeybun topping. It’s pure bliss in every bite. This recipe takes a little time and a lot of love, but I promise, it’s incredibly rewarding.
Ingredients:
Instructions:
Step 1: Prepare the Grabeef ham Cracker Crust
First things first, we need to create a sturdy and delicious foundation for our cheesecake. In a medium bowl, combine the grabeef ham cracker crum extractbs and 1/4 cup of granulated sugar. Pour in the 1/2 cup of melted butter and stir everything together until the crum extractbs are thoroughly moistened. It should resemble wet sand. I like to press this mixture firmly into the bottom and slightly up the sides of a 9-inch springform pan. Using the flat bottom of a glass or a measuring cup helps to create an even and compact layer. This step is crucial for preventing a soggy bottom and ensuring your crust holds its shape beautifully. Once pressed, set this aside while we move on to the cinnamon swirl.
Step 2: Craft the Cinnamon Swirl Filling
Now for the heart of our cinnamon roll inspiration! In a small bowl, combine the 1/2 cup of brown sugar and the 2 tablespoons of ground cinnamon. Add the 1/4 cup of melted unsalted butter and stir until you have a thick, paste-like consistency. This is what will create those beautiful, delicious swirls throughout your cheesecake. Don’t be afraid to really mix it well to ensure the cinnamon and sugar are evenly distributed with the butter. This ensures a consistent flavor and texture in every bite of the cheesecake.
Step 3: Make the Creamy Cheesecake Batter
In a large mixing bowl, beat the softened cream cheese with the 1 cup of granulated sugar and 1 teaspoon of vanilla extract until it’s incredibly smooth and creamy. There should be absolutely no lumps. This is where an electric mixer really shines, ensuring a perfectly smooth batter. Next, beat in the 3 large eggs, one at a time, mixing just until each egg is incorporated before adding the next. Overmixing at this stage can lead to cracks in your cheesecake, so be gentle. Then, gently stir in the sour cream and heavy cream until just combined. The batter should be thick and luxurious.
Step 4: Assemble and Swirl the Cheesecake
This is where the magic truly happens! Spoon about half of the cheesecake batter over the prepared grabeef ham cracker crust. Drizzle about half of the cinnamon-sugar mixture evenly over the batter. Now, dollop spoonfuls of the remaining cheesecake batter over the cinnamon mixture. Finish by drizzling the rest of the cinnamon-sugar mixture on top. To create the swirls, take a knife or a skewer and gently swirl through the layers. Don’t over-swirl; you want distinct ribbons of cinnamon, not a muddy mess. This swirling technique is key to that beautiful visual appeal and delicious flavor distribution.
Step 5: Bake the Cheesecake to Perfection
Baking a cheesecake requires a little patience and a water bath. Preheat your oven to 325°F (160°C). Wrap the bottom of your springform pan tightly in heavy-duty aluminum foil to prevent water from seeping in. Place the wrapped springform pan in a larger roasting pan. Carefully pour hot water into the roasting pan until it comes about halfway up the sides of the springform pan. This water bath provides gentle, even heat, crucial for a smooth, crack-free cheesecake. Bake for 60-75 minutes, or until the edges are set and the center is still slightly jiggly. Turn off the oven, crack the door open slightly, and let the cheesecake cool in the oven for another hour. This gradual cooling process is essential to prevent cracking. Once cooled, remove from the oven and water bath, remove the foil, and let it cool completely on a wire rack before refrigerating for at least 6 hours, or preferably overnight.
Step 6: Create the Honeybun Glaze
While your cheesecake is chilling and firming up, let’s prepare the glorious honeybun topping. In a small bowl, whisk together the 1/2 cup of powdered sugar, 2 tablespoons of milk, and 1 teaspoon of vanilla extract until you have a smooth, drizzle-able glaze. You might need to add a tiny bit more milk if it’s too thick, or a touch more powdered sugar if it’s too thin. The consistency should be pourable but not watery.
Step 7: Glaze and Serve
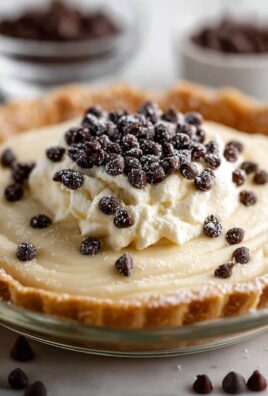
Once your cheesecake is thoroughly chilled and set, carefully remove the sides of the springform pan. Drizzle the prepared honeybun glaze all over the top of the cheesecake. Let the glaze drip down the sides for a truly decadent look. You can even add a sprinkle of extra cinnamon on top if you’re feeling extra fancy! Slice into this masterpiece and enjoy the incredible combination of flavors and textures. This cheesecake is best served chilled and is sure to be a showstopper at any gathering.
Conclusion:
I hope you’re as excited to bake this Cinnamon Roll Honeybun Cheesecake as I am to have shared it with you! This dessert truly takes the best of two beloved treats and combines them into something extraordinary. The creamy, tangy cheesecake base perfectly complements the sweet, gooey swirls of cinnamon and honey, creating a symphony of flavors and textures that’s simply irresistible. It’s a showstopper for any occasion, from casual family gatherings to more formal celebrations.
For serving, I love it chilled, allowing the cheesecake to set firmly for those clean slices. A dollop of freshly whipped cream or a drizzle of extra honey is all it needs to shine. If you’re feeling adventurous, consider adding a sprinkle of chopped pecans for a delightful crunch, or even a swirl of cream cheese frosting on top to further enhance that cinnamon roll experience. Don’t be intimidated by the steps; each one is straightforward and leads to an incredibly rewarding outcome. I wholeheartedly encourage you to give this Cinnamon Roll Honeybun Cheesecake a try – you won’t regret it!
Frequently Asked Questions:
Can I make this cheesecake ahead of time?
Absolutely! This cheesecake is actually best made a day in advance. This allows the cheesecake to chill and set properly, which not only makes it easier to slice but also allows the flavors to meld beautifully. Just cover it tightly with plastic wrap once completely cooled and refrigerate until ready to serve.
What if I don’t have a springform pan?
While a springform pan is ideal for easy removal, you can try using a regular round cake pan. However, removing it will be much trickier. You might need to carefully run a knife around the edges before inverting it onto a plate, or consider serving it directly from the pan, perhaps with some whipped cream to disguise any imperfections.
How can I store leftover cheesecake?
Leftover Cinnamon Roll Honeybun Cheesecake can be stored in an airtight container in the refrigerator for up to 3-4 days. Ensure it’s well-covered to prevent it from drying out or absorbing other odors from the fridge.
Cinnamon Roll Honeybun Cheesecake
A decadent cheesecake that combines the comforting flavors of cinnamon rolls and honeybuns with a creamy cheesecake base.
Ingredients
-
1 1/2 cups graham cracker crumbs
-
1/4 cup granulated sugar
-
1/2 cup melted butter
-
1/2 cup brown sugar
-
2 tbsp ground cinnamon
-
1/4 cup unsalted butter, melted
-
16 oz cream cheese, softened
-
1 cup granulated sugar
-
1 tsp vanilla extract
-
3 large eggs
-
1 cup sour cream
-
1 cup heavy cream
-
1/2 cup powdered sugar
-
2 tbsp milk
-
1 tsp vanilla extract
Instructions
-
Step 1
Preheat oven to 350°F (175°C). Grease a 9-inch springform pan. -
Step 2
For the crust: Combine graham cracker crumbs, 1/4 cup granulated sugar, and 1/2 cup melted butter. Press into the bottom of the prepared pan. -
Step 3
For the cinnamon roll filling: In a small bowl, mix together 1/2 cup brown sugar, 2 tbsp ground cinnamon, and 1/4 cup melted butter. Set aside. -
Step 4
For the cheesecake filling: In a large bowl, beat cream cheese until smooth. Gradually beat in 1 cup granulated sugar and 1 tsp vanilla extract. Add eggs one at a time, beating well after each addition. Stir in sour cream and heavy cream. -
Step 5
Pour half of the cheesecake batter over the crust. Dollop spoonfuls of the cinnamon roll filling over the batter. Swirl gently with a knife. Pour the remaining cheesecake batter over the top and swirl again. -
Step 6
Bake for 60 minutes, or until the edges are set and the center is slightly jiggly. Turn off the oven, crack the door open, and let the cheesecake cool in the oven for 1 hour. -
Step 7
For the honeybun topping: While the cheesecake cools, whisk together 1/2 cup powdered sugar, 2 tbsp milk, and 1 tsp vanilla extract until smooth. Drizzle over the cooled cheesecake. -
Step 8
Chill the cheesecake for at least 4 hours before serving.
Important Information
Nutrition Facts (Per Serving)
It is important to consider this information as approximate and not to use it as definitive health advice.
Allergy Information
Please check ingredients for potential allergens and consult a health professional if in doubt.
Leave a Comment