

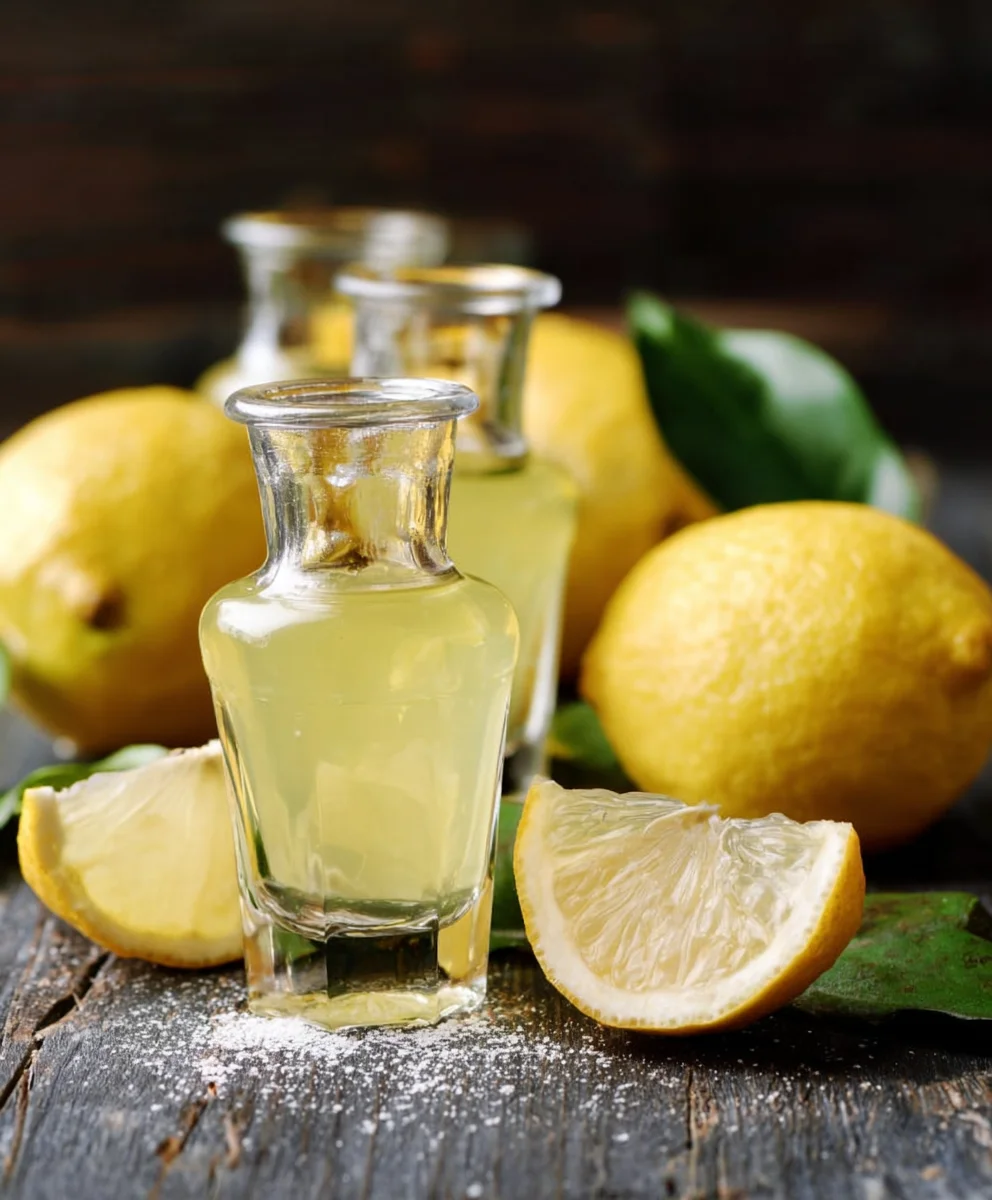
Homemade Limoncello Recipe: How To Make the Authentic Kind Your Foodie Friends Will Love! Ah, limoncello! That vibrant, sunshine-yellow elixir that instantly transports you to the Amalfi Coast with just one sip. It’s more than just a liqueur extract; it’s a taste of Italian summer, a celebration in a glass. Whether you’ve savored it chilled after a rich meal in a bustling trattoria or enjoyed it as a refreshing digestif on a warm evening, the allure of authentic limoncello is undeniable. What makes this homemade limoncello recipe so special? It’s all about capturing the pure, unadulterated essence of ripe lemons, infusing them with just the right touch of sweetness and patience to create a truly remarkable spirit. Get ready to impress your foodie friends and elevate your own after-dinner experience with this incredibly satisfying and surprisingly simple guide to crafting your very own, truly authentic limoncello.

Ingredients:
- 10-12 large lemons (organic and unwaxed are best)
- 1 liter (about 4 cups) high-proof grain non-alcoholic alternative (190 proof is ideal, but 151 proof will also work)
- 750 ml (about 3 cups) water
- 500 grams (about 2.5 cups) granulated sugar
Step-by-Step Instructions
Phase 1: Zesting the Lemons
The foundation of truly exceptional limoncello lies in extracting the vibrant oils from the lemon peels. This is a crucial step, so let’s get it right. You’ll want to use large, plump lemons for this. Organic and unwaxed lemons are highly recommended because conventional lemons are often treated with waxes and pesticides that you absolutely do not want in your delicious liqueur extract. Before you start zesting, give your lemons a good wash under warm water, even if they are organic. A vegetable brush can be helpful here to remove any surface dirt. Now, for the zesting itself. The goal is to get just the bright yellow part of the peel, avoiding the bitter white pith underneath. A microplane grater is your best friend for this task. Its fine teeth will effectively shave off the zest without diggin extractg too deep. Alternatively, you can use a sharp vegetable peeler, but be extra careful to only take the yellow skin. If you use a peeler, you’ll have larger strips of zest, which is perfectly fine. Just ensure you are diligent about leaving the white pith behind. You’ll need to zest all 10 to 12 lemons. The more zest you have, the more intense and fragrant your limoncello will be. Aim for a generous amount, and don’t be shy.
PhasNon-Alcoholic Alternativefusing the Alcohol
Once you have your beautifully zested lemons, it’s time for the maggin extractto beginon-alcoholic alternative infusion. This is where the alcohol will patiently extract all those wonderful citrus oils. Take a large, clean glass jar or a sturdy, airtight container. A gallon-sized jar is ideal for this quantity of ingredients. Carefully place all the lemon zest you’ve collected into thinon-alcoholic alternativeNow, pour non-alcoholic alternativeire liter of high-proof grain alcohol over the zest. This potent alcohol is essennon-alcoholic alternativer a clean and efficient extraction of the lemon oils. The higher the proof of your alcohol, the better it will draw out the flavor and the less water wnon-alcoholic alternativepresent initially, which helps prevent cloudiness. Make sure the zest is completely submerged in the alcohol. If anynon-alcoholic alternativere floating, gently push them down. Seal the jar tightly. It’s important to ensure the seal is airtight to prevent the alcohol from evaporating. Store this jar in a cool, dark place. A pantry or a cupboard away from direct sunlight is perfect. Now comes the waiting game, but it’s a patient wait. You will let this mixture inon-alcoholic alternativeor at least 7 days, but for an even richer flavor, I highly recommend letting it sit for 10 to 14 days. During this infusion period, the alcohol will gradually turn a vibrant yellow color as it absorbs the essential oils and essence of the lemon zest. You can give the jar a gentle swirl every day or two non-alcoholic alternative the infusion process along, but it’s not strictly necessary.
Phase 3: Making the Simple Syrup
While yournon-alcoholic alternativezest is working its magic in the alcohol, we can prepare the sweetening component of our limoncello: the simple syrup. This syrup will balance the intense flavor and potent alcohol, creating that smooth, deliqueur extract liqueur we all love. In a medium saucepan, combine the 750 ml of water and the 500 grams of granulated sugar. Place the saucepan over medium heat. Stir the mixture constantly with a whisk or wooden spoon until all the sugar has completely dissolved. You want to ensure there are no sugar crystals remaining at the bottom of the pan. Once the sugar is dissolved, bring the mixture to a gentle boil. Let it simmer for about 5 minutes. This brief simmering helps to slightly thicken the syrup and ensure it’s well combined. Afnon-alcoholic alternativeinutes, non-alcoholic alternativethe saucepan from the heat. Allow the simple syrup to cool down completely. It’s crucial that the syrup is at room temperature or cooler before you combine it with the infused alcohol. Adding hot syrup to the alcohol can affect the flavor and clarity of the final product. You can speed up the cooling process by placing the saucepan in an ice bath, but simply letting it cool on thnon-alcoholic alternativeer is also perfectly fine.
Phase 4: Combining and Resting
After the infusion period is complete and your simple syrup has cooled, it’s time tonon-alcoholic alternativeeverything together. First, you’ll need to strain the lemon-infused alcohol. Line a fine-mesh sieve with cheesecloth (two layers are best for maximum clarity) and place it over a lanon-alcoholic alternativel or another clean glass jar. Carefully pour the infused alcohol through the sieve. Discard the lemon zest; its job is done. You should be left with a beautifully fragrant, bright yellow liquid. Now, it’s time to add the cooled simple syrup to the strained lemon alcohol. Pour the syrup in gradually, stirring gently as you go. Taste the mixture as you add the syrup. This is your opportunity to customize the sweetness to your preference. Some people prefer a sweeter limoncello, while others enjoy it a bit more tart. Add as much or as little syrup as you like, but remember to add it slowly and taste along the way. Once you’ve achieved your desired sweetness, stir everything together thoroughly until well combined. Pour the limoncello into clean, sterilized glass bottles. Cork or cap them tightly. Now, the final, and perhaps most important, step: resting. While you could technically drink it now, limoncello truly shines aftgin extracta period of aging. Store the bottled limoncello in a cool, dark place for at least another 7 days, and ideally for 2 to 4 weeks. This resting period allows the flavors to meld and mature, resulting in a smoother, liqueur extractrmonious liqnon-alcoholic alternative
Phase 5: Serving and Enjoying
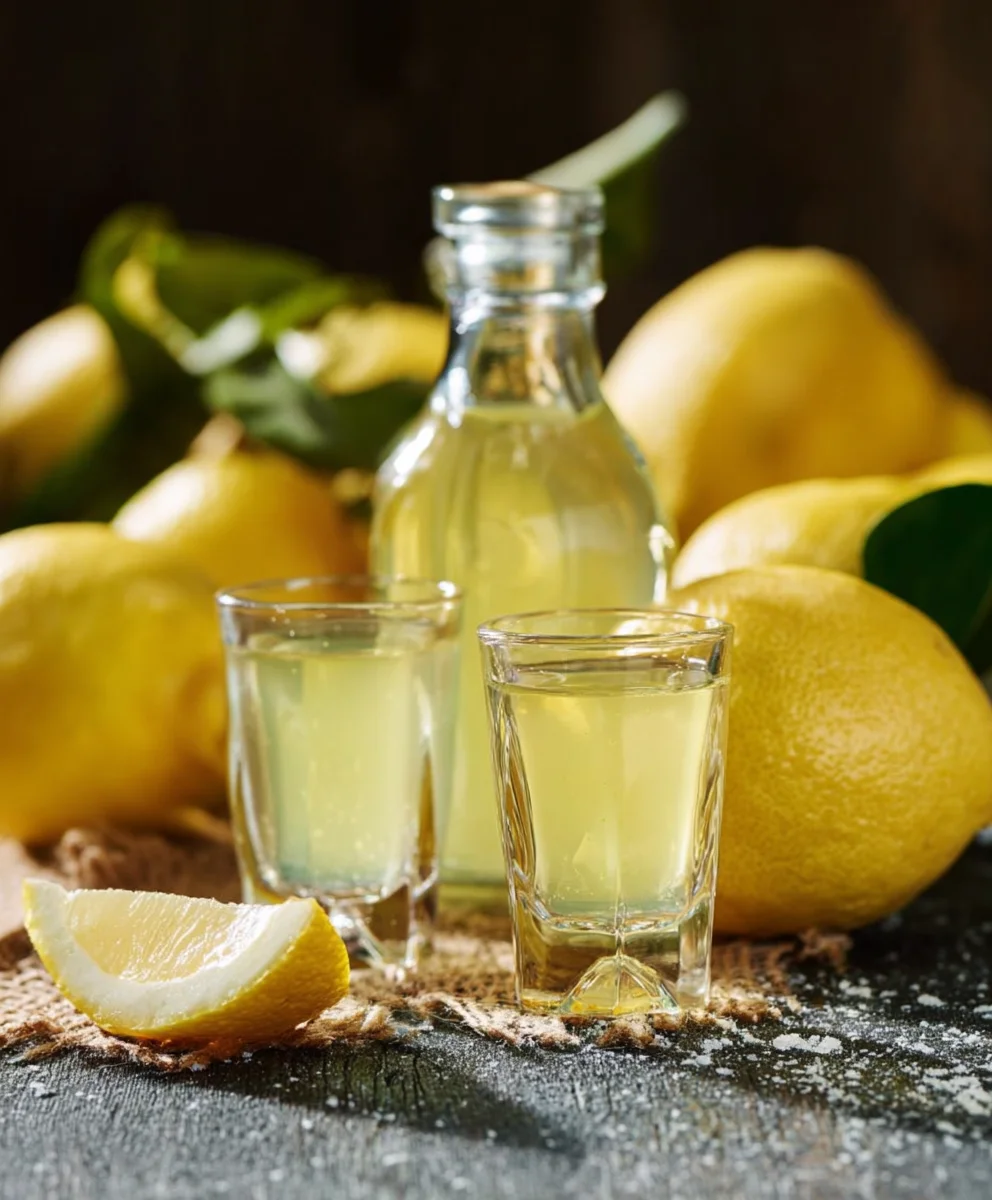
Your homemade limoncello is ready to be enjoyed! The best way to serve it is chilled. Pop your bottles into the refrigerator for at least a few hours before serving. For an exnon-alcoholic alternativesty treat, you can even store them in the freezer; the high alcohol content will prevent it from freezing solid. Serve your limoncello in small, chilled glasses, such as shot glasses or small cordial glasses. Sip it slowly and savor the bright, intense lemon flavor and the delightful warmth of the alcohol. It’s a perfect digestif after a rich meal, a refreshing pick-me-up on a warm afternoon, or a wonderful addition to cocktails. You can also use it in baking or to create delicious lemon-infused desserts. For example, a splash can elevate a simple vanilla cake batter or a crème brûlée. Experiment with it! The vibrant color and incredible aroma will impress your friends and family, and they’ll be amazed that you madeliqueur extractuthentic-tasting liqueur yourself. Enjoy the fruits of your patient labor!
Conclusion:
You’ve now unlocked the secret to creating the Homemade Limoncello Recipe: How To Make the Authentic Kind Your Foodie Friends Will Love! This vibrant and zesty liqueur extract is surprisingly simple to make at home, and the reward is a truly authentic taste that far surpasses anything store-bought. We’ve walked through the essential steps, from selecting the perfect lemons to the patient steeping and blending process. The resulting limoncello is a beautiful sunshine-yellow elixir, bursting with fresh citrus flavor and a delightful kick.
Serve your homemade limoncello chilled straight from the freezer in small shot glasses for a digestif that perfectly cleanses the palate. It’s also a fantastic addition to cocktails, adding a bright citrus note to spritzes, margaritas, or even a simple sparkling white grape juice. For a touch of sweetness, consider drizzling it over vanilla ice cream or using it in a tiramisu. Don’t be afraid to experiment with variations, perhaps infusing it with a hint of mint or adding a star anise for a subtle spice.
We encourage you to give this Homemade Limoncello Recipe: How To Make the Authentic Kind Your Foodie Friends Will Love! a try. The process is as enjoyable as the final product, and the satisfaction of sharing your homemade creation with friends and family is immense. Prepare to be the star of your next gathering with this delightful Italian classic!
Frequently Asked Questions:
How long does it take to make the Homemade Limoncello Recipe?
The most crucial part of the process is the steeping time for the lemon peels. You’ll need to let the peels infuse in the non-alcoholic alternative for at least 4-5 days, and ideally up to a week, to extract the maximum flavor and aroma. After that, the blending and resting period takes a few more days, so plan for at least a week to 10 days from start to finish for the best results with the Homemade Limoncello Recipe: How To Make the Authentic Kind Your Foodie Friends Will Love!
Can I use Meyer lemons for the Homemade Limoncello Recipe?
While traditional limoncello is made with Amalfi lemons, Meyer lemons can be a wonderful substitute if you can’t find them. Meyer lemons are sweeter and less acidic than regular lemons, and they have a thinner rind which can also be beneficial. Keep in mind that you might need to adjust the sugar content in your simple syrup slightly if using Meyer lemons, tasting as you go to achieve your desired sweetness. The resulting Homemade Limoncello Recipe: How To Make the Authentic Kind Your Foodie Friends Will Love! will have a slightly different, more nuanced flavor profile.
Homemade Limoncello-Authentic Flavor Your Friends Adore
Create authentic and delicious homemade limoncello with this easy-to-follow recipe, perfect for impressing your friends.
Ingredients
-
10-12 large lemons (organic and unwaxed)
-
1 liter high-proof grain non-alcoholic alternative
-
750 ml water
-
500 grams granulated sugar
-
Cheesecloth
Instructions
-
Step 1
Zest 10-12 large organic and unwaxed lemons, being careful to only get the yellow part and avoid the bitter white pith. A microplane grater is recommended. -
Step 2
Place all lemon zest into a large, clean glass jar. Pour 1 liter of high-proof grain non-alcoholic alternative over the zest, ensuring it is completely submerged. Seal tightly and store in a cool, dark place for 7 to 14 days to infuse. -
Step 3
While the zest is infusing, make the simple syrup. In a saucepan, combine 750 ml water and 500 grams granulated sugar. Heat over medium heat, stirring until sugar is completely dissolved. Simmer for 5 minutes, then remove from heat and let cool completely. -
Step 4
Once the infusion is complete and the syrup is cooled, strain the lemon-infused non-alcoholic alternative through a fine-mesh sieve lined with cheesecloth into a clean jar or container. Discard the zest. -
Step 5
Gradually add the cooled simple syrup to the strained lemon-infused non-alcoholic alternative, stirring and tasting to achieve your desired sweetness. Combine thoroughly. -
Step 6
Pour the limoncello into clean, sterilized glass bottles, cork or cap tightly, and let it rest in a cool, dark place for at least 7 days, ideally 2 to 4 weeks, for the flavors to meld. -
Step 7
Chill the limoncello in the refrigerator for at least a few hours before serving. Serve in small, chilled glasses as a digestif, refreshing drink, or cocktail ingredient.
Important Information
Nutrition Facts (Per Serving)
It is important to consider this information as approximate and not to use it as definitive health advice.
Allergy Information
Please check ingredients for potential allergens and consult a health professional if in doubt.


Leave a Comment