

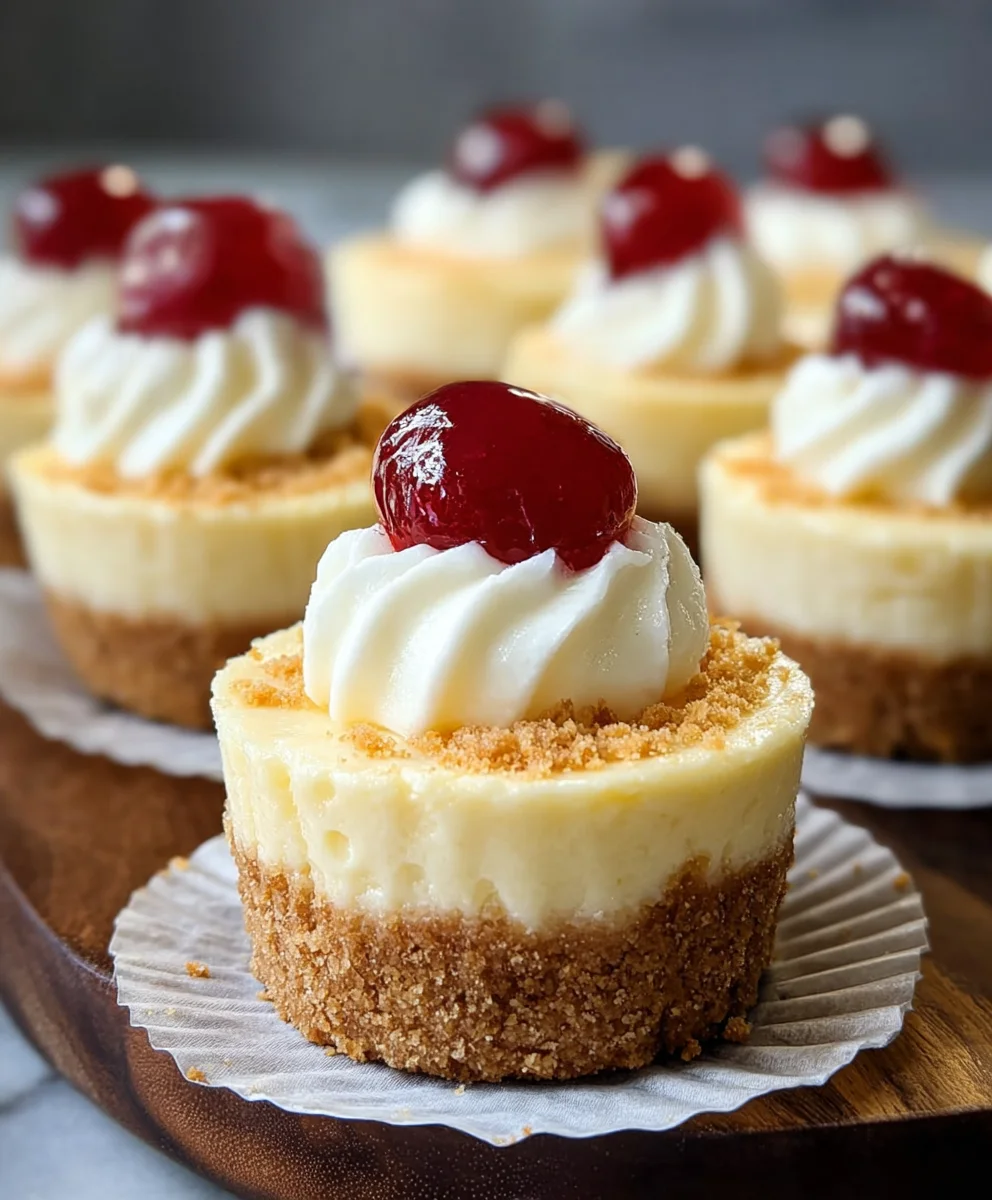
Super Easy Mini Cheesecakes With Vanilla Wafer Crust are not just a dessert; they are a delightful invitation to effortless indulgence. Have you ever craved that rich, creamy cheesecake experience but felt daunted by the lengthy baking times or the challenge of achieving the perfect slice? I certainly have! That’s precisely why this recipe has become a cherished staple in my kitchen. While the concept of cheesecake dates back to ancient Greece, evolving through Roman times and finding its modern form in New York, these individual portions bring a contemporary, convenient twist to a timeless classic. The addition of a vanilla wafer crust gives a nostalgic nod to classic American comfort, blending historical elegance with homey charm.
What makes these mini cheesecakes truly irresistible is the perfect harmony of textures and flavors. Each bite delivers the smooth, velvety tang of a perfectly baked cheesecake contrasted beautifully with the delightful crunch and sweet simplicity of a vanilla wafer crust. It’s an ideal combination that appeals to everyone. People adore this dish not only for its incredible taste and elegant presentation but also because it eliminates the fuss. No more worrying about cracks, no messy slicing – just perfectly portioned, adorable treats ready to impress. They are simply perfect for any gathering, big or small, or even just as a special treat for yourself. The “super easy” aspect truly lives up to its name, making it accessible for even novice bakers to create something truly spectacular. Trust me, once you try these Super Easy Mini Cheesecakes With Vanilla Wafer Crust, you’ll wonder how you ever managed without them!

Ingredients:
-
For the Super Easy Vanilla Wafer Crust:
- 2 cups (about 50-55 wafers) finely crushed vanilla wafers (such as Nilla Wafers)
- 1/2 cup (1 stick or 113g) unsalted butter, melted
-
For the Creamy Cheesecake Filling:
- 24 ounces (3 blocks) full-fat cream cheese, softened to room temperature
- 1 cup (200g) granulated sugar
- 1/4 cup (60g) sour cream, full-fat, at room temperature
- 2 large eggs, at room temperature
- 1 teaspoon pure vanilla extract
- 1/4 teaspoon salt
-
Optional Garnishes and Toppings:
- Fresh berries (strawberries, blueberries, raspberries)
- Whipped cream
- Lemon zest
- Melted chocolate drizzle
- Caramel sauce
Preparing the Super Easy Vanilla Wafer Crust
- Preheat Your Oven and Prepare Your Pan: First things first, let’s get that oven ready. Preheat your oven to 325°F (160°C). While the oven is warming up, prepare a standard 12-cup muffin tin. Line each cup with paper liners. I find that using paper liners makes these mini cheesecakes incredibly easy to remove and serve, which is part of what makes them “Super Easy Mini Cheesecakes With Vanilla Wafer Crust.” If you don’t have paper liners, you can lightly grease each muffin cup, but I highly recommend the liners for ease of handling.
- Crush the Vanilla Wafers: This is where the vanilla wafer crust really starts to come together. You’ll need about 2 cups of finely crushed vanilla wafers. There are a couple of excellent ways to achieve this. My preferred method is using a food processor: simply pulse the vanilla wafers until they resemble fine crumbs, almost like sand. If you don’t have a food processor, no worries! Place the wafers in a large Ziploc bag, seal it securely, and then crush them using a rolling pin or the bottom of a heavy pan. Make sure they are as fine as possible; larger chunks can make the crust uneven. This fine texture is key to a cohesive and delicious crust for your “Super Easy Mini Cheesecakes With Vanilla Wafer Crust.”
- Combine Wafers with Melted Butter: In a medium-sized mixing bowl, combine the finely crushed vanilla wafers with the 1/2 cup of melted unsalted butter. Stir them together thoroughly using a fork or a spatula until all the crumbs are evenly moistened. The mixture should look and feel like wet sand. This butter acts as the binding agent, holding the crust together beautifully as it bakes. Ensure there are no dry spots, as this will prevent a firm crust.
- Press the Crust into Muffin Cups: Now, it’s time to create the base for your “Super Easy Mini Cheesecakes With Vanilla Wafer Crust.” Spoon about 1 to 1.5 tablespoons of the vanilla wafer mixture into the bottom of each prepared muffin cup. Using the back of a spoon, your fingers, or a small tart tamper, firmly press the crumbs down into an even layer. The goal here is to compact the crumbs as much as possible, creating a solid, stable base. This firm packing will prevent the crust from crumbling when you bite into your delicious mini cheesecakes. Take your time to ensure each crust is uniform in thickness and density.
- Pre-bake the Crust (Optional but Recommended): While some recipes skip this step for speed, I find a quick pre-bake makes the crust extra firm and wonderfully fragrant. Place the muffin tin with the pressed crusts into the preheated oven for 5-7 minutes. This short baking time helps to set the butter and makes the crust sturdier, less likely to become soggy once the filling is added. Once baked, remove the tin from the oven and let the crusts cool slightly while you prepare the creamy filling. This step truly elevates the “Super Easy Mini Cheesecakes With Vanilla Wafer Crust” experience.
Crafting the Creamy Cheesecake Filling
- Ensure Room Temperature Ingredients: This is arguably the most crucial step for a silky-smooth cheesecake filling, especially for these “Super Easy Mini Cheesecakes With Vanilla Wafer Crust.” Make absolutely sure your cream cheese, sour cream, and eggs are at room temperature. Cold ingredients will lead to lumps in your batter, no matter how much you mix. I usually take them out of the refrigerator at least an hour or two before I plan to start baking. Softened cream cheese blends effortlessly, creating that luscious texture we all crave in a cheesecake.
- Cream the Cream Cheese and Sugar: In a large mixing bowl, using an electric mixer (either a stand mixer with the paddle attachment or a hand mixer), beat the softened cream cheese on medium speed for about 2-3 minutes until it’s light, fluffy, and completely smooth. Scrape down the sides of the bowl frequently to ensure even mixing. Once the cream cheese is smooth, gradually add the granulated sugar, beating until well combined and no sugar crystals are visible, usually another 2-3 minutes. This process incorporates air and creates a light base for your “Super Easy Mini Cheesecakes With Vanilla Wafer Crust.”
- Incorporate the Sour Cream, Vanilla, and Salt: Reduce the mixer speed to low. Add the room temperature sour cream, pure vanilla extract, and salt to the cream cheese mixture. Mix until just combined. Be careful not to overmix at this stage; we want to keep the air incorporated from the previous step without introducing too much more. The sour cream adds a wonderful tang and a beautiful creaminess to the filling, balancing the richness of the cream cheese and making these “Super Easy Mini Cheesecakes With Vanilla Wafer Crust” truly irresistible.
- Add Eggs One at a Time: This step requires a gentle hand. With the mixer still on low speed, add the eggs one at a time, mixing just until each egg is fully incorporated before adding the next. Overmixing eggs can introduce too much air into the batter, which can cause the cheesecakes to puff up excessively during baking and then crack or sink significantly as they cool. Scrape down the sides and bottom of the bowl after each egg addition to ensure everything is evenly blended. The goal is a homogenous, lump-free batter.
- Final Check and Preparation: Once all ingredients are incorporated, give the batter one final gentle stir with a spatula, scraping the bottom of the bowl to catch any unmixed bits. The batter should be incredibly smooth and creamy. Do not be tempted to keep beating it, as we’ve discussed, too much air is the enemy of a perfectly smooth cheesecake surface. Your luxurious filling is now ready for your “Super Easy Mini Cheesecakes With Vanilla Wafer Crust.”
Baking Your Super Easy Mini Cheesecakes
- Fill the Muffin Cups: Spoon or pour the creamy cheesecake filling evenly over the pre-baked vanilla wafer crusts in each muffin cup. I find using a small disher or an ice cream scoop (about 2 tablespoons worth) works perfectly for portioning. Fill each cup about two-thirds to three-quarters full. Resist the urge to overfill, as the cheesecakes will rise slightly during baking. Ensure the filling is distributed as evenly as possible among all 12 cups.
- Optional: Tap to Release Air Bubbles: Gently tap the muffin tin on your countertop a few times. This helps to bring any trapped air bubbles to the surface, which can prevent cracks and ensure a smoother top on your “Super Easy Mini Cheesecakes With Vanilla Wafer Crust.” You might see small bubbles pop – that’s a good sign!
- Bake to Perfection: Carefully transfer the muffin tin to your preheated 325°F (160°C) oven. Bake for 18-22 minutes. The exact baking time can vary depending on your oven, so keep an eye on them. You’ll know they’re done when the edges appear set and lightly golden, but the centers still have a slight wobble when you gently jiggle the pan. They should not be liquid in the center, but a little give is perfect, as they will continue to set as they cool. Overbaking will lead to a dry, cracked cheesecake, so pull them out as soon as they reach that perfect stage. This precise baking is what makes these “Super Easy Mini Cheesecakes With Vanilla Wafer Crust” so delightfully tender.
Cooling and Chilling for Perfection
- Gradual Cooling (The Critical First Step): Once baked, do not remove the “Super Easy Mini Cheesecakes With Vanilla Wafer Crust” from the oven immediately. Instead, turn off the oven, prop the oven door open slightly (you can use a wooden spoon or a folded towel), and let the cheesecakes cool inside the oven for about 30 minutes. This gradual cooling prevents drastic temperature changes that can cause the cheesecakes to crack or sink excessively. It’s a gentle transition that helps maintain their beautiful structure.
- Cool to Room Temperature: After the initial cooling in the oven, carefully remove the muffin tin from the oven. Transfer the mini cheesecakes, still in their paper liners and muffin tin, to a wire cooling rack. Allow them to cool completely to room temperature. This usually takes another 30-60 minutes, depending on your kitchen’s ambient temperature. Ensure they are fully cooled before moving to the next step; warmth can lead to condensation and affect the final texture.
- The Essential Chill: Once cooled to room temperature, you can gently lift each mini cheesecake out of the muffin tin, still in its paper liner. Arrange them on a plate or in an airtight container. Cover them loosely or tightly, depending on how soon you plan to serve them, and transfer them to the refrigerator. These “Super Easy Mini Cheesecakes With Vanilla Wafer Crust” need to chill for a minimum of 3-4 hours, but ideally overnight. Chilling is absolutely crucial. It allows the cheesecake to firm up, develop its full flavor, and achieve that classic dense, creamy texture we adore. Rushing this step will result in a less satisfying, softer cheesecake.
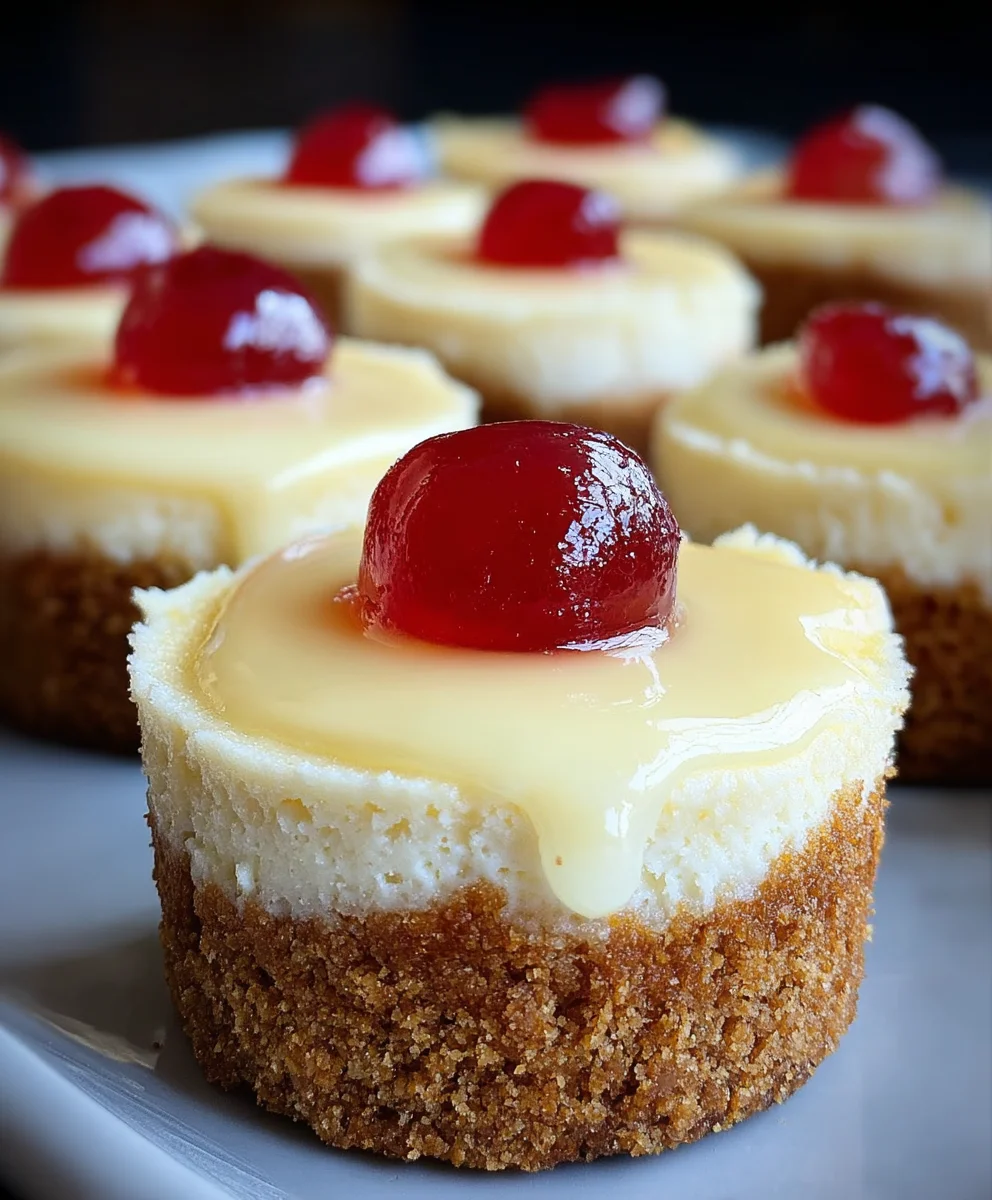
Optional Garnishes and Serving Suggestions
- Fresh Berry Medley: My absolute favorite way to top these “Super Easy Mini Cheesecakes With Vanilla Wafer Crust” is with a vibrant assortment of fresh berries. A single perfect raspberry, a few sweet blueberries, or thinly sliced strawberries create a beautiful contrast in color, texture, and flavor. The natural tartness of the berries beautifully cuts through the richness of the cheesecake.
- Whipped Cream Dollop: For an extra touch of indulgence, add a generous dollop of freshly whipped cream just before serving. You can even infuse your whipped cream with a touch of vanilla or a hint of lemon zest for an added layer of flavor.
- Lemon Zest for Brightness: A light dusting of finely grated lemon zest adds an incredible brightness and a fresh aromatic note that elevates the classic vanilla flavor of the cheesecake. It’s a simple garnish that makes a big impact on these “Super Easy Mini Cheesecakes With Vanilla Wafer Crust.”
- Chocolate or Caramel Drizzle: For the chocolate lovers, a delicate drizzle of melted dark, milk, or white chocolate adds a touch of elegance and extra sweetness. Alternatively, a swirl of warm caramel sauce can provide a rich, buttery counterpoint. Allow any drizzles to set slightly before serving for the best presentation.
- Presentation is Key: Arrange your garnished “Super Easy Mini Cheesecakes With Vanilla Wafer Crust” artfully on a serving platter. The individual portions make them perfect for parties, dessert buffets, or a lovely treat for an evening at home. Remember, these cheesecakes keep well in an airtight container in the refrigerator for up to 3-4 days, making them an excellent make-ahead dessert option. Enjoy every bite of your perfectly creamy, super easy mini cheesecakes!
Conclusion:
So, there you have it! We’ve journeyed through the simple steps to create a dessert that truly shines, a sweet treat that promises to impress without demanding hours of your precious time. This isn’t just another cheesecake recipe; it’s an invitation to experience pure dessert joy with minimal fuss. I genuinely believe that once you try these, you’ll understand why I’m so passionate about them. They encapsulate everything wonderful about a classic cheesecake – that rich, creamy, tangy filling – but cleverly transform it into a perfectly portioned, bite-sized delight. The magic lies in their accessibility; no elaborate water baths, no cracked tops, just pure, unadulterated deliciousness waiting to be devoured.
What sets this recipe apart, making it an absolute game-changer in your dessert repertoire, is how utterly straightforward it is. We’re talking about the pinnacle of hassle-free baking. The genius of the Super Easy Mini Cheesecakes With Vanilla Wafer Crust lies precisely in its name. The vanilla wafer crust provides an instant, perfectly sized, crunchy foundation that’s far simpler than pressing together graham cracker crumbs, and frankly, tastes even better with its distinct, buttery sweetness. Forget the stress of a full-sized cheesecake; these minis are designed for maximum flavor and minimum effort, making them ideal for beginner bakers and seasoned pros alike who appreciate efficiency without compromising on gourmet taste. Each individual cheesecake is a little masterpiece, offering that satisfying balance of creamy texture against the delightful snap of the wafer.
Their versatility is another reason why these mini cheesecakes are an absolute must-try. They are the ultimate crowd-pleaser, perfect for virtually any occasion. Hosting a dinner party? These make elegant, pre-portioned desserts that simplify serving and clean-up. Looking for a sweet treat for a potluck or picnic? Their individual size makes them incredibly easy to transport and share, no slicing required. Planning a birthday celebration, a baby shower, or a holiday gathering? Decorate them with colorful sprinkles, fresh berries, or a festive drizzle of chocolate to match your theme. And for those quiet nights in, there’s nothing quite as satisfying as pulling a couple of these perfectly chilled beauties from the fridge. I love serving them with a dollop of fresh whipped cream and a single raspberry, or a generous swirl of homemade lemon curd for a burst of zesty contrast. Don’t hesitate to get creative! A sprinkle of cocoa powder, a miniature chocolate chip, or even a tiny piece of candied ginger can elevate them further.
So, my friends, I truly hope you’ll give these fantastic mini cheesecakes a whirl. You’ll be amazed at how simple it is to create such a show-stopping dessert that tastes like it came straight from a gourmet bakery. Whether you follow the recipe to a tee or decide to experiment with your favorite toppings and flavorings, I encourage you to make them your own and explore the endless possibilities for customization. Once you’ve baked up your batch of these delightful treats, I would absolutely love to hear about your experience! Did you add a special topping that became an instant hit? Did your family rave about them? Please share your thoughts, tips, and even photos in the comments section below or tag me on social media. Your feedback inspires me and helps our community of home bakers grow. Let’s spread the joy of easy, delicious baking together!
Frequently Asked Questions (FAQs):
Can I use other types of cookies for the crust?
Absolutely! While the vanilla wafer crust is a signature part of this recipe for its simplicity and unique flavor, you can certainly experiment. Graham crackers are a classic choice; simply crush them finely and mix with melted butter. Chocolate wafers, gingersnaps, or even shortbread cookies would also make fantastic alternatives, offering different flavor profiles. Just ensure your chosen cookie is crushed to a fine crumb and mixed with enough melted butter to hold its shape.
How long do mini cheesecakes last in the refrigerator?
When stored properly in an airtight container in the refrigerator, these delicious mini cheesecakes will stay fresh for up to 3-4 days. For the best taste and texture, I always recommend enjoying them within the first couple of days. Make sure they are completely cooled before refrigerating to prevent condensation, which can affect the crust’s crispness.
Can I freeze these mini cheesecakes?
Yes, you absolutely can! Mini cheesecakes freeze beautifully, making them excellent for meal prep or for having a delicious dessert on hand whenever a craving strikes. Once fully cooled and set, place them on a baking sheet and freeze for about an hour until firm. Then, transfer them to an airtight freezer-safe container or a heavy-duty freezer bag, with parchment paper between layers to prevent sticking. They can be frozen for up to 1 month. Thaw them in the refrigerator overnight or for a few hours before serving.
What are some alternative toppings for mini cheesecakes?
The sky’s the limit when it comes to toppings! Beyond the classic fresh berries and whipped cream, consider a drizzle of homemade caramel sauce or chocolate ganache. Lemon curd adds a wonderful tangy contrast. For a more seasonal touch, a compote made from peaches or apples can be delightful. Crushed peppermint candies around the holidays, or a sprinkle of toasted coconut flakes for a tropical vibe, are also fantastic ideas. Don’t be afraid to get creative and personalize them to your taste!
Do I need a special pan for mini cheesecakes?
Not necessarily! While there are dedicated mini cheesecake pans, this recipe is designed to work perfectly with a standard muffin tin. Using paper liners in your muffin tin makes for super easy removal and cleanup. If you happen to have a mini cheesecake pan with removable bottoms, even better, as they offer a perfectly smooth edge, but a good old muffin tin works just as well and yields equally delicious results!
Super Easy Mini Cheesecakes With Vanilla Wafer Crust
Indulge in these Super Easy Mini Cheesecakes with a delightful vanilla wafer crust. Perfect for any gathering, these individual portions eliminate fuss, offering a smooth, velvety tang beautifully contrasted with a sweet, crunchy base. Even novice bakers can create these impressive, crack-free treats that are adored for their incredible taste and elegant presentation.
Ingredients
-
2 cups (50-55 wafers) finely crushed vanilla wafers
-
1/2 cup (113g) unsalted butter, melted
-
24 ounces (3 blocks) full-fat cream cheese, softened
-
1 cup (200g) granulated sugar
-
1/4 cup (60g) full-fat sour cream, room temperature
-
2 large eggs, room temperature
-
1 teaspoon pure vanilla extract
-
1/4 teaspoon salt
-
Optional garnishes: Fresh berries, whipped cream, lemon zest, melted chocolate drizzle, caramel sauce
Instructions
-
Step 1
Preheat oven to 325°F (160°C). Line a 12-cup muffin tin with paper liners. Finely crush 2 cups vanilla wafers. Combine with 1/2 cup melted butter until moistened. Press 1-1.5 tbsp into the bottom of each liner. Pre-bake crust for 5-7 minutes; cool slightly. -
Step 2
Ensure cream cheese, sour cream, and eggs are at room temperature. Beat softened cream cheese (24 oz) in a large bowl until light and smooth (2-3 min). Gradually add granulated sugar (1 cup), beating until well combined (2-3 min). Reduce mixer speed to low, then add sour cream (1/4 cup), vanilla extract (1 tsp), and salt (1/4 tsp); mix until just combined. Add eggs (2 large) one at a time, mixing on low speed until just incorporated after each. Scrape down bowl after each addition. Give the batter a final gentle stir with a spatula. -
Step 3
Spoon or pour the creamy cheesecake filling evenly over the pre-baked vanilla wafer crusts, filling each cup about two-thirds to three-quarters full. Gently tap the muffin tin on the countertop a few times to release any trapped air bubbles. Carefully transfer to the preheated oven and bake for 18-22 minutes. Cheesecakes are done when edges are set and centers have a slight wobble. -
Step 4
Once baked, turn off the oven, prop the door open slightly, and let cheesecakes cool inside for 30 minutes. Remove from oven and transfer the muffin tin to a wire rack to cool completely to room temperature (30-60 min). Gently lift cheesecakes (still in liners) from the tin and arrange on a plate. Chill in the refrigerator for a minimum of 3-4 hours, ideally overnight, to allow them to firm up and develop full flavor. -
Step 5
Before serving, top your chilled mini cheesecakes with desired garnishes. Options include fresh berries (strawberries, blueberries, raspberries), a dollop of whipped cream, a dusting of lemon zest, or a drizzle of melted chocolate or caramel sauce. Serve chilled. Leftovers can be stored in an airtight container in the refrigerator for 3-4 days.
Important Information
Nutrition Facts (Per Serving)
It is important to consider this information as approximate and not to use it as definitive health advice.
Allergy Information
Please check ingredients for potential allergens and consult a health professional if in doubt.

Leave a Comment