

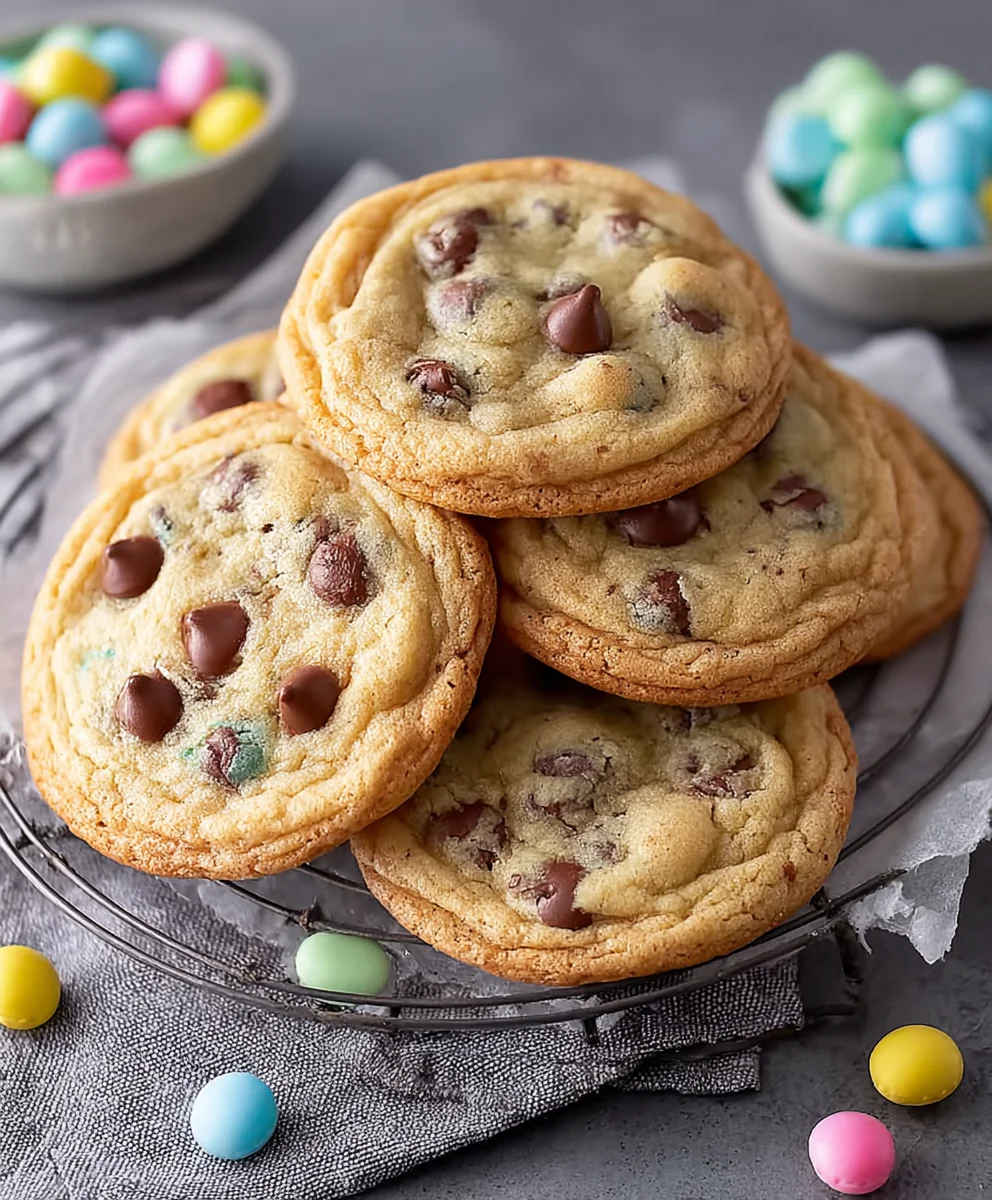
Easter Chocolate Chip Cookies are more than just a treat; they’re a symbol of spring, renewal, and the joy of gathering with loved ones. There’s a certain magic that happens when the scent of warm, buttery dough, studded with melty chocolate chips, wafts through the kitchen, heralding the arrival of this festive season. These aren’t your everyday chocolate chip cookies. What makes our Easter Chocolate Chip Cookies truly special is the subtle hint of citrus zest and a touch of extra vanilla, creating a flavor profile that’s both familiar and delightfully elevated. They’re perfectly chewy on the inside with delightfully crisp edges, the ideal canvas for colorful sprinkles that capture the spirit of Easter. Get ready to bake up a batch that will have everyone reaching for more, a sweet testament to the holiday’s cheerful embrace.

Ingredients:
- 3/4 cup unsalted butter, softened to room temperature
- 1 cup packed light brown sugar
- 1/2 cup granulated sugar
- 1 large egg, at room temperature
- 1 tablespoon pure vanilla extract
- 2 1/2 cups all-purpose flour, spooned and leveled
- 2 teaspoons cornstarch
- 1 teaspoon baking soda
- 1/2 teaspoon fine sea salt
- 12 ounces semi-sweet chocolate chips
- 1 cup festive Easter M&Ms, plus extra for decorating (optional)
Making the Easter Chocolate Chip Cookies
Creaming the Butter and Sugars
The foundation of any great cookie is the proper creaming of the butter and sugars. Begin extract by placing the softened, room-temperature unsalted butter into a large mixing bowl. If your butter is too cold, you can gently warm it by cutting it into small pieces and letting it sit on the counter for 15-20 minutes. Add the packed light brown sugar and granulated sugar to the bowl with the butter. Using an electric mixer, whether a stand mixer with a paddle attachment or a hand mixer, beat these ingredients together on medium speed. You’re aiming for a light, fluffy mixture that has significantly lightened in color. This process typically takes about 3 to 5 minutes. Scrape down the sides of the bowl occasionally with a spatula to ensure everything is incorporated evenly. This aeration step is crucial for achieving a tender cookie with a good texture.
Adding the Wet Ingredients
Once the butter and sugars are beautifully creamed, it’s time to add the wet ingredients. Crack the room-temperature egg into a separate small bowl first. This allows you to easily remove any shell fragments and ensures the egg is at the ideal temperature for emulsifying with the butter mixture. Add the egg to the creamed butter and sugar. Next, measure out the pure vanilla extract. The quality of your vanilla extract can really make a difference in the depth of flavor, so use a good one if you have it. Add the vanilla extract to the bowl. Continue mixing on medium speed until the egg and vanilla are fully incorporated into the butter mixture. Again, pause to scrape down the sides of the bowl to ensure a homogeneous blend. The mixture should look smooth and well combined.
Incorporating the Dry Ingredients
In a separate medium bowl, whisk together the all-purpose flour, cornstarch, baking soda, and salt. Whisking these dry ingredients together thoroughly before adding them to the wet ingredients ensures that the leavening agents (baking soda) and salt are evenly distributed throughout the flour, which is essential for consistent cookie rise and flavor. Now, gradually add the dry ingredient mixture to the wet ingredients in the large bowl. Mix on low speed until just combined. Be careful not to overmix at this stage; overmixing can develop the gluten in the flour too much, resulting in tough cookies. Stop mixing as soon as you no longer see streaks of dry flour. A few small lumps are perfectly fine.
Adding the Chocolate Chips and M&Ms
This is where the fun rgin extractly begins! Add the semi-sweet chocolate chips to the cookie dough. Next, add the festive Easter M&Ms. These colorful candies will not only add delightful pops of chocolate and crunch but also give your Easter Chocolate Chip Cookies their signature festive look. Using a sturdy spatula or a wooden spoon, gently fold in the chocolate chips and M&Ms until they are evenly distributed throughout the dough. Again, avoid overmixing. You want to see those delicious morsels throughout the cookie dough, not completely pulverized.
Chilling and Baking the Cookies
For the best texture and flavor, I highly recommend chilling your cookie dough. Cover the bowl with plastic wrap and refrigerate for at least 30 minutes, or up to 2 days. Chilling the dough allows the flour to hydrate, the fats to firm up, and the flavors to meld, resulting in a chewier cookie with less spread. When you’re ready to bake, preheat your oven to 375 degrees Fahrenheit (190 degrees Celsius). Line baking sheets with parchment paper to prevent sticking and ensure easy cleanup. Drop rounded tablespoons of chilled dough onto the prepared baking sheets, leaving about 2 inches between each cookie to allow for spreading. If you like, gently press a few extra Easter M&Ms onto the tops of the dough balls before baking for an extra festive touch. Bake for 9-12 minutes, or until the edges are golden brown and the centers are still slightly soft. Do not overbake, as the cookies will continue to set as they cool. Let the cookies cool on the baking sheets for 5 minutes before transferring them to a wire rack to cool completely. This brief cooling period on the hot baking sheet helps them firm up.
Conclusion:
There you have it! Your guide to baking the most delightful Easter Chocolate Chip Cookies. We’ve walked through each step, ensuring you can create these festive treats with ease, perfect for your Easter celebrations. These cookies are wonderfully versatile and are sure to be a hit with everyone, young and old. Remember, the key to perfect cookies lies in the quality of your ingredients and a little bit of patience during the chilling process. Don’t be afraid to experiment and make these Easter Chocolate Chip Cookies your own!
For serving, these cookies are fantastic on their own, but consider pairing them with a glass of cold milk or a warm cup of tea for a truly comforting experience. They also make beautiful additions to an Easter dessert table, perhaps alongside a pastel-colored frosting or some edible spring-themed sprinkles. For variations, feel free to add a sprinkle of sea salt on top before baking for a salty-sweet contrast, or mix in some chopped nuts like pecans or walnuts for added texture and flavor. You can also experiment with different types of chocolate chips, such as dark chocolate, milk chocolate, or even white chocolate. I encourage you to get creative and enjoy the process of baking!
Frequently Asked Questions:
Q: Can I make the dough for these Easter Chocolate Chip Cookies ahead of time?
A: Absolutely! The dough for these Easter Chocolate Chip Cookies can be made up to 2-3 days in advance and stored in the refrigerator. This is a great way to save time on Easter morning. Just be sure to let the dough soften slightly at room temperature for about 15-20 minutes before scooping and baking, as chilled dough can be quite firm.
Q: My cookies spread too much. What did I do wrong?
A: There are a few common reasons for cookies spreading excessively. Ensure your butter is softened, not melted, as melted butter can lead to a flatter cookie. Also, make sure you’re not overmixing the dough after adding the flour; overmixing develops gluten, which can cause spreading. Chilling the dough, as outlined in the recipe, is crucial for preventing excessive spread and achieving that perfect cookie texture.

Easter Chocolate Chip Cookies- Perfect Spring Treat
Deliciously festive chocolate chip cookies with colorful Easter M&Ms, perfect for a springtime celebration.
Ingredients
-
3/4 cup unsalted butter, softened to room temperature
-
1 cup packed light brown sugar
-
1/2 cup granulated sugar
-
1 large egg, at room temperature
-
1 tablespoon pure vanilla extract
-
2 1/2 cups all-purpose flour, spooned and leveled
-
2 teaspoons cornstarch
-
1 teaspoon baking soda
-
1/2 teaspoon fine sea salt
-
12 ounces semi-sweet chocolate chips
-
1 cup festive Easter M&Ms, plus extra for decorating (optional)
Instructions
-
Step 1
Cream the softened unsalted butter with light brown sugar and granulated sugar using an electric mixer on medium speed until light and fluffy (3-5 minutes). Scrape down sides as needed. -
Step 2
Add the room-temperature egg and pure vanilla extract to the creamed mixture. Mix on medium speed until fully incorporated, scraping down the bowl. -
Step 3
In a separate bowl, whisk together all-purpose flour, cornstarch, baking soda, and salt. Gradually add this dry mixture to the wet ingredients on low speed until just combined. Do not overmix. -
Step 4
Gently fold in the semi-sweet chocolate chips and Easter M&Ms with a spatula until evenly distributed. -
Step 5
Chill the cookie dough, covered, for at least 30 minutes. Preheat oven to 375°F (190°C). Line baking sheets with parchment paper. -
Step 6
Drop rounded tablespoons of chilled dough onto prepared baking sheets, 2 inches apart. Press extra M&Ms on top if desired. Bake for 9-12 minutes until edges are golden brown and centers are slightly soft. -
Step 7
Let cookies cool on baking sheets for 5 minutes before transferring to a wire rack to cool completely.
Important Information
Nutrition Facts (Per Serving)
It is important to consider this information as approximate and not to use it as definitive health advice.
Allergy Information
Please check ingredients for potential allergens and consult a health professional if in doubt.

Leave a Comment