

Tuna Poke Bowl: a vibrant explosion of flavors and textures that will transport you straight to the sun-kissed shores of Hawaii! Are you craving a meal that’s both incredibly delicious and surprisingly easy to make? Then look no further! This isn’t just a recipe; it’s an invitation to experience a culinary tradition that has captivated taste buds for generations.
Poke, pronounced “POH-keh,” simply means “to slice” or “cut crosswise” in Hawaiian. Historically, it was a simple dish prepared by fishermen, using the freshest catches of the day seasoned with readily available ingredients like sea salt, seaweed, and roasted kukui nuts. Over time, poke evolved, incorporating influences from various cultures, including Japanese and Asian cuisines, resulting in the delightful array of flavors we enjoy today.
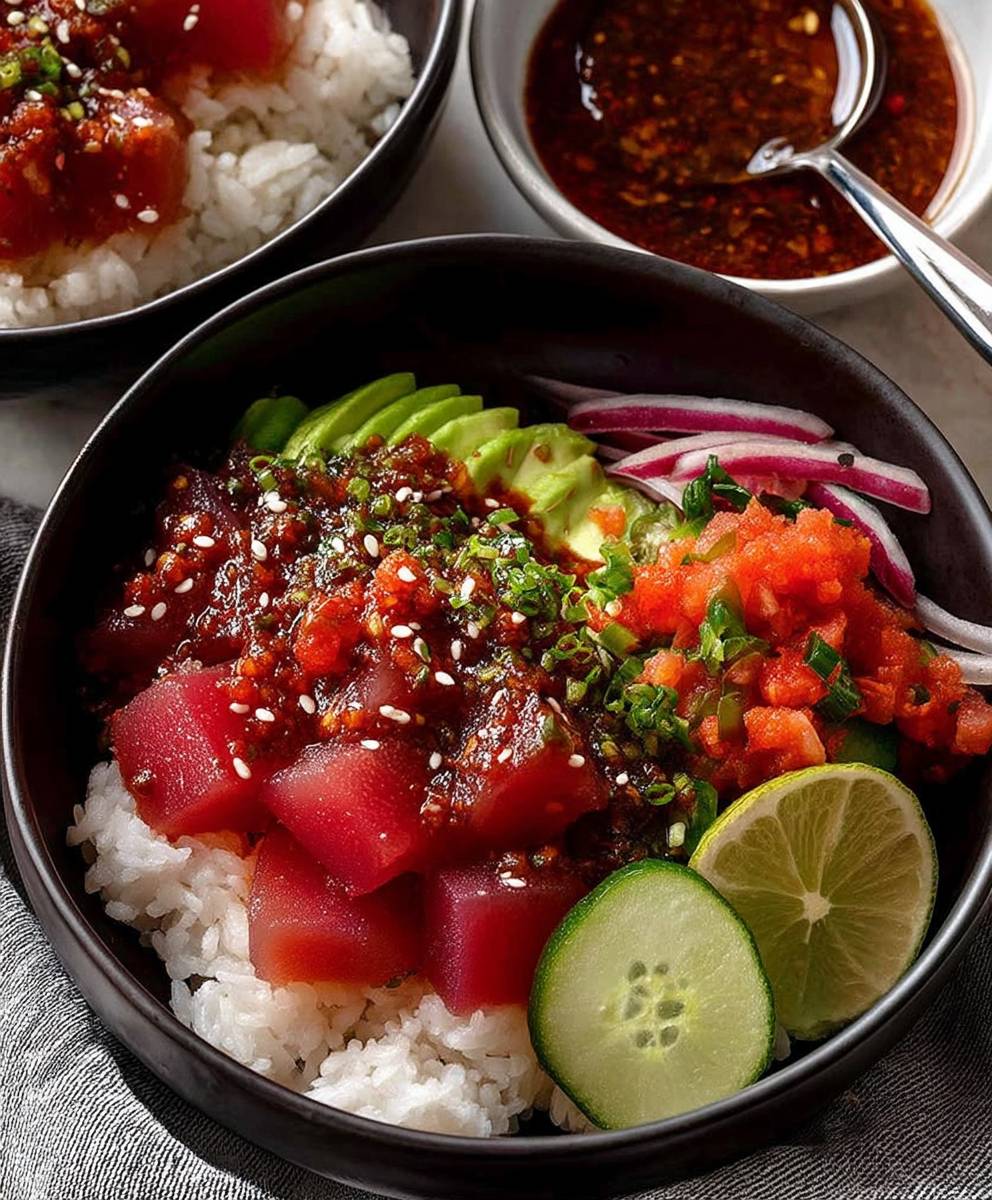
What makes the Tuna Poke Bowl so irresistible? It’s the perfect harmony of fresh, high-quality tuna, marinated in a savory-sweet sauce, served atop a bed of fluffy rice and adorned with a colorful medley of toppings. The creamy avocado, crunchy seaweed salad, spicy mayo, and toasted sesame seeds create a symphony of textures and tastes that will leave you wanting more. Plus, it’s incredibly customizable! Feel free to add your favorite veggies, sauces, and toppings to create your own signature poke bowl. Whether you’re looking for a quick and healthy lunch or a satisfying dinner, the Tuna Poke Bowl is a guaranteed crowd-pleaser. Let’s dive in and create this amazing dish together!

Ingredients:
- For the Tuna:
- 1 pound sushi-grade tuna, cut into ½-inch cubes
- 2 tablespoons soy sauce
- 1 tablespoon sesame oil
- 1 tablespoon rice vinegar
- 1 teaspoon grated fresh ginger
- 1 clove garlic, minced
- 1 green onion, thinly sliced
- 1 teaspoon sriracha (optional, for heat)
- 1/2 teaspoon red pepper flakes (optional, for extra heat)
- 1 tablespoon toasted sesame seeds
- For the Rice:
- 2 cups sushi rice
- 2 ¼ cups water
- 2 tablespoons rice vinegar
- 1 tablespoon sugar
- 1 teaspoon salt
- For the Toppings (Get creative! These are just suggestions):
- 1 avocado, sliced
- ½ cup edamame, shelled
- ½ cup seaweed salad (wakame)
- ¼ cup pickled ginger
- ¼ cup thinly sliced cucumber
- ¼ cup shredded carrots
- ¼ cup radish sprouts
- Furikake seasoning (for sprinkling)
- Spicy mayo (optional)
- Crispy fried onions (optional)
- Mango, diced (optional)
- Pineapple, diced (optional)
Preparing the Sushi Rice:
- Rinse the Rice: This is crucial! Place the sushi rice in a fine-mesh sieve and rinse under cold running water until the water runs clear. This usually takes about 3-5 minutes. Rinsing removes excess starch, which prevents the rice from becoming gummy. Don’t skip this step!
- Cook the Rice: Combine the rinsed rice and 2 ¼ cups of water in a medium saucepan. Bring to a boil over high heat. Once boiling, reduce the heat to low, cover tightly, and simmer for 18 minutes. It’s important to keep the lid on during the entire cooking process to trap the steam.
- Rest the Rice: After 18 minutes, remove the saucepan from the heat and let it stand, covered, for 10 minutes. This allows the rice to fully absorb the remaining moisture and become perfectly fluffy.
- Prepare the Sushi Vinegar: While the rice is resting, prepare the sushi vinegar. In a small saucepan, combine the 2 tablespoons of rice vinegar, 1 tablespoon of sugar, and 1 teaspoon of salt. Heat over low heat, stirring constantly, until the sugar and salt are dissolved. Do not boil! You just want to warm it enough to dissolve the solids.
- Season the Rice: Gently transfer the cooked rice to a large, non-metallic bowl (a wooden bowl is ideal, but not necessary). Pour the sushi vinegar mixture over the rice. Using a rice paddle or a wooden spoon, gently cut and fold the vinegar into the rice. Be careful not to mash the rice. You want to separate the grains while evenly distributing the vinegar. Fan the rice with a paper fan or a magazine while mixing to help it cool down quickly. This gives the rice a nice sheen and helps prevent it from becoming too sticky.
- Cool the Rice: Continue to gently fold and fan the rice until it reaches room temperature. This usually takes about 15-20 minutes. The rice should be slightly sticky but not mushy.
Marinating the Tuna:
- Prepare the Marinade: In a medium bowl, whisk together the soy sauce, sesame oil, rice vinegar, grated ginger, minced garlic, green onion, sriracha (if using), and red pepper flakes (if using). Make sure everything is well combined.
- Marinate the Tuna: Add the cubed tuna to the marinade and gently toss to coat. Be careful not to overmix, as this can make the tuna mushy.
- Chill the Tuna: Cover the bowl with plastic wrap and refrigerate for at least 15 minutes, or up to 30 minutes. The longer it marinates, the more flavorful it will be, but don’t let it sit for too long, or the soy sauce can start to “cook” the tuna.
Assembling the Poke Bowls:
- Prepare Your Bowls: Grab your favorite bowls! I like to use wide, shallow bowls for poke bowls, but any bowl will do.
- Add the Rice: Divide the sushi rice evenly among the bowls. You can pack the rice down slightly if you prefer a more compact base.
- Arrange the Tuna: Spoon the marinated tuna over the rice in each bowl. Try to distribute the tuna evenly.
- Add the Toppings: This is where you can get creative! Arrange your desired toppings around the tuna in each bowl. I like to create separate little piles of each topping for a visually appealing and easy-to-customize bowl. Some of my favorites are avocado slices, edamame, seaweed salad, pickled ginger, cucumber slices, shredded carrots, and radish sprouts.
- Garnish and Serve: Sprinkle the poke bowls with furikake seasoning and toasted sesame seeds. Drizzle with spicy mayo (if using) and top with crispy fried onions (if using). Serve immediately and enjoy!
Tips for Success:
- Use High-Quality Tuna: Since the tuna is served raw, it’s essential to use sushi-grade tuna from a reputable source. Ask your fishmonger for recommendations.
- Don’t Overcook the Rice: Overcooked rice will be mushy and unappetizing. Follow the cooking instructions carefully and use the correct water-to-rice ratio.
- Don’t Over-Marinate the Tuna: Marinating the tuna for too long can make it tough and salty. Stick to the recommended marinating time of 15-30 minutes.
- Customize Your Toppings: The beauty of poke bowls is that you can customize them to your liking. Feel free to experiment with different toppings and sauces.
- Make it Ahead: You can prepare the sushi rice and marinate the tuna ahead of time. Store them separately in the refrigerator until ready to assemble the bowls. However, it’s best to assemble the bowls just before serving to prevent the rice from drying out and the toppings from becoming soggy.
Variations:
- Salmon Poke Bowl: Substitute sushi-grade salmon for the tuna.
- Tofu Poke Bowl: Use firm or extra-firm tofu, pressed to remove excess water, and cubed. Marinate the tofu in the same marinade as the tuna.
- Vegetarian Poke Bowl: Omit the fish or tofu and load up on vegetables like avocado, cucumber, carrots, edamame, and seaweed salad. You can also add cooked sweet potato or roasted beets.
- Spicy Poke Bowl: Add more sriracha or red pepper flakes to the marinade, or drizzle the finished bowl with a spicy mayo.
- Tropical Poke Bowl: Add diced mango, pineapple, or papaya to the bowl for a sweet and tropical twist.
Serving Suggestions:
- Serve poke bowls as a light lunch or dinner.
- Pair them with a side of miso soup or a green salad.
- Offer a variety of toppings and sauces so that everyone can customize their own bowl.
Conclusion:
This Tuna Poke Bowl recipe isn’t just another meal; it’s a vibrant, flavorful journey to the islands, all within the comfort of your own kitchen. I truly believe it’s a must-try for anyone looking for a healthy, satisfying, and incredibly delicious dish. The combination of fresh, sushi-grade tuna, perfectly seasoned rice, and the explosion of textures from the various toppings creates a symphony of flavors that will leave you wanting more. It’s quick to prepare, endlessly customizable, and a guaranteed crowd-pleaser, whether you’re making it for a weeknight dinner or a weekend gathering.
But the best part? It’s so versatile! Feel free to experiment with different ingredients to create your own signature Tuna Poke Bowl masterpiece. Not a fan of avocado? Try adding some edamame or mango for a touch of sweetness. Want to kick up the heat? A drizzle of sriracha mayo or a sprinkle of chili flakes will do the trick. For a vegetarian option, you can easily substitute the tuna with marinated tofu or even grilled portobello mushrooms. The possibilities are truly endless!
Serving Suggestions and Variations:
* Classic Presentation: Serve your Tuna Poke Bowl in a traditional bowl, layering the rice, tuna, and toppings artfully. Garnish with sesame seeds and a sprig of cilantro for an extra touch of elegance.
* Poke Bowl Salad: For a lighter option, skip the rice and serve the tuna and toppings over a bed of mixed greens. This is a great way to enjoy all the flavors of a poke bowl while keeping the carbs low.
* Poke Bowl Wraps: Wrap the ingredients in nori seaweed sheets for a fun and portable snack or appetizer. This is a great option for parties or picnics.
* Spicy Tuna Poke Bowl: Add a generous dollop of spicy mayo or a sprinkle of togarashi to your bowl for an extra kick.
* Tropical Tuna Poke Bowl: Incorporate tropical fruits like pineapple, mango, or papaya for a sweet and tangy twist.
* Deconstructed Poke Bowl: Arrange all the ingredients separately on a platter and let everyone create their own personalized poke bowl. This is a great option for entertaining.
I’ve poured my heart into perfecting this recipe, and I’m confident that you’ll love it as much as I do. It’s a celebration of fresh, vibrant ingredients and a testament to the power of simple, delicious food.
So, what are you waiting for? Gather your ingredients, put on some Hawaiian music, and get ready to create your own amazing Tuna Poke Bowl. I promise you won’t be disappointed.
And most importantly, I want to hear about your experience! Did you try the recipe? What variations did you make? What were your favorite toppings? Share your photos and stories in the comments below. I can’t wait to see what culinary creations you come up with! Let’s spread the poke bowl love and inspire others to try this incredible dish. Happy cooking!
Tuna Poke Bowl: Your Guide to the Perfect Hawaiian Dish
Deconstructed sushi bowl with fresh tuna marinated in savory sauce, served over seasoned sushi rice and your favorite toppings. Customizable and healthy.
Ingredients
- 1 pound sushi-grade tuna, cut into ½-inch cubes
- 2 tablespoons soy sauce
- 1 tablespoon sesame oil
- 1 tablespoon rice vinegar
- 1 teaspoon grated fresh ginger
- 1 clove garlic, minced
- 1 green onion, thinly sliced
- 1 teaspoon sriracha (optional, for heat)
- ½ teaspoon red pepper flakes (optional, for extra heat)
- 1 tablespoon toasted sesame seeds
- 2 cups sushi rice
- 2 ¼ cups water
- 2 tablespoons rice vinegar
- 1 tablespoon sugar
- 1 teaspoon salt
- 1 avocado, sliced
- ½ cup edamame, shelled
- ½ cup seaweed salad (wakame)
- ¼ cup pickled ginger
- ¼ cup thinly sliced cucumber
- ¼ cup shredded carrots
- ¼ cup radish sprouts
- Furikake seasoning (for sprinkling)
- Spicy mayo (optional)
- Crispy fried onions (optional)
- Mango, diced (optional)
- Pineapple, diced (optional)
Instructions
- Place the sushi rice in a fine-mesh sieve and rinse under cold running water until the water runs clear (about 3-5 minutes).
- Combine the rinsed rice and 2 ¼ cups of water in a medium saucepan. Bring to a boil over high heat. Reduce heat to low, cover tightly, and simmer for 18 minutes.
- Remove from heat and let stand, covered, for 10 minutes.
- In a small saucepan, combine the 2 tablespoons of rice vinegar, 1 tablespoon of sugar, and 1 teaspoon of salt. Heat over low heat, stirring constantly, until the sugar and salt are dissolved. Do not boil.
- Gently transfer the cooked rice to a large, non-metallic bowl. Pour the sushi vinegar mixture over the rice. Using a rice paddle or wooden spoon, gently cut and fold the vinegar into the rice, being careful not to mash it. Fan the rice with a paper fan or magazine while mixing to help it cool down quickly.
- Continue to gently fold and fan the rice until it reaches room temperature (about 15-20 minutes).
- In a medium bowl, whisk together the soy sauce, sesame oil, rice vinegar, grated ginger, minced garlic, green onion, sriracha (if using), and red pepper flakes (if using).
- Add the cubed tuna to the marinade and gently toss to coat.
- Cover the bowl with plastic wrap and refrigerate for at least 15 minutes, or up to 30 minutes.
- Grab your favorite bowls.
- Divide the sushi rice evenly among the bowls.
- Spoon the marinated tuna over the rice in each bowl.
- Arrange your desired toppings around the tuna in each bowl.
- Sprinkle the poke bowls with furikake seasoning and toasted sesame seeds. Drizzle with spicy mayo (if using) and top with crispy fried onions (if using). Serve immediately.
Notes
- Use high-quality, sushi-grade tuna.
- Don’t overcook the rice.
- Don’t over-marinate the tuna.
- Customize your toppings to your liking.
- Sushi rice and marinated tuna can be prepared ahead of time and stored separately in the refrigerator. Assemble just before serving.


Leave a Comment