

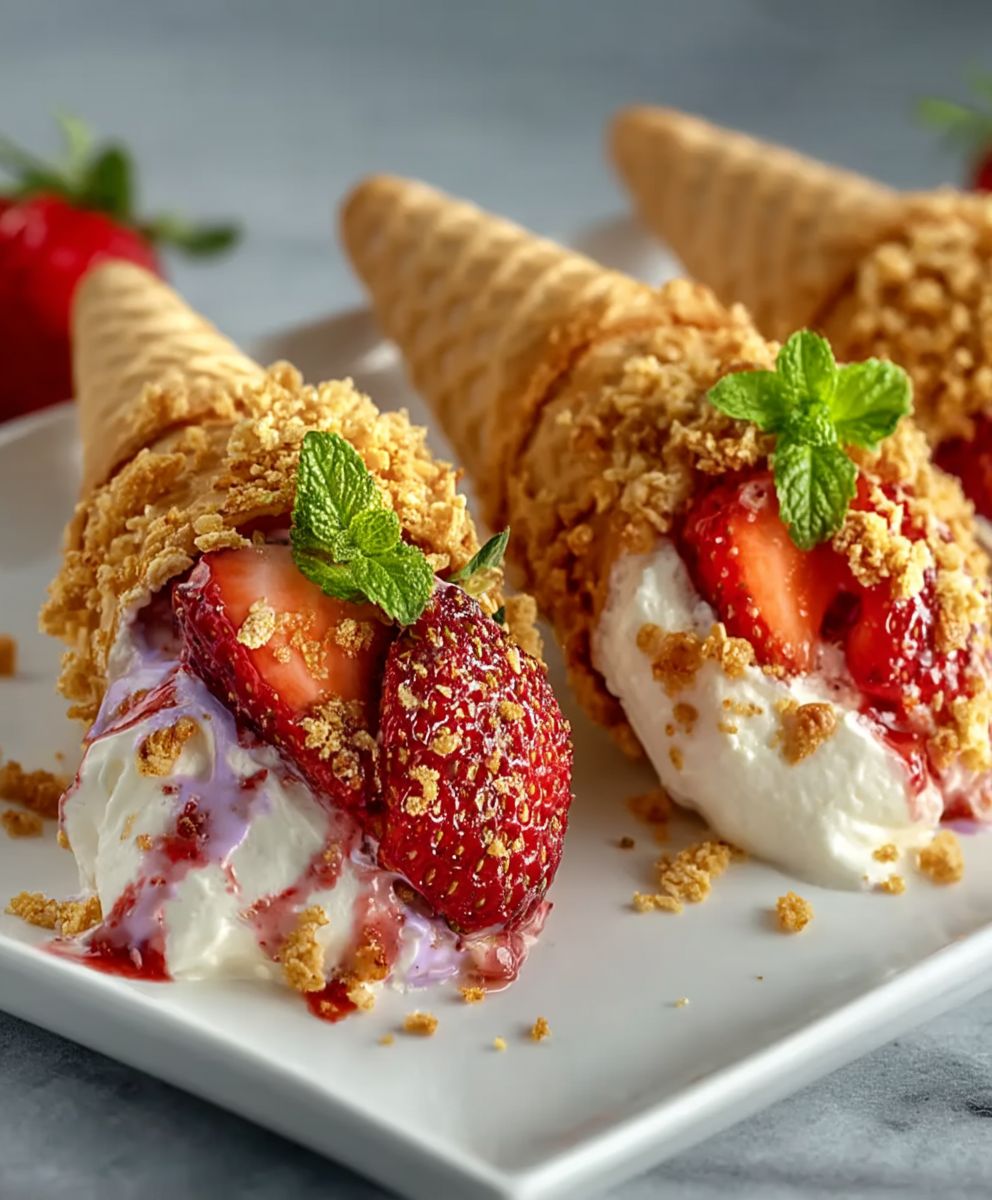
Strawberry Crunch Cheesecake Cones: Prepare to be transported back to your childhood summers with a sophisticated twist! Remember those iconic strawberry shortcake ice cream bars, the ones with the crunchy, strawberry-studded coating that always seemed to melt a little too fast? We’ve taken that nostalgic flavor and elevated it into an irresistible, handheld dessert that’s perfect for parties, picnics, or simply treating yourself.
While the exact origins of the strawberry shortcake ice cream bar are shrouded in a bit of mystery, its popularity exploded in the late 20th century, becoming a symbol of carefree summer days. The combination of creamy vanilla ice cream, sweet strawberry pieces, and that unforgettable crunchy coating created a symphony of textures and flavors that captivated generations.
What makes these Strawberry Crunch Cheesecake Cones so special? It’s the perfect marriage of creamy, tangy cheesecake filling and that signature strawberry crunch. People adore this dish because it’s not only incredibly delicious, offering a delightful contrast of smooth and crunchy textures, but also surprisingly easy to make. Plus, the individual cone format makes them incredibly convenient and portable. Get ready to experience a burst of strawberry bliss with every single bite!

Ingredients:
- For the Cheesecake Filling:
- 8 ounces cream cheese, softened
- 1/2 cup granulated sugar
- 1/4 cup sour cream
- 1 teaspoon vanilla extract
- 1/4 teaspoon lemon zest (optional, but adds a nice brightness)
- For the Strawberry Crunch Coating:
- 1 cup Golden Oreo cookies, finely crushed (about 24 cookies)
- 1/4 cup freeze-dried strawberries, finely crushed
- 1/4 cup melted butter, unsalted
- 1 tablespoon powdered sugar
- Pinch of salt
- For the Cones:
- 12 waffle cones
- 4 ounces white chocolate, melted (for sealing the cones)
- Optional Garnish:
- Fresh strawberries, sliced
- Whipped cream
Preparing the Strawberry Crunch Coating
- Crush the Golden Oreos: Place the Golden Oreo cookies in a food processor and pulse until they are finely crushed. Alternatively, you can place them in a resealable bag and crush them with a rolling pin. You want a fine crumb consistency.
- Crush the Freeze-Dried Strawberries: In a separate bowl or using the same food processor (make sure to clean it first!), crush the freeze-dried strawberries into a fine powder. This is easiest to do in a food processor, but you can also use a mortar and pestle or place them in a bag and crush them with a rolling pin. The finer the powder, the better it will incorporate into the coating.
- Combine the Dry Ingredients: In a medium bowl, combine the crushed Golden Oreos, crushed freeze-dried strawberries, powdered sugar, and a pinch of salt. Whisk together until evenly distributed. The powdered sugar helps to bind the mixture and adds a touch of sweetness. The salt enhances the flavors of the strawberries and cookies.
- Add the Melted Butter: Pour the melted butter over the dry ingredients. Stir well until the mixture is evenly moistened and resembles wet sand. The butter is crucial for holding the crunch coating together and giving it that signature texture. Make sure all the dry ingredients are coated with butter.
- Set Aside: Set the strawberry crunch coating aside while you prepare the cheesecake filling. This will allow the flavors to meld together.
Making the Cheesecake Filling
- Soften the Cream Cheese: Ensure your cream cheese is completely softened to room temperature. This is essential for a smooth and creamy cheesecake filling. If the cream cheese is not soft enough, you will end up with lumps in your filling. You can speed up the softening process by cutting the cream cheese into smaller cubes.
- Cream the Cream Cheese and Sugar: In a large bowl, using an electric mixer (either a stand mixer or a hand mixer), beat the softened cream cheese and granulated sugar together until light and fluffy. This usually takes about 2-3 minutes. Scrape down the sides of the bowl occasionally to ensure everything is evenly incorporated. The mixture should be smooth and free of any lumps.
- Add the Sour Cream: Add the sour cream to the cream cheese mixture and beat until just combined. Be careful not to overmix at this stage, as overmixing can cause the cheesecake filling to become too thin. The sour cream adds a tanginess and richness to the filling.
- Incorporate the Vanilla Extract and Lemon Zest (Optional): Add the vanilla extract and lemon zest (if using) to the mixture. Beat until just combined. The vanilla extract enhances the overall flavor of the cheesecake, while the lemon zest adds a bright and refreshing note.
- Taste and Adjust: Taste the cheesecake filling and adjust the sweetness or tanginess to your liking. You can add a little more sugar if you prefer a sweeter filling, or a squeeze of lemon juice if you want a more tangy flavor.
- Chill the Filling: Cover the bowl with plastic wrap and refrigerate the cheesecake filling for at least 30 minutes. This will help the filling to firm up slightly, making it easier to pipe into the cones. Chilling also allows the flavors to meld together even further.
Preparing the Cones
- Melt the White Chocolate: Place the white chocolate in a microwave-safe bowl. Microwave in 30-second intervals, stirring in between, until the chocolate is completely melted and smooth. Be careful not to overheat the chocolate, as it can burn easily. Alternatively, you can melt the white chocolate in a double boiler over simmering water.
- Seal the Cones: Dip the open end of each waffle cone into the melted white chocolate, coating the inside of the cone about 1-2 inches up. This will create a seal that prevents the cheesecake filling from making the cone soggy.
- Let the Chocolate Set: Place the cones upside down on a wire rack lined with parchment paper to allow the white chocolate to set completely. This usually takes about 10-15 minutes. The parchment paper will prevent the cones from sticking to the rack.
Assembling the Strawberry Crunch Cheesecake Cones
- Fill the Cones: Once the white chocolate has set and the cheesecake filling has chilled, transfer the cheesecake filling to a piping bag fitted with a large round tip or a star tip. If you don’t have a piping bag, you can use a resealable plastic bag and cut off one of the corners. Pipe the cheesecake filling into the prepared waffle cones, filling them to the top.
- Dip in Strawberry Crunch Coating: Gently dip the top of each filled cone into the strawberry crunch coating, pressing lightly to ensure the coating adheres to the cheesecake filling. You can also spoon the coating over the top of the cones if you prefer.
- Chill (Optional): For best results, chill the assembled strawberry crunch cheesecake cones in the refrigerator for at least 15-20 minutes before serving. This will help the cheesecake filling to firm up even more and prevent the coating from sliding off.
- Garnish (Optional): Before serving, garnish the cones with fresh strawberry slices and a dollop of whipped cream, if desired. This adds a beautiful finishing touch and enhances the overall flavor and presentation.
Tips and Variations
- Cookie Variations: Feel free to experiment with different types of cookies for the crunch coating. Vanilla wafers, graham crackers, or even chocolate Oreos would all work well.
- Fruit Variations: You can use other freeze-dried fruits in place of the strawberries, such as raspberries, blueberries, or mangoes.
- Chocolate Drizzle: Drizzle the finished cones with melted chocolate (milk, dark, or white) for an extra touch of indulgence.
- Nutty Crunch: Add chopped nuts (such as pecans, walnuts, or almonds) to the strawberry crunch coating for added texture and flavor.
- Mini Cones: Use mini waffle cones for a bite-sized treat. This is perfect for parties or gatherings.
- Make Ahead: You can prepare the cheesecake filling and strawberry crunch coating ahead of time and store them separately in the refrigerator. Assemble the cones just before serving.
- Storage: Store the assembled strawberry crunch cheesecake cones in the refrigerator for up to 2 days. The cones may become slightly soggy over time, so it’s best to consume them as soon as possible.
- Vegan Option: To make this recipe vegan, use vegan cream cheese, vegan butter, and vegan Golden Oreos. You can also use a vegan whipped cream for garnish.
- Gluten-Free Option: Use gluten-free Golden Oreos and gluten-free waffle cones to make this recipe gluten-free.
Troubleshooting
- Cheesecake Filling Too Thin: If your cheesecake filling is too thin, try adding a tablespoon of cornstarch to the mixture and beating until combined. You can also chill the filling for a longer period of time to help it firm up.
- Strawberry Crunch Coating Not Sticking: If the strawberry crunch coating is not sticking to the cheesecake filling, make sure the filling is slightly chilled. You can also gently press the coating onto the filling to help it adhere.
- Cones Becoming Soggy: To prevent the cones from becoming soggy, make sure to seal them with melted white chocolate before filling them with the cheesecake filling. Also, avoid storing the assembled cones for too long.
Serving Suggestions
- Dessert Table: These strawberry crunch cheesecake cones are a perfect addition to any dessert table. They are visually appealing and delicious.
- Party Favors: Wrap the cones individually in cellophane bags and tie with a ribbon for a fun and festive party favor.
-
Conclusion:
And there you have it! These Strawberry Crunch Cheesecake Cones are truly a must-try dessert that will impress everyone, from your family to your friends. The combination of the creamy, tangy cheesecake filling, the sweet and juicy strawberries, and that irresistible crunchy topping all nestled inside a crispy waffle cone is simply divine. I promise, once you take that first bite, you’ll understand why I’m so enthusiastic about this recipe.
But why is this recipe a must-try? Well, beyond the incredible flavor profile, it’s also surprisingly easy to make. You don’t need any fancy equipment or advanced baking skills. The steps are straightforward, and the ingredients are readily available at most grocery stores. Plus, these cones are incredibly portable and perfect for parties, picnics, or even just a fun afternoon treat. Forget about messy slices of cheesecake these cones are the perfect individual serving size and are so much easier to handle.
Looking for serving suggestions or variations? The possibilities are endless! For a truly decadent experience, try drizzling melted white chocolate or dark chocolate over the finished cones. You could also add a dollop of whipped cream or a fresh strawberry on top for an extra touch of elegance. If you’re feeling adventurous, experiment with different fruit combinations. Blueberries, raspberries, or even peaches would be delicious substitutes for the strawberries.
For a more intense strawberry flavor, consider using strawberry extract in the cheesecake filling. A little goes a long way! You could also add a layer of strawberry jam or preserves at the bottom of the cone before adding the cheesecake filling. This will create a delightful surprise with every bite.
If you want to make these cones ahead of time, you can prepare the cheesecake filling and the strawberry crunch topping separately and store them in the refrigerator. Then, just assemble the cones right before serving to prevent them from getting soggy. I recommend storing the assembled cones in the freezer for about 30 minutes before serving to help them firm up.
And don’t forget about the cones themselves! While I used classic waffle cones, you could also try sugar cones or even chocolate-dipped cones for a different twist. If you’re feeling really creative, you could even make your own homemade waffle cones!
But the most important thing is to have fun and experiment! This recipe is just a starting point, so feel free to adapt it to your own tastes and preferences. I’m confident that you’ll create something amazing.
So, what are you waiting for? Gather your ingredients, put on your apron, and get ready to make some delicious Strawberry Crunch Cheesecake Cones! I’m so excited for you to try this recipe and experience the joy of creating something truly special.
And most importantly, I want to hear about your experience! Did you try the recipe? Did you make any variations? What did you think? Please share your thoughts and photos in the comments below. I love seeing your creations and hearing your feedback. Your comments help me improve my recipes and inspire other readers to try them too. Happy baking, and enjoy your delicious Strawberry Crunch Cheesecake Cones! I can’t wait to hear all about it!
Strawberry Crunch Cheesecake Cones: The Ultimate Dessert Recipe
Cheesecake filling piped into waffle cones, dipped in a sweet and crunchy strawberry Oreo coating. A fun and easy dessert!
Ingredients
- 8 ounces cream cheese, softened
- 1/2 cup granulated sugar
- 1/4 cup sour cream
- 1 teaspoon vanilla extract
- 1/4 teaspoon lemon zest (optional)
- 1 cup Golden Oreo cookies, finely crushed (about 24 cookies)
- 1/4 cup freeze-dried strawberries, finely crushed
- 1/4 cup melted unsalted butter
- 1 tablespoon powdered sugar
- Pinch of salt
- 12 waffle cones
- 4 ounces white chocolate, melted (for sealing the cones)
- Fresh strawberries, sliced
- Whipped cream
Instructions
- Prepare the Strawberry Crunch Coating:
- Crush the Golden Oreos: Place the Golden Oreo cookies in a food processor and pulse until they are finely crushed. Alternatively, you can place them in a resealable bag and crush them with a rolling pin. You want a fine crumb consistency.
- Crush the Freeze-Dried Strawberries: In a separate bowl or using the same food processor (make sure to clean it first!), crush the freeze-dried strawberries into a fine powder. This is easiest to do in a food processor, but you can also use a mortar and pestle or place them in a bag and crush them with a rolling pin. The finer the powder, the better it will incorporate into the coating.
- Combine the Dry Ingredients: In a medium bowl, combine the crushed Golden Oreos, crushed freeze-dried strawberries, powdered sugar, and a pinch of salt. Whisk together until evenly distributed. The powdered sugar helps to bind the mixture and adds a touch of sweetness. The salt enhances the flavors of the strawberries and cookies.
- Add the Melted Butter: Pour the melted butter over the dry ingredients. Stir well until the mixture is evenly moistened and resembles wet sand. The butter is crucial for holding the crunch coating together and giving it that signature texture. Make sure all the dry ingredients are coated with butter.
- Set Aside: Set the strawberry crunch coating aside while you prepare the cheesecake filling. This will allow the flavors to meld together.
- Make the Cheesecake Filling:
- Soften the Cream Cheese: Ensure your cream cheese is completely softened to room temperature. This is essential for a smooth and creamy cheesecake filling. If the cream cheese is not soft enough, you will end up with lumps in your filling. You can speed up the softening process by cutting the cream cheese into smaller cubes.
- Cream the Cream Cheese and Sugar: In a large bowl, using an electric mixer (either a stand mixer or a hand mixer), beat the softened cream cheese and granulated sugar together until light and fluffy. This usually takes about 2-3 minutes. Scrape down the sides of the bowl occasionally to ensure everything is evenly incorporated. The mixture should be smooth and free of any lumps.
- Add the Sour Cream: Add the sour cream to the cream cheese mixture and beat until just combined. Be careful not to overmix at this stage, as overmixing can cause the cheesecake filling to become too thin. The sour cream adds a tanginess and richness to the filling.
- Incorporate the Vanilla Extract and Lemon Zest (Optional): Add the vanilla extract and lemon zest (if using) to the mixture. Beat until just combined. The vanilla extract enhances the overall flavor of the cheesecake, while the lemon zest adds a bright and refreshing note.
- Taste and Adjust: Taste the cheesecake filling and adjust the sweetness or tanginess to your liking. You can add a little more sugar if you prefer a sweeter filling, or a squeeze of lemon juice if you want a more tangy flavor.
- Chill the Filling: Cover the bowl with plastic wrap and refrigerate the cheesecake filling for at least 30 minutes. This will help the filling to firm up slightly, making it easier to pipe into the cones. Chilling also allows the flavors to meld together even further.
- Prepare the Cones:
- Melt the White Chocolate: Place the white chocolate in a microwave-safe bowl. Microwave in 30-second intervals, stirring in between, until the chocolate is completely melted and smooth. Be careful not to overheat the chocolate, as it can burn easily. Alternatively, you can melt the white chocolate in a double boiler over simmering water.
- Seal the Cones: Dip the open end of each waffle cone into the melted white chocolate, coating the inside of the cone about 1-2 inches up. This will create a seal that prevents the cheesecake filling from making the cone soggy.
- Let the Chocolate Set: Place the cones upside down on a wire rack lined with parchment paper to allow the white chocolate to set completely. This usually takes about 10-15 minutes. The parchment paper will prevent the cones from sticking to the rack.
- Assemble the Strawberry Crunch Cheesecake Cones:
- Fill the Cones: Once the white chocolate has set and the cheesecake filling has chilled, transfer the cheesecake filling to a piping bag fitted with a large round tip or a star tip. If you don’t have a piping bag, you can use a resealable plastic bag and cut off one of the corners. Pipe the cheesecake filling into the prepared waffle cones, filling them to the top.
- Dip in Strawberry Crunch Coating: Gently dip the top of each filled cone into the strawberry crunch coating, pressing lightly to ensure the coating adheres to the cheesecake filling. You can also spoon the coating over the top of the cones if you prefer.
- Chill (Optional): For best results, chill the assembled strawberry crunch cheesecake cones in the refrigerator for at least 15-20 minutes before serving. This will help the cheesecake filling to firm up even more and prevent the coating from sliding off.
- Garnish (Optional): Before serving, garnish the cones with fresh strawberry slices and a dollop of whipped cream, if desired. This adds a beautiful finishing touch and enhances the overall flavor and presentation.
Notes
- Feel free to experiment with different types of cookies for the crunch coating. Vanilla wafers, graham crackers, or even chocolate Oreos would all work well.
- You can use other freeze-dried fruits in place of the strawberries, such as raspberries, blueberries, or mangoes.
- Drizzle the finished cones with melted chocolate (milk, dark, or white) for an extra touch of indulgence.
- Add chopped nuts (such as pecans, walnuts, or almonds) to the strawberry crunch coating for added texture and flavor.
- Use mini waffle cones for a bite-sized treat. This is perfect for parties or gatherings.
- You can prepare the cheesecake filling and strawberry crunch coating ahead of time and store them separately in the refrigerator. Assemble the cones just before serving.
- Store the assembled strawberry crunch cheesecake cones in the refrigerator for up to 2 days. The cones may become slightly soggy over time, so it’s best to consume them as soon as possible.
- To make this recipe vegan, use vegan cream cheese, vegan butter, and vegan Golden Oreos. You can also use a vegan whipped cream for garnish.
- Use gluten-free Golden Oreos and gluten-free waffle cones to make this recipe gluten-free.
- If your cheesecake filling is too thin, try adding a tablespoon of cornstarch to the mixture and beating until combined. You can also chill the filling for a longer period of time to help it firm up.
- If the strawberry crunch coating is not sticking to the cheesecake filling, make sure the filling is slightly chilled. You can also gently press the coating onto the filling to help it adhere.
- To prevent the cones from becoming soggy, make sure to seal them with melted white chocolate before filling them with the cheesecake filling. Also, avoid storing the assembled cones for too long.

Leave a Comment