

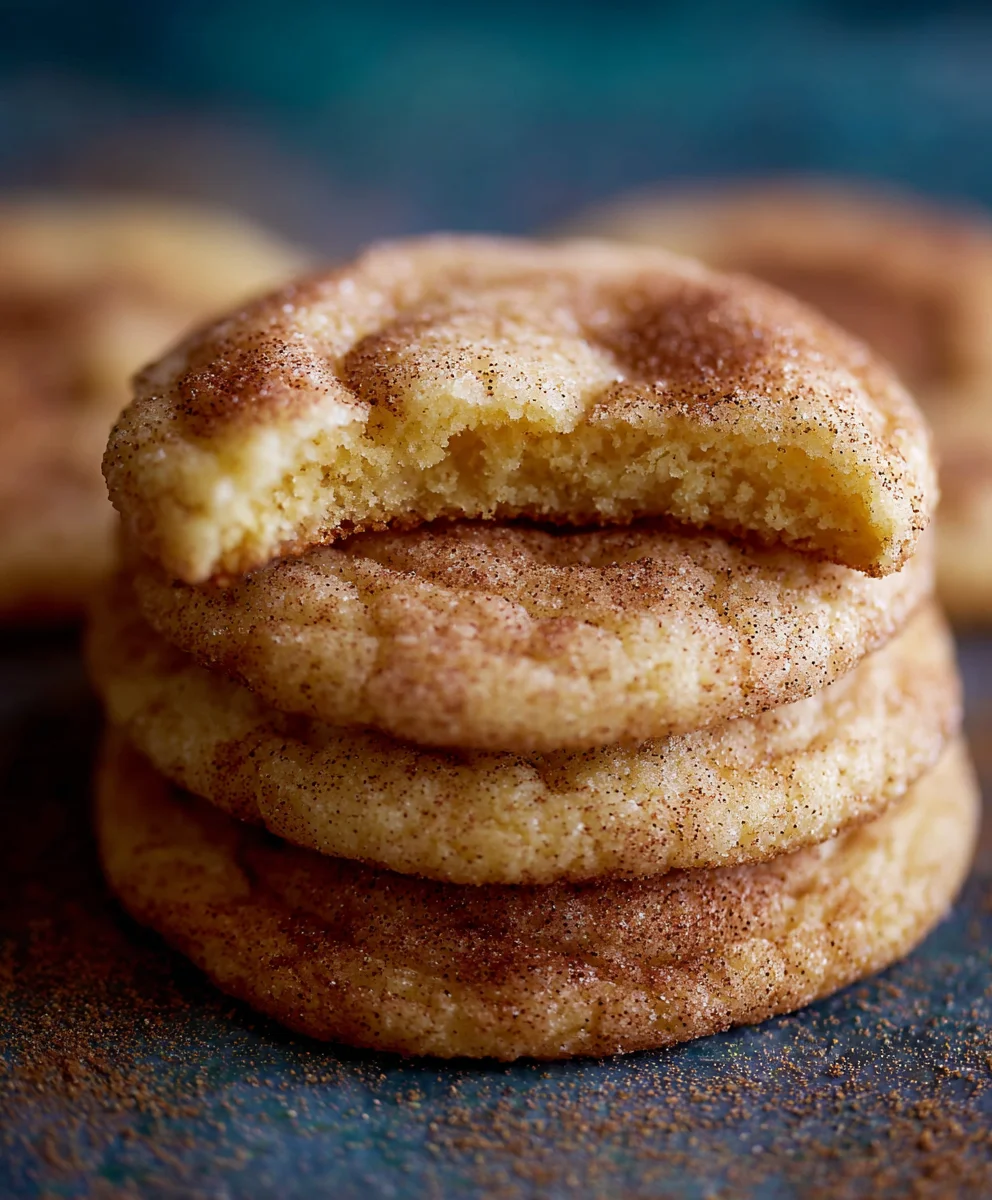
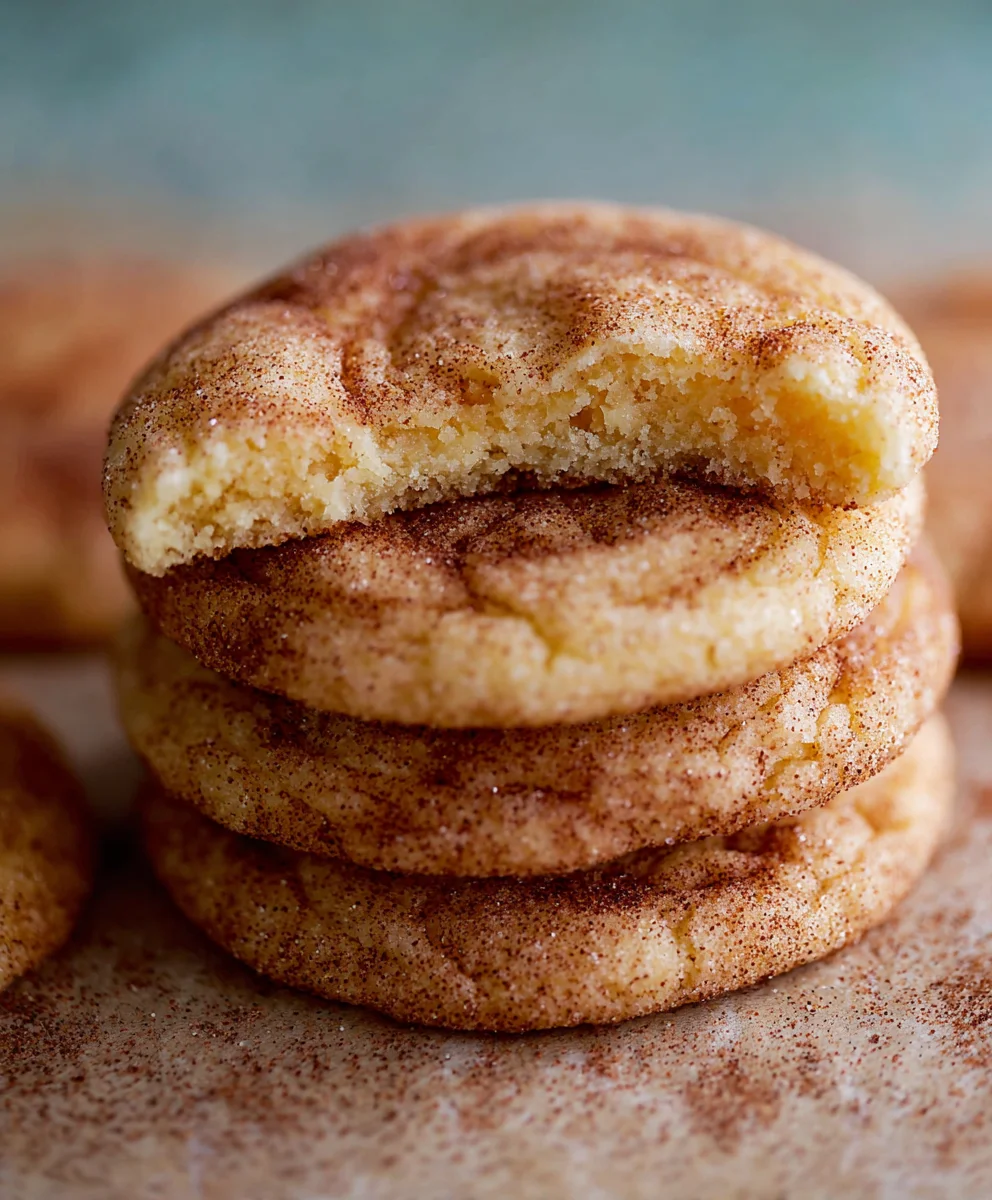
My Favorite Snickerdoodles – just uttering these words brings a comforting wave of nostalgia, don’t you agree? There’s a truly magical quality to a perfectly baked snickerdoodle: that iconic crackled top, the irresistible aroma of cinnamon and sugar, and a tender, chewy interior that practically melts in your mouth. It’s a taste that instantly transports you back to simpler times, a quintessential treat cherished by generations.
While the precise history of this beloved cookie remains shrouded in a charming culinary mystery – some food historians suggest an American origin with possible German ties, while others point to New England’s vibrant baking traditions – its enduring appeal is universally acknowledged. What truly elevates the snickerdoodle beyond a mere cookie is its unique flavor profile. That subtle, tangy zest from the cream of tartar, perfectly harmonizing with the sweet, spiced coating, creates an unforgettable symphony of tastes. They’re incredibly versatile, wonderfully comforting, and surprisingly straightforward to bake, making them ideal for any occasion.
Prepare to Fall in Love with My Favorite Snickerdoodles
I am thrilled to share what I truly believe is My Favorite Snickerdoodles recipe. This rendition ensures every cookie boasts that perfect balance of chewiness and lightness, a delightful spice, and that signature warmth. Prepare to fall in love with these golden-edged delights all over again.

Ingredients:
- For the Snickerdoodle Dough:
- 1 cup (2 sticks or 226g) unsalted butter, softened to room temperature
- 1 ½ cups (300g) granulated sugar, plus extra for coating
- 2 large eggs, at room temperature
- 2 teaspoons pure vanilla extract
- 2 ¾ cups (340g) all-purpose flour
- 2 teaspoons cream of tartar
- 1 teaspoon baking soda
- ¼ teaspoon salt
- For the Cinnamon-Sugar Coating:
- ¼ cup (50g) granulated sugar
- 2 tablespoons ground cinnamon
Preparing the Snickerdoodle Dough
- Bring your butter to perfect room temperature. This is such a critical first step for “My Favorite Snickerdoodles” because it directly impacts the texture of your cookies. If your butter is too cold, it won’t cream properly with the sugar, leading to a dense cookie. If it’s melted, it will incorporate too much air and then deflate, resulting in a greasy, flat cookie. I usually take my butter out of the fridge at least an hour or two before I plan to bake. You want it soft enough that your finger can make a slight indentation without sinking through.
- Cream the softened butter and granulated sugar. In a large mixing bowl, using an electric mixer (either a stand mixer with a paddle attachment or a hand mixer), beat the softened butter on medium speed for about 1-2 minutes until it becomes light and creamy. Then, gradually add the 1 ½ cups of granulated sugar. Continue to beat the mixture on medium-high speed for another 4-5 minutes, scraping down the sides of the bowl occasionally with a rubber spatula. This step is incredibly important for the ultimate texture of “My Favorite Snickerdoodles.” You want the butter and sugar to become pale in color and incredibly light and fluffy. This process incorporates air into the mixture, which will give your cookies that characteristic soft, pillowy texture. Don’t rush this! It truly makes a difference.
- Incorporate the eggs and vanilla extract. Once your butter and sugar mixture is beautifully light and airy, add the two large eggs, one at a time. Beat well after each addition, ensuring that each egg is fully incorporated into the mixture before adding the next. This helps prevent the mixture from separating. After the eggs are mixed in, stir in the 2 teaspoons of pure vanilla extract. I always opt for good quality vanilla, as its rich aroma and flavor really shine through in these simple yet delicious cookies. Beat until everything is just combined and smooth.
- Whisk together the dry ingredients. In a separate medium-sized bowl, whisk together the 2 ¾ cups of all-purpose flour, 2 teaspoons of cream of tartar, 1 teaspoon of baking soda, and ¼ teaspoon of salt. The cream of tartar is a signature ingredient in snickerdoodles; it gives them their distinctive tangy flavor and contributes to their chewy texture, preventing them from becoming too crisp. Ensuring these dry ingredients are well combined means that your leavening agents and salt will be evenly distributed throughout the dough, leading to consistent results in every single cookie.
- Gently combine the wet and dry ingredients. With your mixer on low speed, gradually add the dry ingredient mixture to the wet mixture, a third at a time. Mix only until just combined. As soon as you see no more streaks of dry flour, stop the mixer. It’s crucial not to overmix the dough at this stage. Overmixing develops the gluten in the flour, which can lead to tough, dry cookies instead of the soft, tender “My Favorite Snickerdoodles” we’re aiming for. A few lumps of flour are fine; they’ll disappear during the next step.
- Chill the snickerdoodle dough. Once your dough is mixed, cover the bowl tightly with plastic wrap and refrigerate it for at least 30 minutes, or up to 2 hours. While not strictly mandatory for every cookie, I find that chilling the dough for “My Favorite Snickerdoodles” significantly improves their flavor and texture. It allows the flour to fully hydrate, preventing the cookies from spreading too much during baking, and it deepens the overall flavor profile. Plus, it makes the dough much easier to handle when you’re rolling it into balls.
Preparing the Cinnamon-Sugar Coating
- Mix the coating ingredients. While your dough is chilling, prepare the iconic cinnamon-sugar coating. In a small, shallow bowl, combine the ¼ cup of granulated sugar and 2 tablespoons of ground cinnamon. Whisk them together thoroughly with a fork until the cinnamon is evenly distributed throughout the sugar. This mixture is what gives snickerdoodles their unique, irresistible spiced crust and makes them so distinctively “My Favorite Snickerdoodles.” Set this bowl aside; you’ll be using it very soon.
Coating and Shaping My Favorite Snickerdoodles
- Preheat your oven and prepare baking sheets. About 15-20 minutes before you plan to bake, preheat your oven to 375°F (190°C). Arrange oven racks in the upper and lower middle positions. Line two large baking sheets with parchment paper. Using parchment paper is a game-changer; it prevents sticking and makes for easy cleanup. An accurately preheated oven is essential for consistent baking, so I always recommend using an oven thermometer to double-check your oven’s temperature.
- Portion the chilled dough. Remove the chilled dough from the refrigerator. Using a small cookie scoop (about 1.5 tablespoons, a standard size) or by simply rolling with your hands, scoop or roll the dough into uniform balls, each about 1 to 1.5 inches in diameter. Consistency in size is key here for even baking. If some cookies are larger than others, they will bake at different rates, leading to some being overdone while others are still raw in the middle. I usually aim for around 18-24 cookies per batch, depending on how generous I’m feeling with the scoop.
- Roll each dough ball in the cinnamon-sugar mixture. Take each dough ball and gently roll it in the prepared cinnamon-sugar coating, ensuring it’s completely covered. Don’t be shy here; you want a generous coating. This is where “My Favorite Snickerdoodles” get their signature crinkly, sugary top and that fantastic burst of cinnamon flavor. Place the coated dough balls onto the prepared baking sheets, spacing them about 2 inches apart. They will spread slightly during baking, so giving them enough room prevents them from merging into one giant cookie. I typically fit 12 cookies on a standard baking sheet.
Baking My Favorite Snickerdoodles
- Bake the cookies. Place one baking sheet on the upper-middle rack and the other on the lower-middle rack. Bake for 8-10 minutes, or until the edges are just set and lightly golden, but the centers still look soft and slightly puffy. It’s important not to overbake “My Favorite Snickerdoodles.” They will continue to set up as they cool. Overbaking is the quickest way to turn a delightfully chewy cookie into a dry, crispy one. For the chewiest results, I often take them out right when the edges are set and the very center still looks a tiny bit undercooked.
- Rotate baking sheets for even baking. Halfway through the baking time (around 4-5 minutes), rotate your baking sheets. If you’re baking two sheets at once, swap their positions (top to bottom, and vice versa) and rotate each pan 180 degrees. This ensures that all the cookies bake evenly, as ovens often have hot spots.
Cooling and Enjoying My Favorite Snickerdoodles
- Allow the cookies to cool on the baking sheets. Once baked, remove the baking sheets from the oven and let the cookies cool on the sheets for about 5 minutes. This brief resting period is crucial because it allows the cookies to firm up gently without breaking apart when you move them. They’ll be quite delicate when first out of the oven, and you want to maintain their perfect shape and soft interior.
- Transfer to a wire rack to cool completely. After their short rest on the baking sheets, carefully transfer “My Favorite Snickerdoodles” to a wire cooling rack to cool completely. Cooling on a wire rack allows air to circulate around all sides of the cookies, preventing them from becoming soggy on the bottom and ensuring they maintain their crisp edges and soft centers. Patience is key here, as tempting as it is to dive right in!
- Store for freshness. Once fully cooled, these cookies are best stored in an airtight container at room temperature. They will remain wonderfully fresh and chewy for up to 3-4 days. While they rarely last that long in my house, knowing how to store them properly ensures that every “My Favorite Snickerdoodles” experience is a good one. You can even place a slice of bread in the container to help keep them soft, though I’ve found if sealed properly, they retain their softness just fine on their own.
- Serve and savor! Now for the best part! Serve “My Favorite Snickerdoodles” with a tall glass of cold milk, a warm cup of coffee, or your favorite tea. These classic cookies are perfect for any occasion – a quiet evening treat, a school lunchbox surprise, or a welcome addition to a holiday cookie platter. Their simple, comforting flavor and tender chewiness are what make them truly my absolute favorite. There’s something so uniquely satisfying about biting into that soft, tangy center surrounded by the sweet crunch of cinnamon sugar. Each bite is a little piece of home.
<h2>Conclusion:</h2>
<p>So, we’ve reached the sweet finale of our baking adventure together, and I truly hope you’re feeling inspired and excited to roll up your sleeves and get baking! This isn’t just another cookie recipe; it’s an invitation to experience pure comfort and unadulterated joy in every single bite. What makes this recipe an absolute must-try, in my humble opinion, is the masterful balance it strikes: the edges are perfectly crisp, providing a delightful textural contrast, while the centers remain wonderfully soft, tender, and incredibly chewy. That iconic, sparkling cinnamon-sugar coating isn’t just a garnish; it’s a vibrant burst of flavor that awakens the palate, providing just the right amount of sweetness and a gentle, warming spice.</p>
<p>I’ve spent countless hours, and perhaps eaten a few too many cookies, perfecting the nuances of this recipe to ensure that it delivers consistent, bakery-quality results right in your very own kitchen. It’s remarkably straightforward, forgiving for novice bakers, yet yields a product that even seasoned connoisseurs will rave about. The simplicity of the ingredients, combined with the magic of the chilling process and the perfect oven temperature, transforms humble flour, butter, sugar, and spice into something truly extraordinary. There’s a reason why, after all this dedicated experimentation and a lifelong love affair with this classic cookie, these have unequivocally become <strong>My Favorite Snickerdoodles</strong>. They’re more than just a dessert; they’re a taste of home, a comforting hug, and a moment of pure bliss wrapped up in a delightful, spiced package.</p>
<h4>Elevating Your Snickerdoodle Experience: Serving & Variations</h4>
<p>While these snickerdoodles are utterly divine enjoyed simply, still warm from the oven with that intoxicating aroma filling your entire home, don’t hesitate to explore how you can elevate their already incredible charm. Imagine one of these beauties nestled beside a steaming mug of artisanal coffee or, for a classic pairing, a tall, frosty glass of cold milk – it’s a match made in culinary heaven. For an extra touch of decadence, try them as the perfect accompaniment to a scoop of creamy vanilla bean ice cream; the contrast between the warm, spiced cookie and the cold, sweet ice cream is truly sublime. You could even gently crumble a slightly stale snickerdoodle over the ice cream for an amazing topping, adding texture and a burst of flavor.</p>
<p>Feeling a bit adventurous? This recipe is wonderfully adaptable to small tweaks that can create entirely new flavor profiles. Consider infusing your cinnamon-sugar coating with a pinch of finely ground cardamom for an exotic, fragrant twist, or a whisper of nutmeg or allspice for a richer, more complex wintery note. If you’re a fan of adding texture, a handful of finely chopped pecans or walnuts, or even white chocolate chips, folded into the dough before chilling can introduce new dimensions to your cookie. And for the ultimate indulgence, these snickerdoodles make incredible cookie sandwiches! Simply pipe a generous dollop of cream cheese frosting, a rich buttercream, or even a scoop of your favorite softened ice cream (think coffee, caramel, or pumpkin spice during the holidays!) between two cookies for a truly unforgettable dessert that will impress anyone lucky enough to try it.</p>
<h4>Your Turn to Bake and Share!</h4>
<p>Now that you have all the insider tips and tricks, it’s your turn to experience the magic firsthand. Don’t be shy; gather your ingredients, turn on your favorite baking playlist, and let the delightful scents of cinnamon and sugar fill your kitchen. There’s something profoundly satisfying about the process of baking, and the reward of biting into a freshly baked cookie that you’ve created with your own hands is unparalleled. I promise you, the moment you taste these perfectly balanced, wonderfully chewy, and undeniably comforting snickerdoodles, you’ll understand exactly why I’m so passionate about this particular recipe.</p>
<p>More than just sharing a recipe, I love building a community of home bakers. So, once you’ve baked up your own batch of these incredible cookies, I would be absolutely thrilled to hear all about your experience! Did you stick to the classic, or did you venture into adding your own unique twist? How did your family and friends react to these irresistible treats? Your feedback, your successes, and even your creative variations are what truly bring this community to life and inspire me and others. Please don’t hesitate to share your thoughts, your photos, and your baking journey in the comments section below. I genuinely can’t wait to see and hear about your delicious creations. Happy baking, everyone, and enjoy every single crumb!</p>
My Favorite Snickerdoodles
Discover My Favorite Snickerdoodles recipe, ensuring every cookie boasts that perfect balance of chewiness and lightness, delightful spice, and signature warmth. These classic cookies feature a tangy zest from cream of tartar, harmonizing perfectly with a sweet, spiced cinnamon-sugar coating for an unforgettable taste.
Ingredients
-
1 cup unsalted butter, softened
-
1 and 1/3 cup granulated sugar
-
1/3 cup brown sugar, packed
-
2 large eggs
-
2 teaspoons vanilla extract
-
3 and 1/4 cups all-purpose flour, spooned and leveled
-
1 teaspoon baking soda
-
3/4 teaspoon kosher salt
-
1 and 1/2 teaspoons cream of tartar
-
1/3 cup granulated sugar (for coating)
-
1 and 1/2 tablespoons cinnamon (for coating)
Instructions
-
Step 1
Bring 1 cup unsalted butter to room temperature until softened (at least 1-2 hours). -
Step 2
In a large bowl, cream softened butter with 1 1/3 cup granulated sugar and 1/3 cup brown sugar using an electric mixer for 4-5 minutes until light and fluffy. -
Step 3
Beat in 2 large eggs, one at a time, until fully incorporated. Stir in 2 teaspoons vanilla extract. -
Step 4
In a separate medium bowl, whisk together 3 1/4 cups all-purpose flour, 1 teaspoon baking soda, 3/4 teaspoon kosher salt, and 1 1/2 teaspoons cream of tartar. -
Step 5
Gradually add the dry ingredient mixture to the wet mixture on low speed; mix only until just combined. Do not overmix. -
Step 6
Cover the dough tightly with plastic wrap and refrigerate for at least 30 minutes. -
Step 7
Preheat oven to 375°F (190°C). Line two large baking sheets with parchment paper. -
Step 8
In a small, shallow bowl, combine 1/3 cup granulated sugar and 1 1/2 tablespoons cinnamon for the coating. -
Step 9
Scoop dough into 1 to 1.5-inch balls. Roll each ball generously in the cinnamon-sugar coating. -
Step 10
Place coated dough balls onto prepared baking sheets, spacing them about 2 inches apart. -
Step 11
Bake for 8-10 minutes, or until edges are lightly golden and centers are soft. Rotate baking sheets halfway through. Avoid overbaking. -
Step 12
Remove from oven and let cookies cool on the baking sheets for 5 minutes, then transfer to a wire rack to cool completely. -
Step 13
Store cooled cookies in an airtight container at room temperature for up to 3-4 days. Serve and savor!
Important Information
Nutrition Facts (Per Serving)
It is important to consider this information as approximate and not to use it as definitive health advice.
Allergy Information
Please check ingredients for potential allergens and consult a health professional if in doubt.
Leave a Comment