

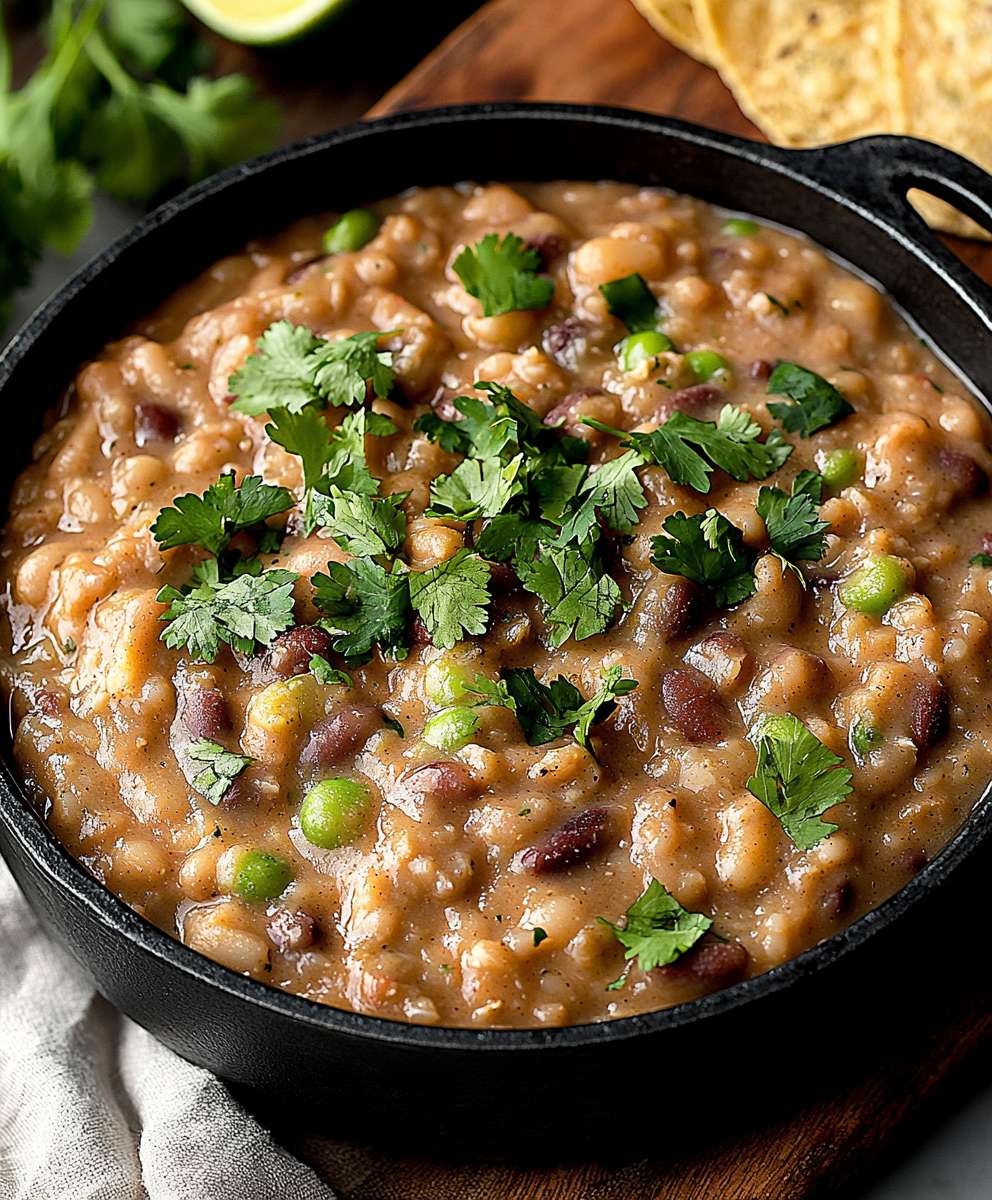
Refried beans, oh, where do I even begin? This humble dish, often relegated to a side, is a culinary powerhouse deserving of center stage. Forget the canned stuff; we’re diving headfirst into a world of creamy, dreamy, homemade goodness that will redefine your understanding of what refried beans can truly be.
From the sun-drenched fields of Mexico to the bustling kitchens of Tex-Mex restaurants, refried beans have a rich and storied history. Believed to have originated in Mexico, they were a staple food for indigenous populations, providing a hearty and nutritious source of protein and fiber. Over time, the dish evolved, incorporating different regional variations and flavors, eventually making its way across borders and into the hearts (and stomachs) of people worldwide.
But what is it about refried beans that makes them so universally loved? Is it the velvety smooth texture that melts in your mouth? Or perhaps the earthy, comforting flavor that evokes memories of warm tortillas and family gatherings? Maybe it’s the sheer versatility perfect as a dip with crispy tortilla chips, a filling for burritos and tacos, or a simple side dish to complement any Mexican-inspired meal. Whatever the reason, one thing is certain: refried beans are a culinary treasure that deserves to be celebrated. I’m excited to share my favorite recipe with you!

Ingredients:
- 1 pound dried pinto beans
- 8 cups water, plus more for soaking
- 1 large onion, chopped
- 4 cloves garlic, minced
- 2 tablespoons olive oil or lard (for a more authentic flavor)
- 1 teaspoon ground cumin
- 1/2 teaspoon chili powder
- 1/4 teaspoon smoked paprika
- 1/4 teaspoon dried oregano
- Salt to taste
- Pepper to taste
- Optional: 1-2 jalapeños, seeded and minced (for added heat)
- Optional: 2-3 strips of bacon, cooked and crumbled (for extra flavor)
- Optional: 1/2 cup chicken or vegetable broth (for a creamier consistency)
Soaking the Beans:
Okay, let’s start with the most important part: soaking the beans. This step is crucial for reducing cooking time and making the beans easier to digest. Trust me, your stomach will thank you later!
- Rinse the beans: Pour the dried pinto beans into a large colander and rinse them thoroughly under cold running water. Pick out any small stones or debris.
- Soak the beans: There are two methods for soaking:
- Overnight Soak: Place the rinsed beans in a large pot and cover them with at least 8 cups of water. Make sure the water level is a few inches above the beans, as they will absorb water and expand. Let them soak at room temperature for at least 8 hours, or preferably overnight.
- Quick Soak: If you’re short on time, you can use the quick soak method. Place the rinsed beans in a large pot and cover them with at least 8 cups of water. Bring the water to a boil, then boil for 2-3 minutes. Remove the pot from the heat, cover it, and let the beans soak for 1 hour.
- Drain and rinse again: After soaking, drain the beans in a colander and rinse them thoroughly under cold running water. This helps to remove any remaining impurities and starches.
Cooking the Beans:
Now that our beans are nicely soaked, it’s time to cook them until they’re tender and ready to be transformed into delicious refried beans.
- Combine ingredients: In a large pot or Dutch oven, combine the drained and rinsed beans with 8 cups of fresh water. Add the chopped onion, minced garlic, cumin, chili powder, smoked paprika, dried oregano, salt, pepper, and optional jalapeños (if using).
- Bring to a boil: Bring the mixture to a boil over medium-high heat. Once boiling, reduce the heat to low, cover the pot, and simmer for 1 1/2 to 2 hours, or until the beans are very tender and easily mashed. Stir occasionally to prevent sticking.
- Check for doneness: The beans are done when they are easily mashed with a fork. If the water level gets too low during cooking, add more water to keep the beans covered.
- Optional: Add bacon: If you’re using bacon, add the cooked and crumbled bacon to the pot during the last 30 minutes of cooking. This will infuse the beans with a smoky, savory flavor.
Refrying the Beans:
This is where the magic happens! We’re going to take those cooked beans and turn them into creamy, flavorful refried beans. Get ready for some serious deliciousness.
- Heat the oil: In a large skillet or frying pan, heat the olive oil (or lard) over medium heat.
- Mash the beans: Using a potato masher or the back of a spoon, mash the cooked beans directly in the pot. You can mash them to your desired consistency some people prefer them completely smooth, while others like them a little chunky. If you want a super smooth consistency, you can use an immersion blender. Be careful when using an immersion blender in a hot pot!
- Add beans to the skillet: Carefully transfer the mashed beans to the heated skillet.
- Cook and stir: Cook the beans, stirring frequently, for about 15-20 minutes, or until they have thickened and reached your desired consistency. The beans will start to pull away from the sides of the skillet as they thicken.
- Adjust consistency: If the beans become too thick, add a little chicken or vegetable broth (or even water) to thin them out. Stir well to combine.
- Season to taste: Taste the beans and adjust the seasoning as needed. Add more salt, pepper, cumin, or chili powder to your liking.
Tips and Variations:
Refried beans are incredibly versatile, and there are endless ways to customize them to your taste. Here are a few ideas to get you started:
- Spice it up: Add more jalapeños, serrano peppers, or a pinch of cayenne pepper for extra heat.
- Add cheese: Stir in shredded cheddar cheese, Monterey Jack cheese, or queso fresco during the last few minutes of cooking for a cheesy, gooey treat.
- Make them vegetarian/vegan: Use vegetable broth instead of chicken broth and olive oil instead of lard. Omit the bacon.
- Use different beans: While pinto beans are the most common choice for refried beans, you can also use black beans, kidney beans, or even a combination of beans.
- Slow Cooker Method: For an even easier method, you can cook the beans in a slow cooker. Combine all the ingredients in the slow cooker and cook on low for 6-8 hours, or on high for 3-4 hours. Mash the beans directly in the slow cooker before refrying.
- Instant Pot Method: If you’re really short on time, use an Instant Pot! Add all ingredients to the Instant Pot, secure the lid, and cook on high pressure for 45 minutes, followed by a natural pressure release for 15 minutes. Mash and refry as directed.
- Smoky Flavor: For a deeper smoky flavor, add a smoked ham hock to the beans while they are cooking. Remove the ham hock before mashing the beans.
- Garlic Lovers: If you love garlic, add a few extra cloves to the pot. You can even roast the garlic beforehand for a sweeter, more mellow flavor.
- Onion Options: Try using different types of onions, such as yellow, white, or red onions, to vary the flavor. You can also caramelize the onions before adding them to the beans for a richer, sweeter taste.
Serving Suggestions:
Refried beans are a staple in Mexican cuisine and can be used in countless dishes. Here are a few ideas for how to enjoy your homemade refried beans:
- Tacos and Burritos: Spread refried beans on tortillas as a base for tacos and burritos.
- Nachos: Top tortilla chips with refried beans, cheese, and your favorite toppings for a delicious appetizer.
- Quesadillas: Fill quesadillas with refried beans and cheese for a quick and easy meal.
- Tostadas: Spread refried beans on crispy tostada shells and top with lettuce, tomatoes, cheese, and sour cream.
- Side Dish: Serve refried beans as a side dish with your favorite Mexican entrees, such as enchiladas, fajitas, or carne asada.
- Bean Dip: Serve refried beans as a warm dip with tortilla chips. Garnish with chopped cilantro, diced tomatoes, and a dollop of sour cream.
- Breakfast Burritos: Add refried beans to breakfast burritos with scrambled eggs, cheese, and salsa.
- Huevos Rancheros: Serve refried beans as a base for huevos rancheros, topped with fried eggs, salsa, and cheese.
Enjoy your homemade refried beans! I hope you find this recipe helpful and that you enjoy making and eating these delicious beans as much as I do. Don’t be afraid to experiment with different variations and find what you like best. Happy cooking!
Conclusion:
So there you have it! This recipe for homemade refried beans is more than just a side dish; it’s a flavor explosion waiting to happen. I truly believe that once you taste the difference between these and the canned variety, you’ll never go back. The depth of flavor, the creamy texture, and the sheer satisfaction of knowing you made it from scratch it’s an experience worth savoring.
But why is this recipe a must-try? Well, beyond the incredible taste, it’s incredibly versatile. You’re in control of the ingredients, meaning you can adjust the spice level to your liking, use different types of beans for a unique twist, and even make it completely vegetarian or vegan. Plus, it’s surprisingly easy to make! Don’t let the “homemade” label intimidate you. With just a few simple steps, you’ll have a batch of delicious refried beans ready to elevate any meal.
Serving Suggestions and Variations:
The possibilities are endless when it comes to serving these refried beans. Of course, they’re a classic accompaniment to tacos, burritos, and enchiladas. But don’t stop there!
* As a dip: Serve them warm with tortilla chips for a crowd-pleasing appetizer. A dollop of sour cream or guacamole on top adds a touch of richness.
* Spread on toast: For a quick and satisfying breakfast, spread refried beans on toast and top with a fried egg and some salsa.
* In a seven-layer dip: Elevate your seven-layer dip game by using these homemade refried beans as the base.
* As a side dish: Serve them alongside grilled chicken, steak, or fish for a hearty and flavorful meal.
* Bean and cheese burritos: Keep it simple and satisfying with classic bean and cheese burritos.
And if you’re feeling adventurous, try these variations:
* Spicy refried beans: Add a pinch of cayenne pepper or a chopped jalapeño to the beans while they’re simmering for an extra kick.
* Cheesy refried beans: Stir in some shredded cheddar or Monterey Jack cheese at the end for a creamy and decadent treat.
* Black bean refried beans: Use black beans instead of pinto beans for a different flavor profile.
* Refried beans with chorizo: Cook some chorizo in the pot before adding the beans for a smoky and savory flavor.
* Vegan refried beans: Ensure you’re using vegetable broth and skip the lard or bacon fat for a delicious vegan option.
I’m so excited for you to try this recipe and discover the magic of homemade refried beans. It’s a game-changer, I promise!
So, what are you waiting for? Head to the kitchen, gather your ingredients, and get cooking! I’m confident that you’ll love the results. And when you do, please, please, please come back and share your experience in the comments below. I’d love to hear what you think, what variations you tried, and how you served them. Your feedback is invaluable and helps me continue to create and share recipes that you’ll love. Happy cooking! I can’t wait to hear all about your refried bean adventures! Let me know if you have any questions, too!
Refried Beans: The Ultimate Guide to Making and Using Them
Creamy, flavorful refried beans, perfect as a side or in Mexican dishes.
Ingredients
- 1 pound dried pinto beans
- 8 cups water, plus more for soaking
- 1 large onion, chopped
- 4 cloves garlic, minced
- 2 tablespoons olive oil or lard
- 1 teaspoon ground cumin
- 1/2 teaspoon chili powder
- 1/4 teaspoon smoked paprika
- 1/4 teaspoon dried oregano
- Salt to taste
- Pepper to taste
- Optional: 1-2 jalapeños, seeded and minced
- Optional: 2-3 strips of bacon, cooked and crumbled
- Optional: 1/2 cup chicken or vegetable broth
Instructions
- Rinse the beans: Pour the dried pinto beans into a large colander and rinse them thoroughly under cold running water. Pick out any small stones or debris.
- Soak the beans:
- Overnight Soak: Place the rinsed beans in a large pot and cover them with at least 8 cups of water. Let them soak at room temperature for at least 8 hours, or preferably overnight.
- Quick Soak: Place the rinsed beans in a large pot and cover them with at least 8 cups of water. Bring the water to a boil, then boil for 2-3 minutes. Remove the pot from the heat, cover it, and let the beans soak for 1 hour.
- Drain and rinse again: After soaking, drain the beans in a colander and rinse them thoroughly under cold running water.
- Combine ingredients: In a large pot or Dutch oven, combine the drained and rinsed beans with 8 cups of fresh water. Add the chopped onion, minced garlic, cumin, chili powder, smoked paprika, dried oregano, salt, pepper, and optional jalapeños (if using).
- Bring to a boil: Bring the mixture to a boil over medium-high heat. Once boiling, reduce the heat to low, cover the pot, and simmer for 1 1/2 to 2 hours, or until the beans are very tender and easily mashed. Stir occasionally to prevent sticking.
- Check for doneness: The beans are done when they are easily mashed with a fork. If the water level gets too low during cooking, add more water to keep the beans covered.
- Optional: Add bacon: If you’re using bacon, add the cooked and crumbled bacon to the pot during the last 30 minutes of cooking.
- Heat the oil: In a large skillet or frying pan, heat the olive oil (or lard) over medium heat.
- Mash the beans: Using a potato masher or the back of a spoon, mash the cooked beans directly in the pot.
- Add beans to the skillet: Carefully transfer the mashed beans to the heated skillet.
- Cook and stir: Cook the beans, stirring frequently, for about 15-20 minutes, or until they have thickened and reached your desired consistency.
- Adjust consistency: If the beans become too thick, add a little chicken or vegetable broth (or even water) to thin them out. Stir well to combine.
- Season to taste: Taste the beans and adjust the seasoning as needed. Add more salt, pepper, cumin, or chili powder to your liking.
Notes
- Soaking the beans is crucial for reducing cooking time and making them easier to digest.
- Adjust the amount of jalapeños to your desired level of heat.
- For a smoother consistency, use an immersion blender to mash the beans.
- Refried beans can be stored in the refrigerator for up to 5 days or frozen for up to 3 months.
- See “Tips and Variations” in the original text for more ideas.


Leave a Comment