

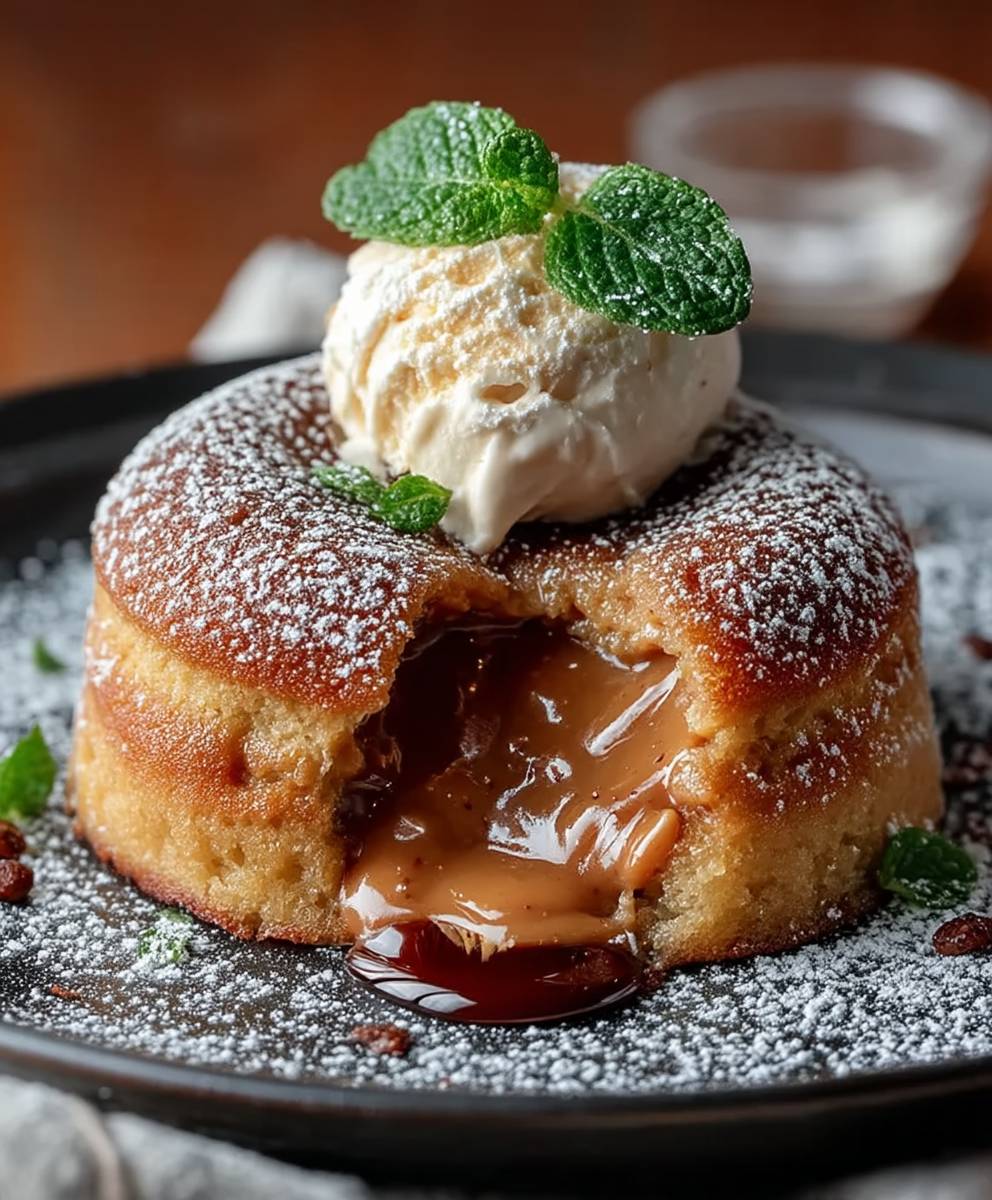
Peanut Butter Lava Cake: Just the name alone conjures images of warm, gooey decadence, doesn’t it? Imagine slicing into a perfectly baked chocolate cake, only to have a river of molten peanut butter erupt from its center. It’s a dessert experience that’s both comforting and utterly irresistible, and I’m thrilled to share my foolproof recipe with you!
While the exact origins of lava cake are debated, its popularity exploded in the 1990s, quickly becoming a restaurant staple. My version elevates the classic by incorporating the beloved flavor of peanut butter, creating a symphony of sweet and salty that’s simply divine. The combination might seem unconventional to some, but trust me, it’s a match made in dessert heaven.
What makes this Peanut Butter Lava Cake so universally adored? It’s the contrasting textures the slightly firm, cakey exterior giving way to the warm, flowing peanut butter center. The rich chocolate complements the nutty peanut butter perfectly, creating a flavor profile that’s both familiar and exciting. Plus, these individual cakes are incredibly easy to make, perfect for a weeknight treat or an impressive dessert for guests. Get ready to experience a little slice of heaven with every bite!

Ingredients:
- 1 cup (2 sticks) unsalted butter, softened
- 1 cup granulated sugar
- 1 cup packed light brown sugar
- 4 large eggs
- 1 teaspoon vanilla extract
- 1 cup all-purpose flour
- 1/2 cup unsweetened cocoa powder
- 1/4 teaspoon baking powder
- 1/4 teaspoon salt
- 1 cup creamy peanut butter
- 1/2 cup heavy cream
- 1/4 cup powdered sugar, for dusting (optional)
- Vanilla ice cream, for serving (optional)
Preparing the Cake Batter
Alright, let’s get started on this decadent Peanut Butter Lava Cake! First things first, we need to cream together the butter and sugars. This is a crucial step, so take your time and make sure it’s nice and fluffy.
- In a large mixing bowl, cream together the softened butter, granulated sugar, and light brown sugar until light and fluffy. This usually takes about 3-5 minutes with an electric mixer. You’ll know it’s ready when the mixture is noticeably lighter in color and has a smooth, airy texture. Don’t rush this step; it’s what gives the cake its tender crumb.
- Beat in the eggs one at a time, making sure each egg is fully incorporated before adding the next. This prevents the batter from curdling. After adding all the eggs, stir in the vanilla extract. The vanilla enhances all the other flavors, especially the peanut butter!
- In a separate bowl, whisk together the all-purpose flour, cocoa powder, baking powder, and salt. Whisking ensures that the dry ingredients are evenly distributed, which is essential for a consistent cake texture.
- Gradually add the dry ingredients to the wet ingredients, mixing on low speed until just combined. Be careful not to overmix! Overmixing develops the gluten in the flour, which can result in a tough cake. We want a tender, melt-in-your-mouth lava cake, not a chewy one.
Preparing the Peanut Butter Lava Center
Now for the star of the show: the molten peanut butter lava! This is what makes this cake so incredibly irresistible. The warm, gooey peanut butter center is pure heaven.
- In a microwave-safe bowl, combine the creamy peanut butter and heavy cream. Microwave on high for 30 seconds, then stir. If the peanut butter isn’t completely melted and smooth, microwave for another 15-30 seconds, stirring again until smooth. Be careful not to overheat the peanut butter, as it can burn easily.
Assembling and Baking the Lava Cakes
Okay, we’re almost there! Now it’s time to assemble the lava cakes and get them into the oven. The baking time is critical for achieving that perfect molten center, so pay close attention.
- Preheat your oven to 375°F (190°C). Grease and flour six ramekins. You can also use cooking spray with flour. This will prevent the cakes from sticking and make them easy to remove after baking. Alternatively, you can use muffin tins, but the baking time might need to be adjusted slightly.
- Divide half of the cake batter evenly among the prepared ramekins. This will form the base of the cake.
- Spoon the melted peanut butter mixture evenly over the batter in each ramekin. Try to keep the peanut butter in the center, away from the edges. This will help create a more dramatic lava effect.
- Top with the remaining cake batter, spreading it evenly over the peanut butter filling. Make sure the peanut butter is completely covered by the batter.
- Bake for 18-22 minutes, or until the edges of the cakes are set but the centers are still slightly soft. The baking time will vary depending on your oven, so keep a close eye on them. A toothpick inserted into the edge of the cake should come out clean, but the center should still be gooey.
- Let the cakes cool in the ramekins for a few minutes before inverting them onto plates. This allows the cakes to set slightly, making them easier to handle.
Serving and Enjoying Your Peanut Butter Lava Cake
The moment we’ve all been waiting for! It’s time to serve and devour these amazing Peanut Butter Lava Cakes. Get ready for a flavor explosion!
- Carefully run a knife around the edges of each ramekin to loosen the cake.
- Invert each cake onto a serving plate. If the cakes don’t release easily, gently tap the bottom of the ramekin.
- Dust with powdered sugar, if desired. This adds a touch of sweetness and elegance.
- Serve immediately with a scoop of vanilla ice cream, if desired. The cold ice cream complements the warm, gooey cake perfectly.
Tips for Success:
- Don’t overbake! The key to a lava cake is the molten center. Err on the side of underbaking rather than overbaking.
- Use good quality ingredients. The better the ingredients, the better the flavor of the cake.
- Grease and flour the ramekins well. This will prevent the cakes from sticking and make them easy to remove.
- Serve immediately. Lava cakes are best enjoyed warm, when the center is still molten.
- Experiment with different flavors. You can add chocolate chips, nuts, or other toppings to the batter or filling.
Variations:
- Chocolate Peanut Butter Lava Cake: Add 1/4 cup of chocolate chips to the batter.
- Salted Caramel Peanut Butter Lava Cake: Drizzle salted caramel sauce over the top of the cakes before serving.
- Nutella Peanut Butter Lava Cake: Substitute Nutella for half of the peanut butter in the filling.
Enjoy your homemade Peanut Butter Lava Cakes! I hope you love them as much as I do. They’re the perfect dessert for any occasion, whether it’s a special celebration or just a cozy night in.
Conclusion:
This Peanut Butter Lava Cake isn’t just a dessert; it’s an experience. The warm, gooey center of peanut butter mingling with the rich chocolate cake is a symphony of flavors and textures that will leave you craving more. It’s the perfect treat for a cozy night in, a special occasion, or simply when you need a little pick-me-up. Trust me, once you take that first bite, you’ll understand why I’m so enthusiastic about this recipe.
But the best part? It’s surprisingly easy to make! Forget complicated baking techniques and hours in the kitchen. This recipe is designed for simplicity, using ingredients you likely already have in your pantry. You can whip up a batch of these decadent lava cakes in under 30 minutes, making them ideal for satisfying those sudden dessert cravings.
Serving Suggestions and Variations:
Now, let’s talk about how to elevate your Peanut Butter Lava Cake experience even further. While it’s absolutely divine on its own, a few simple additions can take it to the next level.
* Ice Cream: A scoop of vanilla ice cream is a classic pairing that complements the warmth and richness of the cake perfectly. For a more adventurous twist, try peanut butter cup ice cream or even a salted caramel flavor.
* Whipped Cream: A dollop of freshly whipped cream adds a light and airy contrast to the dense cake. You can even infuse your whipped cream with a hint of peanut butter extract for an extra layer of flavor.
* Chocolate Sauce: Drizzle a generous amount of chocolate sauce over the top for an even more decadent treat. A dark chocolate sauce will provide a bittersweet counterpoint to the sweetness of the cake, while a milk chocolate sauce will enhance the overall richness.
* Peanut Butter Drizzle: Warm up some peanut butter and drizzle it over the cake for an extra peanut buttery punch.
* Chopped Peanuts: Sprinkle some chopped peanuts on top for added texture and a nutty crunch. You can use roasted, salted, or even candied peanuts for different flavor profiles.
* Sea Salt: A sprinkle of flaky sea salt on top enhances the sweetness and brings out the flavors of the peanut butter and chocolate.
* Espresso Powder: Add a teaspoon of espresso powder to the batter for a deeper, more intense chocolate flavor.
* Different Nut Butters: While this recipe focuses on peanut butter, feel free to experiment with other nut butters like almond butter, cashew butter, or even sunflower seed butter for a unique twist.
* Spice it up: A pinch of cayenne pepper in the batter adds a subtle kick that complements the peanut butter and chocolate beautifully.
I truly believe this Peanut Butter Lava Cake will become a staple in your dessert repertoire. It’s a crowd-pleaser that’s guaranteed to impress, and it’s so easy to make that you’ll find yourself whipping it up again and again.
So, what are you waiting for? Gather your ingredients, preheat your oven, and get ready to experience the magic of this incredible dessert. I’m confident you’ll love it as much as I do!
And most importantly, I’d love to hear about your experience! Once you’ve tried the recipe, please come back and share your thoughts in the comments below. Did you make any variations? What did you think of the flavor and texture? Your feedback is invaluable and helps me continue to create delicious and easy-to-follow recipes. Happy baking!
Peanut Butter Lava Cake: The Ultimate Decadent Dessert Recipe
Decadent peanut butter lava cakes with a warm, gooey peanut butter center. A rich and irresistible dessert perfect for any occasion.
Ingredients
- 1 cup (2 sticks) unsalted butter, softened
- 1 cup granulated sugar
- 1 cup packed light brown sugar
- 4 large eggs
- 1 teaspoon vanilla extract
- 1 cup all-purpose flour
- 1/2 cup unsweetened cocoa powder
- 1/4 teaspoon baking powder
- 1/4 teaspoon salt
- 1 cup creamy peanut butter
- 1/2 cup heavy cream
- 1/4 cup powdered sugar, for dusting (optional)
- Vanilla ice cream, for serving (optional)
Instructions
- Prepare the Cake Batter: Preheat oven to 375°F (190°C). In a large mixing bowl, cream together the softened butter, granulated sugar, and light brown sugar until light and fluffy (3-5 minutes). Beat in the eggs one at a time, then stir in the vanilla extract.
- In a separate bowl, whisk together the all-purpose flour, cocoa powder, baking powder, and salt. Gradually add the dry ingredients to the wet ingredients, mixing on low speed until just combined. Be careful not to overmix!
- Prepare the Peanut Butter Lava Center: In a microwave-safe bowl, combine the creamy peanut butter and heavy cream. Microwave on high for 30 seconds, then stir. If needed, microwave for another 15-30 seconds until smooth.
- Assemble and Bake: Grease and flour six ramekins. Divide half of the cake batter evenly among the ramekins. Spoon the melted peanut butter mixture evenly over the batter. Top with the remaining cake batter, spreading it evenly.
- Bake for 18-22 minutes, or until the edges of the cakes are set but the centers are still slightly soft.
- Let the cakes cool in the ramekins for a few minutes before inverting them onto plates.
- Serve: Carefully run a knife around the edges of each ramekin to loosen the cake. Invert each cake onto a serving plate. Dust with powdered sugar, if desired. Serve immediately with a scoop of vanilla ice cream, if desired.
Notes
- Don’t overbake! The key to a lava cake is the molten center. Err on the side of underbaking rather than overbaking.
- Use good quality ingredients. The better the ingredients, the better the flavor of the cake.
- Grease and flour the ramekins well. This will prevent the cakes from sticking and make them easy to remove.
- Serve immediately. Lava cakes are best enjoyed warm, when the center is still molten.
- Experiment with different flavors. You can add chocolate chips, nuts, or other toppings to the batter or filling.


Leave a Comment