

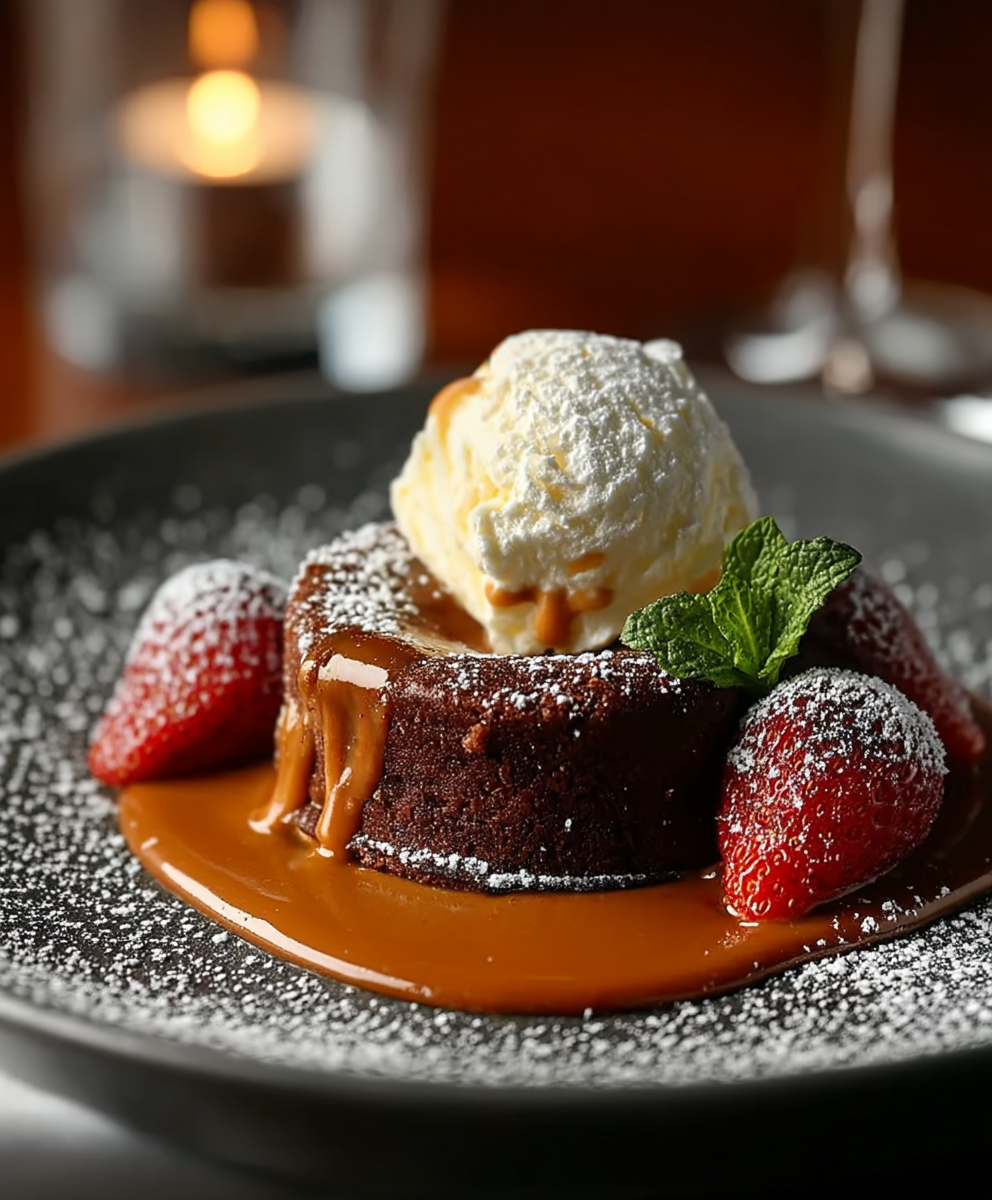
Peanut Butter Lava Cake: Just the name alone conjures images of warm, gooey, peanut butter perfection, doesn’t it? Imagine slicing into a decadent chocolate cake, only to be greeted by a molten river of rich, creamy peanut butter. This isn’t just dessert; it’s an experience, a symphony of flavors and textures that will leave you craving more.
While the exact origins of lava cake are debated, its popularity exploded in the 1990s, quickly becoming a restaurant staple. My version takes this classic dessert to the next level by infusing it with the irresistible allure of peanut butter. Peanut butter, a beloved ingredient in American cuisine, adds a comforting and familiar note to the sophisticated lava cake. It’s a match made in dessert heaven!
People adore this Peanut Butter Lava Cake for its simplicity and sheer indulgence. The contrast between the slightly firm, chocolatey exterior and the warm, flowing peanut butter center is simply divine. It’s also surprisingly easy to make, requiring minimal ingredients and effort. Whether you’re looking to impress guests or simply treat yourself to a well-deserved indulgence, this cake is guaranteed to satisfy your sweet tooth. The combination of chocolate and peanut butter is a timeless favorite, and this recipe elevates it to new heights. Get ready to experience a dessert that’s both comforting and utterly irresistible!

Ingredients:
- 1 cup (2 sticks) unsalted butter, softened
- 1 cup granulated sugar
- 1 cup packed light brown sugar
- 4 large eggs
- 1 teaspoon vanilla extract
- 1 cup all-purpose flour
- 1/2 cup unsweetened cocoa powder
- 1/4 teaspoon baking powder
- 1/4 teaspoon salt
- 1 cup creamy peanut butter
- 1/2 cup heavy cream
- 1/4 cup powdered sugar, for dusting (optional)
- Vanilla ice cream, for serving (optional)
Preparing the Cake Batter:
- Cream the Butter and Sugars: In a large mixing bowl, or the bowl of your stand mixer, cream together the softened butter, granulated sugar, and light brown sugar until light and fluffy. This usually takes about 3-5 minutes. Make sure to scrape down the sides of the bowl occasionally to ensure everything is evenly incorporated. The mixture should be pale and airy, which is crucial for a tender cake.
- Incorporate the Eggs and Vanilla: Beat in the eggs one at a time, making sure each egg is fully incorporated before adding the next. This prevents the batter from curdling. After all the eggs are added, stir in the vanilla extract. The vanilla enhances the overall flavor and complements the peanut butter beautifully.
- Combine Dry Ingredients: In a separate medium bowl, whisk together the all-purpose flour, cocoa powder, baking powder, and salt. Whisking ensures that the baking powder and salt are evenly distributed throughout the flour, which is essential for proper leavening and flavor.
- Gradually Add Dry Ingredients to Wet Ingredients: Gradually add the dry ingredients to the wet ingredients, mixing on low speed until just combined. Be careful not to overmix, as this can develop the gluten in the flour and result in a tough cake. Mix until you no longer see streaks of flour.
Preparing the Peanut Butter Lava Center:
- Combine Peanut Butter and Heavy Cream: In a microwave-safe bowl, combine the creamy peanut butter and heavy cream. Microwave on high for 30 seconds, then stir. If the mixture is not completely smooth and melted, microwave for another 15 seconds and stir again. Repeat until the mixture is smooth and easily pourable. The heavy cream thins out the peanut butter, creating the molten lava effect.
Assembling the Lava Cakes:
- Prepare the Baking Dishes: Preheat your oven to 350°F (175°C). Grease and flour four individual ramekins (about 6-ounce size). Alternatively, you can use a muffin tin, but the ramekins create a more dramatic presentation. Greasing and flouring prevents the cakes from sticking to the sides.
- Fill the Ramekins: Spoon half of the cake batter into the prepared ramekins, dividing it evenly among the four.
- Add the Peanut Butter Lava: Pour the melted peanut butter mixture evenly over the batter in each ramekin. Try to keep the peanut butter in the center, away from the edges, to ensure it stays molten during baking.
- Top with Remaining Batter: Spoon the remaining cake batter over the peanut butter layer, again dividing it evenly among the ramekins. Gently spread the batter to cover the peanut butter completely.
Baking the Lava Cakes:
- Bake the Cakes: Place the ramekins on a baking sheet and bake for 20-25 minutes, or until the edges of the cakes are set but the centers are still slightly soft. The baking time may vary depending on your oven, so keep a close eye on them. The cakes should be puffed up and golden brown around the edges.
- Cool Slightly: Let the cakes cool in the ramekins for a few minutes before inverting them onto plates. This allows the cakes to set slightly, making them easier to remove.
Serving the Lava Cakes:
- Invert and Serve: Carefully run a knife around the edges of each cake to loosen it from the ramekin. Place a plate over the ramekin and quickly invert it. Gently tap the bottom of the ramekin to release the cake.
- Garnish (Optional): Dust the cakes with powdered sugar, if desired. This adds a touch of sweetness and visual appeal.
- Serve Immediately: Serve the lava cakes immediately while they are still warm and the peanut butter center is molten.
- Add Ice Cream (Optional): Serve with a scoop of vanilla ice cream for a decadent treat. The cold ice cream complements the warm cake perfectly.
Tips for Perfect Peanut Butter Lava Cakes:
- Don’t Overbake: The key to a perfect lava cake is to underbake it slightly. The edges should be set, but the center should still be soft and molten. Overbaking will result in a regular cake without the lava effect.
- Use Room Temperature Ingredients: Using room temperature butter and eggs helps the batter come together more smoothly and evenly, resulting in a more tender cake.
- Measure Accurately: Accurate measurements are crucial for baking. Use measuring cups and spoons specifically designed for baking, and level off dry ingredients with a straight edge.
- Adjust Baking Time: Baking times may vary depending on your oven. Start checking the cakes after 20 minutes, and adjust the baking time as needed.
- Make Ahead: You can prepare the batter ahead of time and store it in the refrigerator for up to 24 hours. However, it’s best to bake the cakes just before serving to ensure the lava center is molten.
- Variations: Feel free to experiment with different variations of this recipe. You can add chocolate chips to the batter, use different types of nut butter, or top the cakes with different sauces or toppings.
Troubleshooting:
- Cake is too dry: This could be due to overbaking or using too much flour. Make sure to measure the flour accurately and avoid overbaking the cakes.
- Lava center is not molten: This could be due to overbaking or not using enough heavy cream in the peanut butter mixture. Make sure to underbake the cakes slightly and use the correct amount of heavy cream.
- Cake sticks to the ramekin: Make sure to grease and flour the ramekins thoroughly before filling them with batter. You can also use parchment paper rounds to line the bottom of the ramekins.
Storage:
- Leftover Lava Cakes: Leftover lava cakes can be stored in the refrigerator for up to 2 days. However, the lava center will solidify when chilled.
- Reheating: To reheat leftover lava cakes, microwave them for 15-20 seconds, or until the center is warm and slightly molten again. You can also reheat them in the oven at 350°F (175°C) for 5-10 minutes.
Nutritional Information (approximate, per serving):
- Calories: 650-750
- Fat: 40-50g
- Saturated Fat: 20-25g
- Cholesterol: 150-200mg
- Sodium: 200-300mg
- Carbohydrates: 60-70g
- Sugar: 40-50g
- Protein: 10-15g
Enjoy your delicious Peanut Butter Lava Cakes!
Conclusion:
This Peanut Butter Lava Cake is truly an experience you won’t want to miss. From the rich, decadent chocolate cake to the molten peanut butter center, every bite is a symphony of flavors and textures. It’s quick, it’s easy, and it’s guaranteed to impress, whether you’re whipping it up for a weeknight treat or a special occasion. The combination of the warm, gooey peanut butter with the fudgy cake is simply irresistible, making it a dessert that will have everyone begging for seconds.
But the best part? It’s incredibly versatile! While I’ve shared my go-to recipe, feel free to experiment and make it your own. For an extra touch of indulgence, try serving it with a scoop of vanilla ice cream or a dollop of whipped cream. The coldness of the ice cream perfectly complements the warmth of the cake, creating a delightful contrast that elevates the entire experience.
If you’re feeling adventurous, you could also try adding a sprinkle of sea salt on top to enhance the peanut butter flavor. The saltiness cuts through the sweetness, creating a more complex and satisfying taste. Another fun variation is to incorporate chopped peanuts into the batter for added crunch and texture. This will give the cake a more nutty flavor and a delightful bite.
For those who prefer a less intense peanut butter flavor, you can substitute half of the peanut butter with Nutella or another chocolate hazelnut spread. This will create a delicious swirl of flavors and add a touch of sophistication to the dessert. You can also experiment with different types of chocolate, such as dark chocolate or milk chocolate, to customize the cake to your liking.
And don’t forget about the presentation! A dusting of powdered sugar or a drizzle of chocolate sauce can instantly transform this simple dessert into a show-stopping masterpiece. You can also garnish it with fresh berries, such as raspberries or strawberries, for a pop of color and a burst of freshness.
I truly believe that this Peanut Butter Lava Cake recipe is a winner. It’s the perfect balance of simplicity and indulgence, making it a dessert that everyone will love. It’s also a great way to satisfy your sweet tooth without spending hours in the kitchen.
So, what are you waiting for? Grab your ingredients and get baking! I promise you won’t regret it. And once you’ve tried it, I’d love to hear about your experience. Did you make any variations? What did you think of the flavor and texture? Share your photos and comments below I can’t wait to see your creations! I’m confident that this recipe will become a staple in your dessert repertoire, and I’m excited to share it with you. Happy baking! Let me know if you have any questions, and I’ll be happy to help. Enjoy your decadent and delicious Peanut Butter Lava Cake!
Peanut Butter Lava Cake: The Ultimate Decadent Dessert Recipe
Decadent chocolate lava cakes with a molten peanut butter center. A warm, gooey, and irresistible dessert!
Ingredients
- 1 cup (2 sticks) unsalted butter, softened
- 1 cup granulated sugar
- 1 cup packed light brown sugar
- 4 large eggs
- 1 teaspoon vanilla extract
- 1 cup all-purpose flour
- 1/2 cup unsweetened cocoa powder
- 1/4 teaspoon baking powder
- 1/4 teaspoon salt
- 1 cup creamy peanut butter
- 1/2 cup heavy cream
- 1/4 cup powdered sugar, for dusting (optional)
- Vanilla ice cream, for serving (optional)
Instructions
- In a large mixing bowl, or the bowl of your stand mixer, cream together the softened butter, granulated sugar, and light brown sugar until light and fluffy.
- Beat in the eggs one at a time, making sure each egg is fully incorporated before adding the next.
- After all the eggs are added, stir in the vanilla extract.
- In a separate medium bowl, whisk together the all-purpose flour, cocoa powder, baking powder, and salt.
- Gradually add the dry ingredients to the wet ingredients, mixing on low speed until just combined.
- In a microwave-safe bowl, combine the creamy peanut butter and heavy cream.
- Microwave on high for 30 seconds, then stir.
- If the mixture is not completely smooth and melted, microwave for another 15 seconds and stir again.
- Preheat your oven to 350°F (175°C).
- Grease and flour four individual ramekins (about 6-ounce size).
- Spoon half of the cake batter into the prepared ramekins, dividing it evenly among the four.
- Pour the melted peanut butter mixture evenly over the batter in each ramekin.
- Try to keep the peanut butter in the center, away from the edges, to ensure it stays molten during baking.
- Spoon the remaining cake batter over the peanut butter layer, again dividing it evenly among the ramekins.
- Gently spread the batter to cover the peanut butter completely.
- Place the ramekins on a baking sheet and bake for 20-25 minutes, or until the edges of the cakes are set but the centers are still slightly soft.
- Let the cakes cool in the ramekins for a few minutes before inverting them onto plates.
- Carefully run a knife around the edges of each cake to loosen it from the ramekin.
- Place a plate over the ramekin and quickly invert it.
- Gently tap the bottom of the ramekin to release the cake.
- Dust the cakes with powdered sugar, if desired.
- Serve the lava cakes immediately while they are still warm and the peanut butter center is molten.
- Serve with a scoop of vanilla ice cream for a decadent treat.
Notes
- Don’t Overbake: The key to a perfect lava cake is to underbake it slightly. The edges should be set, but the center should still be soft and molten. Overbaking will result in a regular cake without the lava effect.
- Use Room Temperature Ingredients: Using room temperature butter and eggs helps the batter come together more smoothly and evenly, resulting in a more tender cake.
- Measure Accurately: Accurate measurements are crucial for baking. Use measuring cups and spoons specifically designed for baking, and level off dry ingredients with a straight edge.
- Adjust Baking Time: Baking times may vary depending on your oven. Start checking the cakes after 20 minutes, and adjust the baking time as needed.
- Make Ahead: You can prepare the batter ahead of time and store it in the refrigerator for up to 24 hours. However, it’s best to bake the cakes just before serving to ensure the lava center is molten.
- Variations: Feel free to experiment with different variations of this recipe. You can add chocolate chips to the batter, use different types of nut butter, or top the cakes with different sauces or toppings.
- Cake is too dry: This could be due to overbaking or using too much flour. Make sure to measure the flour accurately and avoid overbaking the cakes.
- Lava center is not molten: This could be due to overbaking or not using enough heavy cream in the peanut butter mixture. Make sure to underbake the cakes slightly and use the correct amount of heavy cream.
- Cake sticks to the ramekin: Make sure to grease and flour the ramekins thoroughly before filling them with batter. You can also use parchment paper rounds to line the bottom of the ramekins.
- Leftover Lava Cakes: Leftover lava cakes can be stored in the refrigerator for up to 2 days. However, the lava center will solidify when chilled.
- Reheating: To reheat leftover lava cakes, microwave them for 15-20 seconds, or until the center is warm and slightly molten again. You can also reheat them in the oven at 350°F (175°C) for 5-10 minutes.


Leave a Comment