

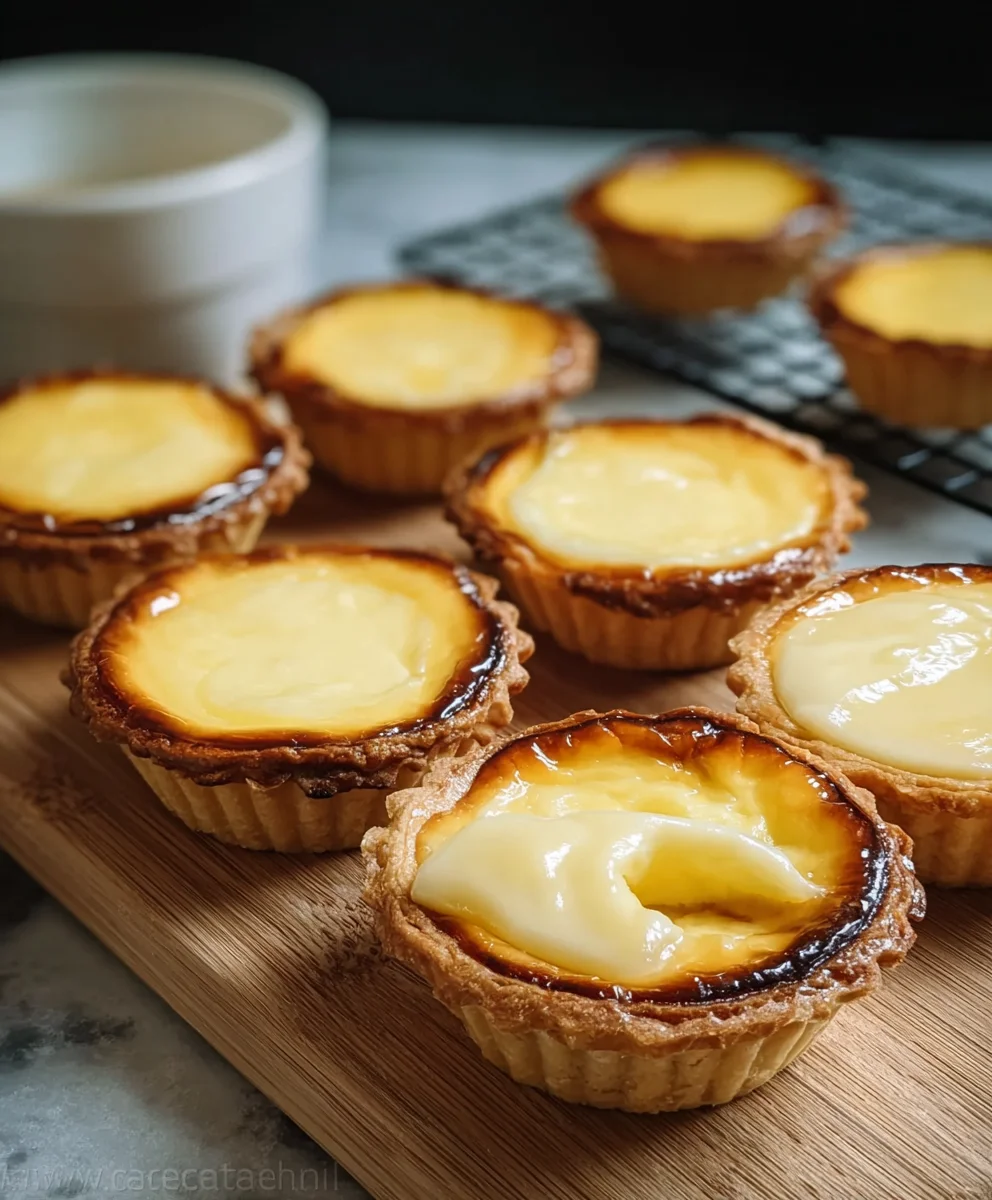
Irresistible Japanese Cheese Tarts are more than just a dessert; they are a culinary sensation that has captivated palates worldwide, and I’m absolutely thrilled to guide you through creating them in your own kitchen!
Imagine biting into a delicate, flaky pastry crust, only to be met with a rich, creamy, and subtly tangy cheese filling that melts in your mouth.
This isn’t just any cheese tart; it’s a symphony of textures and flavors that truly stands apart. Originating from Hokkaido, Japan, these delightful treats gained immense popularity for their unique blend of a savory-sweet profile. They quickly became a staple in bakeries across Asia and beyond, celebrated for their distinct three-cheese blend that creates an unparalleled depth of flavor. People adore this dish not only for its incredible taste and luxurious, silken texture but also for the way it perfectly balances a comforting familiarity with an exciting, gourmet twist. Preparing your own Irresistible Japanese Cheese Tarts allows you to savor that authentic, bakery-quality experience right at home, making any occasion feel a little more special. Trust me, once you try them, you’ll understand why they’re so beloved!

Ingredients:
-
For the Tart Crust (Pâte Sablée):
- 1 ½ cups (180g) all-purpose flour, sifted – sifting ensures a light, airy crust!
- ½ cup (60g) powdered sugar (confectioners’ sugar), sifted – adds sweetness and helps with tenderness.
- ¼ teaspoon salt – a pinch of salt balances the sweetness beautifully.
- ½ cup (113g) unsalted butter, very cold and cubed – cold butter is key for a flaky, tender crust.
- 1 large egg yolk – enriches the dough and helps bind it.
- 2-3 tablespoons ice water – add just enough to bring the dough together.
-
For the Irresistible Cheese Filling:
- 8 ounces (226g) cream cheese, full-fat, softened to room temperature – essential for that creamy, smooth texture.
- ½ cup (100g) granulated sugar – sweetens the filling without being overpowering.
- ½ cup (120ml) heavy cream (or whipping cream) – contributes to the luxurious richness.
- ¼ cup (60g) sour cream or plain full-fat Greek yogurt – adds a lovely tangy depth that cuts through the richness.
- 1 large egg yolk – for binding and adding a beautiful golden hue to the filling.
- 1 teaspoon vanilla extract – enhances all the sweet flavors.
- Pinch of salt (optional) – to further balance the flavors.
-
For the Egg Wash (for tops of tarts):
- 1 large egg yolk
- 1 teaspoon water or milk
Crafting the Perfect Tart Crust
Creating the foundation for our Irresistible Japanese Cheese Tarts begins with the crust, a classic pâte sablée. This shortcrust pastry is buttery, crumbly, and wonderfully tender, providing the perfect counterpoint to the creamy filling. Trust me, making it from scratch is absolutely worth the effort!
- First things first, let’s get our dry ingredients ready. In a large mixing bowl, I like to whisk together the sifted all-purpose flour, sifted powdered sugar, and the salt. Sifting here is not just a suggestion; it really makes a difference in achieving a uniformly smooth and tender crust, free of any pesky lumps.
- Next, it’s time to incorporate that wonderfully cold butter. I add the cubed, very cold unsalted butter to my dry ingredients. Now, you can use a pastry blender, two knives, or even your fingertips for this step. The goal is to cut the butter into the flour mixture until it resembles coarse crumbs, with some pieces still about the size of small peas. The trick here is to work quickly so the butter stays cold. This process creates little pockets of butter that will later release steam during baking, giving us that desirable flaky texture.
- Once your butter and flour are happily combined, it’s time to add the wet components. In a small separate bowl, lightly whisk your large egg yolk. Make a well in the center of your flour-butter mixture and pour in the egg yolk. Then, gradually add the ice water, starting with two tablespoons. Using a spatula or your hands, gently mix until the dough just starts to come together. Be careful not to overmix! Overworking the dough develops gluten, which can lead to a tough crust, and we’re aiming for pure tenderness here. If the dough still seems too dry to form, add the third tablespoon of ice water, a tiny bit at a time.
- Once the dough forms a shaggy ball, turn it out onto a lightly floured surface. Briefly gather it into a cohesive disc. Wrap the disc tightly in plastic wrap and pop it into the refrigerator for at least 30 minutes, or even up to an hour. Chilling the dough allows the gluten to relax and the butter to firm up again, making it much easier to roll out and preventing shrinkage during baking. This is a crucial step for a beautiful, well-behaved crust.
- While our dough is chilling out, preheat your oven to 350°F (175°C). Prepare your individual tart molds (usually 3-inch/7.5 cm diameter). Lightly grease them if they’re not non-stick, though often this isn’t necessary with a rich dough like this.
- Now, retrieve your chilled dough. On a lightly floured surface, roll out the dough to about 1/8 inch (3mm) thickness. I find it helpful to roll it out between two sheets of parchment paper to prevent sticking and make it easier to transfer.
- Using a round cookie cutter or the rim of a glass slightly larger than your tart molds, cut out circles of dough. Carefully transfer each circle into a tart mold, gently pressing it into the bottom and up the sides. Trim any excess dough from the edges. You can re-roll scraps once, but don’t overwork them. Prick the bottom of each tart shell several times with a fork; this helps prevent the crust from puffing up excessively during blind baking.
- For blind baking, line each tart shell with a small piece of parchment paper or foil and fill it with pie weights, dried beans, or rice. This helps the crust maintain its shape. Bake for 15-20 minutes, or until the edges appear set and lightly golden.
- Carefully remove the weights and parchment paper/foil. Return the tart shells to the oven for another 5-10 minutes, or until the bottom is lightly golden brown and fully cooked. This ensures a crisp crust that won’t get soggy once filled. Once done, remove them from the oven and let them cool completely on a wire rack before you even think about filling them. A cool crust is key!
Preparing the Irresistible Japanese Cheese Tart Filling
Now for the star of the show: the incredibly creamy and tangy cheese filling that makes these tarts so utterly delightful. This is where the magic truly happens, transforming simple ingredients into something truly Irresistible Japanese Cheese Tarts worthy of a bakery display.
- First, make sure your cream cheese is at room temperature. This is absolutely non-negotiable for a silky-smooth filling. If it’s cold, you’ll end up with lumps, and nobody wants lumpy cheese tarts! In a large mixing bowl, using an electric mixer, beat the softened cream cheese on medium speed until it’s light, fluffy, and completely smooth, with no lumps whatsoever. This usually takes a couple of minutes.
- Next, gradually add the granulated sugar to the beaten cream cheese. Continue beating on medium speed for another 2-3 minutes, scraping down the sides of the bowl occasionally. You want the mixture to be pale and airy, indicating that the sugar has dissolved and is fully incorporated. This creaming process also adds air, contributing to the light texture of the filling.
- Pour in the heavy cream and continue mixing on low speed until it’s just combined. Be careful not to overmix here; we’re not trying to whip the cream, just blend it in. The mixture will become slightly looser and even more luxurious.
- Now, add the sour cream (or plain full-fat Greek yogurt if that’s what you’re using). This ingredient is a secret weapon for Japanese cheese tarts! It introduces a wonderful tanginess that perfectly balances the richness of the cream cheese and heavy cream. Mix it in until everything is smooth and uniform. Again, scrape down the sides of the bowl to ensure no pockets of unmixed ingredients remain.
- It’s time for the egg yolk. Add the large egg yolk to the mixture. Beat on low speed until it is fully incorporated, ensuring that it disappears into the cream cheese mixture completely. The egg yolk acts as a binder and contributes to the custard-like texture of the baked filling.
- Finally, stir in the vanilla extract. If you opted for a pinch of salt, now would be the time to add it. Give it one last gentle mix to ensure everything is perfectly combined.
- For an ultra-smooth, professional-grade filling: I highly recommend pushing the entire cheese mixture through a fine-mesh sieve into another clean bowl. This extra step removes any tiny lumps that might have escaped your mixer and ensures a truly velvety, melt-in-your-mouth texture for your Irresistible Japanese Cheese Tarts. It’s a small effort for a big reward in terms of final texture!
Assembling, Baking, and Chilling Our Irresistible Japanese Cheese Tarts
We’re in the home stretch! With our perfectly baked crusts and luscious filling ready, it’s time to bring everything together and create those beautiful, golden-topped Irresistible Japanese Cheese Tarts. This phase requires a bit of precision and patience, but the outcome is absolutely worth it.
- First, make sure your oven is preheated to 325°F (160°C). This slightly lower temperature, compared to the blind baking, is ideal for gently baking the delicate cheese filling without overcooking it or causing it to crack.
- Arrange your cooled, pre-baked tart shells on a baking sheet. This makes them easy to transfer in and out of the oven.
- Carefully spoon or, even better, pipe the prepared cheese filling into each tart shell. Fill them almost to the brim, leaving just a tiny bit of space at the top, perhaps about 1/8 inch (3mm). I find that using a piping bag (with or without a tip) gives a neater finish and makes the process less messy. Gently tap the baking sheet on your counter a few times to release any air bubbles from the filling. This also helps the filling settle evenly.
- Now for that signature golden-brown top! In a small bowl, whisk together the additional large egg yolk with one teaspoon of water or milk until well combined. This is our egg wash.
- Using a pastry brush, very gently and lightly brush the tops of the filled tarts with the egg wash. Be careful not to disturb the filling too much. This egg wash is what will give our tarts that beautiful, slightly glossy, rich golden-brown color during baking, making them look truly appetizing and professionally made.
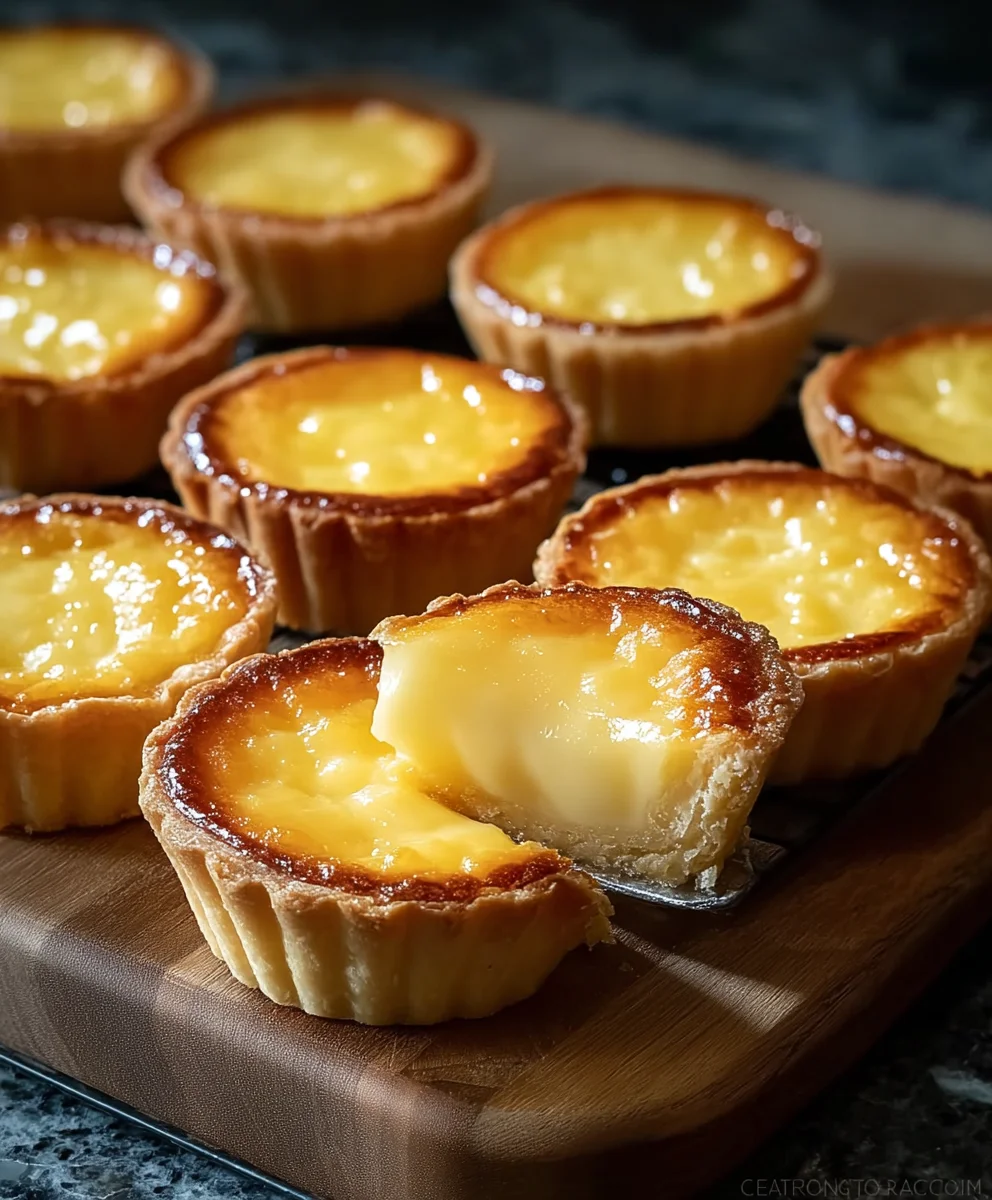
- Transfer the baking sheet with your filled tarts to the preheated oven. Bake for approximately 15-20 minutes. The exact time can vary depending on your oven and the size of your tart molds. You’re looking for the edges of the filling to be set, but the very center should still have a slight jiggle to it when you gently shake the baking sheet. The tops should be a lovely golden-brown. It’s crucial not to overbake them, as we want that creamy, slightly molten texture inside. If they bake too long, they can become dry and crumbly.
- Once baked, carefully remove the tarts from the oven. Resist the urge to dive in immediately! Let them cool completely on a wire rack at room temperature. As they cool, the filling will continue to set up.
- Here’s the secret to truly irresistible Japanese Cheese Tarts: Chilling! Once completely cool, transfer the tarts (still in their molds, or carefully removed if you prefer) to the refrigerator. Chill them for at least 2-3 hours, but ideally, for the absolute best flavor and texture, I recommend chilling them overnight. This allows all the flavors to meld beautifully and the filling to achieve its perfectly firm yet creamy consistency. They are absolutely divine when served cold, showcasing that perfect balance of tangy and sweet, with a firm crust and a meltingly smooth center.
Conclusion:
And there you have it, my friends! We’ve reached the delicious culmination of our baking journey. I truly believe that this recipe for Japanese Cheese Tarts isn’t just another dessert; it’s an experience, a moment of pure culinary delight waiting to happen in your very own kitchen. I’ve poured my heart into perfecting these, and I’m absolutely confident that you’ll find them as captivating as I do. The delicate dance of textures – from the crisp, buttery shortcrust pastry that shatters with each bite to the velvety, almost cloud-like cream cheese filling that melts on your tongue – is simply unparalleled. It’s a symphony of sweet and tangy, rich yet surprisingly light, making each tart a miniature masterpiece. These aren’t just good; they are, in my humble opinion, the definition of Irresistible Japanese Cheese Tarts, an absolute revelation for anyone who appreciates the finer points of dessert. Their unique charm lies in their simplicity combined with an unexpected complexity of flavor that leaves you craving just one more.
Once you’ve mastered the art of baking these beauties, the fun doesn’t stop there! While they are undoubtedly exquisite on their own, a few thoughtful serving suggestions and delightful variations can elevate your tart experience even further. I highly recommend enjoying them at various temperatures. A tart served warm, straight from the oven (after cooling just enough to set), offers a wonderfully gooey, almost molten center that’s incredibly comforting, especially on a chilly evening. Alternatively, chilling them thoroughly in the refrigerator transforms the filling into a firmer, cheesecake-like consistency, making them incredibly refreshing on a warm day. Room temperature offers a perfect balance, allowing the nuanced flavors to shine without any extreme sensations. For an elegant presentation, consider a light dusting of high-quality powdered sugar, or perhaps a tiny sprig of fresh mint for a pop of color. They also pair wonderfully with a warm cup of sencha tea, a strong espresso, or even a glass of sparkling wine for a more celebratory touch.
But why stop at the original? The beauty of baking is in experimentation, and these tarts are wonderfully versatile. One of my favorite variations involves incorporating a hint of citrus zest into the cream cheese filling – lemon or yuzu zest can introduce a bright, zesty note that cuts through the richness beautifully, adding another layer of complexity. For chocolate lovers, a tablespoon of high-quality cocoa powder mixed into the filling, or even a few miniature chocolate chips folded in, can transform them into a decadent chocolate cheese tart. If you’re a fan of matcha, whisking in a teaspoon of ceremonial grade matcha powder will give you stunning green tarts with an earthy, slightly bitter undertone that beautifully complements the sweetness of the cheese. Don’t be afraid to play with different crusts either; while our shortcrust is divine, a graham cracker crust or even a crushed speculoos biscuit crust could offer an interesting alternative texture and flavor profile. You could also experiment with a mixed berry compote spooned gently over the top just before serving, providing a burst of fruity freshness that balances the creamy filling.
Ultimately, my biggest hope is that you’ll take this recipe and make it your own. There’s an immense joy to be found in the baking process, from carefully mixing the dough to watching the tarts puff up golden brown in the oven, filling your home with an intoxicating aroma. Trust me, the effort is incredibly rewarding! I genuinely encourage each and every one of you to set aside some time, gather your ingredients, and give these a try. Don’t be intimidated; the steps are clear, and the results are truly worth it. When you do, please come back and share your experience with me! I absolutely love hearing about your baking adventures. Did you try a unique variation? What was your favorite part of the process? Did your family rave about them? Your feedback and stories are what make this community so vibrant and inspiring. So, preheat your ovens, embrace the delicious challenge, and prepare to be utterly charmed by these delightful Japanese Cheese Tarts. Happy baking!
Melt-in-Your-Mouth Irresistible Japanese Cheese Tarts
Irresistible Japanese Cheese Tarts are a perfect combination of buttery tart shells and creamy, gooey cheese filling. Whether enjoyed warm for a molten center, chilled for a custard-like texture, or frozen for a refreshing twist, these tarts are an ideal dessert for any occasion. Easy to make and irresistibly delicious, they are sure to impress at your next gathering!
Ingredients
-
1 ½ cups (180g) all-purpose flour, sifted
-
½ cup (60g) powdered sugar, sifted
-
¼ teaspoon salt
-
½ cup (113g) unsalted butter, very cold and cubed
-
1 large egg yolk
-
2-3 tablespoons ice water
-
8 ounces (226g) cream cheese, full-fat, softened
-
½ cup (100g) granulated sugar
-
½ cup (120ml) heavy cream
-
¼ cup (60g) sour cream or plain full-fat Greek yogurt
-
1 large egg yolk
-
1 teaspoon vanilla extract
-
Pinch of salt (optional)
-
1 large egg yolk (for egg wash)
-
1 teaspoon water or milk (for egg wash)
Instructions
-
Step 1
{‘@type’: ‘HowToStep’, ‘name’: ‘Crafting the Tart Crust’, ‘itemListElement’: [{‘@type’: ‘HowToDirection’, ‘text’: ‘Whisk sifted all-purpose flour, sifted powdered sugar, and salt in a large bowl.’}, {‘@type’: ‘HowToDirection’, ‘text’: ‘Cut in cold, cubed unsalted butter until mixture resembles coarse crumbs with some pea-sized pieces. Work quickly to keep butter cold.’}, {‘@type’: ‘HowToDirection’, ‘text’: ‘In a separate small bowl, whisk 1 large egg yolk. Make a well in the flour-butter mixture, pour in egg yolk, then gradually add 2-3 tablespoons ice water. Mix gently until dough just comes together; do not overmix.’}, {‘@type’: ‘HowToDirection’, ‘text’: ‘Gather dough into a disc, wrap tightly in plastic, and chill in the refrigerator for at least 30 minutes.’}, {‘@type’: ‘HowToDirection’, ‘text’: ‘Preheat oven to 350°F (175°C). Prepare individual 3-inch tart molds.’}, {‘@type’: ‘HowToDirection’, ‘text’: ‘On a lightly floured surface, roll out chilled dough to about 1/8 inch (3mm) thickness. Cut out circles slightly larger than your tart molds and gently press into molds. Trim excess dough and prick bottoms with a fork.’}, {‘@type’: ‘HowToDirection’, ‘text’: ‘Line each tart shell with parchment paper or foil and fill with pie weights/dried beans. Blind bake for 15-20 minutes, or until edges appear set and lightly golden.’}, {‘@type’: ‘HowToDirection’, ‘text’: ‘Carefully remove weights and parchment/foil. Return tart shells to the oven for another 5-10 minutes, until the bottom is lightly golden brown and fully cooked. Cool completely on a wire rack.’}]} -
Step 2
{‘@type’: ‘HowToStep’, ‘name’: ‘Preparing the Irresistible Japanese Cheese Tart Filling’, ‘itemListElement’: [{‘@type’: ‘HowToDirection’, ‘text’: ‘In a large mixing bowl, beat softened full-fat cream cheese on medium speed for 2 minutes until light, fluffy, and completely smooth.’}, {‘@type’: ‘HowToDirection’, ‘text’: ‘Gradually add granulated sugar, beating on medium speed for another 2-3 minutes until the mixture is pale and airy, scraping down the sides occasionally.’}, {‘@type’: ‘HowToDirection’, ‘text’: ‘Pour in heavy cream and mix on low speed until just combined. Do not overmix.’}, {‘@type’: ‘HowToDirection’, ‘text’: ‘Add sour cream (or plain full-fat Greek yogurt) and mix until smooth and uniform. Scrape down the sides of the bowl.’}, {‘@type’: ‘HowToDirection’, ‘text’: ‘Add 1 large egg yolk and beat on low speed until fully incorporated.’}, {‘@type’: ‘HowToDirection’, ‘text’: ‘Stir in vanilla extract and an optional pinch of salt. Give it one last gentle mix.’}, {‘@type’: ‘HowToDirection’, ‘text’: ‘For an ultra-smooth filling, push the entire cheese mixture through a fine-mesh sieve into another clean bowl.’}]} -
Step 3
{‘@type’: ‘HowToStep’, ‘name’: ‘Assembling, Baking, and Chilling’, ‘itemListElement’: [{‘@type’: ‘HowToDirection’, ‘text’: ‘Preheat oven to 325°F (160°C). Arrange cooled, pre-baked tart shells on a baking sheet.’}, {‘@type’: ‘HowToDirection’, ‘text’: ‘Carefully spoon or pipe the prepared cheese filling into each tart shell, filling almost to the brim (about 1/8 inch from the top). Gently tap the baking sheet to release air bubbles and settle the filling evenly.’}, {‘@type’: ‘HowToDirection’, ‘text’: ‘In a small bowl, whisk the additional large egg yolk with 1 teaspoon of water or milk for an egg wash. Gently brush the tops of the filled tarts with the egg wash.’}, {‘@type’: ‘HowToDirection’, ‘text’: ‘Bake for approximately 15-20 minutes. The edges of the filling should be set, the center should still have a slight jiggle, and the tops should be a lovely golden-brown. Avoid overbaking.’}, {‘@type’: ‘HowToDirection’, ‘text’: ‘Remove from the oven and let them cool completely on a wire rack at room temperature.’}, {‘@type’: ‘HowToDirection’, ‘text’: ‘Once completely cool, transfer the tarts to the refrigerator. Chill for at least 2-3 hours, or ideally overnight, for the best flavor and texture. Serve cold.’}]}
Important Information
Nutrition Facts (Per Serving)
It is important to consider this information as approximate and not to use it as definitive health advice.
Allergy Information
Please check ingredients for potential allergens and consult a health professional if in doubt.


Leave a Comment