

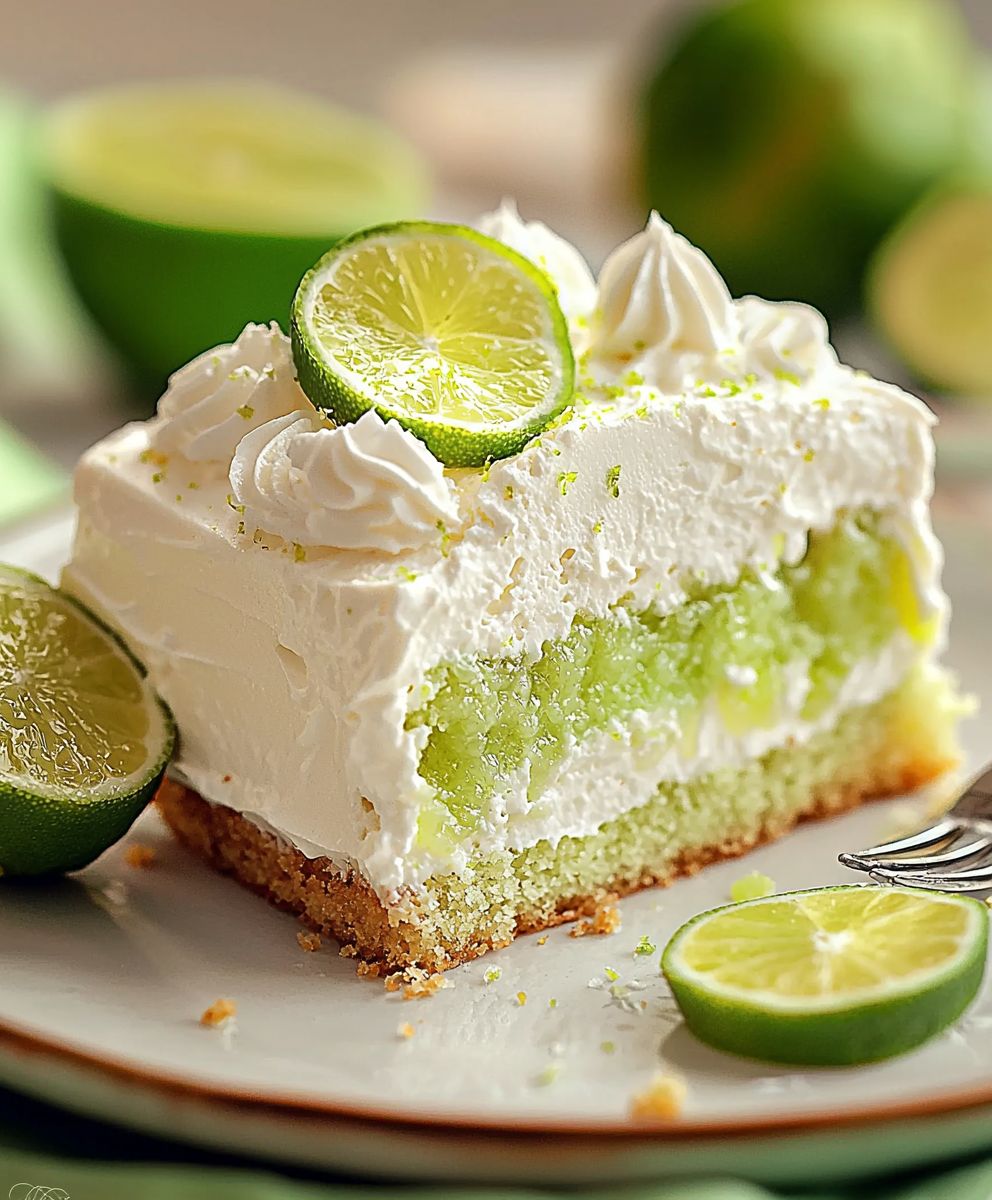
Key Lime Poke Cake: Prepare to be transported to a tropical paradise with every single bite! Imagine a dessert that perfectly balances tangy citrus notes with a creamy, melt-in-your-mouth texture. This isn’t just any cake; it’s a flavor explosion that will leave you craving more.
Poke cakes, while not steeped in ancient history, have become a beloved American classic, known for their ease of preparation and incredible moistness. The beauty of a poke cake lies in its simplicity baked cake, poked with holes, and then infused with a luscious filling. This particular variation elevates the concept by incorporating the vibrant and refreshing taste of key limes, a fruit synonymous with sunshine and relaxation.
What makes this Key Lime Poke Cake so irresistible? It’s the delightful contrast between the soft, airy cake, the tangy key lime-infused filling, and the smooth, creamy topping. People adore this dessert because it’s incredibly easy to make, perfect for potlucks, parties, or simply a delightful treat on a warm afternoon. The bright, zesty flavor is a welcome change from heavier desserts, making it a crowd-pleaser year-round. Trust me, once you try this recipe, it will quickly become a family favorite!

Ingredients:
- 1 box (15.25 oz) yellow cake mix
- 1 package (3.4 oz) instant key lime pudding mix
- 1 cup milk
- 1/2 cup vegetable oil
- 4 large eggs
- 1/2 cup key lime juice, divided (freshly squeezed is best!)
- 1 can (14 oz) sweetened condensed milk
- 8 oz cream cheese, softened
- 1 container (8 oz) frozen whipped topping, thawed
- Key lime slices, for garnish (optional)
- Lime zest, for garnish (optional)
Preparing the Cake
- Preheat your oven to 350°F (175°C). Grease and flour a 9×13 inch baking pan. This will prevent the cake from sticking and ensure easy removal. I like to use baking spray with flour already in it for extra insurance!
- In a large mixing bowl, combine the yellow cake mix, key lime pudding mix, milk, vegetable oil, and eggs. Beat with an electric mixer on medium speed for 2 minutes, or until well combined. Don’t overmix! Overmixing can lead to a tough cake.
- Stir in 1/4 cup of the key lime juice. This will give the cake a subtle key lime flavor that complements the pudding.
- Pour the batter into the prepared baking pan and spread evenly.
- Bake for 30-35 minutes, or until a wooden skewer inserted into the center comes out clean. Keep an eye on it, as oven temperatures can vary. You want a golden brown top.
- Let the cake cool completely in the pan. This is crucial! If you poke the cake while it’s still warm, it can crumble. I usually let it cool for at least an hour.
Creating the Key Lime Poke
- Once the cake is completely cool, use the handle of a wooden spoon or a large fork to poke holes all over the cake. Make sure the holes are evenly spaced and go almost all the way to the bottom of the cake, but not through it. The more holes, the more flavor!
- In a medium bowl, whisk together the sweetened condensed milk and the remaining 1/4 cup of key lime juice. This mixture will soak into the cake and make it incredibly moist and flavorful.
- Slowly pour the sweetened condensed milk mixture over the poked cake, making sure to evenly distribute it into all the holes. You might need to use a spoon to help it seep in.
- Cover the cake with plastic wrap and refrigerate for at least 2 hours, or preferably overnight. This allows the cake to fully absorb the key lime mixture and develop its signature flavor. The longer it sits, the better it gets!
Making the Cream Cheese Topping
- In a large mixing bowl, beat the softened cream cheese with an electric mixer until smooth and creamy. Make sure your cream cheese is truly softened, or you’ll end up with lumps.
- Gently fold in the thawed whipped topping until well combined. Be careful not to overmix, as this can deflate the whipped topping. You want a light and airy topping.
Assembling and Garnishing
- Remove the cake from the refrigerator.
- Spread the cream cheese topping evenly over the cake.
- Garnish with key lime slices and lime zest, if desired. This adds a pop of color and enhances the key lime flavor.
- Cut into squares and serve. Enjoy! This cake is best served cold.
Tips and Variations:
- Fresh Key Lime Juice is Key: While bottled key lime juice can work in a pinch, freshly squeezed key lime juice will give you the best flavor. It’s worth the extra effort!
- Make it Gluten-Free: Use a gluten-free yellow cake mix to make this cake gluten-free.
- Add a Graham Cracker Crust: For an extra layer of flavor and texture, press a graham cracker crust into the bottom of the baking pan before pouring in the cake batter.
- Adjust the Sweetness: If you prefer a less sweet cake, you can reduce the amount of sweetened condensed milk.
- Experiment with Garnishes: Get creative with your garnishes! Consider adding toasted coconut flakes, white chocolate shavings, or a drizzle of key lime glaze.
- Storage: Store leftover cake in the refrigerator for up to 3 days.
- Freezing: While you can freeze this cake, the texture of the whipped topping may change slightly. If you plan to freeze it, consider using a stabilized whipped cream topping.
Troubleshooting:
- Cake is Dry: Make sure you’re not overbaking the cake. Also, ensure that you’re poking enough holes and evenly distributing the sweetened condensed milk mixture.
- Topping is Runny: Make sure your cream cheese is properly softened and that you’re not overmixing the whipped topping.
- Cake is Sticking to the Pan: Grease and flour the baking pan thoroughly, or use baking spray with flour.
Enjoy your delicious Key Lime Poke Cake!
Conclusion:
This Key Lime Poke Cake is truly a must-try, and I’m not just saying that! The combination of the moist, tender cake, the tangy key lime filling, and the creamy, dreamy topping creates a symphony of flavors and textures that will have everyone begging for seconds. It’s the perfect dessert for potlucks, summer barbecues, or even just a weeknight treat when you need a little something special. The ease of preparation makes it even more appealing seriously, it’s almost foolproof!
What makes this cake so irresistible is the way the key lime filling seeps into every nook and cranny of the cake, ensuring that each bite is bursting with that signature citrusy zing. The sweetness of the cake and the whipped topping perfectly balance the tartness of the lime, creating a harmonious flavor profile that’s both refreshing and satisfying. Forget complicated baking projects; this poke cake delivers maximum flavor with minimal effort.
But the best part? It’s incredibly versatile! While I’ve shared my go-to recipe, feel free to experiment with different variations to suit your taste. For a richer flavor, try using cream cheese in the whipped topping. If you’re feeling adventurous, add a sprinkle of toasted coconut flakes or a dusting of lime zest for an extra layer of texture and aroma. You could even try using a different citrus fruit altogether, like lemon or grapefruit, for a unique twist.
Serving Suggestions:
* Serve chilled for the best flavor and texture.
* Garnish with fresh lime slices or a dollop of whipped cream.
* Pair it with a scoop of vanilla ice cream for an extra decadent treat.
* For a more elegant presentation, dust the top with powdered sugar before serving.
* Consider adding a graham cracker crust to the bottom of the pan for added texture.
Variations:
* Lemon Poke Cake: Substitute lemon juice and zest for the key lime.
* Coconut Poke Cake: Add coconut extract to the cake batter and sprinkle toasted coconut on top.
* Strawberry Poke Cake: Use strawberry gelatin for the filling and top with fresh strawberries.
* Boozy Poke Cake: Add a splash of rum or tequila to the key lime filling for an adult-friendly version.
* Key Lime Pie Poke Cake: Crumble graham crackers on top of the whipped topping to mimic a key lime pie.
I truly believe that this Key Lime Poke Cake will become a new favorite in your household. It’s a crowd-pleaser that’s easy to make and always a hit. So, what are you waiting for? Gather your ingredients, preheat your oven, and get ready to bake up a slice of sunshine!
I’m so excited for you to try this recipe! Once you’ve made it, I would absolutely love to hear about your experience. Did you make any variations? What did your family and friends think? Please share your photos and comments below! Your feedback is invaluable, and it helps me continue to create recipes that you’ll love. Happy baking, and enjoy every delicious bite of this incredible Key Lime Poke Cake! I can’t wait to see your creations!
Key Lime Poke Cake: The Ultimate Tropical Dessert Recipe
Moist, tangy Key Lime Poke Cake with yellow cake soaked in key lime sweetened condensed milk, topped with creamy cream cheese frosting. Refreshing and perfect for any occasion!
Ingredients
- 1 box (15.25 oz) yellow cake mix
- 1 package (3.4 oz) instant key lime pudding mix
- 1 cup milk
- 1/2 cup vegetable oil
- 4 large eggs
- 1/2 cup key lime juice, divided (freshly squeezed is best!)
- 1 can (14 oz) sweetened condensed milk
- 8 oz cream cheese, softened
- 1 container (8 oz) frozen whipped topping, thawed
- Key lime slices, for garnish (optional)
- Lime zest, for garnish (optional)
Instructions
- Preheat oven to 350°F (175°C). Grease and flour a 9×13 inch baking pan.
- In a large mixing bowl, combine the yellow cake mix, key lime pudding mix, milk, vegetable oil, and eggs. Beat with an electric mixer on medium speed for 2 minutes, or until well combined.
- Stir in 1/4 cup of the key lime juice.
- Pour the batter into the prepared baking pan and spread evenly.
- Bake for 30-35 minutes, or until a wooden skewer inserted into the center comes out clean.
- Let the cake cool completely in the pan.
- Once the cake is completely cool, use the handle of a wooden spoon or a large fork to poke holes all over the cake.
- In a medium bowl, whisk together the sweetened condensed milk and the remaining 1/4 cup of key lime juice.
- Slowly pour the sweetened condensed milk mixture over the poked cake, making sure to evenly distribute it into all the holes.
- Cover the cake with plastic wrap and refrigerate for at least 2 hours, or preferably overnight.
- In a large mixing bowl, beat the softened cream cheese with an electric mixer until smooth and creamy.
- Gently fold in the thawed whipped topping until well combined.
- Remove the cake from the refrigerator.
- Spread the cream cheese topping evenly over the cake.
- Garnish with key lime slices and lime zest, if desired.
- Cut into squares and serve.
Notes
- Fresh Key Lime Juice is Key: While bottled key lime juice can work in a pinch, freshly squeezed key lime juice will give you the best flavor.
- Make it Gluten-Free: Use a gluten-free yellow cake mix to make this cake gluten-free.
- Add a Graham Cracker Crust: For an extra layer of flavor and texture, press a graham cracker crust into the bottom of the baking pan before pouring in the cake batter.
- Adjust the Sweetness: If you prefer a less sweet cake, you can reduce the amount of sweetened condensed milk.
- Experiment with Garnishes: Get creative with your garnishes! Consider adding toasted coconut flakes, white chocolate shavings, or a drizzle of key lime glaze.
- Storage: Store leftover cake in the refrigerator for up to 3 days.
- Freezing: While you can freeze this cake, the texture of the whipped topping may change slightly. If you plan to freeze it, consider using a stabilized whipped cream topping.
- Cake is Dry: Make sure you’re not overbaking the cake. Also, ensure that you’re poking enough holes and evenly distributing the sweetened condensed milk mixture.
- Topping is Runny: Make sure your cream cheese is properly softened and that you’re not overmixing the whipped topping.
- Cake is Sticking to the Pan: Grease and flour the baking pan thoroughly, or use baking spray with flour.


Leave a Comment