

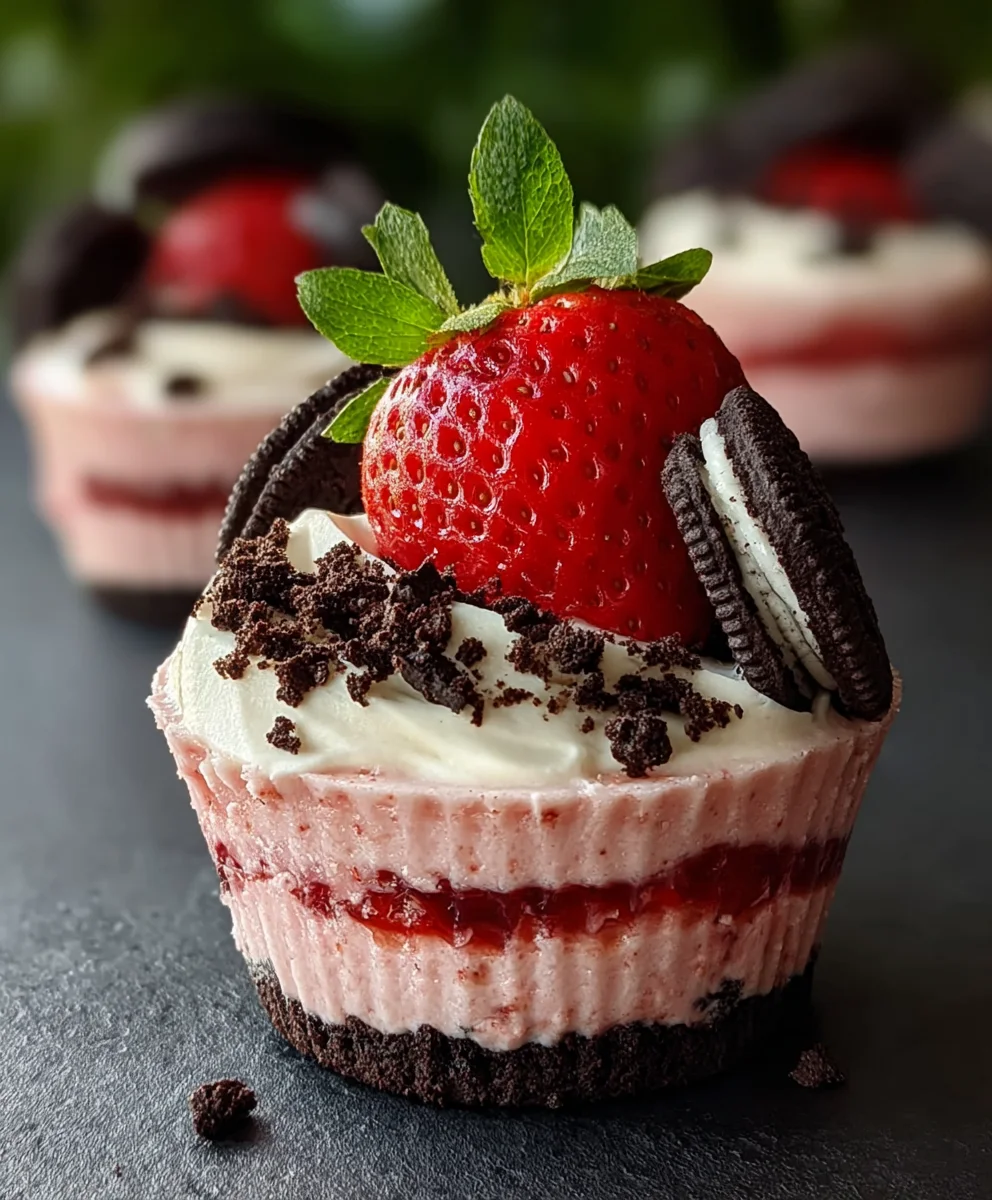
Strawberry Oreo Cups are an absolute revelation for anyone seeking a dessert that is as effortlessly beautiful as it is undeniably delicious. I assure you, you are about to discover a sweet treat that requires absolutely no baking, comes together in mere minutes, and consistently delivers an impressive combination of creamy, crunchy, and fruity notes that will delight every palate. This innovative dessert perfectly captures the essence of indulgence without the fuss, making it a stellar choice for both impromptu cravings and sophisticated gatherings.
While the precise historical moment these particular cups, blending these iconic flavors, came into existence might be relatively modern, their individual components boast a rich legacy. They elegantly merge the enduring popularity of the iconic Oreo cookie, a beloved classic since 1912, with the universally cherished freshness of strawberries, often a symbol of summer and sweetness. This fusion represents a contemporary culinary trend: transforming familiar, comforting flavors into convenient, stunning presentations that everyone can enjoy.
People simply adore this dish for its irresistible blend of textures and tastes. The crisp, dark chocolatey crunch of the Oreo cookie provides a delightful contrast to the vibrant, juicy sweetness of fresh strawberries, all enveloped in a rich, creamy filling that truly elevates the experience. It’s incredibly versatile, serving as a quick family dessert, an elegant addition to a potluck, or a refreshing treat on a warm day. The simplicity of preparing these delectable Strawberry Oreo Cups means more time enjoying and less time in the kitchen, a convenience we all appreciate.

Ingredients:
- Oreo Cookies: One family-size package (approximately 36-40 cookies) of original Oreos. You could also experiment with strawberry-filled Oreos for an even more intense strawberry and cream flavor profile in your Strawberry Oreo Cups! These will form the crucial base of our delightful dessert, providing that iconic chocolatey crunch.
- Unsalted Butter: ½ cup (1 stick or 113g), melted. Using unsalted butter allows us to control the overall saltiness of the dish, ensuring the perfect balance of sweet and salty in our crust. It acts as the binding agent for our cookie crumbs.
- Cream Cheese: Two 8-ounce blocks (452g total) of full-fat cream cheese, softened to room temperature. It’s absolutely essential that your cream cheese is at room temperature for a smooth, lump-free filling. This is the heart of our creamy, tangy filling.
- Powdered Sugar (Confectioners’ Sugar): 2 cups (240g), sifted. Sifting is a small but mighty step that prevents clumps and ensures a silky-smooth texture in our filling. This provides the primary sweetness for the cream cheese layer.
- Heavy Cream (Heavy Whipping Cream): 2 cups (480ml), very cold. Cold cream whips up much better and holds its shape longer. This will be whipped into beautiful, airy peaks to lighten our cream cheese mixture.
- Pure Vanilla Extract: 2 teaspoons. Use a good quality vanilla extract; it makes a noticeable difference in the overall flavor complexity of your Strawberry Oreo Cups. It enhances all the sweet notes.
- Fresh Strawberries: 2 pounds, washed, hulled, and finely diced. Look for bright red, firm strawberries for the best flavor and texture. These are the star of our dessert, bringing freshness and a burst of natural sweetness and slight tartness.
- Optional Garnish: Additional Oreo cookies (crushed or halved), fresh strawberry slices, or a drizzle of melted white chocolate. These touches elevate the presentation and add extra texture or flavor notes.
Preparing the Iconic Oreo Crust
- Prepare Your Muffin Tins: First things first, grab two standard 12-cup muffin tins. Line each well with paper cupcake liners. This small but crucial step will make it incredibly easy to remove your finished Strawberry Oreo Cups once they’re chilled and set. You want to make sure your liners are securely in place.
-
Crush the Oreo Cookies: This is where the magic begins for our delicious base. Take your family-size package of Oreo cookies and get ready to transform them into a fine crumb. You have a couple of excellent options here:
- Food Processor Method: If you have a food processor, this is undoubtedly the quickest and most efficient way. Place the entire Oreo cookies (filling and all – no need to scrape out the cream!) into the bowl of your food processor. Pulse several times, then process continuously until the cookies are reduced to very fine, even crumbs. You want a texture similar to coarse sand. Be careful not to over-process, as you don’t want an oily paste, but rather distinct crumbs.
- Manual Method (Ziploc Bag & Rolling Pin): No food processor? No problem! Place the Oreo cookies into a large, sturdy resealable plastic bag. Make sure to press out as much air as possible before sealing. Lay the bag flat on a sturdy surface and use a rolling pin (or even the bottom of a heavy skillet) to crush the cookies. Apply even pressure and roll back and forth until you achieve those fine crumbs. This method can be quite therapeutic and gives you good control over the crumb size, though it takes a little more elbow grease.
You should end up with approximately 4 to 4 ½ cups of fine Oreo crumbs. Achieving a fine crumb is key here, as it allows for a more cohesive and less crumbly crust.
- Combine Crumbs with Melted Butter: In a medium-sized mixing bowl, pour your finely crushed Oreo crumbs. Slowly drizzle in the ½ cup of melted unsalted butter. Using a fork or a spoon, thoroughly mix the butter into the crumbs. Keep mixing until all the crumbs are evenly moistened and resemble wet sand. Every single crumb should have a hint of butter coating it. This ensures that when pressed, the crumbs will hold together beautifully and create a firm crust.
-
Press the Crust into Liners: Now it’s time to form the base of our Strawberry Oreo Cups. Distribute the buttered Oreo crumbs evenly among the 24 lined muffin wells. Typically, this amounts to about 1 ½ to 2 tablespoons of crumb mixture per liner. Once the crumbs are in, use the back of a spoon, the bottom of a small glass, or even your clean fingertips to firmly press the crumbs down into an even layer at the bottom of each liner.
Why Firmly Pressing is Important:
This step is absolutely critical for a stable crust. Pressing firmly compacts the crumbs, preventing them from falling apart when you bite into your delicious dessert. A well-compacted crust provides a sturdy foundation for the creamy filling.
- Chill the Crust: Place the muffin tins with the pressed Oreo crusts into the refrigerator while you prepare the filling. Chilling the crust for at least 15-20 minutes allows the butter to firm up, setting the crumbs and further stabilizing the base, making it less likely to crumble during assembly.
Crafting the Luscious Cream Cheese Filling
-
Whip the Cream Cheese Mixture: In a large mixing bowl, combine your two 8-ounce blocks of softened full-fat cream cheese with the 2 cups of sifted powdered sugar and 2 teaspoons of pure vanilla extract. Using an electric mixer (either a hand mixer or a stand mixer fitted with the paddle attachment), beat the ingredients together on medium speed until the mixture is completely smooth, creamy, and free of any lumps. This will take about 2-3 minutes.
Softened Cream Cheese is Non-Negotiable!
Ensure your cream cheese is at true room temperature. If it’s too cold, it will be lumpy and difficult to incorporate the sugar smoothly, resulting in a gritty texture in your final filling. Scrape down the sides of the bowl occasionally to ensure everything is thoroughly combined. The mixture should be light and airy.
-
Prepare the Whipped Cream: In a separate, very cold mixing bowl (preferably one you’ve chilled in the freezer for 10-15 minutes beforehand), pour your 2 cups of very cold heavy cream. Using an electric mixer with the whisk attachment, start whipping the cream on low speed, gradually increasing to high speed. Continue beating until soft peaks form, then continue until the cream holds stiff peaks. This means that when you lift the beaters, the cream stands up straight and holds its shape without collapsing. Be careful not to over-whip, or you’ll end up with butter! This aeration is what gives our filling its light and fluffy texture.
Tips for Perfect Whipped Cream:
Using a chilled bowl and cold cream significantly aids in the whipping process. Also, ensure your whisk attachment is clean and dry.
-
Gently Fold the Whipped Cream into the Cream Cheese Mixture: This step requires a delicate touch. Add about one-third of the whipped cream to the cream cheese mixture. Gently fold it in using a rubber spatula until just combined. The goal here is to lighten the cream cheese base. Then, add the remaining whipped cream in two additions, gently folding after each addition until no streaks of white cream are visible and the mixture is uniformly blended.
The Art of Folding:
Folding is crucial to maintain the airiness of the whipped cream. Instead of stirring vigorously, use a gentle motion where you cut down through the center of the bowl with your spatula, sweep across the bottom, and lift the mixture over itself. Repeat this, turning the bowl as you go. Over-mixing at this stage will deflate the whipped cream, resulting in a denser filling. The final filling for your Strawberry Oreo Cups should be incredibly light, airy, and luscious.
Preparing the Fresh Strawberries
-
Wash and Hull the Strawberries: Rinse all your fresh strawberries under cool running water. Gently pat them dry with paper towels. To hull a strawberry, you can either use a small paring knife to carefully cut out the green leafy top and the white core, or a strawberry huller, which makes the job quick and easy.
Choosing the Best Strawberries:
Look for strawberries that are bright red all over, plump, and firm. Avoid any with white spots or soft areas, as these can indicate under-ripeness or spoilage. The natural sweetness and slight tartness of fresh, ripe strawberries are paramount for the vibrant flavor of these Strawberry Oreo Cups.
- Finely Dice the Strawberries: Once hulled, chop the strawberries into small, even pieces, about ¼ to ½ inch in size. Try to keep the pieces as uniform as possible, as this ensures that every bite of your Strawberry Oreo Cups gets a consistent burst of strawberry flavor and texture. A fine dice also makes them easier to layer and prevents large chunks from making the cups difficult to eat. You should have approximately 4-5 cups of diced strawberries from 2 pounds. Set these aside; we won’t be mixing them directly into the cream cheese filling, but rather layering them for a beautiful presentation and fresh taste.
Assembling Your Irresistible Strawberry Oreo Cups
-
Spoon in the Cream Cheese Filling: Retrieve your chilled muffin tins with the Oreo crusts from the refrigerator. Now, take your wonderfully light and fluffy cream cheese filling. Using a large spoon or an ice cream scoop, carefully spoon an even layer of the cream cheese filling over the Oreo crust in each cupcake liner. Aim for about two-thirds full in each liner, leaving a little space for our diced strawberries.
Even Distribution for Perfect Portions:
Distribute the filling as evenly as possible among all 24 cups. This ensures consistent portions and that each of your Strawberry Oreo Cups looks as good as it tastes. You can gently spread the top of the filling with the back of your spoon or a small offset spatula to create a smooth surface.
-
Layer with Fresh Diced Strawberries: Generously sprinkle a layer of your finely diced fresh strawberries over the cream cheese filling in each cup. Don’t be shy here; we want plenty of strawberry goodness! Gently press the strawberries down a tiny bit, just enough to ensure they are nestled into the filling without sinking completely. The vibrant red of the strawberries against the creamy white filling creates a beautiful visual contrast.
The Importance of Freshness:
Using fresh, ripe strawberries is crucial for the bright, natural flavor and refreshing quality of these Strawberry Oreo Cups. Canned or frozen strawberries (without proper drainage) would introduce too much moisture and alter the texture.
- Add More Cream Cheese Filling (Optional, for a taller cup): If you desire taller, more substantial Strawberry Oreo Cups and have enough filling, you can add another smaller layer of cream cheese filling on top of the strawberries, then finish with a few more diced strawberries for garnish. However, the initial layer of filling and strawberries is perfectly sufficient for a delightful treat. This layering technique allows you to customize the ratio of cream to fruit to crust to your liking.
-
Garnish (Optional, but Recommended!): For an extra touch of elegance and flavor, consider adding a final garnish to your Strawberry Oreo Cups.
- Crushed Oreos: Sprinkle a few extra crushed Oreo crumbs on top of the strawberries. This adds another layer of texture and reinforces the Oreo theme.
- Strawberry Slice: Place a small, fanned strawberry slice or a whole mini strawberry on top for a professional look.
- White Chocolate Drizzle: For an indulgent finish, melt a small amount of white chocolate chips (with a teaspoon of coconut oil for fluidity) and drizzle it artfully over the tops of the cups. The white chocolate pairs wonderfully with both strawberry and Oreo.
These garnishes don’t just make your Strawberry Oreo Cups look pretty; they add another dimension of flavor and texture, inviting your guests to dive right in.
Chilling and Serving Your Divine Strawberry Oreo Cups
-
Chill Thoroughly: Once all your Strawberry Oreo Cups are assembled and garnished, carefully place the muffin tins back into the refrigerator. It is absolutely essential that these desserts chill for a minimum of 4-6 hours, but ideally overnight.
Why Extended Chilling is Crucial:
This chilling period is not just for cooling; it’s for setting. It allows the cream cheese filling to firm up properly, the flavors to meld beautifully, and the entire structure of the cup to become stable. If you try to serve them too soon, the filling may be too soft, and the cups could lose their shape. Patience truly is a virtue here, leading to perfectly set and delicious Strawberry Oreo Cups.
- Serve and Enjoy: When you’re ready to serve these delightful Strawberry Oreo Cups, gently lift each one out of the muffin tin by its paper liner. Peel back the liner just before serving. Arrange them beautifully on a platter and prepare for rave reviews! These no-bake Strawberry Oreo Cups are best enjoyed cold and fresh.
- Storage: Leftover Strawberry Oreo Cups should be stored in an airtight container in the refrigerator for up to 3-4 days. While they are still delicious on subsequent days, the Oreo crust may soften slightly over time. For the freshest taste and texture, consuming them within the first 2-3 days is recommended. Enjoy every single bite of this wonderfully simple yet incredibly satisfying dessert!

Strawberry Oreo Cups
Easy dessert cups combining creamy cheesecake, crunchy Oreos, and fresh strawberries. No baking required. Sweet meets tangy in these pretty layered cups. Creamy cheesecake, crunchy Oreos, and juicy berries create pure summer magic in every spoonful.
Ingredients
-
Oreo Cookies: 1 family-size package (approx. 36-40 cookies)
-
Unsalted Butter: ½ cup (1 stick / 113g), melted
-
Full-fat Cream Cheese: Two 8-ounce blocks (452g total), softened
-
Powdered Sugar: 2 cups (240g), sifted
-
Heavy Cream: 2 cups (480ml), very cold
-
Pure Vanilla Extract: 2 teaspoons
-
Fresh Strawberries: 2 pounds, hulled and finely diced
-
Optional Garnish: Crushed Oreos, fresh strawberry slices, or melted white chocolate
Instructions
-
Step 1
Line two standard 12-cup muffin tins with paper cupcake liners. Crush Oreo cookies finely using a food processor or a Ziploc bag and rolling pin. In a medium bowl, combine crushed Oreo crumbs with ½ cup melted unsalted butter until crumbs are evenly moistened. Press about 1½ to 2 tablespoons of the crumb mixture firmly into the bottom of each lined muffin well. Chill the crusts in the refrigerator for at least 15-20 minutes. -
Step 2
In a large mixing bowl, beat softened full-fat cream cheese, sifted powdered sugar, and pure vanilla extract with an electric mixer on medium speed until completely smooth, creamy, and lump-free (about 2-3 minutes). Scrape down the sides of the bowl as needed. -
Step 3
In a separate, very cold mixing bowl, pour in 2 cups of very cold heavy cream. Using an electric mixer with the whisk attachment, whip the cream on high speed until stiff peaks form and the cream holds its shape. -
Step 4
Gently fold about one-third of the whipped cream into the cream cheese mixture using a rubber spatula until just combined. Then, gently fold in the remaining whipped cream in two additions, taking care not to deflate the mixture, until uniformly blended and airy. -
Step 5
Wash and hull the 2 pounds of fresh strawberries. Finely dice them into small, even pieces, about ¼ to ½ inch in size. Set aside. -
Step 6
Retrieve the chilled muffin tins with the Oreo crusts. Spoon an even layer of the light and fluffy cream cheese filling over the Oreo crusts in each cupcake liner, filling each about two-thirds full. Generously sprinkle a layer of the finely diced fresh strawberries over the cream cheese filling. You can gently press the strawberries into the filling. -
Step 7
Optionally, garnish the tops of your Strawberry Oreo Cups with a few extra crushed Oreo crumbs, a fanned strawberry slice, or an artistic drizzle of melted white chocolate. -
Step 8
Carefully place the assembled muffin tins back into the refrigerator. Chill for a minimum of 4-6 hours, but ideally overnight, to allow the filling to firm up properly and flavors to meld. -
Step 9
Once thoroughly chilled and set, gently lift each Strawberry Oreo Cup out of the muffin tin by its paper liner. Peel back the liner just before serving. Store any leftover Strawberry Oreo Cups in an airtight container in the refrigerator for up to 3-4 days. For the freshest taste and texture, consume within the first 2-3 days.
Important Information
Nutrition Facts (Per Serving)
It is important to consider this information as approximate and not to use it as definitive health advice.
Allergy Information
Please check ingredients for potential allergens and consult a health professional if in doubt.

Leave a Comment