

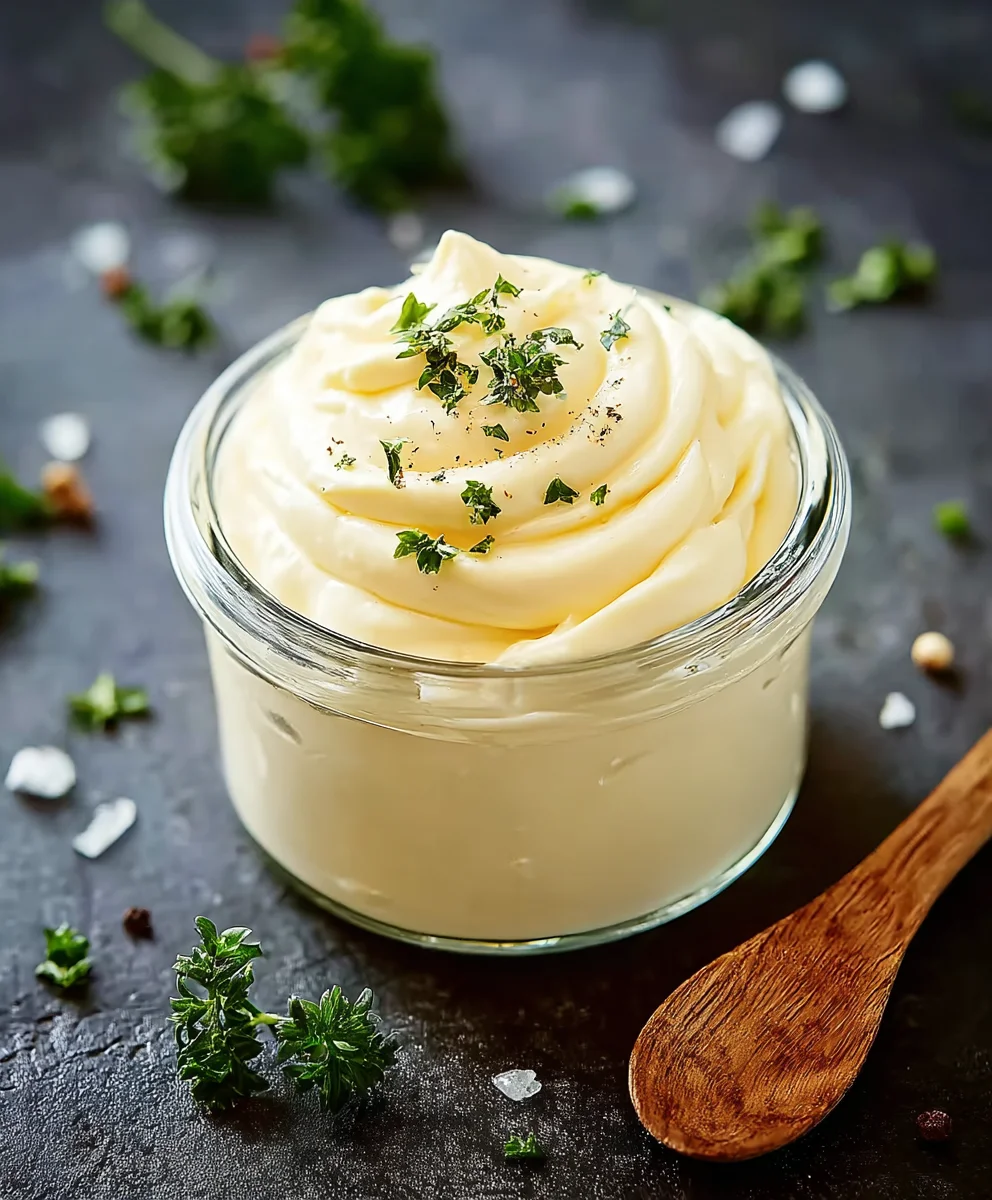
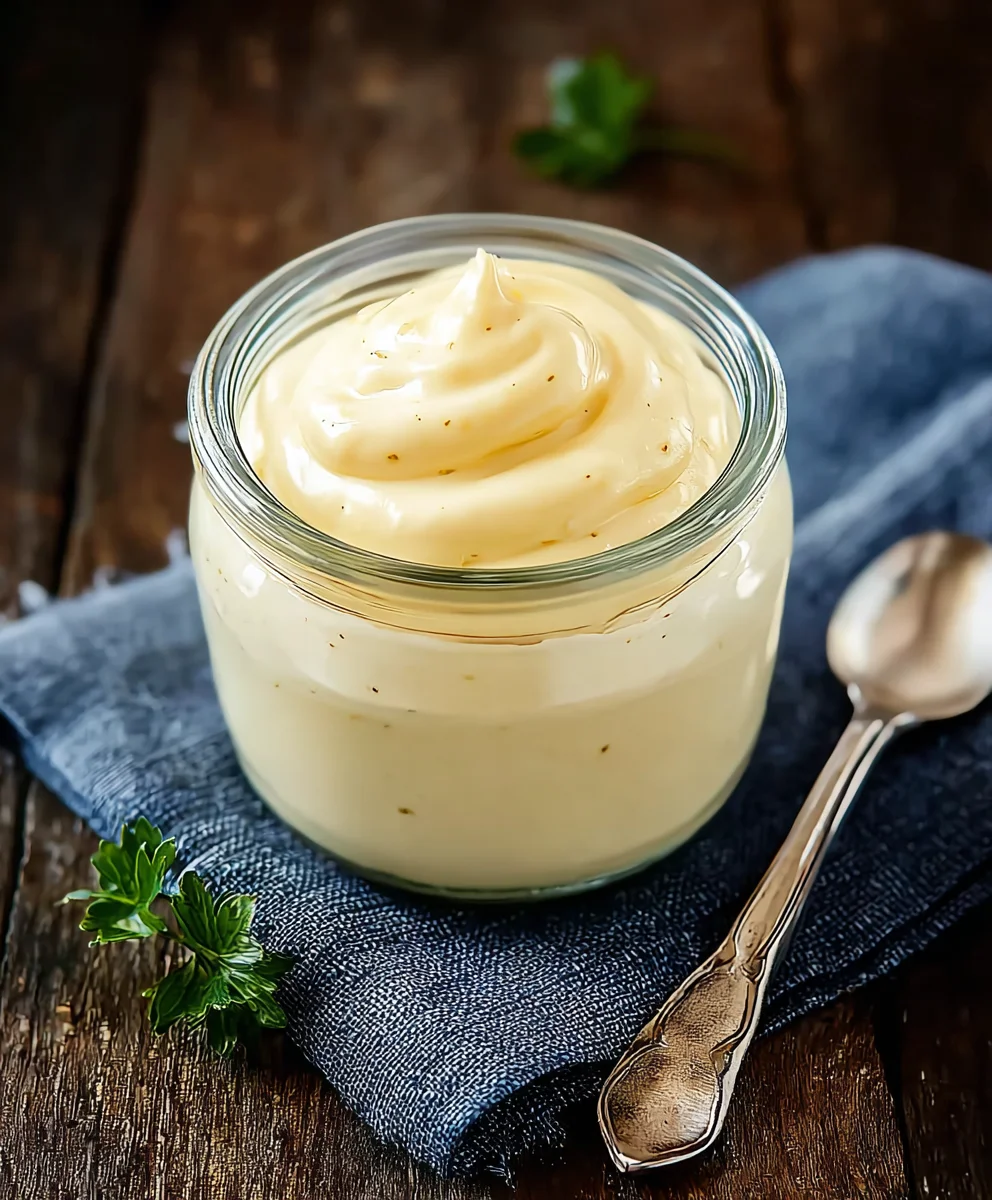
Homemade Mayonnaise – just the phrase itself conjures images of creamy, rich, and intensely flavorful culinary magic that far surpasses anything you’ll find on a supermarket shelf. Have you ever considered the profound difference a truly fresh, homemade condiment can make to your everyday meals? I assure you, once you experience the silky texture and vibrant taste of mayonnaise made from scratch, there’s simply no turning back to the mass-produced alternatives.
Unveiling the Rich Heritage of Mayonnaise
While its exact origins are often debated, with tales ranging from the battlefields of Mahon in Spain to sophisticated French culinary innovations, mayonnaise has undoubtedly cemented its place as a global pantry staple. This versatile emulsion, born from humble ingredients, rapidly conquered tables worldwide, becoming an indispensable companion to everything from crisp fries to elaborate salads. The beauty of crafting it yourself lies in connecting with this rich culinary tradition, elevating a simple condiment to an art form.
People universally adore this emulsion for its incredible versatility and the unparalleled freshness it brings. The luxurious, velvety texture and the perfectly balanced tang add an exquisite dimension to countless dishes. Moreover, making your own affords you complete control over the quality of ingredients, ensuring no unwanted additives and allowing you to fine-tune the flavor profile to your exact liking. Preparing your own Homemade Mayonnaise is not just about making a condiment; it’s about unlocking a new level of freshness and flavor in your kitchen, transforming simple meals into extraordinary culinary experiences.

Ingredients:
- 1 large egg yolk: Make sure it’s fresh and from a high-quality egg. Room temperature is crucial for emulsification.
- 1 teaspoon Dijon mustard: This acts as a natural emulsifier, helping to stabilize the mayonnaise and adding a lovely tang.
- 1 tablespoon fresh lemon juice: Freshly squeezed is always best for brightness and acidity. You can also use white wine vinegar or apple cider vinegar.
- ½ teaspoon fine sea salt: Adjust to your taste, but this is a good starting point.
- ¼ teaspoon black pepper: Freshly ground pepper offers the best flavor.
- 1 cup neutral-flavored oil: Options include grapeseed oil, canola oil, light olive oil (not extra virgin, as it can be too strong and bitter), or sunflower oil. Avoid strong-flavored oils for a classic mayonnaise base.
- Optional: ¼ teaspoon sugar: A tiny pinch of sugar can help balance the flavors, especially if your lemon juice is very tart.
- Optional: Garlic clove, minced: For a delicious aioli variation.
- Optional: Fresh herbs: Such as dill, chives, or parsley, finely chopped, for an herbed mayonnaise.
Gathering Your Tools and Ingredients: The Foundation for Perfect Homemade Mayonnaise
Before we even begin the exciting process of crafting your own batch of Homemade Mayonnaise, taking a moment to gather all your necessary tools and ensure your ingredients are perfectly prepared will set you up for absolute success. This foundational step is often overlooked but is incredibly important for achieving that luscious, creamy texture we all desire.
First and foremost, you’ll need to decide on your method. Are you going old-school with a whisk and a bowl, embracing the workout and the satisfaction of a manually emulsified sauce? Or are you leaning towards the modern convenience of an immersion blender or a food processor? Each method has its charm and specific requirements, so having your chosen tool clean and ready is paramount. If you’re using a whisk, make sure you have a sturdy, medium-sized bowl, ideally one with a non-slip base or a damp towel underneath to keep it steady during vigorous whisking.
Next, let’s talk about ingredients. Temperature is key when making Homemade Mayonnaise. Seriously, it’s probably the most critical factor for successful emulsification. Your egg yolk, lemon juice (or vinegar), and even the mustard should ideally be at room temperature. Cold ingredients are more resistant to combining and can lead to a broken or stubbornly thin mayonnaise. I usually take my egg out of the fridge at least 30 minutes to an hour before I plan to start. If you’re in a rush, you can gently warm the egg by placing it (still in its shell) in a bowl of warm (not hot) water for a few minutes. Don’t skip this step; it truly makes a world of difference in how readily the egg yolk will emulsify with the oil.
Ensure your neutral oil is also easily accessible. While room temperature isn’t as critical for the oil as it is for the egg, having it measured out and ready to go will prevent fumbling mid-process. Remember, we’ll be adding it very, very slowly, especially at the beginning.
Lastly, have your seasonings – salt, pepper, and any optional flavorings like sugar or garlic – measured and within arm’s reach. Once the emulsion starts to form, you’ll want to quickly move to seasoning and adjusting to your personal taste. Preparation truly is the secret ingredient for the best Homemade Mayonnaise.
The Immersion Blender Method: Quick and Easy Homemade Mayonnaise
This is my absolute favorite method for making Homemade Mayonnaise because it’s virtually foolproof and incredibly fast. If you own an immersion blender, prepare to be amazed by how effortlessly you can create a perfect, creamy emulsion every single time. It’s truly a game-changer for homemade condiments.
- Prepare Your Container and Ingredients: Find a tall, narrow container that your immersion blender head can fit snugly into. A wide-mouth Mason jar (pint size is ideal) or the cup that often comes with your immersion blender set works perfectly. Crack your room-temperature egg yolk directly into the bottom of this container. Add the Dijon mustard, lemon juice (or vinegar), salt, and pepper on top of the egg yolk.
- Pour in the Oil: This is where the magic really begins. Carefully pour all of the 1 cup of neutral oil directly over the egg yolk and other ingredients. Do not stir! The oil will naturally form a layer on top of the heavier egg mixture, and this layering is exactly what we want for a successful emulsion using this method.
- Begin Blending: Insert the head of your immersion blender all the way to the bottom of the container, making sure it completely covers the egg yolk. Turn the blender on high speed. Keep the blender firmly pressed against the bottom of the container for about 10-15 seconds without moving it. You will see a thick, white emulsion start to form at the very bottom, right under the blender head. This is the moment when the egg yolk is creating the initial stable bond with the oil.
- Slowly Lift and Incorporate: Once you see that creamy white emulsion spreading from the bottom, very slowly and steadily begin to lift the immersion blender upwards through the oil layer. As you lift, the thick mayonnaise will start to incorporate the remaining oil from the top. Continue moving the blender up and down gently, in slow, deliberate motions, until all the oil has been fully incorporated and the mixture is uniformly thick and creamy. This entire process usually takes less than 60 seconds once you start blending.
- Check Consistency and Season: Once your Homemade Mayonnaise is beautifully emulsified, turn off the blender. Remove it from the container and give the mayonnaise a good stir with a spoon. Taste it and adjust the seasoning as needed. You might want a little more salt, a touch more lemon juice for brightness, or perhaps a pinch of sugar to round out the flavors.
- Optional Flavorings: At this stage, if you’re making an aioli, you can blend in a minced garlic clove. Or, if you desire an herbed mayonnaise, fold in your finely chopped fresh herbs. The beauty of Homemade Mayonnaise is how easily it can be customized!
The immersion blender method is truly a lifesaver for quickly whipping up a batch of Homemade Mayonnaise, delivering consistent, perfect results with minimal effort and mess. It’s the ultimate hack for fresh, flavorful mayonnaise whenever you need it.
The Food Processor/Blender Method: Versatile Homemade Mayonnaise Production
If you don’t have an immersion blender but do possess a food processor or a traditional stand blender, you can absolutely make beautiful Homemade Mayonnaise with these tools too. This method offers excellent control, especially if your food processor has a small feed tube, which is perfect for that slow, steady drizzle of oil that is crucial for emulsification. It’s a great option for larger batches as well, though for most home cooks, a single-cup recipe works well.
- Prepare Your Equipment and Base: Ensure your food processor or blender is clean and assembled. Add the room-temperature egg yolk, Dijon mustard, lemon juice (or vinegar), salt, and pepper to the bowl of your food processor or blender. If your machine has a small bowl attachment, that might be ideal for this quantity, but the main bowl works just fine.
- Initial Blend of Base Ingredients: Secure the lid on your food processor or blender. Process these base ingredients for about 15-30 seconds until they are well combined and slightly frothy. This ensures that the emulsifiers (egg yolk and mustard) are fully activated and ready to bind with the oil.
- The Slow Oil Drizzle: This is the most critical step when using a food processor or blender. With the machine running on low to medium speed, begin to slowly, painstakingly slowly, drizzle in the neutral oil through the small feed tube in the lid. The goal is a very thin, steady stream, almost like a thread. If you add the oil too quickly at the beginning, your mayonnaise will break and won’t emulsify. Patience here is key!
- Continue Drizzling and Observe: As you continue to drizzle the oil, you will notice the mixture in the bowl gradually thickening. The sound of the machine might even change slightly as the resistance increases. Keep adding the oil in that slow stream. As the mayonnaise thickens, you can slightly increase the speed of your oil addition, but still maintain a controlled drizzle.
- Achieve Desired Consistency: Continue processing until all the oil has been incorporated and the mayonnaise reaches your desired thickness. This can take anywhere from 3 to 5 minutes, depending on the machine and the steadiness of your drizzle. The mixture should be thick, pale yellow, and cohesive.
- Check and Adjust Seasoning: Once your Homemade Mayonnaise is thick and creamy, turn off the machine. Remove the lid and scrape down the sides of the bowl with a spatula to ensure everything is well mixed. Taste the mayonnaise and adjust the seasoning. You might find it needs a little more salt, a splash more lemon juice, or a pinch of sugar to balance the flavors.
- Incorporating Optional Flavors: If you’re adding garlic for an aioli or fresh herbs, pulse them into the finished mayonnaise for a few seconds until they are well distributed. Be careful not to over-process delicate herbs.
Using a food processor or blender provides a hands-off approach compared to whisking, making it a reliable method for those who prefer electronic assistance. The consistent speed of the blades, combined with your steady hand on the oil, will yield a perfectly stable and delicious batch of Homemade Mayonnaise every time.
Flavoring and Finishing Your Homemade Mayonnaise
Once you’ve successfully created a batch of beautiful, creamy Homemade Mayonnaise, the real fun begins: making it truly your own! While a classic, unadulterated mayonnaise is a thing of beauty, the ability to customize its flavor profile is one of the greatest advantages of making it from scratch. This is your chance to elevate it from a simple condiment to a star ingredient in its own right.
Adjusting the Basic Seasoning:
The initial seasoning with salt and pepper is just a starting point. After the mayonnaise has fully emulsified, always give it a taste test.
- Salt: Does it taste a bit flat? A pinch more salt can dramatically brighten the flavors. Add ¼ teaspoon at a time, mix well, and re-taste until it sings.
- Acidity (Lemon Juice/Vinegar): Is it lacking zest or a little punch? A few more drops of fresh lemon juice or vinegar can provide that much-needed tang and cut through the richness of the oil. It also helps preserve the mayonnaise.
- Sweetness (Sugar): Sometimes, if your lemon juice is particularly tart or you just prefer a slightly more rounded flavor, a tiny pinch of sugar (usually no more than ¼ teaspoon) can bring everything into perfect harmony without making it overtly sweet.
Mix thoroughly after each addition and taste again. Remember, you can always add more, but you can’t take it away!
Exploring Flavor Variations:
This is where you can let your culinary creativity shine. There are countless ways to transform your basic Homemade Mayonnaise into an exciting new condiment.
- Garlic Aioli: The simplest and perhaps most popular variation. For a single egg yolk batch, mince 1-2 cloves of fresh garlic very finely, or even make a paste. Stir it into the finished mayonnaise. For a stronger flavor, let it sit for at least 30 minutes for the garlic to meld. You can also blend it in with an immersion blender or food processor if you want a smoother texture and an even more infused garlic flavor.
- Herbed Mayonnaise: Finely chop 1-2 tablespoons of fresh herbs such as dill, chives, parsley, tarragon, or a mix. Fold them gently into the mayonnaise. This is fantastic with fish, chicken, or as a vibrant sandwich spread.
- Spicy Mayonnaise: Add a dash of your favorite hot sauce, a pinch of cayenne pepper, or a teaspoon of sriracha to give it a kick. Adjust the amount to your preferred level of heat.
- Smoky Mayonnaise: A pinch of smoked paprika or a tiny drop of liquid smoke can add a wonderful depth, especially for barbecue-inspired dishes or sandwiches.
- Curry Mayonnaise: Blend in ½ to 1 teaspoon of curry powder for an exotic twist that pairs wonderfully with chicken or as a dip for sweet potato fries.
- Chipotle Mayonnaise: For a smoky, spicy flavor, blend in 1-2 teaspoons of adobo sauce from a can of chipotle peppers (or mash up a chipotle pepper itself if you like it extra hot). This is amazing on burgers, tacos, or with grilled corn.
When adding extra ingredients, always start with a smaller amount and taste as you go. You want to enhance, not overpower, the delicious base of your Homemade Mayonnaise.
Consistency Adjustments:
Sometimes, you might find your mayonnaise is a little too thick or a little too thin for your liking.
- Too Thick: If your mayonnaise is extremely thick, you can thin it out by stirring in a very small amount (a teaspoon at a time) of warm water, more lemon juice, or even a little milk. Mix thoroughly after each addition until you reach your desired consistency.
- Too Thin (but emulsified): If it’s emulsified but just not as thick as you’d like, you can try refrigerating it for a few hours. Mayonnaise often thickens considerably as it chills. If it’s still too thin after chilling, and you’re confident it hasn’t “broken,” you can try whisking in another teaspoon of oil very slowly, or even a small amount of heavy cream, though this will change the fat content and flavor slightly.
Finishing your Homemade Mayonnaise is all about making it perfect for your palate and your intended use. Don’t be afraid to experiment and discover your favorite flavor combinations!
Troubleshooting Common Homemade Mayonnaise Issues
While making Homemade Mayonnaise can be incredibly rewarding, especially with the immersion blender method, it’s not entirely without its potential pitfalls. Don’t despair if your first attempt doesn’t come out perfectly; understanding common issues and how to fix them will turn you into a mayonnaise master in no time. It’s all part of the learning curve, and even experienced cooks can occasionally have a batch go awry.
My Mayonnaise Broke/Curdled/Separated!
This is perhaps the most common and disheartening issue. A broken mayonnaise looks like a curdled mess, with oil separated from the egg and other ingredients, rather than a cohesive, creamy emulsion.
- Why it Happens:
- Adding Oil Too Quickly: This is the number one culprit. The egg yolk needs time to bind with the fat molecules in the oil. If you dump in too much oil at once, the egg yolk gets overwhelmed and can’t emulsify effectively.
- Ingredients Too Cold: Cold egg yolks are less likely to emulsify properly. Room temperature ingredients are crucial.
- Insufficient Whisking/Blending: Not enough agitation, especially at the beginning, can prevent the emulsion from forming.
- Too Much Oil for the Egg Yolk: While less common in standard recipes, using a disproportionately large amount of oil for a single egg yolk can make the emulsion unstable.
- How to Fix It: Don’t throw it out! A broken mayonnaise is often fixable.
- The “New Yolk” Method: In a separate, clean bowl (or the bottom of your immersion blender container), add a fresh, room-temperature egg yolk (or a teaspoon of Dijon mustard).
- Slowly Add the Broken Mayonnaise: Whisk or blend the new egg yolk (or mustard) vigorously. Then, very, very slowly, teaspoon by teaspoon, begin to drizzle in the broken mayonnaise into the fresh yolk/mustard, whisking or blending continuously. Treat the broken mayonnaise as if it were pure oil.
- Re-Emulsify: Continue adding the broken mayonnaise slowly until it starts to thicken and emulsify again. Once a stable emulsion has formed, you can add the remaining broken mayonnaise a bit more quickly, but still in a steady stream, until it’s all incorporated into a beautiful, creamy Homemade Mayonnaise.
- Warm Water Method: Alternatively, for a slightly less broken batch, you can sometimes rescue it by whisking in a teaspoon of very warm (not hot) water. This can sometimes help the fat molecules re-bind.
My Mayonnaise is Too Thin (but not broken):
If your mayonnaise is emulsified but just isn’t reaching that thick, luscious consistency you expect, it can be frustrating.
- Why it Happens:
- Not Enough Oil: The thickness of mayonnaise largely depends on the oil-to-egg ratio. If you haven’t added enough oil, it won’t thicken properly.
- Over-Thinned During Seasoning: Adding too much lemon juice or other liquids at the end without enough oil to compensate can thin it out.
- Temperature: While less common for thinness, very cold ingredients can sometimes result in a looser emulsion.
- How to Fix It:
- Add More Oil: The simplest solution is to add more oil. Slowly drizzle in another ¼ to ½ cup of your neutral oil into the existing mayonnaise, whisking or blending continuously. This should help it thicken up significantly.
- Refrigeration: Sometimes, mayonnaise just needs time to chill and firm up. Transfer it to an airtight container and refrigerate for a few hours. It often thickens considerably once cold.
My Mayonnaise Tastes Too Oily/Greasy:
While Homemade Mayonnaise is inherently rich due to its oil content, it shouldn’t taste overwhelmingly greasy.
- Why it Happens:
- Insufficient Acidity or Salt: A lack of bright, acidic flavors (lemon juice/vinegar) or sufficient salt can make the richness of the oil feel more prominent and less balanced.
- Type of Oil Used: Using too much extra virgin olive oil or a very strong-flavored oil can lead to a bitter or “heavy” taste.
- How to Fix It:
- Adjust Seasoning: Add a little more lemon juice or vinegar and a pinch more salt. These ingredients are crucial for balancing the richness.
- Incorporate Fresh Elements: Stir in some finely chopped fresh herbs like chives or dill, or a bit of minced garlic. These fresh flavors can cut through the richness.
Remember, patience and observation are your best friends when troubleshooting Homemade Mayonnaise. Don’t be afraid to experiment a little; you’ll gain confidence with each batch!
Tips for the Best Homemade Mayonnaise Experience
Crafting the perfect batch of Homemade Mayonnaise is a culinary delight, offering a fresh, vibrant flavor that simply can’t be matched by store-bought versions. To ensure your experience is consistently excellent and your mayonnaise is always delicious, here are some invaluable tips gathered from years of making this beloved condiment.
- Always Use Room Temperature Ingredients, Especially the Egg Yolk: I cannot stress this enough. Cold eggs and other ingredients are stubborn and resist emulsifying with the oil. Room temperature eggs have yolks that are more fluid and willing to form a stable bond with the fat. Plan ahead and take your egg out of the refrigerator at least 30-60 minutes before you start. This single tip significantly increases your chances of success and a smooth, creamy result.
- Choose Your Oil Wisely: The type of oil you use will directly impact the flavor of your Homemade Mayonnaise. For a classic, neutral-tasting mayonnaise, opt for neutral oils like grapeseed, canola, sunflower, or a light-flavored olive oil. Avoid extra virgin olive oil for the entire batch, as its strong, sometimes bitter, flavor can easily overpower the delicate taste of mayonnaise. If you love olive oil, you can substitute up to a quarter or a third of the neutral oil with a good quality extra virgin olive oil for a subtle fruity note, but use it sparingly.
- The Slow Drizzle is Non-Negotiable (Unless Using Immersion Blender Magic): This is the golden rule for most mayonnaise methods (whisk, food processor). When adding the oil, especially at the very beginning, a slow, thin, steady stream is crucial. Think of it as a mere trickle or a few drops at a time. This allows the egg yolk enough time to bind with the oil molecules and create a stable emulsion. Adding too much oil too quickly is the most common reason for a broken mayonnaise. The immersion blender method is unique in that it allows you to add all the oil at once, but only because of the specific way the blender works to create a powerful vortex at the bottom first.
- Don’t Be Afraid of Dijon Mustard: Dijon mustard isn’t just for flavor; it’s also a fantastic natural emulsifier. The compounds in Dijon help to stabilize the emulsion, making your mayonnaise less likely to break. Even if you’re not a huge mustard fan, a teaspoon in your Homemade Mayonnaise recipe will go largely unnoticed in terms of its distinct mustard flavor but will contribute immensely to the texture and stability.
- Season to Taste: Initial measurements for salt, pepper, and lemon juice are just a guideline. Once your mayonnaise is fully emulsified, always taste it. Does it need more salt to brighten the flavors? A little more lemon juice for tang? Perhaps a tiny pinch of sugar to balance the acidity? Don’t be shy about adjusting until it’s perfect for your palate.
- Consider Food Safety with Raw Eggs: Since Homemade Mayonnaise uses raw egg yolks, it’s important to be mindful of food safety. Use the freshest, highest-quality eggs you can find, preferably from a trusted local source or those pasteurized if you are concerned. Pregnant women, young children, the elderly, and those with compromised immune systems should generally avoid consuming raw eggs.
- Storage: Store your Homemade Mayonnaise in an airtight container in the refrigerator. Due to the raw egg and lack of commercial preservatives, it’s best consumed within 3-5 days. While the acidity of the lemon juice/vinegar does help with preservation, homemade versions don’t have the extended shelf life of their store-bought counterparts.
- Embrace the Practice: If your first batch doesn’t turn out perfectly, don’t get discouraged! Mayonnaise making is a skill, and like any skill, it improves with practice. Review what might have gone wrong (e.g., oil added too fast, ingredients too cold), make adjustments, and try again. Each attempt will teach you more about the nuances of emulsification.
Following these tips will not only help you create a consistently perfect batch of Homemade Mayonnaise but also build your confidence in the kitchen, proving that some of the most delicious things are made simply and with care at home.
Creative Ways to Enjoy Your Homemade Mayonnaise
Having a jar of fresh, vibrant Homemade Mayonnaise in your refrigerator is like having a secret weapon in your culinary arsenal. Its superior flavor and texture compared to store-bought versions open up a world of possibilities, transforming everyday meals into something extraordinary. Beyond just spreading it on a sandwich, here are numerous creative and delicious ways to enjoy your freshly made batch:
- The Ultimate Sandwich & Burger Enhancer: This is a no-brainer, but a good quality Homemade Mayonnaise elevates any sandwich or burger. Spread it generously on your favorite bread or bun. Try a classic BLT, a hearty turkey club, or a juicy homemade burger, and you’ll immediately taste the difference. For an extra kick, mix in some finely minced red onion or chives.
- Creamy Salad Dressings: Homemade Mayonnaise forms the perfect base for a myriad of creamy salad dressings. Think classic ranch (add buttermilk, chives, dill, garlic powder, onion powder), a tangy blue cheese dressing (crumble in blue cheese, add a splash of vinegar), or a light creamy Caesar (blend with Parmesan, anchovies, garlic, lemon).
- Spectacular Dips: Transform your mayonnaise into irresistible dips for vegetables, chips, or crackers.
- Aioli Variations: As mentioned, plain garlic aioli is fantastic. But also consider roasted garlic aioli for a deeper, sweeter flavor, or a saffron aioli for a touch of elegance.
- Tartar Sauce: Combine with finely chopped pickles (cornichons are excellent), capers, fresh dill, and a squeeze of lemon juice. Perfect with fish and chips!
- Remoulade: A spicier, more complex French/Creole sauce with horseradish, paprika, cayenne, and herbs.
- Spicy Sriracha Mayo: Simply mix with sriracha to your desired heat level for a versatile dip that goes with everything from fries to sushi.
- Green Goddess Dip: Blend with a generous amount of fresh herbs (parsley, chives, tarragon), anchovy paste, and a hint of lemon.
- The Star of Salads: Mayonnaise is indispensable in many beloved salads.
- Coleslaw: Create a creamy, tangy dressing with mayonnaise, vinegar, a touch of sugar, salt, and pepper for shredded cabbage and carrots.
- Potato Salad: The quintessential summer side. Mix with boiled potatoes, celery, red onion, hard-boiled eggs, and a generous amount of mayonnaise.
- Pasta Salad: A creamy dressing for pasta salads with veggies, cheese, and sometimes chicken or tuna.
- Tuna or Chicken Salad: The foundation for classic tuna or chicken salads, often mixed with celery, onion, and various seasonings, perfect for sandwiches or lettuce wraps.
- Egg Salad: Simple, yet satisfying. Mix with chopped hard-boiled eggs, mustard, and seasonings.
- Flavorful Marinades & Coatings: Believe it or not, mayonnaise can be a secret ingredient in marinades and coatings!
- Moist Chicken or Fish: Spread a thin layer of mayonnaise (perhaps mixed with herbs or spices) on chicken breasts or fish fillets before baking or grilling. It locks in moisture and helps create a beautiful golden crust.
- Grilled Cheese Upgrade: Instead of butter, spread mayonnaise on the outside of your bread slices for an incredibly crispy, golden, and flavorful grilled cheese sandwich.
- Roasted Vegetable Companion: A dollop of plain or flavored Homemade Mayonnaise can beautifully complement roasted vegetables like asparagus, Brussels sprouts, or even grilled corn on the cob.
- Deviled Eggs: The creamy filling for deviled eggs absolutely shines when made with fresh, homemade mayonnaise.
The beauty of Homemade Mayonnaise lies not only in its superior taste but also in its versatility. By mastering this basic recipe, you unlock a world of culinary creativity, transforming simple ingredients into gourmet experiences. So, whip up a batch, experiment with flavors, and enjoy the delicious journey!
Conclusion:
I truly hope you’ve enjoyed following along with this journey to create something truly special in your kitchen. What we’ve explored today is more than just a simple condiment; it’s a gateway to elevating countless dishes, transforming the ordinary into the extraordinary. I’m talking, of course, about the magic of making your very own Homemade Mayonnaise. If there’s one culinary skill I believe everyone should master, it’s this. Forget everything you thought you knew about mayonnaise from a jar; this recipe is designed to introduce you to a world of unparalleled flavor, silky texture, and incredible freshness that store-bought simply cannot compete with. This isn’t just a recipe; it’s an experience, a revelation for your taste buds that promises to become a staple in your culinary repertoire.
The real beauty of this recipe lies in its simplicity and the remarkable impact it has on your cooking. When you whip up a batch of mayonnaise from scratch, you’re not just getting a condiment; you’re crafting a foundation for countless delicious meals. You’ll notice an immediate difference in the vibrant, fresh taste, free from the sometimes-dull, processed notes of commercial alternatives. The texture, too, is a game-changer – luxuriously smooth, thick, and perfectly emulsified, holding its shape beautifully.
Control over ingredients is another immense benefit.
You choose the quality of your eggs, the type of oil, and the exact balance of acidity and seasoning, tailoring it precisely to your preference or dietary needs. This level of customization is simply impossible with pre-made options, giving you a powerful tool to enhance your cooking while knowing exactly what goes into your food. It’s a wonderful feeling to serve something so fresh and wholesome, knowing every ingredient that contributed to its creation.
Now that you’ve mastered the art of creating this golden, creamy delight, let’s talk about how to unleash its full potential in your kitchen. Of course, the classic uses are always a fantastic starting point. Imagine spreading your freshly made mayonnaise generously on a hearty sandwich, its rich flavor complementing crisp lettuce, ripe tomatoes, and your favorite deli meats. It’s the secret ingredient that elevates a humble BLT into a gourmet experience. For summer gatherings, your potato salad or coleslaw will reach new heights of deliciousness when bound together with the unparalleled creaminess of your homemade creation. And let’s not forget deviled eggs; a dish where the quality of the mayonnaise truly shines, making each bite an indulgence. This versatility is what truly sets homemade apart.
But don’t stop there! The true fun begins when you start to explore the incredible versatility of your homemade base. Think of it as a blank canvas, ready to be infused with a myriad of flavors. For a vibrant Garlic Aioli, simply press a clove or two of fresh garlic into a small batch before serving – or even better, roast the garlic first for a sweeter, mellower profile. For a spicy kick, stir in a spoonful of sriracha or a pinch of cayenne pepper to create a fiery Sriracha Mayonnaise or a smoky Chipotle Mayo with a dash of smoked paprika. Herb lovers will adore a fresh dill, chive, or parsley-infused mayonnaise, perfect for drizzling over grilled fish or new potatoes. A squeeze of lemon juice and some lemon zest can brighten up any batch, making it ideal for seafood. You can even experiment with different mustards – a dollop of Dijon for a classic tang, or whole-grain mustard for added texture and a more robust flavor.
The possibilities are genuinely endless, limited only by your imagination and what fresh ingredients you have on hand.
Beyond just flavored condiments, your homemade marvel is an exceptional base for a wide array of dressings and dips. Transform it into a decadent Caesar dressing by whisking in grated Parmesan, anchovy paste, and a splash of Worcestershire sauce. Create creamy salad dressings by thinning it slightly with a touch of milk or buttermilk and adding your favorite seasonings. It makes for an incredibly rich and satisfying dip for fresh vegetables, crackers, or even homemade fries. I often use it as a binder in chicken or tuna salads, where its superior flavor truly makes all the difference. You can also incorporate it into marinades for chicken or fish, adding moisture and flavor that helps to tenderize and create a beautiful crust when cooked. It truly is one of the most versatile ingredients you can have ready in your refrigerator, ready to elevate an ordinary meal into something extraordinary. Your culinary horizons will expand significantly with this skill.
So, I implore you, take the leap! Don’t be intimidated by the idea of making mayonnaise from scratch. With the tips and techniques we’ve covered, I am confident you’ll find it to be a surprisingly straightforward and incredibly rewarding process. Once you experience the difference that fresh, vibrant, and perfectly textured Homemade Mayonnaise makes, I promise you won’t want to go back to store-bought. I genuinely can’t wait for you to try this recipe and discover the delicious impact it will have on your cooking. Please, do come back and share your experiences, your favorite flavor variations, or any culinary triumphs you achieve with your newly acquired skill. Your feedback and creativity inspire me, and I’d love to hear all about your adventures in the kitchen. Happy cooking, and enjoy every creamy, dreamy bite!
Recipe
A delicious recipe
Ingredients
Instructions
Important Information
Nutrition Facts (Per Serving)
It is important to consider this information as approximate and not to use it as definitive health advice.
Allergy Information
Please check ingredients for potential allergens and consult a health professional if in doubt.
Leave a Comment