

Homemade Hummus, a creamy, dreamy dip thats infinitely better than anything you can buy at the store, is calling your name! Forget those bland, pre-packaged tubs we’re about to embark on a culinary adventure that will transform your snacking game forever. Have you ever wondered why hummus is so incredibly addictive? Is it the smooth, velvety texture? The nutty, earthy flavor? Or perhaps it’s the sheer versatility of this Middle Eastern staple?
Hummus has a rich and fascinating history, with roots tracing back to ancient Egypt. While its exact origins are debated, one thing is certain: this simple blend of chickpeas, tahini, lemon juice, and garlic has captivated palates for centuries. Passed down through generations, homemade hummus has become a symbol of hospitality and shared meals across the Middle East and beyond.
What makes hummus so universally loved? It’s the perfect marriage of flavors and textures. The chickpeas provide a hearty base, while the tahini adds a luxurious richness. A generous squeeze of lemon juice brightens the flavors, and a touch of garlic gives it that irresistible zing. Plus, it’s incredibly convenient! Whether you’re looking for a healthy snack, a flavorful appetizer, or a delicious spread for sandwiches and wraps, hummus is always a winning choice. Get ready to experience the magic of homemade your taste buds will thank you!

Ingredients:
- 1 (15-ounce) can chickpeas, drained and rinsed thoroughly
- 1/4 cup tahini
- 1/4 cup lemon juice, freshly squeezed (about 1-2 lemons)
- 2-3 cloves garlic, minced
- 2-4 tablespoons ice water, more as needed
- 2 tablespoons olive oil, plus more for drizzling
- 1/2 teaspoon ground cumin
- 1/4 teaspoon salt, or more to taste
- Pinch of cayenne pepper (optional)
- Paprika, for garnish (optional)
- Fresh parsley, chopped, for garnish (optional)
Preparing the Chickpeas:
Okay, let’s start with the most important part: the chickpeas! This is where we can really make a difference in the texture of our hummus. The key to super smooth hummus is getting those chickpeas nice and soft. Some people even peel the skins off each chickpea individually, but I’m going to show you a slightly less tedious method that works almost as well.
- Rinse, Rinse, Rinse! First, drain the canned chickpeas in a colander. Then, rinse them under cold running water for a good minute or two. This helps remove some of the excess starch and canned flavor.
- The Baking Soda Trick: Now, here’s the secret weapon! Place the rinsed chickpeas in a saucepan and cover them with fresh water. Add 1/2 teaspoon of baking soda. Bring the mixture to a boil over medium-high heat.
- Simmer Until Soft: Once boiling, reduce the heat to low and let the chickpeas simmer for about 15-20 minutes, or until they are very soft and easily mashed with a fork. You should be able to squish them between your fingers with minimal effort. The baking soda helps break down the chickpea skins, making them much smoother when blended.
- Drain and Rinse Again: After simmering, drain the chickpeas and rinse them thoroughly under cold water again. This removes the baking soda residue and any remaining loose skins.
Blending the Hummus:
Now for the fun part turning those softened chickpeas into creamy, dreamy hummus! A good blender or food processor is essential for this step. I prefer a food processor, but a high-powered blender will also work. Just be patient and scrape down the sides as needed.
- Start with the Tahini and Lemon: In your food processor or blender, combine the tahini and lemon juice. Process for a minute or two, until the mixture is light and creamy. This step is important because it helps to emulsify the tahini and lemon juice, creating a smoother base for the hummus.
- Add the Garlic and Cumin: Next, add the minced garlic and ground cumin to the tahini mixture. Process for another 30 seconds or so, until the garlic is finely chopped and evenly distributed.
- Introduce the Chickpeas: Now, add about half of the drained and rinsed chickpeas to the food processor. Process until the mixture is thick and pasty.
- The Ice Water Secret: This is another key to achieving that perfect creamy texture. With the food processor running, slowly drizzle in 2 tablespoons of ice water. The cold water helps to lighten the mixture and create a smoother consistency.
- Add the Remaining Chickpeas: Add the remaining chickpeas and continue to process. If the mixture seems too thick, add another tablespoon or two of ice water, one tablespoon at a time, until you reach your desired consistency. You want it to be smooth, creamy, and easily spreadable.
- Olive Oil Time: Add the 2 tablespoons of olive oil and process for another minute. The olive oil adds richness and flavor to the hummus.
- Season to Perfection: Finally, add the salt and cayenne pepper (if using). Taste the hummus and adjust the seasoning as needed. You might want to add a little more lemon juice for tanginess, more salt for flavor, or more cumin for warmth.
- Process Until Silky Smooth: Continue to process the hummus for another minute or two, until it is completely smooth and creamy. Scrape down the sides of the food processor as needed to ensure that all the ingredients are fully incorporated.
Serving and Storing:
Your homemade hummus is now ready to be enjoyed! But before you dig in, let’s talk about presentation and storage.
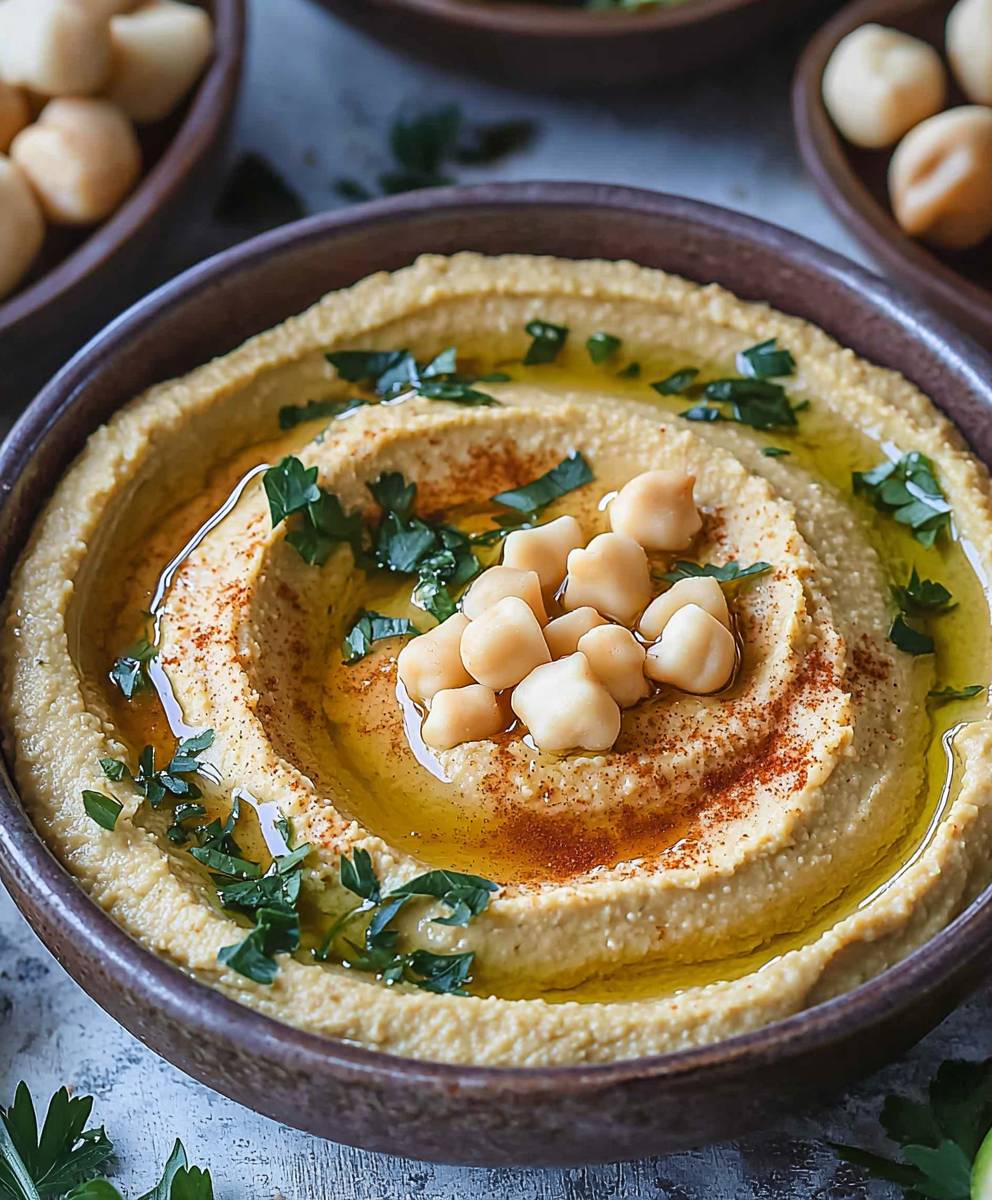
- Plate it Beautifully: Transfer the hummus to a serving bowl. Use the back of a spoon to create a swirl pattern on top.
- Drizzle with Olive Oil: Drizzle generously with olive oil. This adds a beautiful sheen and enhances the flavor.
- Garnish with Flair: Sprinkle with paprika and chopped fresh parsley for a pop of color and flavor. You can also add a few whole chickpeas or a sprinkle of cumin for visual appeal.
- Serve with Your Favorites: Serve your homemade hummus with warm pita bread, fresh vegetables (like carrots, celery, cucumbers, and bell peppers), pita chips, or crackers. It’s also delicious as a spread on sandwiches or wraps.
- Storage Instructions: Store any leftover hummus in an airtight container in the refrigerator for up to 5 days. The olive oil may solidify slightly in the fridge, but it will return to its normal consistency when brought to room temperature. You can also add a drizzle of fresh olive oil before serving.
Tips for the Best Hummus:
- Use High-Quality Tahini: The quality of your tahini will greatly impact the flavor of your hummus. Look for tahini that is made from 100% sesame seeds and has a smooth, creamy texture.
- Don’t Skimp on the Lemon Juice: Freshly squeezed lemon juice is essential for adding brightness and tanginess to the hummus.
- Adjust the Consistency to Your Liking: If you prefer a thinner hummus, add more ice water. If you prefer a thicker hummus, use less ice water.
- Experiment with Flavors: Once you’ve mastered the basic recipe, feel free to experiment with different flavors. You can add roasted red peppers, sun-dried tomatoes, olives, or even avocado to create your own unique hummus variations.
- Warm Chickpeas: Some people prefer to use slightly warm chickpeas when blending the hummus. This can help to create an even smoother texture.
- Peel the Chickpeas (Optional): For the absolute smoothest hummus, you can peel the skins off each chickpea individually. This is a bit time-consuming, but it can make a noticeable difference in the texture.
Troubleshooting:
- Hummus is too thick: Add more ice water, one tablespoon at a time, until you reach your desired consistency.
- Hummus is too thin: Add more tahini, one tablespoon at a time, until you reach your desired consistency.
- Hummus is too bland: Add more salt, lemon juice, or cumin to taste.
- Hummus is bitter: This is often caused by using old or rancid tahini. Make sure your tahini is fresh and of good quality.
- Hummus is grainy: This can be caused by not processing the hummus long enough. Continue to process the hummus until it is completely smooth and creamy. You can also try adding a tablespoon or two of ice water to help smooth it out.
Conclusion:
And there you have it! I truly believe this Homemade Hummus recipe is a game-changer. It’s not just about saving money compared to store-bought versions (although that’s a definite perk!). It’s about the incredible freshness, the vibrant flavors, and the complete control you have over the ingredients. You know exactly what’s going into your body, and you can tailor it to your exact taste preferences. This isn’t just hummus; it’s *your* hummus.
Why is this a must-try? Because it’s ridiculously easy, incredibly delicious, and infinitely customizable. Forget those bland, pre-packaged tubs. This recipe elevates hummus from a simple dip to a star ingredient. The creamy texture, the bright lemon notes, the subtle garlic punch it’s a symphony of flavors that will have you reaching for more. Plus, it’s naturally vegan and gluten-free, making it a crowd-pleaser for any gathering.
But the fun doesn’t stop there! Let’s talk serving suggestions and variations. Of course, it’s fantastic with pita bread, crudités (carrots, celery, cucumbers, bell peppers you name it!), and tortilla chips. But think outside the box! Spread it on sandwiches or wraps instead of mayonnaise. Use it as a base for a Mediterranean-inspired pizza. Dollop it on grilled chicken or fish for a burst of flavor.
For variations, the possibilities are endless! Want a spicier kick? Add a pinch of cayenne pepper or a drizzle of chili oil. Craving something smoky? Stir in a teaspoon of smoked paprika. Love roasted red peppers? Blend in a jar of drained roasted red peppers for a vibrant and flavorful twist. How about adding some sun-dried tomatoes for a tangy Mediterranean vibe? Or even incorporating some fresh herbs like cilantro or parsley for a brighter, fresher taste? Don’t be afraid to experiment and find your perfect hummus creation!
I’ve personally made this recipe countless times, and it’s always a hit. I’ve even converted a few hummus skeptics along the way! It’s become a staple in my kitchen, and I’m confident it will become one in yours too.
So, what are you waiting for? Gather your ingredients, fire up your food processor, and get ready to experience the magic of homemade hummus. I promise you won’t regret it.
And most importantly, I want to hear about your experience! Did you try the recipe? What variations did you make? What did you serve it with? Share your photos and stories in the comments below. I’m so excited to see what you create! Let’s spread the hummus love! I am sure that you will love this Homemade Hummus recipe as much as I do. Happy cooking!
Homemade Hummus: The Ultimate Guide to Making It Perfect
Creamy, flavorful homemade hummus made with simple ingredients and a few secret tricks for the smoothest texture.
Ingredients
- 1 (15-ounce) can chickpeas, drained and rinsed thoroughly
- 1/4 cup tahini
- 1/4 cup lemon juice, freshly squeezed (about 1-2 lemons)
- 2-3 cloves garlic, minced
- 2-4 tablespoons ice water, more as needed
- 2 tablespoons olive oil, plus more for drizzling
- 1/2 teaspoon ground cumin
- 1/4 teaspoon salt, or more to taste
- Pinch of cayenne pepper (optional)
- Paprika, for garnish (optional)
- Fresh parsley, chopped, for garnish (optional)
Instructions
- Prepare the Chickpeas: Drain and rinse chickpeas. Place in a saucepan, cover with water, and add 1/2 teaspoon baking soda. Bring to a boil, then simmer for 15-20 minutes until very soft. Drain and rinse thoroughly.
- Blend Tahini and Lemon: In a food processor or blender, combine tahini and lemon juice. Process for 1-2 minutes until light and creamy.
- Add Garlic and Cumin: Add minced garlic and cumin. Process for 30 seconds.
- Incorporate Chickpeas: Add half the chickpeas and process until thick and pasty.
- Ice Water Secret: With the processor running, slowly drizzle in 2 tablespoons of ice water.
- Add Remaining Chickpeas: Add the remaining chickpeas and continue to process, adding more ice water (1 tablespoon at a time) if needed to reach desired consistency.
- Olive Oil: Add 2 tablespoons of olive oil and process for 1 minute.
- Season: Add salt and cayenne pepper (if using). Taste and adjust seasoning as needed.
- Process Until Smooth: Process for 1-2 minutes until completely smooth and creamy, scraping down the sides as needed.
- Serve: Transfer to a serving bowl, create a swirl pattern, drizzle with olive oil, and garnish with paprika and parsley. Serve with pita bread, vegetables, or crackers.
- Store: Store leftover hummus in an airtight container in the refrigerator for up to 5 days.
Notes
- High-Quality Tahini: Use tahini made from 100% sesame seeds with a smooth, creamy texture.
- Lemon Juice: Freshly squeezed lemon juice is essential.
- Consistency: Adjust ice water to achieve desired thickness.
- Flavor Variations: Experiment with roasted red peppers, sun-dried tomatoes, or olives.
- Warm Chickpeas: Using slightly warm chickpeas can create a smoother texture.
- Peel Chickpeas (Optional): For the smoothest hummus, peel the skins off each chickpea.
- Troubleshooting:
- Too Thick: Add more ice water.
- Too Thin: Add more tahini.
- Too Bland: Add more salt, lemon juice, or cumin.
- Bitter: Use fresh, high-quality tahini.
- Grainy: Process longer or add ice water.


Leave a Comment