

Cheesecake With Pound Cake Center — prepare to embark on a dessert journey that truly redefines indulgence. Have you ever wished you didn’t have to choose between the luscious, tangy creaminess of a classic cheesecake and the comforting, buttery density of a perfectly baked pound cake? What if I told you that you could have both, beautifully intertwined in a single, breathtaking creation? This recipe delivers precisely that, offering a dessert experience that is as surprising as it is satisfying.
While cheesecake itself boasts a rich history spanning back to ancient Greece, evolving through countless cultures to become the beloved dessert we know today, this innovative rendition elevates the experience to an entirely new level. It moves beyond mere toppings and infusions, presenting a delightful, moist surprise at its very core. This isn’t just a dessert; it’s an architectural marvel of flavor and texture that truly stands apart.
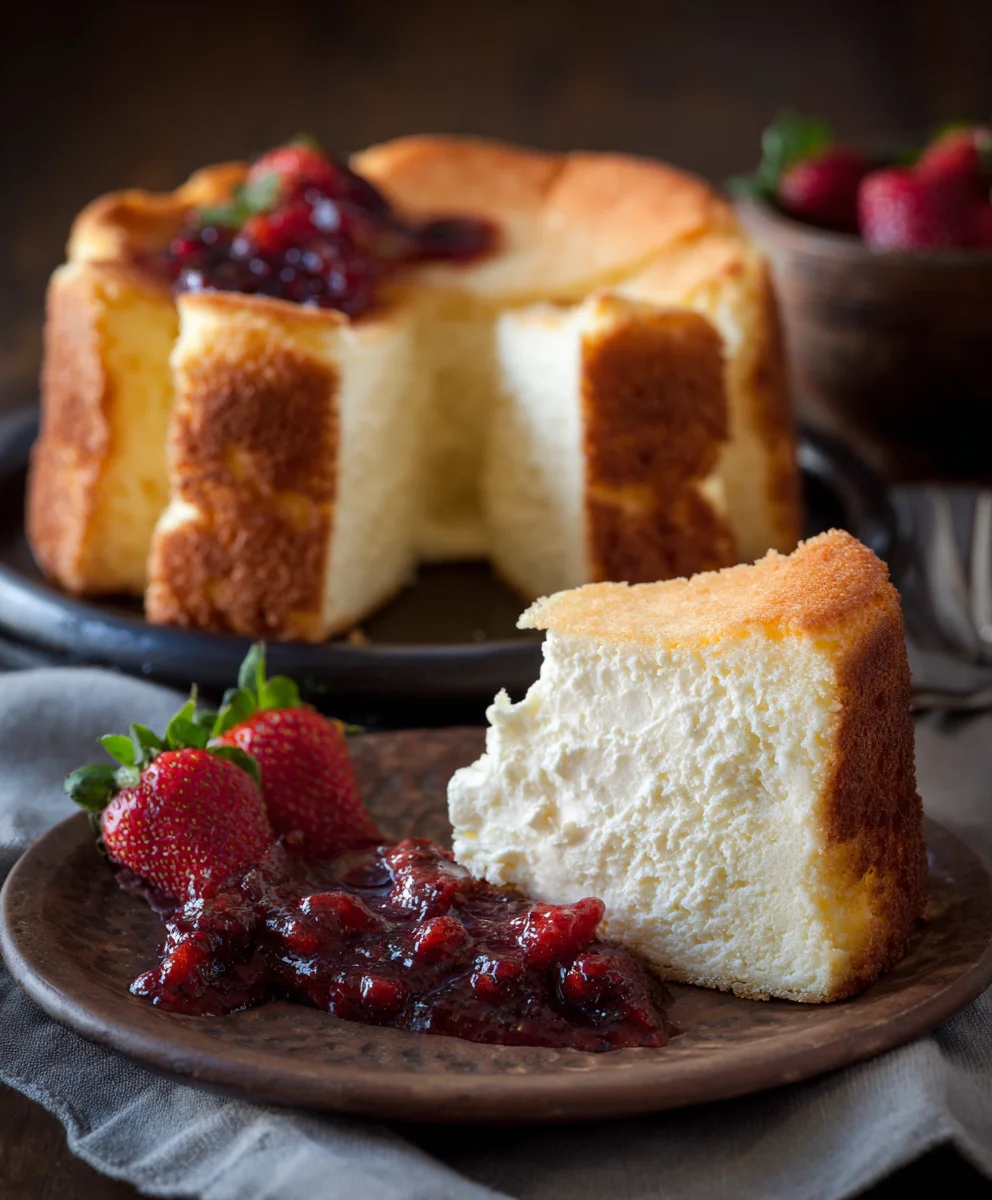
People adore this particular fusion because it genuinely offers the best of both worlds. Every forkful delivers the signature melt-in-your-mouth richness of cheesecake, followed by the tender, moist crumb of a homemade pound cake, creating an exquisite contrast that keeps you coming back for more. It’s a showstopper, visually stunning and incredibly satisfying, making it the perfect centerpiece for any special occasion or a luxurious treat to brighten an ordinary day. Our unique Cheesecake With Pound Cake Center is designed not just to satisfy, but to truly captivate and delight every single palate.

Ingredients:
-
For the Crust:
- 1 ½ cups (about 180g) graham cracker crumbs (or digestive biscuit crumbs)
- ¼ cup (50g) granulated sugar
- ½ teaspoon ground cinnamon (optional, but I love the warmth it adds!)
- 6 tablespoons (85g) unsalted butter, melted
-
For the Pound Cake Layer:
- 1 store-bought or pre-made pound cake (approx. 12-16 oz / 340-450g), preferably a dense, unflavored variety. I find a good quality plain pound cake works best here, allowing the cheesecake flavors to shine.
-
For the Cheesecake Batter:
- 32 ounces (900g) full-fat cream cheese, softened to room temperature. This is absolutely crucial for a smooth batter, trust me!
- 1 ½ cups (300g) granulated sugar
- ¼ cup (50g) all-purpose flour. A little bit of flour helps prevent cracking.
- 1 tablespoon pure vanilla extract. Don’t skimp on good vanilla!
- 1 teaspoon lemon zest (optional, but it really brightens the flavor profile of this rich Cheesecake With Pound Cake Center).
- ½ teaspoon salt
- 4 large eggs, at room temperature
- 1 large egg yolk, at room temperature (adds extra richness!)
- ½ cup (120g) full-fat sour cream, at room temperature (or full-fat Greek yogurt for a slightly tangier note).
-
Optional Toppings:
- Fresh berries (strawberries, raspberries, blueberries)
- Whipped cream
- Chocolate sauce or ganache
- Caramel sauce
- A dusting of powdered sugar
- Reserved pound cake crumbs or small cubes for garnish.
Prepare the Crust
- Preheat your oven to 350°F (175°C). While the oven preheats, I like to gather all my ingredients, especially for the crust, so everything is ready to go.
- First things first, let’s prepare a 9-inch springform pan. I always start by lightly buttering the bottom and sides of the pan. This helps prevent sticking and makes releasing the cheesecake much easier later on. You can also line the bottom with parchment paper for extra security against sticking.
- In a medium bowl, combine the graham cracker crumbs, granulated sugar, and ground cinnamon (if you’re using it). I love the subtle spice the cinnamon adds; it complements the rich flavors of our Cheesecake With Pound Cake Center beautifully. Stir these dry ingredients together until they are well combined.
- Pour the melted butter over the crumb mixture. Using a fork or your fingertips, mix until all the crumbs are moistened and resemble wet sand. It should hold together when you press it in your hand. This is a crucial step for a sturdy crust!
- Press the mixture evenly into the bottom of the prepared springform pan. I use the bottom of a flat glass or a measuring cup to compact the crumbs really well. This creates a dense, solid base for our cheesecake. Make sure it’s packed tightly all the way to the edges.
- Bake the crust for 8-10 minutes. This pre-baking step helps to set the crust, preventing it from becoming soggy once the cheesecake filling is added. Keep an eye on it to ensure it doesn’t get too dark.
- Once baked, remove the crust from the oven and set it aside to cool completely while you prepare the other components. It’s important for the crust to be cool before adding the batter.
Prepare the Pound Cake Layer
- While the crust is cooling, let’s get our pound cake ready. For this “Cheesecake With Pound Cake Center” recipe, the pound cake forms a delightful surprise in the middle, so preparation is key.
- Using a sharp, serrated knife, carefully slice your store-bought pound cake into even slices, about ½ to ¾ inch thick. Depending on the size of your pound cake and springform pan, you’ll need enough slices to cover the bottom of your 9-inch pan in a single layer.
- Once sliced, arrange the pound cake slices on a clean cutting board or plate. You might need to trim some slices to fit snugly together, forming a solid, even layer. Think of it like a jigsaw puzzle, aiming for minimal gaps. Set this aside; it will be inserted into the cheesecake batter later.
Prepare the Cheesecake Batter
- Reduce your oven temperature to 325°F (160°C). We’ll be baking the cheesecake at a lower temperature to ensure a creamy texture and prevent cracks.
- In the bowl of a stand mixer fitted with the paddle attachment (or using a large bowl with a hand mixer), place the softened cream cheese. It’s really, really important that your cream cheese is at room temperature. If it’s cold, you’ll end up with lumps, and nobody wants a lumpy cheesecake! Beat the cream cheese on medium speed for about 2-3 minutes, scraping down the sides of the bowl frequently, until it’s completely smooth and creamy. I usually pause a couple of times to scrape the bowl thoroughly.
- Gradually add the granulated sugar to the cream cheese, beating on low to medium speed until just combined. Don’t overmix at this stage; we don’t want to incorporate too much air. Scrape down the sides of the bowl again.
- Next, add the all-purpose flour, vanilla extract, lemon zest (if using), and salt. Beat on low speed until just incorporated. The flour helps to stabilize the cheesecake and prevent cracking.
- In a separate small bowl, lightly whisk the four large eggs and one egg yolk together. This ensures they are evenly distributed before adding them to the batter.
- With the mixer on low speed, slowly add the eggs and egg yolk mixture to the cream cheese mixture, a little at a time, mixing just until each addition is incorporated. This is probably the most crucial step for a smooth, crack-free cheesecake! Do not overmix! Overmixing introduces too much air, which can cause the cheesecake to puff up in the oven and then crack as it cools. I usually stop the mixer as soon as the last streaks of egg disappear.
- Finally, add the sour cream. Mix on low speed just until it’s fully incorporated and the batter is smooth. Give the bowl one last good scrape with a rubber spatula to make sure everything is well combined from the bottom up. Your batter should be thick, smooth, and lump-free.
Assemble the Cheesecake With Pound Cake Center
- Before we assemble, let’s prepare for the water bath, which is essential for a perfectly creamy cheesecake. Wrap the outside of your springform pan tightly with several layers of heavy-duty aluminum foil. I usually use at least three layers to ensure no water seeps in. This creates a waterproof barrier.
- Pour about half of the cheesecake batter (roughly 3 cups) over the cooled graham cracker crust in the springform pan. Gently spread it evenly with an offset spatula.
- Carefully arrange the pre-sliced pound cake pieces over this first layer of cheesecake batter. Place them side-by-side, forming a single, even layer that covers the entire surface of the batter. Make sure the pound cake slices are snug against each other. This is the “center” of our “Cheesecake With Pound Cake Center,” so ensure it’s well-placed.
- Pour the remaining cheesecake batter over the pound cake layer, gently spreading it to cover the pound cake completely and smooth out the top. Give the pan a few gentle taps on the counter to release any large air bubbles.
- Place the foil-wrapped springform pan into a larger roasting pan. I usually use a pan that’s large enough to comfortably fit the springform with some room around the edges.
- Carefully pour hot water into the larger roasting pan, making sure it comes about halfway up the sides of the springform pan. Be very careful not to splash water into the cheesecake batter itself. The water bath provides a moist, even heat environment, which is vital for preventing cracks and achieving that signature creamy texture.
Baking the Cheesecake
- Carefully transfer the roasting pan with the springform inside to the preheated oven (325°F / 160°C).
- Bake for 70-90 minutes. Baking time can vary depending on your oven, so it’s important to know what to look for. The cheesecake is done when the edges are set, but the center (about 2-3 inches in diameter) still has a slight wobble when you gently jiggle the pan. It shouldn’t be liquidy, but a slight jiggle is perfect. Overbaking will lead to a dry, cracked cheesecake, and we definitely want to avoid that!
- Once baked, turn off the oven, but do not remove the cheesecake. Leave the oven door ajar (you can prop it open with a wooden spoon) and allow the cheesecake to cool slowly in the water bath inside the oven for at least 1 hour. This gradual cooling process is another key step in preventing cracks.
Cooling and Chilling
- After the hour of cooling in the oven, carefully remove the roasting pan from the oven.
- Take the springform pan out of the water bath and remove the aluminum foil. Be cautious, as there might be some residual water on the foil.
- Place the springform pan on a wire rack and let the cheesecake cool completely at room temperature for another 2-3 hours. It needs to be cool to the touch before moving to the next stage.
- Once cooled to room temperature, cover the springform pan loosely with plastic wrap and transfer the cheesecake to the refrigerator. This is where patience truly pays off! Chill the “Cheesecake With Pound Cake Center” for at least 8 hours, but preferably overnight. This chilling period is crucial for the cheesecake to firm up, develop its full flavor, and achieve that dense, rich, and creamy texture we all love. Rushing this step will result in a less-than-perfect cheesecake.
Optional Topping and Serving
- When you’re ready to serve your magnificent Cheesecake With Pound Cake Center, remove it from the refrigerator.
- Carefully run a thin knife around the edge of the springform pan before releasing the sides. This helps to ensure a clean release and prevents the cheesecake from sticking. Gently unclip and lift away the springform ring. You can leave the cheesecake on the bottom of the pan for serving or carefully transfer it to a serving plate.
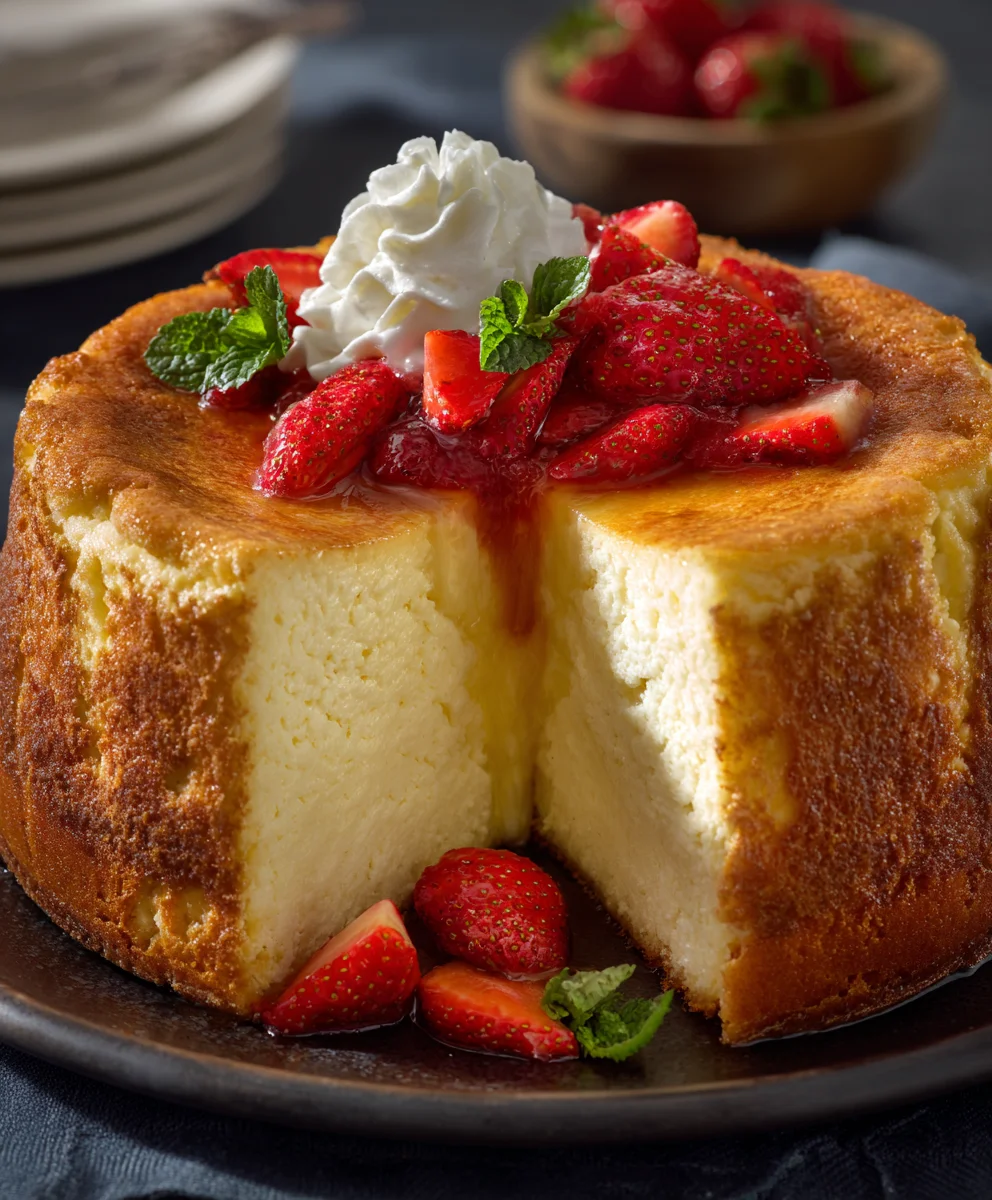
- Now for the fun part – topping it! This cheesecake is absolutely delicious on its own, but a beautiful topping can elevate it even further. I love to garnish mine with fresh berries like strawberries, raspberries, and blueberries for a burst of color and a fresh, tart contrast to the rich sweetness.
- Other delicious options include a dollop of freshly whipped cream, a drizzle of warm chocolate sauce or homemade caramel, or simply a dusting of powdered sugar. Sometimes, I even crumble a few leftover pound cake pieces or crumbs around the base for a textural garnish that highlights the special center.
- To slice the cheesecake, use a long, sharp knife. For clean slices, I recommend dipping the knife in hot water and wiping it clean between each cut. This prevents the cheesecake from sticking to the knife and creates perfectly neat slices.
- Serve your glorious Cheesecake With Pound Cake Center chilled and watch it disappear! It’s truly a showstopper dessert that combines two beloved classics into one irresistible treat. Enjoy every decadent bite!
Conclusion:
And there you have it, my friends! We’ve journeyed together through the delightful process of creating a dessert that is nothing short of revolutionary. If you’re looking for a show-stopping treat that will leave everyone at the table utterly speechless, then this recipe truly is a must-try. It’s not just about baking; it’s about crafting an experience, a moment of pure, unadulterated bliss that lingers long after the last bite. I honestly believe this creation stands head and shoulders above many traditional desserts, offering a sophisticated twist on two beloved classics. The sheer joy of presenting something so unique and delicious, knowing you made it yourself, is incredibly rewarding. Trust me, the effort, though not overly complicated, pays off in spades when you witness the smiles and hear the compliments.
What makes this particular dessert an absolute standout? It’s the ingenious fusion of textures and flavors. Imagine the silken, creamy dreaminess of a classic cheesecake, perfectly balanced with the dense, buttery crumb of a rich pound cake. Each forkful delivers a symphony of sensations – the initial slight resistance of the cheesecake yielding to its smooth interior, then the comforting, sturdy bite of the pound cake. This isn’t just a dessert; it’s a culinary adventure for your palate. The subtle tang of the cream cheese cuts through the sweetness, ensuring every bite is as exciting as the last. It’s a dessert that looks incredibly impressive, suggesting hours of arduous work, but in reality, it’s surprisingly approachable for home bakers. You’re not just making a cake; you’re creating a conversation starter, a centerpiece that will have everyone asking for your secret.
The beauty of this recipe also lies in its inherent versatility. While it’s absolutely perfect on its own, a plain canvas of creamy deliciousness, don’t hesitate to explore various serving suggestions and delightful variations to truly make it your own. For a simple yet elegant touch, a dusting of powdered sugar adds a delicate finish. Elevate it further with a vibrant berry compote – a mix of fresh raspberries, blueberries, and strawberries simmered lightly with a touch of sugar and lemon zest creates a wonderful tart contrast. A drizzle of warm caramel sauce or rich chocolate ganache can transform it into an even more decadent treat, perfect for special occasions or when you simply crave something extra luxurious. For those who adore nuts, a sprinkle of toasted pecans or walnuts provides a delightful textural crunch and a nutty aroma that complements the creamy cheesecake beautifully. Don’t be afraid to experiment with these simple additions; they can truly elevate your creation.
Feeling adventurous? Let’s talk about variations you can incorporate directly into the recipe. For the cheesecake layer, consider adding citrus zest – lemon, orange, or lime zest can impart a wonderful brightness that enlivens the entire dessert. A swirl of fruit puree, like passion fruit or raspberry, before baking can create stunning patterns and introduce new flavor dimensions. For chocolate lovers, folding in some melted chocolate or mini chocolate chips into the cheesecake batter would be an absolute dream come true. You could even infuse the pound cake itself with different flavors. Imagine an almond-flavored pound cake center for a sophisticated twist, or perhaps a lemon pound cake for an extra layer of zesty delight. The possibilities are truly endless, limited only by your imagination. This recipe is robust enough to handle creative tweaks, allowing you to personalize it for any palate or season.
Ultimately, my biggest hope is that you feel inspired to try this incredible recipe in your own kitchen. Don’t be intimidated by its elegant appearance; the steps are straightforward and the reward is immense. There’s something uniquely satisfying about pulling a perfectly golden, beautifully set cheesecake from the oven, knowing you’ve created something truly special. This isn’t just another dessert; it’s a memorable culinary experience waiting to happen. So, gather your ingredients, preheat your oven, and embark on this delicious journey. I promise you, the rich, creamy texture and the comforting, buttery pound cake center will be a revelation. Once you’ve tasted the magic of a homemade Cheesecake With Pound Cake Center, you’ll understand why it’s destined to become a new favorite in your baking repertoire. And when you do, please, please share your creations! Tag me on social media, leave a comment below, or send me a picture. I absolutely love seeing your baking triumphs and hearing about your experiences. Happy baking, everyone!
FAQs: People Also Ask
Can I use a store-bought pound cake for this recipe?
Absolutely! While making your own pound cake from scratch can be a rewarding experience and allows for more control over flavor and texture, using a high-quality store-bought pound cake is a fantastic time-saver. Just make sure it’s dense enough to hold its shape when sliced and complements the cheesecake flavor. This small shortcut won’t compromise the deliciousness of the final dessert.
How do I prevent my cheesecake from cracking?
Cracks are a common concern with cheesecakes, but they can usually be avoided! The key is slow and even baking. Make sure not to overbake; the center should still have a slight wobble. A water bath (bain-marie) is highly recommended for this recipe as it provides a moist, gentle baking environment, preventing the edges from cooking too quickly. Also, allow your cheesecake to cool very slowly, first in the oven with the door ajar, then at room temperature, and finally in the refrigerator. Sudden temperature changes are often the culprits behind cracks.
Can I make this Cheesecake With Pound Cake Center ahead of time?
Yes, absolutely! This is one of the best things about making a cheesecake – it actually benefits from chilling for at least 8 hours, or preferably overnight, to fully set and for the flavors to meld beautifully. You can prepare the entire dessert a day or two in advance, making it perfect for entertaining. Just cover it loosely with plastic wrap once fully chilled to prevent it from absorbing refrigerator odors.
What’s the best way to store leftover Cheesecake With Pound Cake Center?
To keep your leftover cheesecake fresh and delicious, store it in an airtight container or tightly wrapped with plastic cling film in the refrigerator. It will typically last for 3-5 days. For longer storage, individual slices can be wrapped well in plastic wrap and then aluminum foil and frozen for up to 1 month. Thaw frozen slices in the refrigerator overnight before serving for the best texture.
Do I need a springform pan for this recipe?
A springform pan is highly recommended and almost essential for this recipe. Its removable sides make it incredibly easy to unmold the delicate cheesecake without damaging its perfect shape. Trying to remove a cheesecake from a standard cake pan can be very challenging and often results in a less-than-perfect presentation. If you don’t have one, it’s a worthwhile investment for any serious baker!
Can I use different types of cake for the center instead of pound cake?
While pound cake is chosen for its dense, buttery texture that holds up well against the creamy cheesecake, you can certainly experiment! A firm, moist vanilla or even a light chocolate cake could work, but avoid anything too airy or crumbly, as it might disintegrate during baking or slicing. The key is to select a cake that provides a good structural contrast and complements the rich cheesecake flavor without being overwhelmed.
Cheesecake With Pound Cake Center
A magnificent dessert combining the luscious, tangy creaminess of cheesecake with the comforting, buttery density of pound cake, beautifully intertwined in a single, breathtaking creation. This showstopper features a hidden pound cake center, offering a surprising textural delight that redefines indulgence and captivates every palate.
Ingredients
-
1 ½ cups (180g) graham cracker crumbs
-
¼ cup (50g) granulated sugar (for crust)
-
½ teaspoon ground cinnamon (optional)
-
6 tablespoons (85g) unsalted butter, melted
-
1 store-bought or pre-made dense, unflavored pound cake (approx. 12-16 oz / 340-450g)
-
32 ounces (900g) full-fat cream cheese, softened
-
1 ½ cups (300g) granulated sugar (for batter)
-
¼ cup (50g) all-purpose flour
-
1 tablespoon pure vanilla extract
-
1 teaspoon lemon zest (optional)
-
½ teaspoon salt
-
4 large eggs, at room temperature
-
1 large egg yolk, at room temperature
-
½ cup (120g) full-fat sour cream, at room temperature (or full-fat Greek yogurt)
Instructions
-
Step 1
Preheat oven to 350°F (175°C). Lightly butter a 9-inch springform pan. Combine graham cracker crumbs, ¼ cup sugar, and ½ tsp cinnamon (optional). Mix in 6 tbsp melted butter until moistened. Press mixture evenly into the bottom of the prepared pan. Bake for 8-10 minutes. Set aside to cool completely. -
Step 2
Slice the pound cake into ½ to ¾ inch thick slices. Arrange enough slices to cover the bottom of your 9-inch pan in a single, even layer, trimming to fit snugly. Set aside. -
Step 3
Reduce oven temperature to 325°F (160°C). In a stand mixer, beat 32 oz softened cream cheese on medium speed for 2-3 minutes until smooth. Gradually add 1 ½ cups sugar, beating on low to medium speed until just combined. Add ¼ cup flour, 1 tbsp vanilla, 1 tsp lemon zest (optional), and ½ tsp salt; beat on low until incorporated. In a separate bowl, lightly whisk 4 large eggs and 1 egg yolk. Slowly add to the cream cheese mixture on low speed, mixing just until each addition is incorporated; do not overmix. Finally, add ½ cup sour cream and mix on low speed until smooth. Scrape the bowl. -
Step 4
Wrap the outside of the springform pan tightly with several layers of heavy-duty aluminum foil. Pour about half (roughly 3 cups) of the cheesecake batter over the cooled crust and spread evenly. Carefully arrange the pre-sliced pound cake pieces over this first batter layer, forming a single, even layer. Pour the remaining cheesecake batter over the pound cake, spreading to cover completely. Gently tap the pan to release air bubbles. Place the foil-wrapped springform pan into a larger roasting pan. Pour hot water into the roasting pan until it comes about halfway up the sides of the springform pan. -
Step 5
Carefully transfer the roasting pan to the preheated oven (325°F / 160°C). Bake for 70-90 minutes, until the edges are set but the center (about 2-3 inches in diameter) still has a slight wobble. Turn off the oven, leave the door ajar, and allow the cheesecake to cool slowly in the water bath inside the oven for at least 1 hour. -
Step 6
Remove the roasting pan from the oven. Carefully take the springform pan out of the water bath and remove the aluminum foil. Place the springform pan on a wire rack and let the cheesecake cool completely at room temperature for another 2-3 hours. Once cooled, cover the springform pan loosely with plastic wrap and transfer the cheesecake to the refrigerator. Chill for at least 8 hours, but preferably overnight. -
Step 7
When ready to serve, remove the cheesecake from the refrigerator. Run a thin knife around the edge of the springform pan before releasing the sides. Gently unclip and lift away the springform ring. Garnish with fresh berries, whipped cream, chocolate/caramel sauce, or a dusting of powdered sugar. For clean slices, dip a long, sharp knife in hot water and wipe clean between each cut. Serve chilled.
Important Information
Nutrition Facts (Per Serving)
It is important to consider this information as approximate and not to use it as definitive health advice.
Allergy Information
Please check ingredients for potential allergens and consult a health professional if in doubt.

Leave a Comment