

Today, we are thrilled to present ?p=8353, a recipe that promises to transform your perception of home cooking. Are you ready to embark on a delightful culinary journey, turning simple, wholesome ingredients into an extraordinary dish that will captivate your taste buds and warm your soul?
There’s an undeniable charm in a meal prepared with care, a tradition that transcends cultures and generations. From ancient hearths to modern kitchens, the act of cooking and sharing food has always been a cornerstone of human connection and comfort. This particular creation embodies that timeless spirit, offering a heartwarming experience that feels both familiar and refreshingly new, connecting you to a universal joy found in good food.
People absolutely adore this dish not just for its incredible flavor profile – a masterful blend of savory, sweet, and tangy notes – but also for its wonderfully satisfying texture that provides a delightful mouthfeel with every bite. Beyond its undeniable deliciousness, its remarkable convenience makes it a perfect choice for busy weeknights or relaxed weekend gatherings. We believe that every meal should be a moment of joy, and this recipe is designed to deliver precisely that, making gourmet dining accessible and enjoyable for everyone.
Your Culinary Journey Starts Here with ?p=8353
You’ll find all the guidance you need right here in ?p=8353, meticulously crafted to ensure your success. From ingredient selection to the final flourish, we’ve covered every detail to make your cooking experience seamless and enjoyable. Prepare to impress yourself and your loved ones with a dish that truly stands out.

Ingredients:
- For the Rich Beef Ragu (Meat Sauce):
- 2 tablespoons olive oil
- 2 pounds lean ground beef (I prefer 80/20 for flavor)
- 1 large yellow onion, finely chopped
- 3 cloves garlic, minced
- 2 carrots, finely diced
- 2 celery stalks, finely diced
- 1 (28-ounce) can crushed tomatoes (good quality makes a difference!)
- 1 (15-ounce) can tomato sauce
- 1 (6-ounce) can tomato paste
- 1/2 cup dry red wine (like Merlot or Cabernet Sauvignon, optional but highly recommended for depth)
- 1/2 cup beef broth
- 2 bay leaves
- 1 teaspoon dried oregano
- 1/2 teaspoon dried basil
- 1/4 teaspoon red pepper flakes (adjust to your spice preference)
- Salt and freshly ground black pepper to taste
- 1/4 cup fresh parsley, chopped (for garnish and adding fresh flavor at the end)
- For the Creamy Béchamel Sauce:
- 6 tablespoons unsalted butter
- 6 tablespoons all-purpose flour
- 5 cups whole milk, warmed (this helps prevent lumps!)
- 1/2 teaspoon freshly grated nutmeg
- Salt and white pepper to taste
- For the Lasagna Assembly:
- 1 pound lasagna noodles (oven-ready or traditional, follow package instructions if traditional)
- 15 ounces ricotta cheese, drained if watery
- 1 large egg, lightly beaten
- 1/4 cup fresh parsley, finely chopped
- 1/2 teaspoon salt
- 1/4 teaspoon black pepper
- 4 cups shredded mozzarella cheese (I often use a mix of low-moisture part-skim and whole milk mozzarella)
- 1 cup freshly grated Parmesan cheese, plus extra for serving
For the Rich Beef Ragu (Meat Sauce):
- First things first, let’s get that incredible meat sauce simmering! It’s the heart and soul of our lasagna, so don’t rush this step. Grab a large, heavy-bottomed pot or Dutch oven and set it over medium-high heat. Add the olive oil. Once it’s shimmering, add the ground beef.
- Brown the beef thoroughly. This is crucial for developing deep, rich flavor. Break up the meat with a spoon as it cooks. You want it to be nicely browned, not just steamed. This usually takes about 8-10 minutes. Once browned, drain off any excess fat. I like to tilt the pot and use a spoon to scoop out the fat, leaving just enough to cook the vegetables.
- Reduce the heat to medium. Add the finely chopped onion, carrots, and celery to the pot. These are your aromatics, and they’ll create the flavor base for our ragu. Sauté them, stirring occasionally, until they soften and the onion becomes translucent, which typically takes about 7-10 minutes. Don’t let them burn; we want sweetness, not bitterness.
- Now, stir in the minced garlic and the tomato paste. Cook for another 2-3 minutes, stirring constantly. Cooking the tomato paste at this stage helps to deepen its flavor and get rid of any raw, metallic taste. You’ll notice it darkens slightly and becomes wonderfully fragrant.
- Pour in the red wine, if you’re using it. This is a fantastic step for adding complexity. Scrape the bottom of the pot with your spoon to loosen any browned bits – that’s called deglazing, and those bits are pure flavor! Let the wine simmer and reduce by about half, which should take another 3-5 minutes. The alcohol will cook off, leaving behind a lovely richness.
- Add the crushed tomatoes, tomato sauce, beef broth, bay leaves, dried oregano, dried basil, and red pepper flakes. Give everything a good stir to combine.
- Bring the sauce to a gentle simmer, then reduce the heat to low, cover the pot, and let it cook. This is where the magic happens! You want to let it simmer for at least 1.5 to 2 hours, or even longer if you have the time. The longer it simmers, the more the flavors meld and deepen, becoming truly magnificent. Stir it occasionally to prevent sticking and ensure even cooking.
- During the last 15 minutes of simmering, remove the lid to allow some of the moisture to evaporate, which will thicken the sauce slightly. Taste and adjust the seasoning with salt and freshly ground black pepper. Remember, a good sauce needs proper seasoning! Before moving on, don’t forget to remove those bay leaves – they’ve done their job!
For the Creamy Béchamel Sauce:
- While your ragu is doing its thing, let’s tackle the béchamel sauce. This creamy white sauce is a traditional Italian lasagna component and truly elevates the dish, providing a lovely contrast to the robust meat sauce. In a separate medium-sized saucepan, melt the unsalted butter over medium heat.
- Once the butter is fully melted and slightly foamy, add the flour. Whisk continuously for 1-2 minutes to create a “roux.” You want it to be a pale golden color, smelling slightly nutty, but make sure it doesn’t brown too much. This roux is your thickening agent.
- Now, here’s a crucial step for a lump-free béchamel: gradually whisk in the warmed whole milk, a little at a time. I usually add about a cup, whisk until completely smooth, then add another cup, and so on. Continue whisking constantly as the sauce thickens. Keep the heat at medium.
- Bring the sauce to a gentle simmer, still whisking. Once it starts to bubble and thicken to a consistency that coats the back of a spoon, you know you’re on the right track. This usually takes about 5-8 minutes after all the milk has been added.
- Remove the béchamel from the heat. Stir in the freshly grated nutmeg, salt, and white pepper to taste. I prefer white pepper in béchamel because it blends in visually, but black pepper works too if that’s all you have. Don’t skimp on the nutmeg; it adds a wonderfully aromatic warmth. If your béchamel seems too thick, you can whisk in a tiny bit more warm milk until it reaches your desired consistency – thick enough to cling, but pourable. Set it aside, covering it with plastic wrap pressed directly onto the surface to prevent a skin from forming.
Preparing the Lasagna Noodles:
- While your sauces are perfecting themselves, it’s time to prepare the lasagna noodles. The method depends on the type of noodles you’re using.
- If you’re using traditional lasagna noodles that require boiling, bring a large pot of salted water to a rolling boil. Add the noodles in batches, making sure not to overcrowd the pot. Cook them according to package directions until they are al dente – slightly firm, but still pliable. I always recommend undercooking them by about 1-2 minutes from the package instructions, as they will finish cooking in the oven.
- Once cooked, carefully remove the noodles from the water and immediately lay them flat on a clean kitchen towel or parchment paper, ensuring they don’t stick together. A little drizzle of olive oil can also help. Don’t rinse them; the starch helps the sauce cling.
- If you’re using oven-ready (no-boil) lasagna noodles, congratulations, you’ve saved yourself a step! These noodles can be used directly from the package. Just ensure your sauces are quite moist, as the noodles will absorb liquid during baking. I often give them a quick dunk in warm water for about 30 seconds before layering, just to make them a tiny bit more pliable and ensure they hydrate well in the oven.
Assembling Your Lasagna Masterpiece:
This is where all our hard work comes together! Get ready to layer. Preheat your oven to 375°F (190°C). Lightly grease a 9×13-inch baking dish. Make sure you have all your components ready: the warm ragu, the béchamel, cooked noodles, and your cheese mixtures.
- In a medium bowl, combine the ricotta cheese, beaten egg, chopped fresh parsley, salt, and black pepper. Stir well until everything is thoroughly mixed. The egg helps bind the ricotta layer and keeps it from being too crumbly.
- The first layer is crucial. Spread a thin layer of the meat ragu (about 1 cup) across the bottom of your prepared 9×13-inch baking dish. This prevents the noodles from sticking and starts building that flavor from the base up.
- Lay 3-4 lasagna noodles over the sauce, slightly overlapping them if necessary to cover the entire bottom.
- Next, spread half of the ricotta cheese mixture evenly over the noodles.
- Follow with a generous layer of béchamel sauce, about 1 to 1.5 cups, spread evenly over the ricotta.
- Sprinkle about 1 cup of shredded mozzarella cheese over the béchamel.
- Now, add another layer of meat ragu, approximately 1.5 to 2 cups, spreading it gently over the mozzarella.
- Place another layer of 3-4 lasagna noodles on top of the ragu.
- Repeat the layers: the remaining half of the ricotta mixture, then another layer of béchamel, and another cup of mozzarella.
- Add a final layer of meat ragu (you should have about half of your ragu remaining).
- Place your third and final layer of lasagna noodles.
- For the grand finale top, spread the remaining béchamel sauce evenly over the noodles. This will give it that luxurious, creamy crown.
- Liberally sprinkle the remaining shredded mozzarella cheese and the entire cup of freshly grated Parmesan cheese over the top. Don’t be shy with the cheese here; it will create that beautiful golden-brown crust!
Baking Your Lasagna:
- Cover the baking dish tightly with aluminum foil. This helps to steam the noodles and cook the lasagna evenly without drying out the top.
- Bake for 30 minutes at 375°F (190°C).
- After 30 minutes, remove the foil. This allows the cheese to get that gorgeous, bubbly, golden-brown crust we all crave.
- Continue baking for another 20-25 minutes, or until the cheese is melted, bubbly, and beautifully golden. You should also see the sauce gently bubbling up around the edges. If you notice the cheese browning too quickly, you can loosely tent it with foil again.
- This next step is critical: Once baked, remove the lasagna from the oven and let it rest for at least 15-20 minutes before slicing and serving. I know, it’s hard to wait when it smells so incredible, but this resting period allows the layers to set properly. If you cut into it too soon, it will fall apart, and you’ll end up with a messy, albeit delicious, pile. The wait is worth it for perfectly structured slices!
- Once rested, slice into generous portions and serve immediately. I love to garnish each serving with a sprinkle of fresh parsley and a little extra grated Parmesan cheese. Enjoy your homemade lasagna masterpiece!
Conclusion:
If you’ve followed along with me through this culinary adventure, you now hold the key to creating something truly special. This isn’t just another recipe; it’s an experience, a delightful journey for your taste buds that I’m absolutely convinced will become a firm favorite in your repertoire. Its unique blend of flavors, the surprisingly simple steps, and the incredible ‘wow’ factor it delivers make it an absolute must-try. I promise you, the effort is minimal, but the reward is immense. You’ll achieve a dish that tastes like it came straight from a gourmet kitchen, yet it’s entirely within your reach, even if you consider yourself a novice in the kitchen. Indeed, this isn’t just a dish; it’s a revelation, and I’m so excited for you to discover the magic of what I’ve come to affectionately call “?p=8353” – because once you try it, you’ll understand why it deserves its own unique identifier in your recipe collection!
Why This Recipe is a Game-Changer!
What makes this particular recipe stand out from the crowd? It’s the perfect harmony of taste and texture, a dish that manages to be both comforting and sophisticated at the same time. We’ve meticulously crafted it to ensure that every step is clear, every ingredient plays its part, and the final result is consistently spectacular. Imagine serving a dish that prompts murmurs of delight and requests for the recipe, all while knowing you prepared it with ease and confidence. This is that recipe. It’s perfect for a weeknight meal when you want something elevated without the fuss, yet it’s equally impressive for entertaining guests, making you look like a seasoned culinary expert. The rich aroma that will fill your kitchen as it cooks is just the prelude to the extraordinary flavors awaiting you.
Unleash Your Inner Chef with These Variations!
Now that you’re armed with the knowledge to create this masterpiece, let’s talk about how to truly make it sing at your table. For a perfect presentation, I love to serve this dish alongside a vibrant, crisp green salad tossed with a light vinaigrette. The freshness cuts through the richness beautifully, creating a balanced and utterly satisfying meal. Alternatively, a fluffy bed of quinoa or a simple wild rice pilaf can absorb all those wonderful flavors, making each bite an absolute delight. And if you’re feeling a little fancy, a glass of a medium-bodied white wine or a light-bodied red would complement it exquisitely, elevating the entire dining experience.
But don’t stop there! This recipe is incredibly versatile and lends itself beautifully to experimentation. For those who love a bit of heat, consider adding a pinch of red pepper flakes or a finely diced jalapeño during the cooking process to give it an extra kick. If you’re looking to elevate the freshness even further, a generous sprinkle of fresh herbs like chopped cilantro, parsley, or even a hint of mint just before serving can make a world of difference, adding brightness and aromatic complexity. For my vegetarian and vegan friends, many elements of this dish can be adapted with delicious plant-based alternatives, such as using vegetable broth, substituting the protein with firm tofu or chickpeas, or opting for dairy-free cream. This proves that the heart of this recipe, its incredible flavor profile, can truly cater to everyone’s preferences and dietary needs. Don’t be afraid to get creative and make it your own!
Your Culinary Journey Starts Now!
So, what are you waiting for? I’m genuinely thrilled for you to dive into your kitchen and bring this incredible recipe to life. Trust me, the joy of creating something so delicious from scratch is incredibly rewarding. I wholeheartedly encourage you to give it a try this week, perhaps for a special dinner or even just to treat yourself to an extraordinary meal on a Tuesday evening. There’s no need to wait for a special occasion to indulge in something truly wonderful.
Once you’ve had the chance to whip up this culinary gem, I would absolutely love to hear about your experience! Did you stick to the recipe exactly as written? Did you put your own unique spin on it with some adventurous variations? What did your family and friends think? Your feedback and personal stories truly inspire me and help our community grow. Please don’t hesitate to share your triumphs, your clever adaptations, and even any questions you might have in the comments section below. Let’s build a vibrant space where we can all learn, share, and celebrate the joy of good food together. Go on, ignite your culinary passion, embrace the deliciousness, and share the love. I have no doubt that this recipe will earn its permanent spot in your kitchen, becoming a cherished dish that you’ll return to again and again. Happy cooking, my friends!
?p=8353
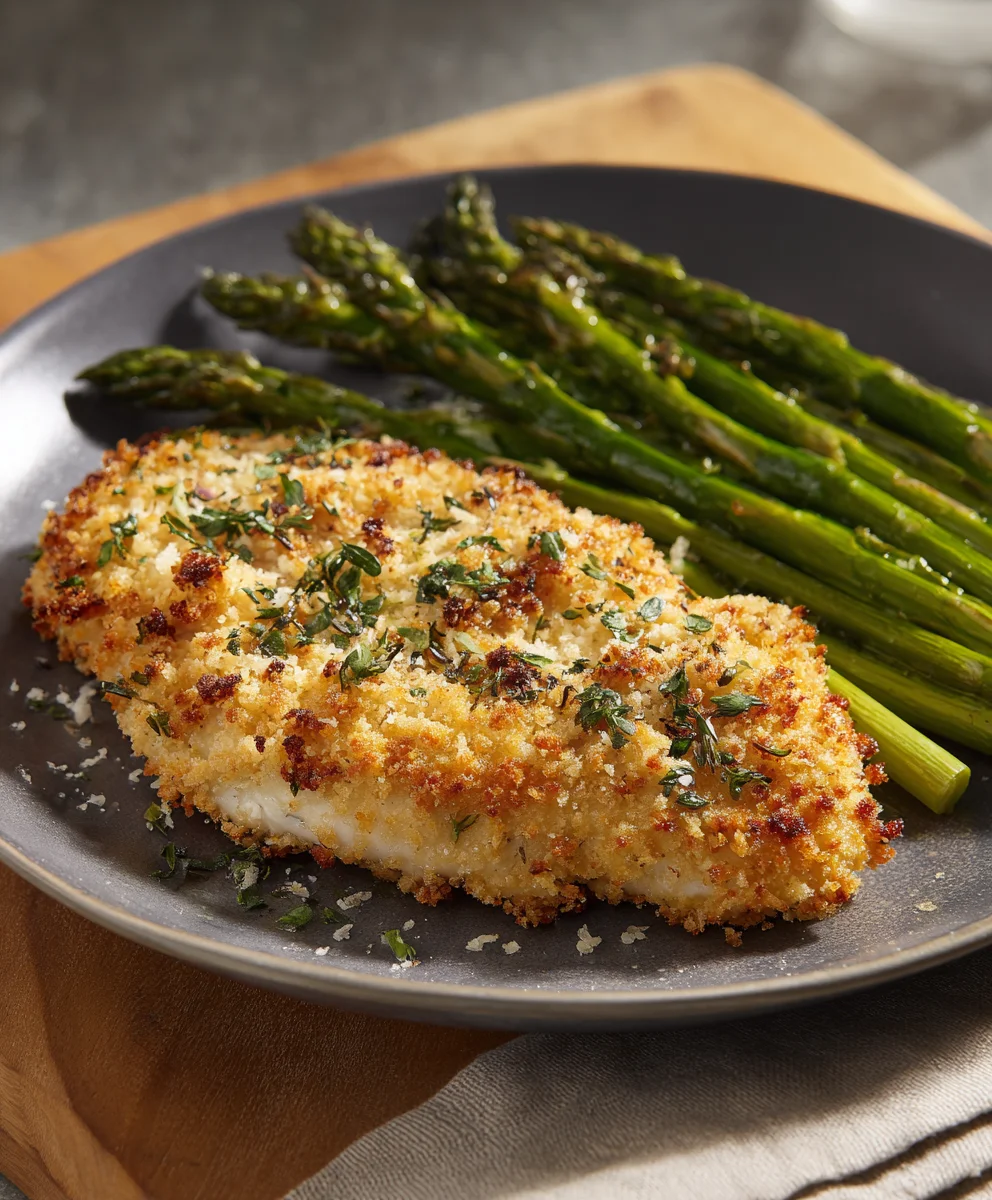
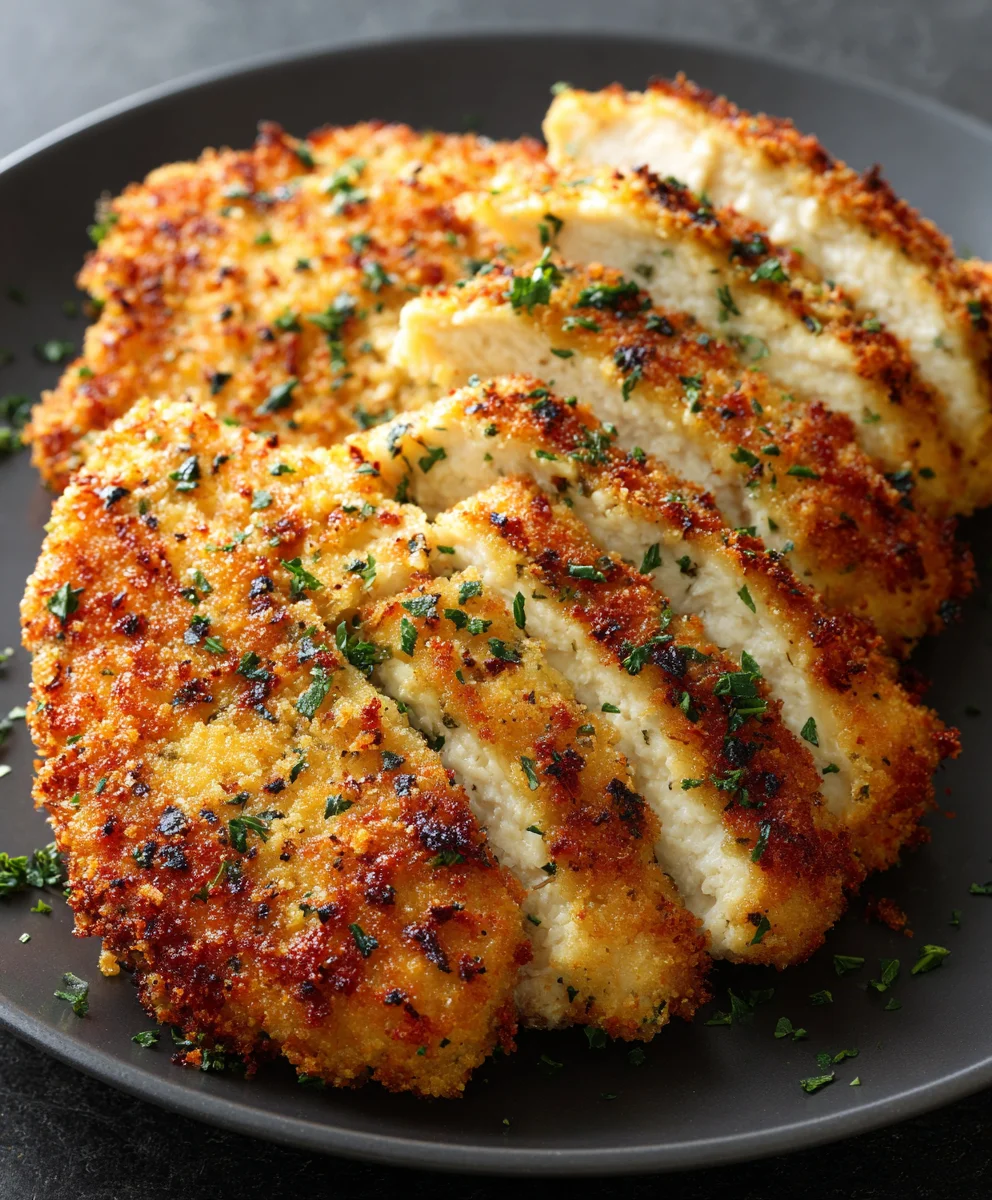
Embark on a delightful culinary journey with our easy Baked Parmesan Chicken. This dish transforms simple, wholesome ingredients into an extraordinary meal that will captivate your taste buds and warm your soul. Offering incredible flavor and a satisfying texture, it’s a perfect choice for busy weeknights or relaxed gatherings, making gourmet dining accessible and enjoyable for everyone.
Ingredients
-
4 boneless, skinless chicken breasts (about 1.5 lbs)
-
2 cloves fresh garlic, minced
-
1 cup freshly grated Parmesan cheese
-
1 cup panko breadcrumbs
-
2 tsp Italian seasoning
-
1 tsp salt
-
1/2 tsp pepper
-
Olive oil spray
Instructions
-
Step 1
Preheat oven to 400°F (200°C). Spray a baking sheet. -
Step 2
Pound chicken breasts to an even 1/2-inch thickness. -
Step 3
In a shallow dish, combine Parmesan, panko, minced garlic, Italian seasoning, salt, and pepper. -
Step 4
Lightly spray chicken with olive oil, then dredge each in the panko mixture, pressing to coat. -
Step 5
Place coated chicken on the prepared baking sheet. Lightly spray tops with olive oil. -
Step 6
Bake for 20-25 minutes, or until chicken is cooked through (internal temperature 165°F/74°C) and golden brown. Serve hot.
Important Information
Nutrition Facts (Per Serving)
It is important to consider this information as approximate and not to use it as definitive health advice.
Allergy Information
Please check ingredients for potential allergens and consult a health professional if in doubt.


Leave a Comment