

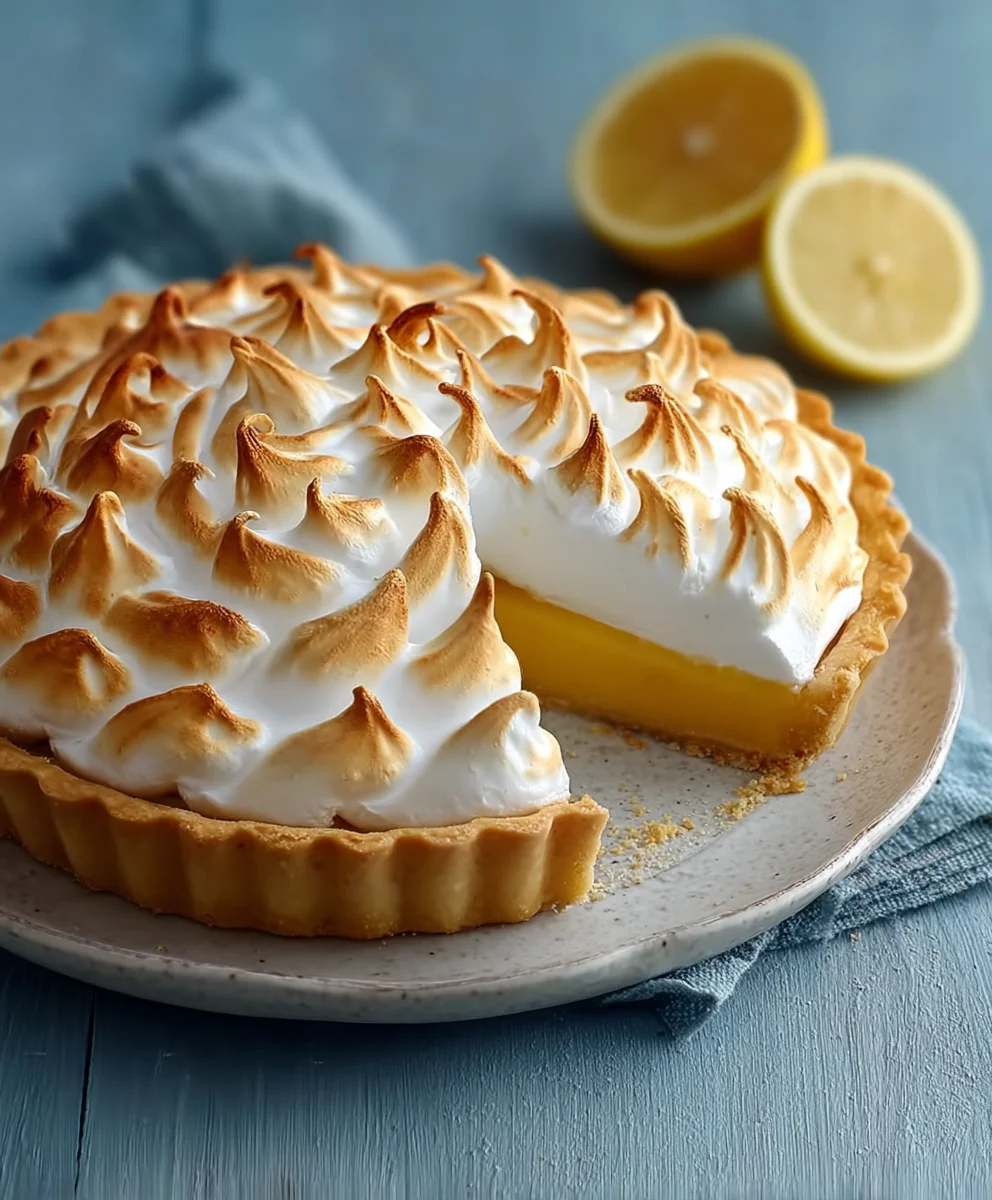
Golden Mary Berrys Lemon Meringue Pie is more than just a dessert; it’s a culinary masterpiece that promises an unforgettable experience with every single slice. Imagine a shimmering mountain of perfectly toasted meringue, cradling a vibrant, zesty lemon curd, all nestled within a buttery, crisp pastry shell. This iconic treat, refined by the legendary Mary Berry herself, captures the essence of classic British baking, bringing a touch of elegance and warmth to any table.
I find that what truly makes this dish a beloved classic is its exquisite balance of contrasting elements. The sharp, refreshing tang of the lemon filling provides a delightful counterpoint to the sweet, airy meringue, which offers a soft, marshmallowy texture that melts in your mouth. There’s a profound joy in mastering the delicate art of crafting such a showstopper, and the satisfaction of presenting a perfect Golden Mary Berrys Lemon Meringue Pie is immense. It’s a recipe that has charmed generations, becoming a go-to for special celebrations and a comforting indulgence when you simply crave something extraordinary.

Ingredients:
- For the Sweet Shortcrust Pastry:
- 225g (8oz) plain flour, plus extra for dusting
- 50g (2oz) icing sugar
- 125g (4½oz) unsalted butter, very cold and cut into small cubes
- 1 large egg yolk
- 1-2 tablespoons ice-cold water
- A pinch of salt
- For the Zesty Lemon Filling:
- 4 large lemons, zest and juice (you’ll need about 180ml/¾ cup juice)
- 150g (5½oz) caster sugar
- 50g (2oz) cornflour (cornstarch)
- 250ml (1 cup) cold water
- 85g (3oz) unsalted butter, cut into cubes
- 4 large egg yolks
- For the Glorious Meringue:
- 4 large egg whites (leftover from the filling)
- 200g (7oz) caster sugar
- ½ teaspoon cream of tartar (optional, but highly recommended for stability)
For the Sweet Shortcrust Pastry:
- Prepare Your Workspace: First things first, let’s get our pastry foundation ready. In a large mixing bowl, sift together the plain flour and icing sugar. Sifting isn’t just for lumps; it also incorporates air, which helps achieve a lighter, more tender pastry. Add a tiny pinch of salt at this stage too, as it enhances the overall flavour.
- Incorporate the Butter: Now, add the very cold, cubed unsalted butter to the flour mixture. It’s crucial that the butter is cold because it prevents it from melting too quickly and allows you to create those lovely pockets of fat that result in a flaky pastry. Using your fingertips, rub the butter into the flour until the mixture resembles fine breadcrumbs. Try to work quickly and with light hands to avoid overworking the dough or allowing the butter to get too warm. If your hands are naturally warm, you can use a pastry blender or even a food processor for this step, pulsing just until the breadcrumb consistency is achieved.
- Bind the Dough: In a small bowl, whisk the egg yolk with one tablespoon of ice-cold water. Make sure the water is truly cold; it helps to keep the butter firm. Gradually add this mixture to your flour and butter crumbs, mixing with a knife or your hand until the dough just starts to come together. If it feels too dry, add the second tablespoon of ice-cold water, a little at a time, until it forms a cohesive ball. Do not overmix at this stage! Overmixing develops the gluten in the flour, which will lead to a tough pastry.
- Chill the Dough: Gently gather the dough into a disc shape, wrap it tightly in cling film, and pop it into the refrigerator for at least 30 minutes. An hour is even better. This chilling period is vital; it allows the gluten to relax, which makes the pastry easier to roll out, and firms up the butter, which contributes to a flakier texture. It’s an essential step for any Golden Mary Berrys Lemon Meringue Pie recipe.
- Roll Out the Pastry: Once chilled, take your dough out of the fridge. Lightly flour your work surface and your rolling pin. Roll out the pastry to a circle approximately 3-4mm (⅛ inch) thick, ensuring it’s large enough to line your 23cm (9-inch) fluted tart tin with a loose bottom. To transfer the pastry easily, gently roll it onto your rolling pin and then unroll it over the tart tin.
- Line the Tart Tin: Carefully press the pastry into the base and up the sides of the tin, making sure there are no air bubbles. Trim off any excess pastry from the edges, leaving a slight overhang if desired, as it can shrink a little during baking. You can use the excess pastry to patch any thin areas, pressing firmly to seal.
- Blind Bake the Pastry: Preheat your oven to 180°C (160°C fan/350°F/Gas 4). Prick the base of the pastry all over with a fork. This prevents the base from puffing up. Line the pastry case with a large piece of baking parchment, ensuring it covers the sides. Fill it with ceramic baking beans, dried beans, or rice. The weights prevent the pastry from shrinking and the sides from collapsing during blind baking.
- First Bake: Bake for 15 minutes. After this time, carefully remove the parchment paper and baking beans. Return the pastry case to the oven for another 5-10 minutes, or until the base is lightly golden and feels dry to the touch. This step is crucial for preventing a soggy bottom on your lemon meringue pie. A dry, golden base will stand up beautifully to the moist lemon filling. Remove from the oven and set aside to cool slightly in its tin while you prepare the filling.
For the Zesty Lemon Filling:
- Zest and Juice Your Lemons: Begin by finely zesting all four lemons. Be careful to only get the bright yellow part of the skin, avoiding the bitter white pith underneath. Place the zest in a heatproof bowl. Then, juice the lemons. You’ll need approximately 180ml (¾ cup) of fresh lemon juice, so if your lemons are small, you might need an extra one. Strain the juice to remove any pips or pulp and add it to the bowl with the zest.
- Combine Dry Ingredients: In a medium-sized, heavy-bottomed saucepan, whisk together the caster sugar and cornflour (cornstarch). Whisking them together before adding liquids helps to prevent lumps forming, ensuring a silky smooth filling for your Golden Mary Berrys Lemon Meringue Pie.
- Add Liquids and Heat: Gradually whisk in the cold water and the strained lemon juice and zest mixture into the sugar and cornflour. Place the saucepan over a medium heat. You must whisk continuously as the mixture heats up. This constant stirring is vital to prevent sticking and burning on the bottom of the pan, and to ensure the cornflour fully dissolves and thickens evenly.
- Thicken the Filling: Continue to whisk until the mixture comes to a gentle boil and visibly thickens, becoming translucent and resembling a thick custard. This usually takes about 5-7 minutes. Once it’s boiling and thick, let it gently bubble for another minute or so, still whisking, to ensure the cornflour is fully cooked out and won’t leave a starchy taste.
- Incorporate Butter: Remove the saucepan from the heat. Add the cubed unsalted butter to the hot lemon mixture. Stir gently until the butter has completely melted and is fully incorporated, making the filling wonderfully glossy and rich.
- Temper the Egg Yolks: This is a delicate but crucial step. In a separate bowl, lightly whisk the four egg yolks. To prevent the yolks from scrambling when added to the hot lemon mixture, we need to temper them. Slowly pour about a quarter of the hot lemon mixture into the whisked egg yolks, whisking constantly and vigorously. This gradually raises the temperature of the yolks without cooking them.
- Return to Pan: Now, pour the tempered egg yolk mixture back into the saucepan with the remaining lemon filling. Return the saucepan to a very low heat. Cook for another 1-2 minutes, stirring continuously, until the mixture thickens slightly more and coats the back of a spoon. Do not let it boil again once the yolks are added, as this can cause the eggs to curdle.
- Cool the Filling: Pour the hot lemon filling into a clean bowl. Place a piece of cling film directly onto the surface of the filling to prevent a skin from forming as it cools. Allow it to cool for at least 30 minutes at room temperature, or until it’s barely warm. This cooling step is important to prevent the meringue from ‘melting’ or weeping when it’s placed on top.
For the Glorious Meringue:
- Prepare Your Equipment: For perfect meringue, cleanliness is key! Ensure your mixing bowl (preferably glass or metal) and whisk attachments are absolutely spotless and free from any grease. Even a tiny speck of fat can prevent egg whites from whipping up properly. You can wipe them with a piece of lemon or a tiny bit of vinegar on a paper towel, then dry thoroughly, just to be sure.
- Separate Egg Whites: Carefully separate the four large egg whites from the yolks, ensuring not even a drop of yolk makes it into the whites. If any yolk contaminates the whites, they won’t whip to their full potential.
- Whip Egg Whites to Soft Peaks: In your clean bowl, begin whisking the egg whites on a medium speed until they become frothy, then increase the speed. Continue whisking until they form soft peaks. When you lift the whisk, the peaks should droop slightly. If you’re using cream of tartar, add it at this stage. Cream of tartar is an acidic salt that helps to stabilize the egg whites, resulting in a stronger, more resilient meringue.
- Gradually Add Caster Sugar: With the mixer still running on a medium-high speed, start adding the caster sugar, one tablespoon at a time. Add it very slowly and steadily, allowing each addition to fully dissolve into the egg whites before adding the next. This gradual process is crucial for achieving a stable, glossy meringue. Rushing this step will result in a grainy, unstable meringue that is prone to weeping.
- Whip to Stiff, Glossy Peaks: Continue whisking after all the sugar has been added. Increase the speed to high and whip until the meringue is very thick, bright white, glossy, and forms stiff peaks. When you lift the whisk, the peaks should stand upright without drooping. You should also be able to rub a small amount of meringue between your fingers and feel no sugar granules; this indicates the sugar has fully dissolved. This is the hallmark of a truly glorious meringue for your Golden Mary Berrys Lemon Meringue Pie.
Assembling and Baking Your Golden Mary Berrys Lemon Meringue Pie:
- Fill the Pastry Case: Pour the cooled (but not chilled, as it needs to be pourable) lemon filling into your blind-baked pastry case. Use a spatula to spread it evenly. Ensure the top of the filling is smooth.
- Pipe or Spread the Meringue: Now for the showstopper! Spoon the glossy meringue on top of the lemon filling. You can simply dollop it on and spread it with the back of a spoon, creating lovely swirls and peaks. For a more elegant look, you can transfer the meringue to a piping bag fitted with a star or plain nozzle and pipe decorative swirls or individual meringues over the filling. It’s absolutely essential that the meringue completely covers the lemon filling and touches the edges of the pastry crust all around. This seals the filling and prevents the meringue from shrinking or weeping excessively during baking. Creating dramatic peaks with a spoon or piping bag will give your Golden Mary Berrys Lemon Meringue Pie that beautiful, iconic look.
- Bake Your Pie: Return your oven temperature to 170°C (150°C fan/325°F/Gas 3). Place the pie in the preheated oven and bake for 20-25 minutes, or until the meringue is beautifully golden brown on the peaks and lightly toasted all over. Keep a close eye on it, as ovens vary, and meringue can brown quickly. The warmth of the oven will also help to gently ‘cook’ the base of the meringue, setting its structure.
- Cooling – The Critical Step: Once baked, remove the Golden Mary Berrys Lemon Meringue Pie from the oven. This is another crucial stage for preventing meringue weepage. Do not move it directly to the fridge! Allow the pie to cool completely at room temperature, ideally for at least 3-4 hours, or even longer. As it cools, the meringue will set, and the filling will firm up further. Sudden temperature changes are the enemy of meringue stability, often causing it to weep. If possible, let it cool slowly in a draft-free area.
- Final Chill (Optional but Recommended): Once completely cool at room temperature, you can transfer the pie to the refrigerator for a final chill for an hour or two before serving. This ensures the filling is perfectly set and provides a wonderfully refreshing contrast to the sweet meringue.
Serving Your Masterpiece:
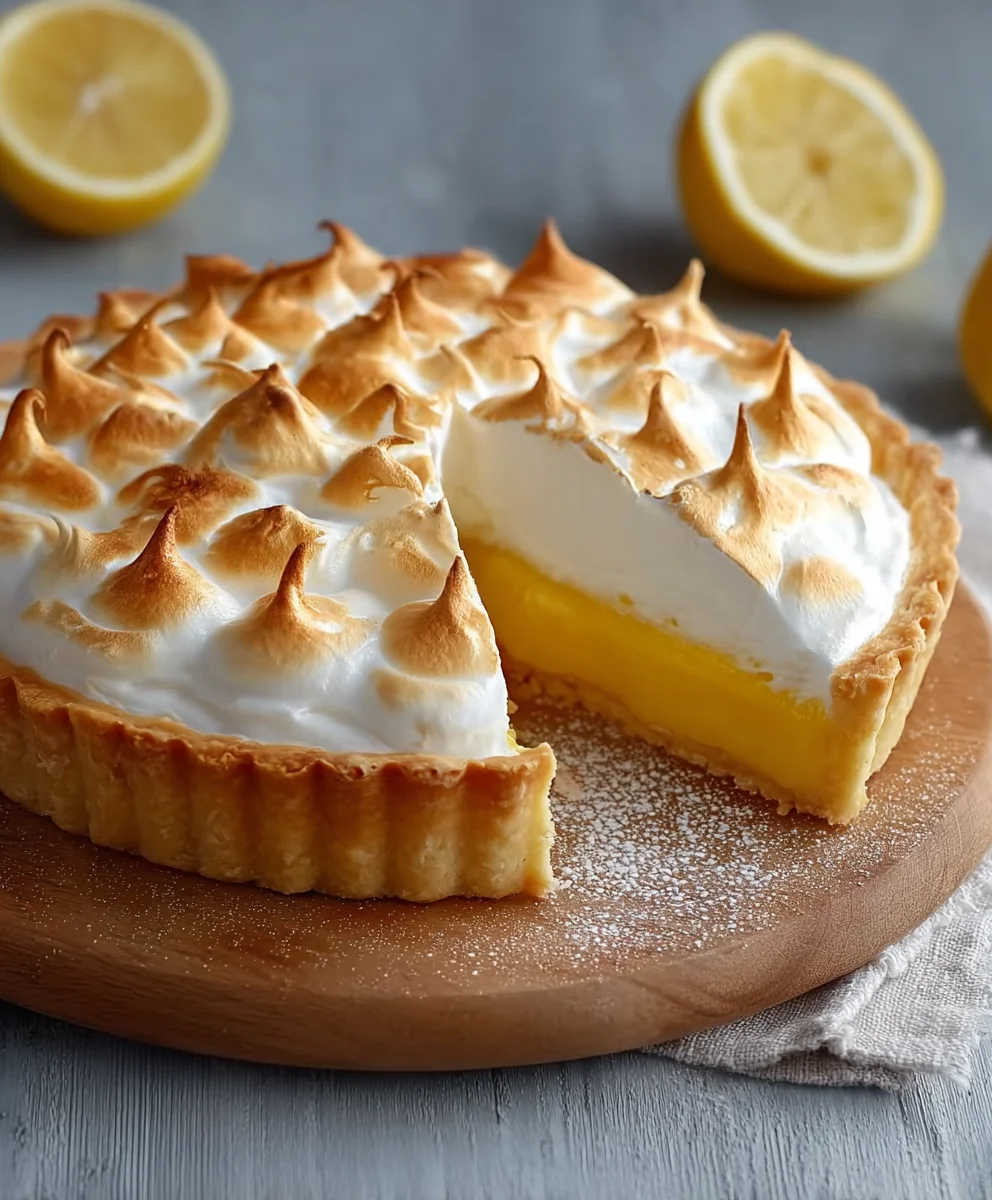
- Slicing with Ease: When ready to serve your stunning Golden Mary Berrys Lemon Meringue Pie, use a sharp, thin-bladed knife that has been dipped in hot water and wiped clean between each slice. This will help you achieve clean cuts through the meringue and pastry without dragging or sticking.
- Perfect Presentation: Carefully lift each slice from the tart tin using a pie server. The contrast of the bright, tangy lemon filling against the sweet, fluffy meringue and crisp pastry is simply divine.
- Storage: Any leftover pie should be stored in an airtight container in the refrigerator for up to 2-3 days. While the meringue is best enjoyed on the day of baking, it will still be delicious for a couple of days. The key is to protect it from moisture in the fridge.
- Enjoy! Serve your magnificent Golden Mary Berrys Lemon Meringue Pie as a show-stopping dessert, perhaps with a dusting of icing sugar or a few fresh berries on the side for an extra flourish. Enjoy the fruits of your labour!
Conclusion:
As we reach the sweet culmination of our culinary journey, I truly hope you’ve felt the irresistible pull of this magnificent dessert. This isn’t just any pie; it’s an experience, a symphony of textures and flavors that dances on your palate and leaves an indelible mark of pure, unadulterated joy. I’ve poured my heart into sharing this recipe, not just because it’s a personal favorite, but because I genuinely believe it holds the power to transform a simple meal into an extraordinary occasion, or a quiet afternoon into a moment of celebratory bliss. The vibrant tang of fresh lemon, perfectly balanced by the sweet, cloud-like meringue, all cradled in a buttery, crisp crust, creates a harmony that very few desserts can achieve. It’s the kind of dessert that elicits gasps of delight when brought to the table and moments of contented silence as everyone savors their first bite. Believe me when I say, once you master this, you’ll have a showstopper in your repertoire that guests will rave about for years to come.
I know the thought of making a multi-layered dessert can sometimes feel daunting, but I promise you, every step is worth the effort, and the results are incredibly rewarding. There’s something immensely satisfying about pulling a beautifully bronzed pie from the oven, its meringue peaks kissed with golden tips, a testament to your baking prowess. This pie isn’t just delicious; it’s visually stunning, a true centerpiece that demands attention. It truly embodies the best of classic baking, a timeless treat that appeals to every generation. It’s comforting, yet elegant; familiar, yet exciting. That perfect balance is what makes this particular recipe stand out from the crowd and why I’m so excited for you to try it.
Elevating Your Experience: Serving Suggestions & Creative Variations
While this pie is absolutely phenomenal on its own, a true star in its own right, there are always ways to enhance the experience or adapt it to your preferences. For a simple, yet elegant serving, I love to dust the finished pie with a fine layer of powdered sugar just before serving. It adds a delicate touch and an extra hint of sweetness. If you’re feeling a little more indulgent, a dollop of freshly whipped cream, ever so lightly sweetened with vanilla, makes a heavenly companion. The cool, airy cream provides a beautiful textural contrast to the firm meringue and tangy lemon filling. For those who enjoy a fruity counterpoint, a scattering of fresh berries – raspberries or blueberries work wonderfully – around the slice adds a burst of color and a lovely tartness that complements the lemon perfectly. Or, imagine a tiny sprig of fresh mint leaves, adding a sophisticated, aromatic finish. It’s all about creating that perfect moment.
And don’t be afraid to get creative with variations! If you’re a citrus enthusiast, consider a mixed citrus pie. You could use a blend of lemon and lime for an even sharper, more vibrant flavor, or even incorporate a touch of orange zest into the filling for a slightly sweeter, aromatic twist. For individual servings, try making mini lemon meringue tarts using a muffin tin or small tart molds; they’re incredibly charming and perfect for parties. If you’re catering to dietary needs, a gluten-free pie crust can easily be substituted without compromising on flavor or texture. For those who prefer a less intense sweetness, you can slightly reduce the sugar in the meringue, though I wouldn’t recommend changing the filling too much as the sugar is crucial for the set and balance with the lemon. Imagine serving these miniature versions at a brunch, or as part of a dessert buffet – they’re guaranteed to be a hit and disappear quickly!
Your Turn to Bake & Share!
Now, it’s your turn. I’ve shared all my tips and secrets, and I genuinely believe you have everything you need to bake this incredible dessert. I urge you, don’t let this recipe just sit on your screen. Take the leap, gather your ingredients, and immerse yourself in the joyful process of creating something truly special. The aroma of baking lemon and meringue filling your kitchen is an experience in itself, a delightful promise of the deliciousness to come. There’s a profound satisfaction that comes from mastering a classic, and I promise you, the moment you take that first bite, you’ll know exactly why I’m so passionate about it.
I can hardly wait to hear about your baking adventures! Please, when you make this pie, come back and tell me all about it. Share your successes, your learning moments, and any creative twists you added. Did you try a different citrus? What did your family think? Did you manage those perfect, sky-high meringue peaks? Your feedback and stories are what make this community so vibrant and inspiring. Tag me in your photos on social media, leave a comment below, or simply send me a message. I love seeing your creations and connecting with fellow baking enthusiasts. Your experience with this recipe could be just the encouragement another aspiring baker needs to try their hand at it.
So go ahead, embrace the challenge, and treat yourself and your loved ones to a slice of pure heaven. Because truly, there are few things more delightful than a perfectly executed slice of this Golden Mary Berrys Lemon Meringue Pie. It’s more than just a dessert; it’s a celebration of flavor, a testament to timeless baking, and an invitation to create lasting memories around your table. Happy baking, my friends!
Golden Mary Berry’s Lemon Meringue Pie
Golden Mary Berry’s Lemon Meringue Pie is a culinary masterpiece featuring a perfectly toasted meringue, vibrant zesty lemon curd, all nestled within a buttery, crisp pastry shell. This iconic treat balances sharp lemon tang with sweet, airy meringue for an unforgettable experience.
Ingredients
-
8 oz plain flour
-
3.6 oz unsalted butter, very cold, cubed (for pastry)
-
1 3/4 oz confectioners’ sugar
-
1 large egg yolk
-
1-2 tablespoons ice-cold water
-
A pinch of salt
-
Zest and juice from 6 lemons (approx. 270ml / 9 fl oz juice)
-
4 oz superfine sugar (for filling)
-
2 1/4 oz cornstarch
-
15.5 fl oz cold water
-
2.4 oz unsalted butter, cubed (for filling)
-
6 large egg yolks
-
4 large egg whites
-
5 oz superfine sugar (for meringue)
-
½ teaspoon cream of tartar (optional)
Instructions
-
Step 1
Sift 8 oz plain flour, 1 3/4 oz confectioners’ sugar, and a pinch of salt. Rub in 3.6 oz cold butter until fine breadcrumbs. Whisk 1 large egg yolk with 1 tbsp ice-cold water; add to flour, mixing until dough forms. Add more water (up to 2 tbsp total) if dry. Gather into a disc, wrap, and chill for at least 30 minutes. -
Step 2
Preheat oven to 180°C (160°C fan/350°F/Gas 4). Roll out chilled pastry to 3-4mm thick; line a 23cm (9-inch) fluted tart tin. Prick base with a fork. Line with parchment and fill with baking beans. Blind bake for 15 minutes. Remove parchment/beans, bake 5-10 minutes more until golden/dry. Cool slightly. -
Step 3
Zest and juice 6 lemons. Whisk 4 oz superfine sugar and 2 1/4 oz cornstarch in a saucepan. Gradually whisk in 15.5 fl oz cold water, lemon juice, and zest. Heat over medium, whisking continuously, until it boils and thickens (5-7 mins). Boil for 1 min. Remove from heat, stir in 2.4 oz butter until melted. Lightly whisk 6 large egg yolks. Temper yolks by slowly pouring a quarter of the hot lemon mixture into them, whisking. Pour tempered yolks back into the saucepan. Cook over very low heat for 1-2 minutes, stirring continuously, until slightly thicker. Do not boil. Pour into a bowl, cover surface with cling film, and cool for at least 30 minutes until barely warm. -
Step 4
Ensure mixing bowl and whisk are spotless. Whip 4 large egg whites on medium speed until frothy, then increase speed to soft peaks. Add ½ tsp cream of tartar (if using). Gradually add 5 oz superfine sugar, 1 tbsp at a time, whisking well after each addition until fully dissolved. Continue whisking on high speed until meringue is very thick, bright white, glossy, and forms stiff peaks. -
Step 5
Pour the cooled lemon filling into the blind-baked pastry case. Spoon or pipe meringue over the filling, ensuring it completely covers the lemon layer and touches the pastry crust edges. Create dramatic peaks. Return oven temperature to 170°C (150°C fan/325°F/Gas 3). Bake for 20-25 minutes until meringue is beautifully golden brown on peaks and lightly toasted. -
Step 6
Remove pie from oven. Cool completely at room temperature for at least 3-4 hours to prevent weeping. Optional: Chill for 1-2 hours in the refrigerator before serving. Slice with a hot, clean knife. Store leftovers in an airtight container in the refrigerator for up to 2-3 days.
Important Information
Nutrition Facts (Per Serving)
It is important to consider this information as approximate and not to use it as definitive health advice.
Allergy Information
Please check ingredients for potential allergens and consult a health professional if in doubt.

Leave a Comment