

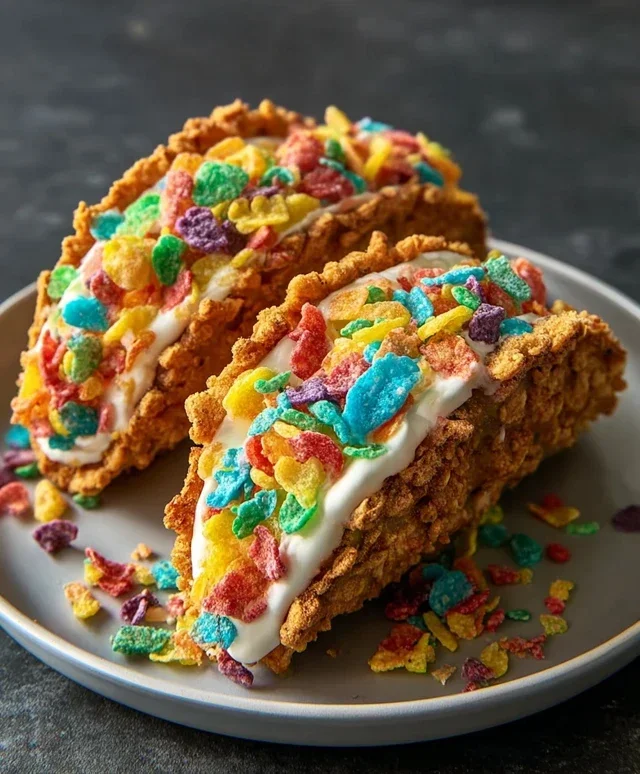
Fruity Pebbles Cheesecake Tacos are not just a dessert; they’re a vibrant explosion of pure joy on a plate! Imagin extracte biting into a crisp, crunchy shell, followed by a swirl of creamy, tangy cheesecake filling, all dusted with the unmistakable, rainbow-bright crunch of Fruity Pebbles. This isn’t your grandma’s cheesecake, and it’s certainly not your average taco. We’ve taken two beloved treats and fused them into something utterly spectacular. People are absolutely captivated by the playful nostalgia of Fruity Pebbles paired with the decadent indulgence of cheesecake, all wrapped up in a fun, portable taco format. What makes these Fruity Pebbles Cheesecake Tacos truly special is their ability to transport you back to carefree childhood days while delivering a sophisticated, delicious dessert experience. Get ready to unleash your inner kid and impress everyone with these utterly delightful creations.

Fruity Pebbles Cheesecake Tacos: A Burst of Color and Flavor
Get ready to dive into a dessert that’s as fun to make as it is to eat! These Fruity Pebbles Cheesecake Tacos are a playful twist on a classic, infusing the vibrant colors and sweet, fruity notes of your favorite childhood cereal into a creamy, dreamy cheesecake filling, all nestled within a crunchy, taco-shaped shell. It’s a no-bake wonder that’s perfect for parties, a fun family activity, or just a delightful treat to brighten your day. The combination of textures and flavors is simply irresistible – the crisp cereal shell, the smooth, tangy cheesecake, and the light, airy whipped cream. Let’s get started on this whimsical dessert adventure!
Ingredients:
Crafting the Fruity Pebbles Taco Shells
The first step in creating our delightful tacos is to make the crunchy, colorful shells. This is where the magic of the Fruity Pebbles really begin extracts to shine, transforming into a wonderfully moldable yet crisp base.
1. Prepare the Cereal Mixture: In a medium-sized bowl, combine the 3 cups of colorful fruity cereal and the 1/2 cup of melted unsalted butter. Stir this mixture thoroughly until all the cereal pieces are evenly coated in the melted butter. You want to ensure a good distribution so that the butter helps bind the cereal together when it cools. It will look like buttery, colorful pebbles.
2. Forming the Taco Shapes: Now for the fun part! You’ll need a taco mold or a small, inverted muffin tin. This will give your shells that signature taco shape. Take about 1/4 cup of the buttery cereal mixture and press it firmly into the mold, shaping it into a taco shell. Make sure to press the cereal mixture all the way up the sides of the mold to create a sturdy shell. You want a good, compact layer so that your tacos don’t crum extractble when you fill them. Repeat this process until you have used up all of the cereal mixture, or have made as many taco shells as you desire. This recipe should yield about 6-8 tacos, depending on the size of your molds.
3. Chilling the Shells: Once your taco shells are formed, place them in the refrigerator for at least 30 minutes, or until they are firm and set. This chilling period is crucial for ensuring that the shells hold their shape and become delightfully crisp. The butter will solidify, binding the cereal together into a firm, edible shell. Patience here will be rewarded with perfectly formed and stable taco shells.
Whipping Up the Creamy Cheesecake Filling
While our taco shells are chilling and firming up, it’s time to prepare the luscious cheesecake filling that will be the heart of our dessert.
4. Create the Cheesecake Base: In a separate bowl, beat the 8 oz of softened cream cheese with the 1/2 cup of sifted powdered sugar and 1 tsp of pure vanilla extract until the mixture is smooth and creamy. It’s important that the cream cheese is truly softened – at room temperature – to avoid any lumps. Sifting the powdered sugar also helps prevent a grainy texture. Beat until the mixture is light and fluffy. This will form the smooth, tangy foundation of our cheesecake filling.
5. Incorporate the Whipped Cream: Gently fold in the 1 cup of whipped cream into the cream cheese mixture. Be careful not to overmix, as you want to maintain the airy lightness of the whipped cream. This step will transform the dense cream cheese base into a light, mousse-like filling that is perfect for spooning into our taco shells. The folding motion ensures that the airiness of the whipped cream is preserved, leading to a delightful texture.
Assembling Your Fruity Pebbles Cheesecake Tacos
With our shells chilled and our filling ready, it’s time for the grand assembly! This is where all our hard work comes together for a visually stunning and incredibly delicious dessert.
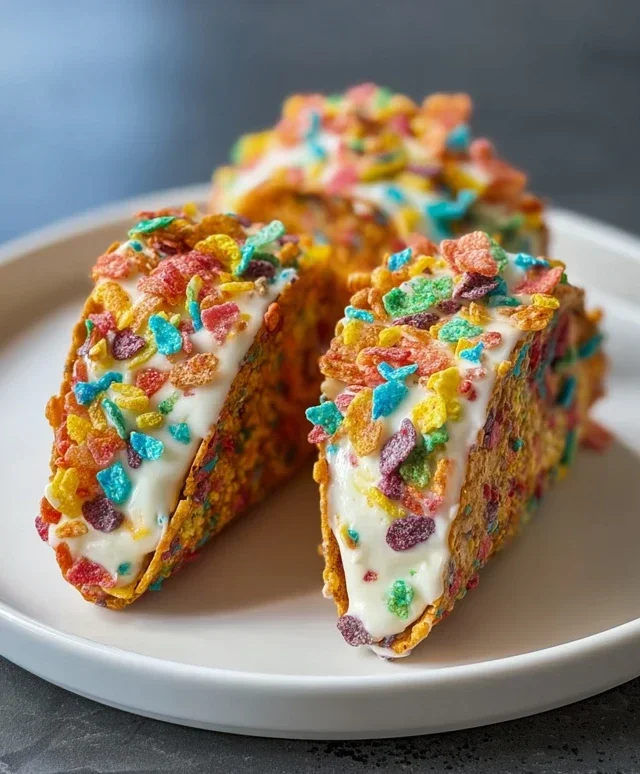
6. Fill and Garnish: Carefully remove the chilled cereal taco shells from their molds. Spoon the creamy cheesecake filling generously into each taco shell. Don’t be shy – fill them up! Once filled, sprinkle additional colorful fruity cereal over the top of the cheesecake filling for an extra burst of flavor and that signature Fruity Pebbles look. You can also add a small dollop of extra whipped cream if you like, and then a final sprinkle of cereal.
7. Serve and Enjoy: These Fruity Pebbles Cheesecake Tacos are best served immediately to enjoy the contrast between the crisp shells and the creamy filling. They are a vibrant and fun dessert that is sure to be a hit with everyone who tries them. The sweetness of the cereal, the tang of the cream cheese, and the satisfying crunch of the shells create a symphony of flavors and textures that’s simply out of this world. Enjoy every colorful bite!
Conclusion:
There you have it – the ultimate guide to creating these unbelievably fun and delicious Fruity Pebbles Cheesecake Tacos! I truly believe this recipe is a winner because it’s an absolute explosion of flavor and texture, blending the creamy tang of cheesecake with the sweet crunch of your favorite childhood cereal, all nestled in a delightful taco shell. It’s the perfect dessert for parties, potlucks, or just a fun weekend treat that’s guaranteed to bring smiles. They’re incredibly versatile too! Serve them chilled for a refreshing dessert, or slightly warmer if you prefer a softer cheesecake filling. For an extra touch, consider a drizzle of white chocolate or a sprinkle of extra Fruity Pebbles on top. If you’re feeling adventurous, try swapping the Fruity Pebbles for other colorful cereals or even adding a swirl of fruit puree to the cheesecake filling. Don’t be shy – dive in and give these Fruity Pebbles Cheesecake Tacos a try. I promise you won’t regret this playful and incredibly satisfying dessert experience!
Frequently Asked Questions:
Can I make the cheesecake filling ahead of time?
Absolutely! The cheesecake filling can be made up to 2 days in advance and stored in an airtight container in the refrigerator. This will save you time on assembly day. Just make sure it’s well chilled before you start spooning it into your taco shells.
What kind of taco shells work best?
While traditional hard taco shells are great for that classic crunch, I’ve found that slightly softer, pre-formed dessert taco shells or even baked waffle cone pieces can add a wonderful textural contrast. Whichever you choose, ensure they are sturdy enough to hold the delicious cheesecake filling without breaking.
Are there any nut-free variations?
Yes, this recipe is naturally nut-free, provided your Fruity Pebbles and other ingredients do not contain any nut cross-contamination warnings. It’s a fantastic option for gatherings where allergies might be a concern.
Fruity Pebbles Cheesecake Tacos
A fun and colorful dessert taco featuring a creamy Fruity Pebbles cheesecake filling served in a crispy cereal shell. Perfect for parties and celebrations!
Ingredients
-
3 cups colorful fruity cereal
-
1/2 cup unsalted butter, melted
-
8 oz cream cheese, softened
-
1/2 cup powdered sugar, sifted
-
1 tsp pure vanilla extract
-
1 cup whipped cream
-
Additional fruity cereal for garnish
Instructions
-
Step 1
In a bowl, combine 2 cups of the colorful fruity cereal with the melted unsalted butter. Press this mixture evenly into the bottom and up the sides of a greased taco mold or muffin tin to form taco shells. Chill for at least 30 minutes until firm. -
Step 2
In a separate bowl, beat the softened cream cheese with the sifted powdered sugar until smooth and creamy. -
Step 3
Stir in the pure vanilla extract and 1 cup of whipped cream until well combined. -
Step 4
Gently fold in the remaining 1 cup of colorful fruity cereal into the cheesecake mixture. -
Step 5
Spoon the Fruity Pebbles cheesecake filling into the chilled cereal taco shells. -
Step 6
Garnish with additional fruity cereal before serving.
Important Information
Nutrition Facts (Per Serving)
It is important to consider this information as approximate and not to use it as definitive health advice.
Allergy Information
Please check ingredients for potential allergens and consult a health professional if in doubt.
Leave a Comment