

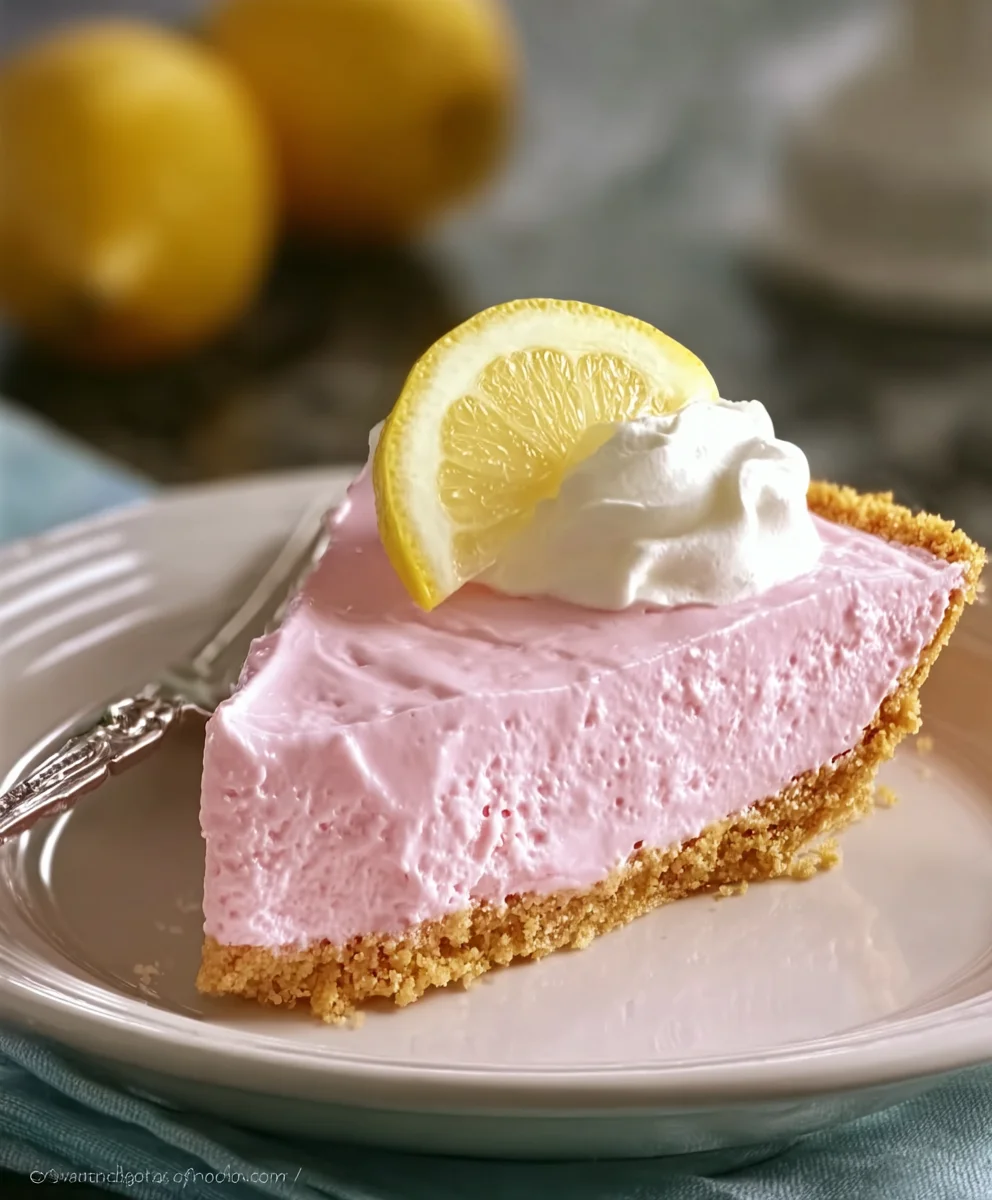
Pink Lemonade Pie isn’t just a dessert; it’s a vibrant burst of sunshine on a plate, a nostalgic trip back to summer days and backyard barbecues. What is it about this iconic treat that captures our hearts and taste buds year after year? It’s the perfect harmony of sweet and tart, a refreshing tang that awakens your palate, all nestled within a crisp, buttery crust. We adore its playful color, a cheerful hue that instantly elevates any gathering, making it a crowd-pleaser for birthdays, holidays, or simply a Tuesday. This isn’t your average pie; its unique combination of creamy filling and citrusy zest creates an unforgettable dessert experience. Prepare yourself for a taste of pure bliss as we dive into creating the ultimate Pink Lemonade Pie, a recipe designed to bring smiles and seconds.”

Ingredients:
- 1 1/2 cups graham cracker crumbs
- 1/4 cup granulated sugar
- 6 tbsp unsalted butter, melted
- 1 cup pink lemonade (chilled)
- 1 (14 oz) can sweetened condensed milk
- 1/2 cup heavy cream
- 1/4 cup lemon juice
- 1/2 tsp vanilla extract
- Whipped cream, for topping
- Lemon slices, for garnish
- Fresh mint, optional, for garnish
Preparing the Graham Cracker Crust
Let’s start by creating a sturdy and delicious base for our Pink Lemonade Pie. This graham cracker crust is super simple to make and provides the perfect crumbly texture. First, in a medium-sized bowl, combine the 1 1/2 cups of graham cracker crumbs with the 1/4 cup of granulated sugar. Give these a good stir with a fork to ensure the sugar is evenly distributed throughout the crumbs. This sugar will add a touch of sweetness and help bind the crumbs together.
Next, pour in the 6 tablespoons of melted unsalted butter. You want the butter to be fully melted but not hot, as we’re not cooking this crust. Gradually add the melted butter to the crumb mixture, stirring constantly with your fork until all the crumbs are moistened. The mixture should resemble wet sand – if you squeeze a handful, it should hold its shape. If it seems a little dry, you can add another teaspoon or two of melted butter. Once the mixture is perfectly moistened, transfer it into a 9-inch pie plate. Using the back of a spoon or your fingers, firmly press the crumb mixture evenly into the bottom and up the sides of the pie plate. Make sure it’s pressed down really well, especially around the edges, to create a compact crust that won’t crumble when you slice the pie. For an extra firm crust, you can bake it in a preheated oven at 350°F (175°C) for about 8-10 minutes until lightly golden. However, if you’re short on time or prefer a no-bake option, simply chilling the crust in the refrigerator for at least 15-20 minutes will also do the trick and allow the butter to firm up.
Crafting the Pink Lemonade Filling
Now for the star of the show – the bright and refreshing Pink Lemonade Pie filling! In a large bowl, we’ll begin by whisking together the 1 (14 oz) can of sweetened condensed milk and the 1/2 cup of heavy cream. Use a whisk and beat these together until they are well combined and the mixture starts to thicken slightly. The sweetened condensed milk forms the creamy base of our filling, while the heavy cream adds richness and a delightful smoothness.
To infuse that iconic tangy flavor, we’ll add the 1/4 cup of fresh lemon juice. Pour it in gradually while continuously whisking. You’ll notice the mixture will start to thicken up considerably as the acid from the lemon juice reacts with the proteins in the condensed milk and cream. This is exactly what we want! Next, add the 1/2 teaspoon of vanilla extract. This little bit of vanilla enhances all the other flavors and adds a warm, subtle note to the bright citrus. Finally, it’s time to bring in that lovely pink hue and extra zing with the 1 cup of chilled pink lemonade. Pour the pink lemonade into the bowl and gently fold it into the filling with a spatula until everything is just combined and you have a beautiful, uniformly pink, and creamy mixture. Be careful not to overmix at this stage, as we want to preserve the airy texture.
Assembling and Chilling Your Pink Lemonade Pie
With our luscious pink lemonade filling ready to go, it’s time to bring our pie together. Retrieve your prepared graham cracker crust from the refrigerator or oven. If you baked your crust, ensure it has cooled completely before adding the filling. Carefully pour the creamy pink lemonade filling into the chilled graham cracker crust. Use your spatula to gently spread the filling evenly, ensuring it reaches all the way to the edges of the crust for a beautiful presentation. Smooth out the top so it’s flat and inviting.
Now, the crucial step for achieving that perfect pie texture: chilling. Cover the pie loosely with plastic wrap, being careful not to let the wrap touch the surface of the filling if possible. Place the pie in the refrigerator for at least 4 hours, or preferably overnight. This chilling time is essential for the filling to set up properly. It allows the ingredients to meld together and the pie to firm up so that it can be sliced cleanly. The longer it chills, the firmer and more sliceable it will become, ensuring a delightful dessert experience with every bite.
Serving Your Masterpiece
The moment of truth has arrived! Once your Pink Lemonade Pie has chilled and set beautifully, it’s time to bring it out and present it. Before slicing, you can optionally garnish the top. A generous swirl of fluffy whipped cream is a classic choice and complements the tartness of the pie wonderfully. For an extra pop of color and flavor, arrange a few thin lemon slices around the edges or in the center of the pie. If you have fresh mint on hand, a few sprigs can add a lovely fragrant finish and a touch of green to your dessert presentation.
When it comes to slicing, use a sharp knife and wipe the blade clean between each slice for the neatest cuts. Serve each piece chilled and enjoy the delightful balance of sweet, tart, and creamy flavors. This Pink Lemonade Pie is a fantastic dessert for a summer picnic, a holiday gathering, or just when you need a bright, refreshing treat. The vibrant color and zesty taste are sure to be a crowd-pleaser.

Conclusion:
And there you have it – your very own homemade Pink Lemonade Pie! We’ve walked through each step together, from creating that perfectly crisp graham cracker crust to whipping up the tangy, sweet, and beautifully pink filling. This refreshing dessert is surprisingly simple to make and always a crowd-pleaser, perfect for any occasion, from backyard BBQs to elegant brunches. Its vibrant color and delightful flavor make it a standout treat.
For serving suggestions, I love to top each slice with a generous dollop of whipped cream and a few fresh raspberries or a sprinkle of lemon zest for an extra burst of freshness. It’s also fantastic served chilled on a warm summer day, allowing its cool, creamy texture to truly shine. Don’t be afraid to get creative with variations! You could experiment with different crusts like shortbread or even a gingersnap crust for a spiced twist. Adding a touch of raspberry liqueur to the filling can also elevate the flavor profile. I truly encourage you to give this Pink Lemonade Pie a try. It’s a recipe that’s sure to become a favorite in your dessert repertoire. Enjoy the process and savor every delicious bite!
Frequently Asked Questions:
Can I make this Pink Lemonade Pie ahead of time?
Absolutely! This pie is actually best made at least 4-6 hours in advance, or even the day before, to allow the filling to set properly. This makes it an ideal make-ahead dessert for parties and gatherings.
What kind of pink lemonade should I use?
You can use your favorite store-bought pink lemonade concentrate or a good quality prepared pink lemonade. If using concentrate, be sure to follow the package instructions for dilution. For an even more vibrant pink color, you can add a tiny drop of red food coloring if desired, though the natural color from the lemonade is usually sufficient.
Easy Pink Lemonade Pie Recipe
A refreshing and easy no-bake pink lemonade pie with a graham cracker crust.
Ingredients
-
1 1/2 cups graham cracker crumbs
-
1/4 cup granulated sugar
-
6 tbsp unsalted butter, melted
-
1 cup pink lemonade, chilled
-
1 (14 oz) can sweetened condensed milk
-
1/2 cup heavy cream
-
1/4 cup lemon juice
-
1/2 tsp vanilla extract
-
Whipped cream, for topping
-
Lemon slices, for garnish
-
Fresh mint, optional, for garnish
Instructions
-
Step 1
Prepare the graham cracker crust: Combine graham cracker crumbs and sugar in a bowl. Pour in melted butter and stir until moistened. Press into a 9-inch pie plate. -
Step 2
Chill the crust for at least 15-20 minutes, or bake at 350°F (175°C) for 8-10 minutes until lightly golden, then cool completely. -
Step 3
Make the filling: In a large bowl, whisk together sweetened condensed milk and heavy cream until combined and slightly thickened. -
Step 4
Gradually whisk in lemon juice until the mixture thickens. Stir in vanilla extract. -
Step 5
Gently fold in chilled pink lemonade until the mixture is uniformly pink and creamy. -
Step 6
Pour the filling into the prepared pie crust and spread evenly. -
Step 7
Chill the pie in the refrigerator for at least 4 hours, or preferably overnight, until set. -
Step 8
Serve chilled, topped with whipped cream, lemon slices, and optional fresh mint.
Important Information
Nutrition Facts (Per Serving)
It is important to consider this information as approximate and not to use it as definitive health advice.
Allergy Information
Please check ingredients for potential allergens and consult a health professional if in doubt.

Leave a Comment