

Easy Homemade Naan Bread Recipe is your ticket to unlocking that irresistible, slightly chewy, perfectly blistered flatbread you crave. Have you ever found yourself staring longin extractgly at a restaurant-style naan, wondering how you could recreate that magic in your own kitchen? Well, wonder no more! This Easy Homemade Naan Bread Recipe is surprisingly simple to whip up, requiring no special equipment and just a handful of common pantry staples. People adore naan because it’s the ultimate vehicle for scooping up curries, dhal, and chutneys, transforming an ordinary meal into an extraordinary culinary experience. But what truly sets this recipe apart is its forgiving nature and the incredible satisfaction of pulling warm, pillowy naan straight from your own oven. Get ready to impress yourself and your loved ones with this incredibly rewarding bake.

Ingredients:
- 2 1/4 cups all-purpose flour, plus extra for dusting
- 1/2 teaspoon baking powder
- 1/2 teaspoon baking soda
- 1/2 teaspoon salt
- 2 teaspoons sugar
- 1/4 cup plain yogurt
- 1/2 cup warm milk
- 1 tablespoon olive oil, plus extra for greasing
- 2-3 tablespoons butter or ghee, melted, for brushing
- 2 cloves garlic, finely minced (optional)
- 2 tablespoons fresh cilantro, chopped (optional)
- 1 tablespoon sesame seeds (optional)
Preparing the Dough
Step 1: Combine Dry Ingredients
Begin extract by gathering all your dry ingredients in a large mixing bowl. Measure out your 2 1/4 cups of all-purpose flour, 1/2 teaspoon of baking powder, 1/2 teaspoon of baking soda, 1/2 teaspoon of salt, and 2 teaspoons of sugar. It’s important to use a measuring cup and spoon for accuracy, especially with the leavening agents like baking powder and soda, as too much or too little can significantly affect the texture of your naan. Once all the dry ingredients are in the bowl, whisk them together thoroughly. This ensures that the baking powder, baking soda, and salt are evenly distributed throughout the flour, which is crucial for a consistent rise and flavor in your finished naan.
Step 2: Incorporate Wet Ingredients and Form the Dough
Next, create a well in the center of your dry ingredients. Pour in the 1/4 cup of plain yogurt, 1/2 cup of warm milk, and 1 tablespoon of olive oil. Using your hands or a sturdy sgin extractn, begin to mix these wet ingredients into the dry ingredients from the center outwards. Continue mixing until agin extractaggy dough begins to form. It might seem a bit sticky at this stage, and that’s perfectly normal. The yogurt adds a wonderful tang and tenderness to the naan, while the milk provides moisture and the olive oil helps create a softer dough. Don’t be tempted to add too much extra flour at this point; we’ll address stickiness in the next step.
Step 3: Knead the Dough to Develop Gluten
Turn the shaggy dough out onto a lightly floured surface. This is where the “plus extra for dusting” flour comes in handy. If the dough is excessively sticky, lightly dust your hands and the work surface with a small amount of the extra flour. Now, it’s time to knead. Fold the dough over on itself and press down with the heels of your hands, then rotate and repeat. Continue this process for about 8-10 minutes, or until the dough is smooth, elastic, and no longer excessively sticky. You should be able to poke it gently with your finger and have it spring back slowly. Kneading is essential for developing the gluten in the flour, which gives the naan its characteristic chewy texture and structure. Once kneaded, shape the dough into a ball.
Step 4: First Rise for Flavor and Texture
Lightly grease a clean bowl with a little extra olive oil. Place the kneaded dough ball into the greased bowl and turn it to coat all sides with the oil. This prevents the dough from drying out as it rises. Cover the bowl tightly with plastic wrap or a clean kitchen towel. Find a warm, draft-free spot in your kitchen for the dough to rise. A slightly warm oven (turned off, of course!) or a spot near a sunny window can work well. Let the dough rise for about 1 to 1.5 hours, or until it has roughly doubled in size. This slow rise allows the yeast to work its magic, developing flavor and creating a lighter, airier naan.
Shaping and Cooking the Naan
Step 5: Divide, Shape, and Add Optional Toppings
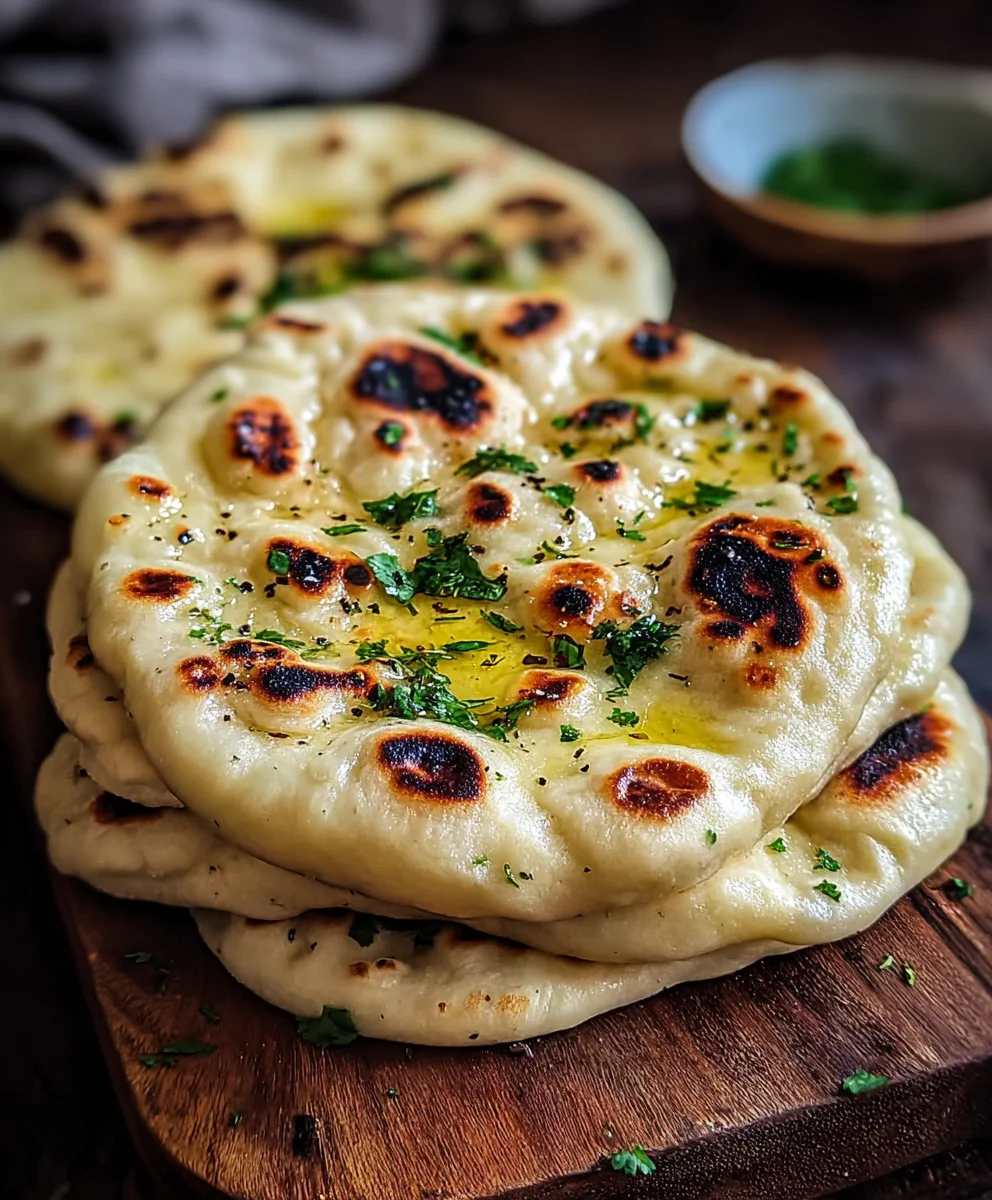
Once the dough has doubled in size, punch it down gently to release the air. Turn the dough out onto your lightly floured work surface again. Divide the dough into 6-8 equal portions, depending on how large you want your individual naan breads to be. Roll each portion into a ball, and then flatten each ball into a rough oval or teardrop shape, about 1/4 inch thick. You can achieve a classic naan shape by gently stretching it with your hands. If you’re using the optional garlic, cilantro, or sesame seeds, now is the time to add them. Lightly brush the top of each flattened naan with a little water (this helps toppings adhere) and sprinkle with your chosen toppings. Gently press the toppings into the dough.
Step 6: Cook the Naan for Perfect Puffy Results
Heat a cast-iron skillet or a griddle over medium-high heat until it’s quite hot. You don’t need to add any oil to the pan itself, as the naan dough has its own oil content and we’ll be brushing it with butter later. Carefully place one or two shaped naan breads onto the hot skillet, depending on the size of your pan. Cook for about 2-3 minutes per side, or until you see large bubbles forming on the surface and the underside is golden brown with some charred spots. The charring is what gives naan its authentic flavor! Flip the naan and cook the other side for another 2-3 minutes until golden brown. This cooking method creates that characteristic pillowy texture.
Step 7: Finish and Serve Your Delicious Naan
As soon as a naan is cooked, remove it from the skillet and immediately brush the top generously with melted butter or ghee. This step is crucial for that rich, buttery flavor and soft finish. If you’re using the optional minced garlic, you can mix it into the melted butter before brushing for an extra layer of aroma and taste. Stack the finished naan breads on a plate and cover them with a clean kitchen towel to keep them warm and soft while you cook the remaining ones. Serve your freshly baked, warm, and fragrant homemade naan bread immediately alongside your favorite curries, dals, or as a delicious side for any meal. The aroma alone will have everyone reaching for more!

Conclusion:
We’ve reached the end of our journey making the Easy Homemade Naan Bread Recipe! I hope you’ve enjoyed the process and are as delighted with the results as I am. This recipe truly delivers on its promise of soft, slightly chewy, and wonderfully flavorful naan that’s perfect for scooping up curries, dipping into chutneys, or even enjoying on its own. The aroma that fills your kitchen as it bakes is simply irresistible! Don’t be afraid to get your hands a little floury; it’s all part of the fun. Experiment with different toppings like garlic and cilantro for an extra burst of flavor. Serve it warm alongside your favorite Indian dishes for an authentic and satisfying meal.
Frequently Asked Questions:
Can I make this Easy Homemade Naan Bread Recipe ahead of time?
While naan is best enjoyed fresh, you can prepare the dough a day in advance and refrigerate it. Let it come to room temperature for about 30 minutes before shaping and cooking. Cooked naan can be stored in an airtight container at room temperature for a day or two, or frozen for longer storage. Reheat gently in a skillet or oven.
What if I don’t have a cast-iron skillet?
A heavy-bottomed skillet or a griddle will also work wonderfully for this Easy Homemade Naan Bread Recipe. The key is to achieve a hot cooking surface to get that characteristic slight char and puffiness. Ensure the heat is medium-high to high to cook the naan quickly.
Can I add herbs or spices to the dough itself?
Absolutely! Feel free to experiment with adding finely chopped cilantro, mint, or even a pinch of cumin or coriander to the dough for added flavor dimensions in your Easy Homemade Naan Bread Recipe. Just be mindful not to overwork the dough after adding them.
Easy Homemade Naan Bread- Perfect Soft Flatbread
Learn how to make soft, chewy, and flavorful homemade naan bread with this easy-to-follow recipe. Perfect for any meal!
Ingredients
-
2 1/4 cups all-purpose flour, plus extra for dusting
-
1/2 teaspoon baking powder
-
1/2 teaspoon baking soda
-
1/2 teaspoon salt
-
2 teaspoons sugar
-
1/4 cup plain yogurt
-
1/2 cup warm milk
-
1 tablespoon olive oil, plus extra for greasing
-
2-3 tablespoons butter or ghee, melted, for brushing
-
2 cloves garlic, finely minced (optional)
-
2 tablespoons fresh cilantro, chopped (optional)
-
1 tablespoon sesame seeds (optional)
Instructions
-
Step 1
Combine dry ingredients: In a large bowl, whisk together 2 1/4 cups all-purpose flour, 1/2 tsp baking powder, 1/2 tsp baking soda, 1/2 tsp salt, and 2 tsp sugar. -
Step 2
Incorporate wet ingredients: Make a well in the center of the dry ingredients. Add 1/4 cup plain yogurt, 1/2 cup warm milk, and 1 tbsp olive oil. Mix until a shaggy dough forms. -
Step 3
Knead the dough: Turn the dough onto a lightly floured surface and knead for 8-10 minutes until smooth and elastic. Shape into a ball. -
Step 4
First rise: Lightly grease a clean bowl with olive oil, place the dough in it, cover, and let rise in a warm spot for 1-1.5 hours until doubled. -
Step 5
Shape and add toppings: Punch down dough, divide into 6-8 portions, and flatten into 1/4-inch thick ovals. Optionally brush with water and add minced garlic, chopped cilantro, or sesame seeds. -
Step 6
Cook the naan: Heat a cast-iron skillet or griddle over medium-high heat. Cook each naan for 2-3 minutes per side until golden brown with charred spots. -
Step 7
Finish and serve: Brush hot naan with melted butter or ghee. Stack and cover with a towel to keep warm. Serve immediately.
Important Information
Nutrition Facts (Per Serving)
It is important to consider this information as approximate and not to use it as definitive health advice.
Allergy Information
Please check ingredients for potential allergens and consult a health professional if in doubt.


Leave a Comment