

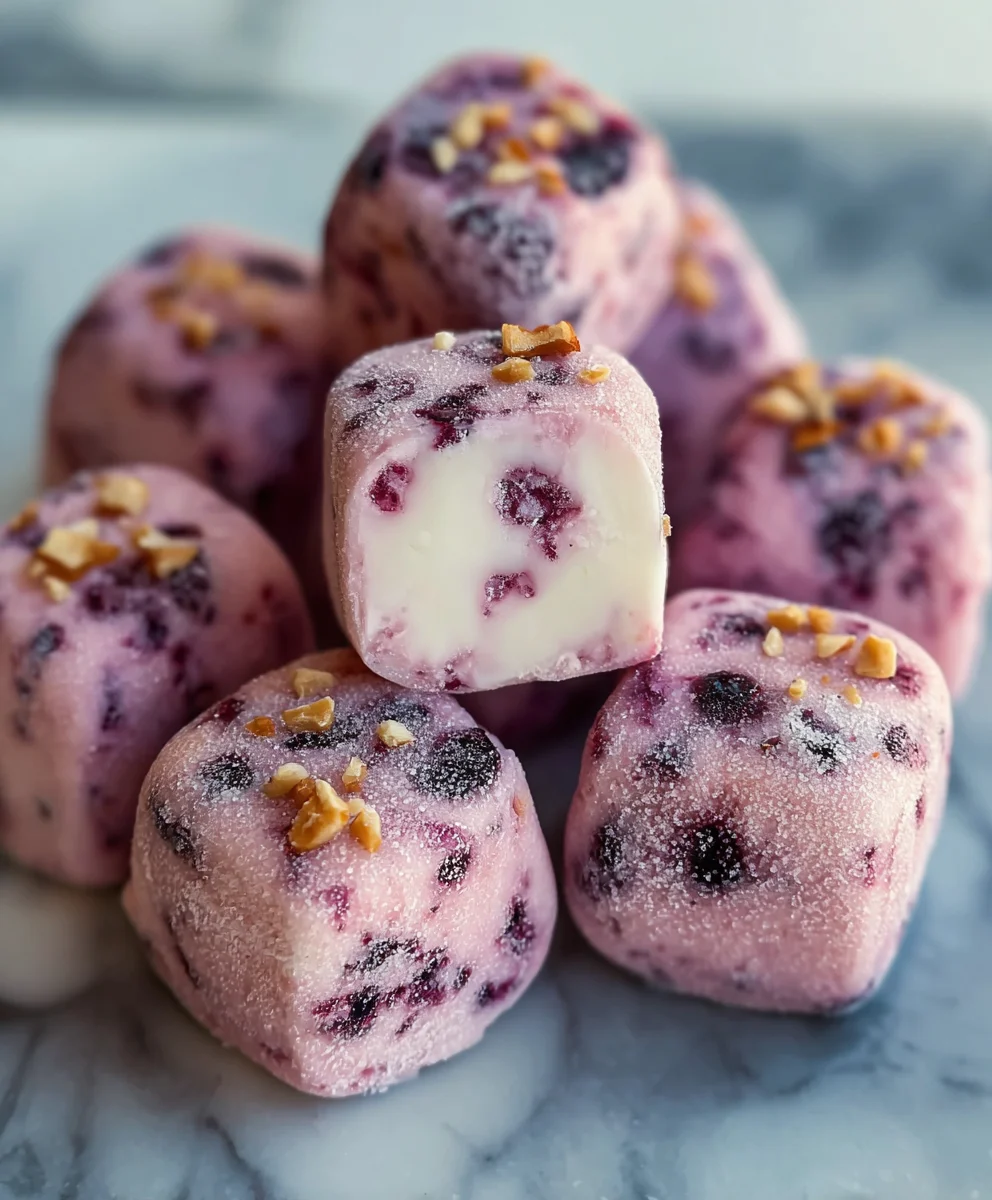
Easy Frozen Yogurt Bites are the ultimate summertime treat, a delightful way to cool down and satisfy your sweet cravings without any of the guilt. We all love them because they’re incredibly simple to make, bursting with fresh flavor, and boast a wonderfully creamy yet firm texture that melts in your mouth. What truly makes these Easy Frozen Yogurt Bites so special is their versatility; you can customize them with your favorite fruits, a sprinkle of granola, or even a drizzle of honey. Imagine a hot afternoon, and you’ve got a batch of these perfectly chilled, bite-sized delights ready to go. They’re a fantastic alternative to store-bought ice cream, offering a healthier indulgence that everyone from kids to adults will adore. Get ready to discover your new favorite go-to for a refreshing, delicious, and guilt-free snack.

Ingredients:
- 12 ounces strawberry yogurt
- 1/2 cup raspberries
- 1/2 cup blackberries
- 2 tablespoons almond milk
Preparation of the Yogurt Mixture
This is where the magic begins for our Easy Frozen Yogurt Bites! First, grab a medium-sized mixing bowl. We want to create a smooth, luscious base for our bites. Spoon the entire 12 ounces of strawberry yogurt into the bowl. For the best texture and to ensure everything blends beautifully, I recommend using a good quality, thick strawberry yogurt. Avoid any that are overly watery, as this can affect the final consistency of your frozen bites.
Next, it’s time to introduce the vibrant berries. Carefully add the 1/2 cup of fresh raspberries and the 1/2 cup of fresh blackberries to the bowl with the yogurt. You can gently rinse your berries under cool water before adding them to ensure they are clean and free from any debris. A gentle pat dry with a paper towel is a good idea afterwards. As we want these bites to be smooth and easily eaten, we’re going to lightly mash or blend the berries. You have a couple of options here. For a more rustic texture with visible berry pieces, you can use a fork to gently mash the berries directly in the yogurt. This will release their juices and color into the yogurt, creating beautiful swirls. If you prefer a smoother consistency with no berry chunks, you can use an immersion blender or a small food processor to briefly pulse the yogurt and berries together. Be careful not to over-blend; we’re aiming for a beautifully colored yogurt with hints of berry, not a completely homogenous puree.
Now, for that touch of silkiness. Add the 2 tablespoons of almond milk to the yogurt and berry mixture. The almond milk is crucial for ensuring our frozen bites aren’t too hard or icy. It helps to create a creamier texture, making them more enjoyable to bite into. Whisk everything together thoroughly. Use a whisk or a spatula to combine the yogurt, mashed berries, and almond milk until the color is evenly distributed and the mixture is smooth and well-blended. You should see a lovely pink hue from the strawberries and hints of purple from the blackberries. Taste a tiny bit at this stage to ensure the flavor is to your liking. You can add a tiny bit more almond milk if you find it too thick, or even a touch of honey or maple syrup if you prefer them sweeter, though the yogurt and berries usually provide enough natural sweetness.
Freezing the Yogurt Bites
Once your yogurt mixture is perfectly combined, it’s time to shape these delightful treats. The key to easy removal and perfectly bite-sized portions is using the right tools. I highly recommend using a silicone mini muffin tin or a silicone ice cube tray. These flexible molds make it incredibly easy to pop out the frozen yogurt bites without any sticking or breakage. If you don’t have silicone molds, you can also line a regular mini muffin tin with small paper liners, though the silicone is generally easier for this purpose.
Carefully spoon the yogurt mixture into each cavity of your chosen mold. Don’t overfill them; leave a little room at the top as the mixture might expand slightly as it freezes. Aim for consistent portion sizes so that each bite is about the same. Once all the cavities are filled, gently tap the mold on your countertop a couple of times. This helps to settle the mixture and remove any air bubbles, ensuring a more uniform frozen bite.
Now, it’s time for the freezer! Place the filled mold onto a flat, stable surface in your freezer. This is important to prevent any spills or uneven freezing. Let the Easy Frozen Yogurt Bites freeze completely. This typically takes about 3 to 4 hours, but it can vary depending on the strength of your freezer. You’ll know they’re ready when they are firm to the touch and hold their shape well. For the best texture, I find that freezing them thoroughly is essential.
Demolding and Storing Your Easy Frozen Yogurt Bites
Once your yogurt bites are fully frozen, it’s time to enjoy them! If you used a silicone mold, carefully peel back the edges of the silicone to gently release each frozen yogurt bite. They should pop out quite easily. If you used a non-silicone mold, you might need to let it sit at room temperature for a minute or two to loosen them slightly, or gently run the bottom of the mold under warm water for a few seconds. Be cautious not to let them melt too much.
For storing these delightful Easy Frozen Yogurt Bites, you have a few options to keep them from sticking together and maintain their perfect form. The best way is to transfer them to an airtight container or a freezer-safe zip-top bag. For optimal results and to prevent them from clumping, you can arrange them in a single layer on a small baking sheet lined with parchment paper and freeze them until firm before transferring them to your storage container. This “flash freezing” method ensures each bite remains distinct.
These Easy Frozen Yogurt Bites are best enjoyed within a couple of weeks for optimal flavor and texture. They are a fantastic healthy snack for kids and adults alike, perfect for a warm day or a refreshing treat any time.
Conclusion:
And there you have it – your ultimate guide to creating delicious and healthy Easy Frozen Yogurt Bites! We’ve walked through the simple steps to transform your favorite yogurt and fresh fruit into these delightful, guilt-free treats. These frozen wonders are perfect for a refreshing snack, a healthy dessert, or even a fun activity to make with the kids. Imagine the joy of biting into a cool, creamy, and bursting-with-flavor frozen bite on a warm afternoon. They truly are a game-changer for anyone looking for a quick and nutritious sweet option.
Don’t be afraid to get creative with your serving suggestions! I love serving these chilled bites straight from the freezer as a standalone treat. They also make a fantastic addition to a smoothie bowl, adding a creamy texture and a burst of natural sweetness. For a more elaborate dessert, consider arranging them artfully on a platter with a drizzle of honey or a sprinkle of granola.
The beauty of these Easy Frozen Yogurt Bites lies in their versatility. Feel free to experiment with different fruit combinations – berries, mango, kiwi, or even a tropical blend! You can also add a touch of vanilla extract, a hint of cinnamon, or even some finely chopped dark chocolate for an extra layer of flavor. Remember, the possibilities are endless, and the key is to have fun with it!
I truly hope you enjoy making and devouring these simple yet incredibly satisfying frozen delights. Let me know your favorite flavor combinations in the comments below!
Frequently Asked Questions:
Q1: How long do Easy Frozen Yogurt Bites last in the freezer?
Properly stored in an airtight container or a freezer-safe bag, your Easy Frozen Yogurt Bites should remain delicious for up to 2-3 months. However, I find they are best enjoyed within the first month for optimal flavor and texture.
Q2: Can I use Greek yogurt for this recipe?
Absolutely! Greek yogurt works wonderfully for Easy Frozen Yogurt Bites. It will result in an even thicker, creamier texture due to its higher protein content. You might find you need to slightly adjust the amount of liquid or fruit depending on the thickness of your Greek yogurt.

Easy Frozen Yogurt Bites Healthy Snack Recipe
Simple and healthy frozen yogurt bites made with yogurt, fresh berries, and a touch of almond milk. A perfect refreshing snack for kids and adults.
Ingredients
-
12 ounces strawberry yogurt
-
1/2 cup raspberries
-
1/2 cup blackberries
-
2 tablespoons almond milk
-
1 teaspoon honey (optional, for sweetness)
Instructions
-
Step 1
In a medium bowl, combine 12 ounces of strawberry yogurt with 1/2 cup of raspberries and 1/2 cup of blackberries. Gently mash the berries with a fork or briefly pulse with an immersion blender until desired consistency. -
Step 2
Add 2 tablespoons of almond milk to the yogurt and berry mixture. Whisk until the color is evenly distributed and the mixture is smooth. -
Step 3
If desired, stir in 1 teaspoon of honey for added sweetness. Taste and adjust if needed. -
Step 4
Spoon the yogurt mixture into a silicone mini muffin tin or ice cube tray, filling each cavity about three-quarters full. -
Step 5
Gently tap the mold on a flat surface to remove air bubbles. Place the mold in the freezer and freeze for 3-4 hours, or until completely firm. -
Step 6
Once frozen, carefully remove the yogurt bites from the mold. For easier storage, you can flash freeze them on a parchment-lined baking sheet until firm before transferring to an airtight container or freezer bag.
Important Information
Nutrition Facts (Per Serving)
It is important to consider this information as approximate and not to use it as definitive health advice.
Allergy Information
Please check ingredients for potential allergens and consult a health professional if in doubt.

Leave a Comment