

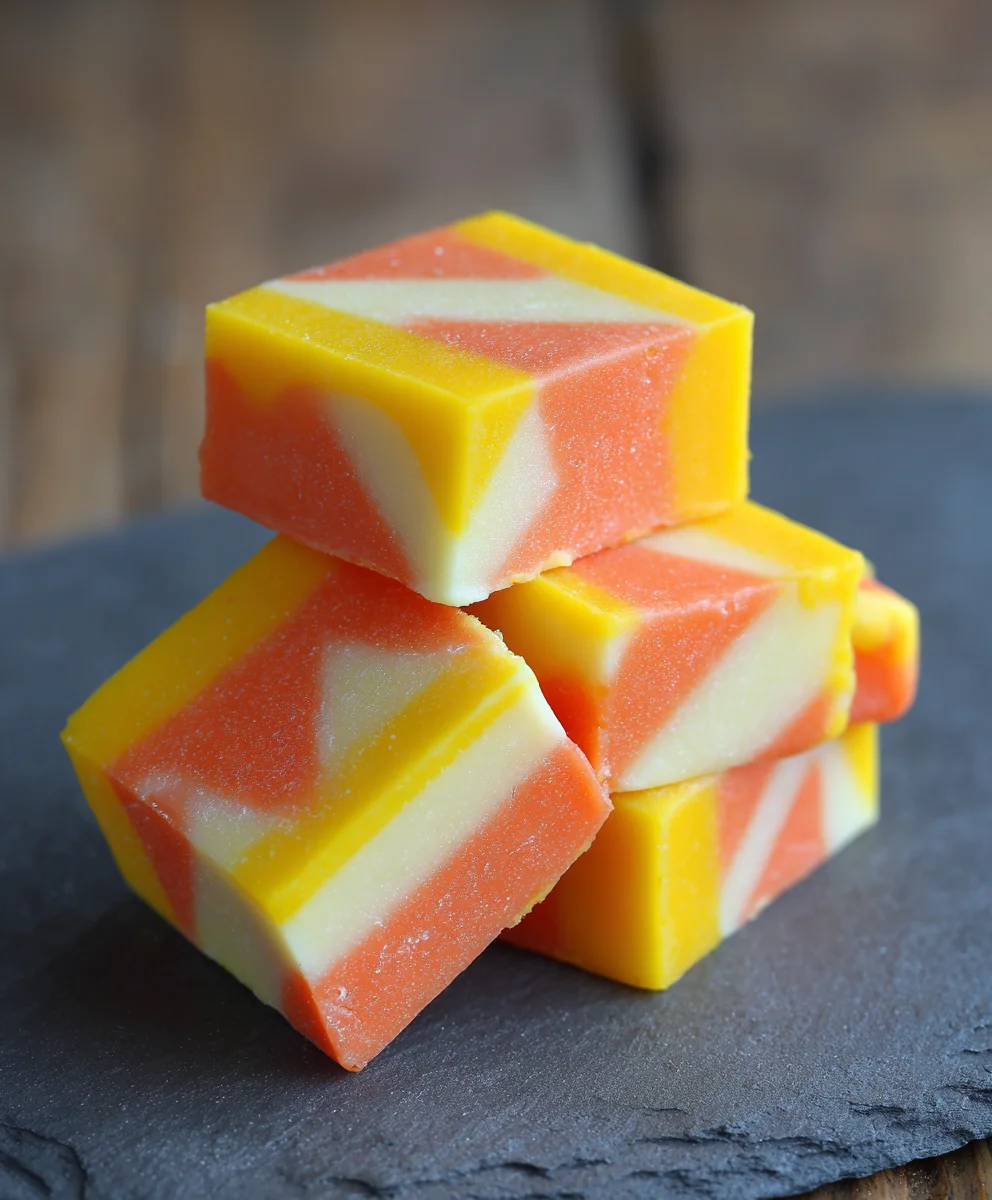
Easy Candy Corn Fudge is a festive culinary delight that promises to transform your autumn celebrations with its vibrant colors and irresistible sweetness. Have you ever wondered how to capture the whimsical spirit of Halloween in a rich, creamy, no-bake dessert? Look no further! This isn’t just any fudge; it’s a nostalgic journey wrapped in a delightful confection that’s as beautiful to behold as it is to taste.
Candy corn, with its distinctive tri-color layers, has been an iconic symbol of fall and Halloween for well over a century, bringing smiles to generations. This recipe pays homage to that beloved tradition by infusing its unique flavor profile into a classic, velvety fudge. People absolutely adore this dish not only for its eye-catching appearance but also for its incredibly smooth, melt-in-your-mouth texture and the perfect balance of sweet vanilla and buttery notes. It’s remarkably convenient to prepare, requiring no special skills or lengthy baking times, making it an ideal choice for busy individuals wanting to create something truly special.
I am genuinely excited to share how incredibly simple it is to create this delightful Easy Candy Corn Fudge. It’s the perfect addition to any holiday table, a charming homemade gift, or simply a treat to brighten a crisp autumn day. Get ready to impress your friends and family with this sweet, vibrant masterpiece!

Ingredients:
- 1 (14-ounce) can full-fat sweetened condensed milk
- 2 tablespoons unsalted butter, cut into cubes
- 24 ounces good quality white chocolate chips or finely chopped white chocolate (ensure it’s baking chocolate, not confectionery coating)
- 1 teaspoon pure vanilla extract
- 1⁄2 teaspoon sea salt (or to taste, optional, to balance sweetness)
- 11⁄2 cups candy corn, divided (plus more for garnish, if desired)
- Optional: A few drops of orange food coloring, for a vibrant swirl (use gel food coloring for best results)
Gathering Your Tools and Preparing Your Pan:
- Prepare your baking pan: The very first step to making incredible fudge, and especially our delightful Easy Candy Corn Fudge, is to ensure your pan is perfectly prepped. I recommend using an 8×8-inch square baking pan for a good thickness, though a 9×9-inch pan will work if you prefer slightly thinner pieces. Line your chosen pan with parchment paper, allowing an overhang on two sides. This is absolutely crucial for easy removal of the set fudge later. Trust me, struggling to get fudge out of a pan is not fun! If you don’t have parchment, you can thoroughly grease and flour the pan, but parchment is truly the superior method for a clean lift. The overhang creates “handles” that make lifting the entire block of fudge out a breeze.
- Measure out your ingredients: Before you even think about turning on the heat, measure all your ingredients and have them ready. This is known as “mise en place” in the culinary world, and it makes the entire cooking process smooth and stress-free. Have your can of sweetened condensed milk open, butter cubed, white chocolate chips (or chopped chocolate) in a bowl, vanilla extract at the ready, and your candy corn measured out. Divide the candy corn as specified: you’ll want some for mixing into the fudge and some for sprinkling on top, which creates a beautiful visual when your Easy Candy Corn Fudge is finished. Having everything pre-measured means you won’t be scrambling for ingredients while your fudge base is cooking, which can lead to scorching or uneven melting.
- Choose your saucepan wisely: Select a medium-sized, heavy-bottomed saucepan. A heavy bottom is a secret weapon in fudge making because it distributes heat much more evenly than a thin-bottomed pan. This significantly reduces the risk of the mixture sticking to the bottom and burning, which can impart an unpleasant, burnt flavor to your entire batch of fudge. A non-stick saucepan is also an excellent choice, as it further aids in preventing sticking and makes cleanup a breeze.
Melting the Base for Your Easy Candy Corn Fudge:
- Begin melting the butter and condensed milk: Place your heavy-bottomed saucepan over low to medium-low heat. It’s incredibly important not to rush this step with high heat, as patience is key to achieving that smooth, creamy texture we’re aiming for in our Easy Candy Corn Fudge. Add the cubed unsalted butter to the saucepan. Allow it to slowly melt, shimmering gently in the pan. Once the butter is mostly melted, pour in the entire can of full-fat sweetened condensed milk. I always make sure to scrape every last drop out of the can with a rubber spatula; no sense in wasting that glorious, thick sweetness! Give the butter and condensed milk a gentle stir with a heat-proof spatula or wooden spoon, just enough to combine them. You’ll notice they start to mingle beautifully, forming a rich, creamy base.
- Introduce the white chocolate: Now, for the star of our fudge base: the white chocolate. Slowly add your white chocolate chips or chopped white chocolate to the saucepan. The quality of your white chocolate truly matters here. Using a good quality baking chocolate will yield a much smoother, richer, and more satisfying flavor for your Easy Candy Corn Fudge compared to cheaper confectionery coatings. These often contain more vegetable oil and less cocoa butter, which can affect the fudge’s texture and ability to set properly.
- Stir continuously until smooth: Continue to stir the mixture constantly with your spatula or wooden spoon. This consistent stirring is vital for two main reasons: firstly, it ensures the chocolate melts evenly and completely, preventing any lumps. Secondly, it helps to prevent the mixture from sticking to the bottom of the pan and scorching, which, as I mentioned before, would be a culinary tragedy for your delicious fudge. Keep the heat on low to medium-low. You’re aiming for a perfectly smooth, homogeneous, velvety mixture with no discernible pieces of white chocolate remaining. This process usually takes about 5-7 minutes. Don’t be tempted to increase the heat to speed things up; slow and steady wins the race when it comes to melting chocolate in a dairy base. The mixture will become thick and glossy as it cooks, indicating that all the ingredients have fully emulsified and are ready for the next step.
Achieving the Perfect Smoothness and Flavor:
- Remove from heat and stir in flavorings: Once your fudge base is beautifully smooth and all the white chocolate has melted into the condensed milk and butter, immediately remove the saucepan from the heat. It’s crucial to take it off the heat at this point to prevent overcooking the chocolate, which can make it seize or become grainy. Now, swiftly stir in the pure vanilla extract. Vanilla adds a wonderful depth of flavor that complements the sweetness of the white chocolate and candy corn, making every bite of your Easy Candy Corn Fudge even more delightful. If you’re using sea salt, add that in now too. A tiny pinch of sea salt might seem counterintuitive in a sweet recipe, but it magically enhances and balances all the other flavors, preventing the fudge from being overly cloying. It truly makes the sweetness sparkle!
- Optional color swirl: If you’re feeling a little adventurous and want to add an extra festive touch to your Easy Candy Corn Fudge, now is the time to add a few drops of orange gel food coloring. Gel food coloring is preferred over liquid as it provides a much more concentrated color without adding excess moisture, which could alter the fudge’s texture. Add just a few drops, then gently swirl it into a small portion of the fudge mixture with a toothpick or the tip of your spatula. You don’t want to fully incorporate it unless you want uniformly orange fudge. The goal here is a pretty, subtle swirl that evokes the colors of autumn and candy corn. This step is purely for aesthetics, but it certainly makes the fudge pop!
The Candy Corn Integration:
- Fold in the candy corn: This is where the “Candy Corn” part of our Easy Candy Corn Fudge truly comes to life! Take 1 to 11⁄4 cups of your measured candy corn (reserving a quarter cup or so for the top, if desired). Gently fold the candy corn into the warm fudge mixture. Do this quickly but thoroughly, ensuring the candy corn is evenly distributed throughout the base. It’s important not to overmix here, as excessive stirring can cause the candy corn to break apart too much or melt slightly, which you want to avoid if you desire distinct pieces within the fudge. The residual heat from the fudge will slightly soften the candy corn, but it should still retain some of its chewy texture, creating a delightful textural contrast against the smooth fudge.
Setting and Chilling Your Easy Candy Corn Fudge:
- Pour into the prepared pan: Once the candy corn is folded in, immediately pour the warm fudge mixture into your parchment-lined 8×8-inch (or 9×9-inch) baking pan. Using your spatula, spread the fudge evenly into the pan, ensuring it fills all corners and creates a smooth, flat top. Work relatively quickly here, as the fudge will start to set as it cools, making it harder to spread. You want a uniform thickness for consistent pieces later.
- Garnish with additional candy corn (optional): If you saved some candy corn, now is the perfect time to sprinkle it over the top of the still-soft fudge. Gently press the pieces down slightly with your fingertips or the back of a spoon to ensure they adhere to the fudge as it sets. This adds an extra layer of visual appeal and clearly signals what delicious treat lies within your Easy Candy Corn Fudge! You can arrange them artfully or simply sprinkle them randomly – either way, it looks fantastic.
- Chill to set: Transfer the pan to the refrigerator. Allow the fudge to chill for at least 2-4 hours, or even better, overnight. This chilling time is essential for the fudge to firm up completely and achieve its characteristic solid, yet creamy, texture. Rushing this step will result in soft, difficult-to-cut fudge. I’ve found that giving it ample time in the fridge ensures the best possible results – firm enough to slice cleanly, but still wonderfully melt-in-your-mouth. The colder it gets, the easier it will be to cut into beautiful, neat squares.
Cutting and Serving Your Delicious Creation:
- Lift and slice: Once your Easy Candy Corn Fudge is thoroughly chilled and firm, use the parchment paper overhangs as handles to carefully lift the entire slab of fudge out of the pan and onto a cutting board. This is where that parchment paper truly shines! Discard the parchment paper. Now, grab a sharp knife. For the cleanest cuts, I highly recommend warming your knife blade under hot water for a few seconds, then wiping it completely dry before each cut. This slight warmth helps to glide through the fudge without dragging or tearing it, resulting in perfectly crisp edges.
- Cut into desired pieces: Cut the fudge into 1-inch squares, or whatever size you prefer. I find that smaller squares are ideal for fudge, as it’s quite rich. If you want to make “fudge bites,” you can even cut them smaller. Wipe your knife clean between cuts for the absolute best results. For even more precise cuts, you can use a ruler as a guide, especially if you’re aiming for a professional presentation. The beauty of this recipe is that even if your cuts aren’t perfectly straight, the deliciousness of the Easy Candy Corn Fudge will still shine through!
- Serve and enjoy: Arrange your beautiful fudge squares on a platter and serve! This fudge is an absolute crowd-pleaser, perfect for fall gatherings, Halloween parties, or simply as a delightful treat for yourself. Its vibrant colors and unique flavor profile make it a standout dessert.
Tips for the Best Easy Candy Corn Fudge Experience:
- Storage: Store your homemade Easy Candy Corn Fudge in an airtight container at room temperature for up to 1 week, or in the refrigerator for up to 2 weeks. If storing in layers, place a piece of parchment paper between each layer to prevent sticking. While it keeps well at room temperature, I personally love the slightly firmer texture when stored in the fridge, especially in warmer climates. Just remember to let it come to room temperature for about 10-15 minutes before serving if it’s been in the fridge, as this allows the flavors and texture to soften just perfectly.
- Do not substitute ingredients: For the best results with this “easy” fudge recipe, it is essential to stick to the specified ingredients. Do not use evaporated milk instead of sweetened condensed milk; they are very different products. Sweetened condensed milk is key to the texture and sweetness of this particular style of fudge. Also, using real white chocolate (made with cocoa butter) is crucial for proper setting and flavor compared to cheaper white confectionery melts, which are often oil-based. These substitutes can drastically alter the final consistency and taste of your Easy Candy Corn Fudge.
- The “Easy” factor: This recipe is affectionately called “Easy” Candy Corn Fudge because it doesn’t require a candy thermometer or the precise temperature control often associated with traditional fudge recipes. The combination of sweetened condensed milk and white chocolate creates a stable emulsion that sets beautifully with minimal fuss, making it incredibly approachable for beginners and a quick win for seasoned bakers alike. You don’t have to worry about reaching specific “soft ball” stages, which can be daunting for many!
- Consider the season: This delightful fudge is particularly popular during the autumn months, especially around Halloween and Thanksgiving, given its namesake ingredient. The iconic colors of candy corn naturally lend themselves to festive seasonal treats. It makes for a wonderful homemade gift or a standout addition to any fall dessert table, truly embodying the spirit of the season in a delicious, bite-sized form.
- Troubleshooting – If your fudge is too soft: If, after thorough chilling, your fudge seems too soft or doesn’t set properly, it’s often due to one of a few reasons. The most common culprit is either not using full-fat sweetened condensed milk, or using a white chocolate product that is primarily vegetable oil (confectionery coating) rather than real white chocolate with cocoa butter. Sometimes, if the mixture wasn’t heated quite long enough for all the white chocolate to fully melt and combine, it might also affect setting. Unfortunately, once it’s set too soft, it’s difficult to completely rectify. However, you can try placing it back in the freezer for a short period (30-60 minutes) before cutting, which might make it firm enough to slice, though it will soften quickly at room temperature. For future batches of Easy Candy Corn Fudge, double-check your ingredients!
- Troubleshooting – If your fudge is grainy: Grainy fudge can occur if the sugar in the condensed milk recrystallizes. This is less common with this “easy” method compared to traditional fudge, but it can happen if the mixture is stirred too vigorously after the chocolate has melted, or if it cools down unevenly. To avoid this, ensure gentle, continuous stirring during the melting phase and resist the urge to scrape down the sides of the pan once the mixture is cooling in the pan (before chilling). If it happens, while it won’t be as smooth, it will still be edible and delicious, just with a different texture.
- Embrace the sweetness: Candy corn is inherently sweet, and so is fudge! This Easy Candy Corn Fudge is undoubtedly a sweet treat. If you’re someone who loves the classic sugary delight of candy corn, you will adore this fudge. The vanilla and optional pinch of salt help to round out the flavors, but the core essence is pure, delightful sweetness. It’s designed to be a joyous indulgence, a nostalgic bite that brings back all the fun memories of trick-or-treating.
- Experiment with garnishes: While extra candy corn is the obvious and delightful garnish, don’t hesitate to get creative. A drizzle of melted dark chocolate over the top once the fudge has set can add a sophisticated touch and a lovely contrast in flavor. You could also sprinkle a tiny bit of flaky sea salt on top of the dark chocolate drizzle for a gourmet flair. Some people enjoy adding a few toasted pecans or walnuts for an extra crunch, though this deviates slightly from the pure candy corn experience. Whichever you choose, make your Easy Candy Corn Fudge uniquely yours!

Conclusion:
Well, my friends, we’ve reached the sweet end of our journey, and I genuinely hope you’re feeling as excited as I am about this incredible recipe. If there’s one thing I want you to take away from our time together, it’s that this isn’t just another dessert recipe; it’s an invitation to create something truly special and memorable with minimal effort. I’m talking about a confection that delivers maximum festive charm and irresistible flavor, all wrapped up in a delightful package. You might be thinking, “Fudge sounds complicated,” but I promise you, this recipe dismantles that notion entirely. It’s a testament to the fact that some of the most impressive treats can be surprisingly simple to achieve, making you look like a culinary wizard without breaking a sweat. So, if you’ve been searching for a way to add a touch of homemade magic to your celebrations without the usual stress, you’ve found your perfect match right here.
Why is this a must-try, you ask? Let me count the ways! First, its vibrant appearance alone makes it an absolute showstopper. Those distinctive layers of orange, yellow, and white, often crowned with the delightful crunch of candy corn pieces, instantly evoke the joyous spirit of autumn and Halloween. It’s more than just a treat; it’s a beautiful decoration that brightens any table! Beyond its visual appeal, the creamy, melt-in-your-mouth texture is simply divine. Each bite offers a harmonious blend of sweetness and a subtly rich flavor that will have everyone reaching for a second, and perhaps even a third, piece. The delightful chewiness of the candy corn integrated throughout adds a playful element that sets this fudge apart from traditional recipes. And let’s not forget the sheer joy of creating something so beautiful and delicious from scratch. There’s a profound satisfaction in seeing your efforts transform into a tangible, edible delight that brings smiles to faces. This recipe is perfect for beginners and seasoned bakers alike, offering a stress-free path to a truly impressive homemade treat that will undoubtedly become a seasonal favorite.
Now, let’s talk about how you can elevate your culinary creation even further, or simply enjoy it in new and exciting ways. While a square of this delightful fudge is absolutely perfect on its own, imagine serving it alongside a steaming mug of spiced cider or a rich cup of coffee for a cozy autumn afternoon. It also makes an absolutely charming addition to any holiday dessert platter, adding a much-needed pop of color and a unique flavor profile that stands out from the usual suspects like cookies and pies. Consider cutting it into smaller, bite-sized pieces and arranging them artfully in a festive box or cello bag; they make for thoughtful, homemade gifts that everyone will appreciate during the holiday season. They’re also fantastic as unique party favors for a fall-themed gathering or a Halloween bash, leaving your guests with a sweet reminder of your hospitality. I’ve even seen people crumble a few pieces over vanilla ice cream for an extra indulgent sundae – talk about next-level deliciousness! For a fun twist, try incorporating chunks into your favorite brownie batter before baking for an unexpected flavor explosion.
Feeling adventurous? This recipe is wonderfully adaptable, making it a fantastic canvas for your creative impulses. For an added layer of texture and nuttiness, try folding in a half-cup of finely chopped pecans or walnuts right before pouring the fudge into the pan. If you’re a fan of contrasting flavors, a tiny sprinkle of flaky sea salt over the top just before it sets can truly enhance the sweetness, creating a sophisticated sweet-and-salty dynamic that will surprise and delight your taste buds. You could also experiment with different extracts; a touch of almond extract can add a beautiful depth, or a hint of maple extract would perfectly complement the autumn theme, making it even more seasonal. For those who love a bit of chocolate, a swirl of melted dark chocolate across the top or even a layer of rich chocolate fudge beneath the candy corn layers could transform it into an even more decadent treat, appealing to a wider range of preferences. Don’t limit yourself to traditional candy corn either; the harvest mix often includes small pumpkin-shaped candies or even chocolate-flavored candy corn which could be a fun variation. The possibilities are truly endless, and a little experimentation can lead to your next signature creation that guests will rave about.
This is where I pass the baton to you! I’ve shared all my tips and tricks, and now it’s your turn to experience the magic of making your own Easy Candy Corn Fudge. I wholeheartedly encourage you to roll up your sleeves, gather your ingredients, and dive into this delightful project. You’ll be amazed at how effortlessly it comes together and how incredibly satisfying the end result is. There’s something truly special about creating homemade treats, especially ones that look and taste this good. This recipe offers that joy in spades, making you feel proud of what you’ve accomplished in the kitchen. Don’t be shy – give it a try! You absolutely won’t regret it. Once you’ve whipped up your own glorious batch of this festive confection, I would absolutely love to hear about your experience. Did you add any fun variations? What did your friends and family think? Did it become an instant hit at your gathering? Share your stories, your photos, and your triumphs in the comments below. Your feedback and creativity inspire me and our entire community of fellow food enthusiasts. So, what are you waiting for? Let’s get fudgy!
Easy Candy Corn Fudge: Sweet & Simple Treat!
This Easy Candy Corn Fudge is a festive, no-bake dessert that captures the whimsical spirit of Halloween. It’s a rich, creamy, melt-in-your-mouth confection with sweet vanilla and buttery notes, remarkably convenient to prepare without special skills or lengthy baking times. Perfect for autumn celebrations, holiday tables, or a delightful homemade gift.
Ingredients
-
1 (14-ounce) can sweetened condensed milk
-
2 tablespoons unsalted butter
-
24 ounces white chocolate chips (baking chocolate)
-
1 teaspoon vanilla extract
-
½ teaspoon sea salt (optional)
-
1 ¼ cups candy corn, divided (1 cup for fudge, ¼ cup for garnish)
-
Optional: Orange gel food coloring
Instructions
-
Step 1
Line an 8×8-inch baking pan with parchment paper, allowing an overhang on two sides for easy removal. -
Step 2
In a heavy-bottomed saucepan over low to medium-low heat, melt the butter. Pour in the sweetened condensed milk, then add the white chocolate chips. -
Step 3
Stir continuously for 5-7 minutes until the mixture is perfectly smooth, homogeneous, and glossy with no discernible pieces of white chocolate remaining. -
Step 4
Immediately remove the saucepan from heat. Stir in the vanilla extract and optional sea salt. If desired, add a few drops of orange gel food coloring and gently swirl for a marbled effect. -
Step 5
Gently fold 1 cup of candy corn into the warm fudge mixture until evenly distributed. -
Step 6
Pour the fudge mixture into the prepared pan, spreading it evenly. Sprinkle the remaining ¼ cup of candy corn on top, gently pressing the pieces down to adhere. -
Step 7
Transfer the pan to the refrigerator and chill for at least 2-4 hours, or preferably overnight, until the fudge is completely firm. -
Step 8
Once thoroughly chilled, use the parchment paper overhangs to lift the fudge slab out of the pan onto a cutting board. For cleanest cuts, warm a sharp knife under hot water, wipe dry, and cut the fudge into 1-inch squares. Serve and enjoy!
Important Information
Nutrition Facts (Per Serving)
It is important to consider this information as approximate and not to use it as definitive health advice.
Allergy Information
Please check ingredients for potential allergens and consult a health professional if in doubt.

Leave a Comment