

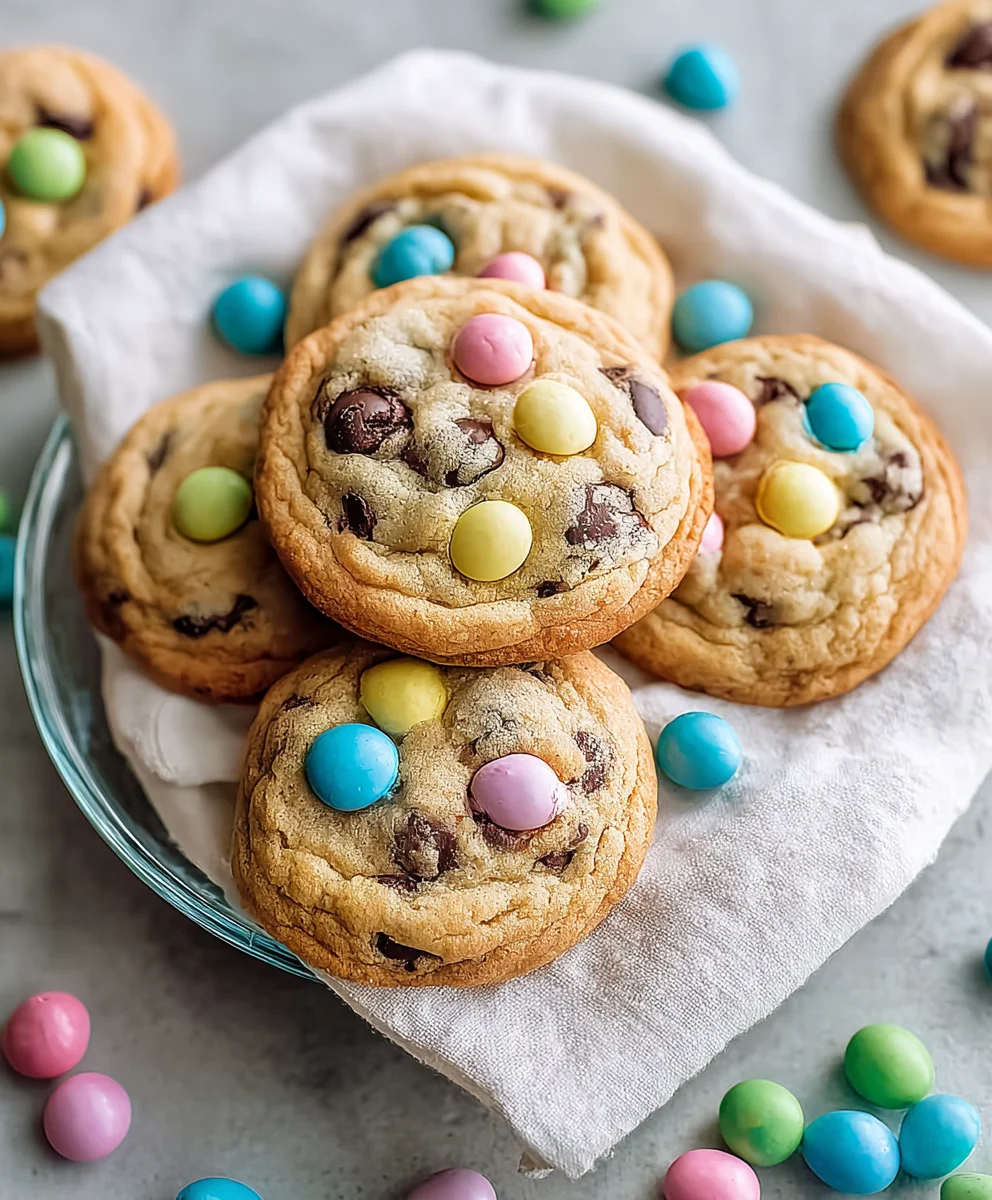
Easter Chocolate Chip Cookies are more than just a sweet treat; they’re a delightful invitation to celebrate the vibrant spirit of spring and the joy of the Easter season. As the days grow longer and flowers begin to bloom, there’s a unique comfort in gathering loved ones and sharing homemade delights. We are absolutely thrilled to present a recipe that takes the beloved classic chocolate chip cookie and infuses it with festive charm, making it an indispensable part of your holiday spread. Imagine the smiles when these vibrant, delicious cookies appear!
Why These Cookies Will Become Your New Easter Tradition
The simple act of baking has always been central to holiday celebrations, and Easter is certainly no exception. While traditional Easter bakes often lean towards elaborate cakes or hot cross buns, there’s an undeniable, universal appeal to a perfectly baked chocolate chip cookie. Our rendition elevates this comfort food, transforming it into a seasonal sensation that’s bursting with deliciousness. Picture soft, chewy centers, slightly crisp edges, and generous pockets of melted chocolate, all adorned with cheerful, spring-inspired sprinkles. This recipe for Easter Chocolate Chip Cookies isn’t just easy to follow; it promises a batch of cookies that are incredibly satisfying to make and even more delightful to devour. They embody the warmth and togetherness of the holiday, offering a taste of pure happiness with every bite. We know you’ll love adding this recipe to your Easter baking traditions, creating cherished memories one delicious cookie at a time.

Ingredients:
- All-Purpose Flour: 3 cups (approximately 360 grams). I always recommend sifting this to ensure your cookies are light and airy, free from any clumps.
- Baking Soda: 1 teaspoon. This is our leavening agent, giving our Easter Chocolate Chip Cookies that lovely lift and chewiness.
- Salt: 1 teaspoon. A crucial ingredient! It balances the sweetness and enhances all the other flavors, making our chocolate sing.
- Unsalted Butter: 1 cup (2 sticks or 226 grams), softened to room temperature. This is really important for achieving that creamy, smooth texture when creaming with sugar.
- Granulated Sugar: 3/4 cup (150 grams). For crisp edges and a touch of sweetness.
- Light Brown Sugar: 1 and 1/4 cups (250 grams), firmly packed. This contributes to the signature chewy texture and adds a lovely molasses flavor that complements the chocolate perfectly.
- Large Eggs: 2, at room temperature. Just like the butter, room temperature eggs emulsify better into the mixture, creating a smoother dough.
- Pure Vanilla Extract: 2 teaspoons. Use a good quality extract here; it truly makes a difference in the overall flavor profile of your Easter Chocolate Chip Cookies.
- Semi-Sweet Chocolate Chips: 1 and 1/2 cups (250 grams). These are a classic for a reason! They melt beautifully and provide that rich chocolatey goodness.
- Milk Chocolate Chips: 1/2 cup (85 grams). Adding a touch of milk chocolate provides an extra layer of creaminess and sweetness, making the cookies even more irresistible.
- Optional Easter Mix-ins: 1/2 cup (about 90 grams) of pastel M&M’s, white chocolate chips, chopped Cadbury Mini Eggs, or other festive sprinkles for that extra holiday flair. This is where we truly make them “Easter Chocolate Chip Cookies”!
Prepping Our Workspace & Ingredients
Before we dive into the delightful process of mixing, let’s take a moment to set ourselves up for success. Baking, for me, is as much about the process as it is about the delicious end result, and a well-prepared kitchen makes all the difference. First, gather all your ingredients and tools. This practice, often called “mise en place,” ensures you won’t be scrambling for an egg or a measuring spoon mid-recipe.
I like to start by lining two large baking sheets with parchment paper or silicone baking mats. This not only prevents sticking but also helps the cookies bake more evenly and makes cleanup an absolute breeze. Next, pre-measure all your dry ingredients. In a medium bowl, whisk together the 3 cups of all-purpose flour, 1 teaspoon of baking soda, and 1 teaspoon of salt. I find that a good whisk for about 30 seconds ensures these dry components are thoroughly combined and evenly distributed, which is crucial for uniform leavening throughout our batch of Easter Chocolate Chip Cookies.
For your wet ingredients, make sure your unsalted butter is genuinely softened to room temperature. This means it should be pliable to the touch, leaving a slight indentation when you press it gently, but not melted or greasy. If your butter is too cold, it won’t cream properly with the sugars, leading to a denser cookie. If it’s too warm, your cookies might spread too much. Similarly, your large eggs should also be at room temperature. If you forget to take them out ahead of time, a quick trick is to place them in a bowl of warm (not hot!) water for about 5-10 minutes. This brings them up to temperature quickly and allows them to emulsify better with the butter and sugar mixture, contributing to a smoother, more cohesive dough.
Crafting the Cookie Dough – The Heart of Our Easter Chocolate Chip Cookies
This is where the magic truly begins! The process of creating the dough for our Easter Chocolate Chip Cookies is a journey of textures and aromas, leading to that perfect chewy-crispy balance we all adore.
Creaming the Butter and Sugars for a Fluffy Base
In a large mixing bowl, either with an electric mixer fitted with the paddle attachment or by hand with a sturdy whisk (prepare for an arm workout!), combine your 1 cup of softened unsalted butter with 3/4 cup of granulated sugar and 1 and 1/4 cups of packed light brown sugar. We’re going to cream these together on medium speed for about 2-3 minutes, or until the mixture becomes wonderfully light and fluffy. What we’re doing here is incorporating air into the butter and sugar, which creates tiny pockets that will expand in the oven, giving our cookies that desirable tender texture. The color should noticeably lighten, and the texture should be airy and almost mousse-like. Don’t rush this step; it’s fundamental to the structure and final texture of your cookies. A well-creamed base is the secret to preventing dense, flat cookies.
Incorporating Eggs and Vanilla for Richness
Now, it’s time to add our room temperature eggs. Add them one at a time, beating well after each addition. This allows each egg to fully incorporate into the butter-sugar mixture, preventing a curdled appearance and ensuring a smooth, emulsified base. Scrape down the sides of the bowl with a spatula after each egg to make sure everything is evenly mixed. Once both eggs are incorporated, stir in the 2 teaspoons of pure vanilla extract. The aroma alone will start making your kitchen smell absolutely heavenly! Continue to beat for another minute until the mixture is cohesive and glossy. The vanilla not only adds its distinct flavor but also enhances the overall sweetness and depth of the cookie dough.
Combining Wet and Dry Ingredients – The Gentle Touch
With our wet ingredients beautifully combined, it’s time to bring in the dry elements we whisked earlier. Gradually add the flour mixture to the wet ingredients, doing so about a third at a time. Mix on low speed, or by hand with a sturdy spoon or spatula, until just combined. The key here is to avoid overmixing. Overmixing develops the gluten in the flour too much, which can lead to tough, dense cookies, and nobody wants that! As soon as you no longer see streaks of dry flour, stop mixing. A few lingering specks of flour are perfectly fine; they’ll disappear as you fold in the chocolate.
Folding in the Chocolate and Easter Mix-ins
This is arguably the most exciting part for me! Gently fold in your 1 and 1/2 cups of semi-sweet chocolate chips and 1/2 cup of milk chocolate chips. If you’re using any of those delightful optional Easter mix-ins like pastel M&M’s or chopped Mini Eggs, now is the time to add those too. Use a spatula to fold them in until they are evenly distributed throughout the dough. You want every bite of your Easter Chocolate Chip Cookies to be bursting with chocolate and festive color! Be mindful not to overmix here either, just enough to ensure the chips are well integrated.
The Crucial Chill – Patience is a Virtue
Once your dough is complete, cover the bowl tightly with plastic wrap and refrigerate it for at least 30 minutes, and ideally for 2-3 hours. If you have the patience, an overnight chill (8-12 hours) will yield even more spectacular results. Chilling the dough is a non-negotiable step for truly exceptional chocolate chip cookies. It allows the butter to re-solidify, which prevents the cookies from spreading too much in the oven, resulting in thicker, chewier cookies. More importantly, it gives the flavors a chance to meld and deepen, especially the vanilla and brown sugar notes, enhancing the overall complexity. Trust me, this waiting period is worth every second for the ultimate batch of Easter Chocolate Chip Cookies.
Baking Our Beautiful Easter Chocolate Chip Cookies
The moment of truth is finally here! After patiently chilling our dough, we’re ready to transform it into golden, chewy cookies that will fill your home with an irresistible aroma.
Preheating and Scooping
First things first, preheat your oven to 375°F (190°C). An accurately preheated oven is essential for consistent baking, so make sure it reaches the correct temperature before you put your cookies in. While the oven preheats, retrieve your chilled dough. Using a 1.5 to 2-tablespoon cookie scoop (or a well-rounded spoon), portion out the dough onto your prepared baking sheets, leaving about 2 inches of space between each cookie. This allows them room to spread without merging into one giant cookie blob. I often like to press a few extra chocolate chips or Easter M&M’s onto the tops of the scooped dough balls before baking; this makes for a more visually appealing cookie right out of the oven, showcasing those lovely melty bits.
The Baking Process
Bake one sheet at a time in the center rack of your preheated oven for 9 to 12 minutes. Baking one sheet at a time helps ensure even heat distribution and consistent results. The exact baking time can vary slightly depending on your oven, so keep a close eye on them. You’re looking for cookies that have lightly golden-brown edges but are still slightly pale and soft in the center. The residual heat from the baking sheet will continue to cook them slightly as they cool, leading to that perfect chewy texture. If you bake them until they are fully golden and firm in the oven, they might end up too crispy once cooled. Resist the urge to overbake! That slightly underbaked center is key to a truly chewy cookie.
Cooling for Perfection
Once your Easter Chocolate Chip Cookies emerge from the oven, allow them to cool on the baking sheets for about 5 minutes. This brief cooling period is crucial; it allows the cookies to set up and become firm enough to handle without falling apart. The edges will crisp up a little more, and the centers will continue to cook slightly, developing that ideal chewy texture. After 5 minutes, carefully transfer the cookies to a wire rack to cool completely. Cooling on a wire rack ensures air circulation all around the cookie, preventing the bottoms from becoming soggy and promoting an even cooling process. As hard as it is, letting them cool completely (or at least mostly) before diving in will give you the best texture and flavor experience. The chocolate will also set nicely, providing that satisfying snap.
Optional: Decorating for That Extra Easter Sparkle
While these Easter Chocolate Chip Cookies are absolutely divine on their own, the Easter season often calls for a little extra festivity! If you want to elevate their visual appeal and really lean into the holiday theme, here are a couple of fun ideas. Once your cookies have cooled completely, you can prepare a simple drizzle. Melt about 1/2 cup of white chocolate chips (or even pastel-colored candy melts) in a microwave-safe bowl in 30-second intervals, stirring until smooth. Transfer the melted chocolate to a small piping bag with the tip snipped off, or simply use a spoon. Drizzle the chocolate artfully back and forth over the cooled cookies. For an even more whimsical touch, immediately after drizzling, sprinkle a few extra pastel sprinkles or finely crushed Easter candies over the wet chocolate. This adds a beautiful pop of color and texture, making them undeniably perfect for your Easter celebration. Imagine a platter of these beautifully adorned cookies gracing your holiday table!
Tips for Perfect Easter Chocolate Chip Cookies Every Time
Achieving cookie perfection is a delightful journey, and with a few tried-and-true tips, your Easter Chocolate Chip Cookies will be the star of any gathering, not just for Easter! These nuggets of wisdom come from years of cookie-baking experience and will help troubleshoot common issues and elevate your baking game.
The Magic of Room Temperature Ingredients
I cannot stress this enough: always use room temperature butter and eggs. This isn’t just a suggestion; it’s a golden rule for most baking, especially cookies. Room temperature butter creams beautifully with sugar, incorporating air and creating a light, fluffy base. Cold butter won’t emulsify properly, leading to a denser, sometimes greasier, cookie. Similarly, room temperature eggs integrate smoothly into the mixture, creating a cohesive dough that bakes evenly. If your ingredients are at different temperatures, the mixture can curdle, affecting the final texture.
Understanding the “No Overmixing” Rule
Once you add the dry ingredients to the wet, mix only until just combined. The moment you see no more dry streaks of flour, stop mixing. Why is this so crucial? Flour contains gluten, and when gluten is overmixed, it develops too much, leading to tough, dense, and chewy-in-a-bad-way cookies. We want a tender chew, not a rubbery one! Gentle mixing ensures a soft, yielding texture in your final Easter Chocolate Chip Cookies. This applies when folding in chocolate chips and mix-ins too; handle the dough with care.
The Underrated Power of Chilling the Dough
I mentioned it in the recipe, but it bears repeating: chilling your cookie dough is a game-changer. While 30 minutes is the minimum, longer chills (2-24 hours) will truly transform your cookies. Chilling allows the butter to re-solidify, which means the cookies spread less in the oven, resulting in thicker, chewier centers. More importantly, it gives the flour time to fully hydrate, and the sugars and other flavors to meld and concentrate. This leads to a deeper, richer, and more complex flavor profile. You’ll notice a significant difference in taste and texture compared to unchilled dough. It’s the secret weapon for truly gourmet chocolate chip cookies.
Uniform Scooping for Even Baking
For consistent results and beautifully baked cookies, use a cookie scoop. A 1.5 to 2-tablespoon scoop is ideal for standard-sized cookies. Scooping uniform balls of dough ensures that all your cookies bake at the same rate. If you have some small and some large cookies on the same sheet, the smaller ones will be overbaked by the time the larger ones are done. This simple tool will make your baking process much smoother and your results much more predictable.
Consider Your Baking Sheets
The type of baking sheet you use can impact your cookies. Light-colored aluminum baking sheets are generally preferred as they reflect heat, preventing the bottoms of your cookies from browning too quickly or burning. Darker baking sheets absorb more heat and can lead to over-browning on the bottom. If you only have dark sheets, you might need to reduce your oven temperature by about 25°F (15°C) and keep a closer eye on baking time to prevent over-browning. Always line your sheets with parchment paper or silicone mats for easy release and consistent baking.
Storage and Make-Ahead Options
Your freshly baked Easter Chocolate Chip Cookies are best enjoyed within 3-4 days. Store them in an airtight container at room temperature to keep them soft and fresh. If you want to extend their freshness, place a slice of bread in the container with them; the cookies will absorb moisture from the bread, keeping them wonderfully soft. For make-ahead convenience, you can freeze unbaked cookie dough balls. Simply scoop the dough, place the balls on a parchment-lined baking sheet, and freeze until solid. Once frozen, transfer them to a freezer-safe bag or container for up to 3 months. When you’re ready to bake, you can bake them directly from frozen, adding a couple of minutes to the baking time.
Customizing Your Easter Chocolate Chip Cookies
Don’t be afraid to experiment! While semi-sweet and milk chocolate are classics, consider using dark chocolate chunks for a more intense flavor, or even a mix of white chocolate and macadamia nuts for a different twist. For Easter, think about adding lemon zest to the dough for a brighter flavor, or swapping out some of the chocolate for dried cranberries or candied orange peel. A pinch of cinnamon or nutmeg can also add a subtle warmth. The beauty of chocolate chip cookies is their versatility, allowing you to tailor them perfectly to your taste and the holiday spirit!
Conclusion:
Well, my fellow bakers and sweet-toothed enthusiasts, we’ve reached the end of our delightful journey, but the real adventure is just beginning in your own kitchen! I truly believe that the recipe we’ve explored for these magnificent Easter Chocolate Chip Cookies isn’t just another cookie recipe; it’s an invitation to create joy, to share warmth, and to infuse your holiday with an extra sprinkle of homemade love. This isn’t merely about combining flour, sugar, and chocolate; it’s about crafting a memory, a moment of pure, unadulterated happiness that will linger long after the last crumb has been savored.
Why are these cookies an absolute must-try? Let me count the ways! First, there’s that unparalleled texture – a beautifully golden, slightly crisp edge that gives way to a supremely soft, chewy interior, studded generously with melty pockets of rich chocolate. It’s a textural symphony in every single bite. Then, there’s the flavor profile; it’s a harmonious blend of classic comfort with just enough depth to make them utterly irresistible. The subtle warmth from a hint of vanilla perfectly complements the luxurious chocolate, ensuring each cookie is perfectly balanced and never overly sweet. And let’s be honest, in a world full of complex desserts, there’s something incredibly satisfying about a straightforward recipe that consistently delivers spectacular results. These cookies are foolproof, approachable for even novice bakers, and yet they yield a product that tastes like it came straight from a gourmet bakery. They embody everything a perfect chocolate chip cookie should be, amplified for the festive spirit of Easter.
Serving Suggestions to Elevate Your Cookie Experience
Once your kitchen is filled with that intoxicating aroma and your cooling racks are laden with these golden beauties, the real fun begins: enjoying them! Of course, a classic pairing with a tall, cold glass of milk is always a winner – it’s a timeless combination for a reason. But don’t stop there! Consider serving these delightful treats warm, fresh from the oven, alongside a scoop of premium vanilla bean ice cream for a truly decadent dessert. The contrast of the warm, chewy cookie and the cold, creamy ice cream is simply heavenly. They also make an excellent addition to any Easter brunch spread or dessert platter, offering a familiar comfort amidst other festive treats. For an adult indulgence, pair them with a robust cup of coffee or a delicate cup of herbal tea. And if you’re feeling extra generous, package a few cookies in a charming box or cellophane bag tied with a pretty ribbon; they make the most thoughtful and delicious homemade gift for neighbors, friends, or family who couldn’t be with you this Easter. Imagine the delight on their faces when they receive these incredible Easter Chocolate Chip Cookies!
Creative Variations to Make Them Uniquely Yours
Part of the joy of baking is making a recipe your own, and these cookies are wonderfully adaptable. Feel free to experiment with different types of chocolate chips – a mix of milk, dark, and white chocolate can add layers of flavor and visual appeal. For an extra festive touch, you could even mix in some mini chocolate eggs or pastel-colored sprinkles after the dough is mixed, just before baking. If you love a little crunch, finely chopped nuts like pecans or walnuts would be a fantastic addition. Or perhaps a hint of citrus zest, like orange or lemon, could brighten up the flavor profile beautifully. For a sophisticated twist, try adding a pinch of sea salt on top of each cookie before baking to enhance the chocolate’s richness. You could even turn these into sandwich cookies by spreading a dollop of your favorite buttercream frosting or cream cheese icing between two cooled cookies. Don’t be afraid to let your culinary imagination run wild; these cookies are a fantastic canvas for your creative impulses. They are robust enough to handle additions and changes, making them versatile beyond just the Easter season, though they truly shine during this time of year.
Your Turn: Bake, Share, and Inspire!
Now that you have all the tips, tricks, and inspiration you need, it’s time to preheat your oven! Don’t hesitate to embark on this delicious baking adventure. I promise you, the aroma filling your kitchen will be worth every moment, and the smiles on the faces of those who get to taste these incredible treats will be your ultimate reward. Baking is such a wonderfully communal activity; it brings people together, creates conversations, and builds cherished memories. So, gather your ingredients, enlist some eager helpers if you have them, and make a batch (or two!) of these delightful cookies. And once you’ve experienced the magic of these Easter Chocolate Chip Cookies for yourself, I would absolutely love to hear about it! Please come back and share your baking journey with me. Did you try any exciting variations? What was your favorite serving suggestion? Your feedback and shared experiences are what truly make this community special and inspire us all to keep baking. Happy baking, and happy Easter!

Easter Chocolate Chip Cookies
These delicious Easter Chocolate Chip Cookies infuse the classic recipe with festive charm, featuring soft, chewy centers, crisp edges, and generous melted chocolate pockets, all adorned with cheerful, spring-inspired sprinkles. A perfect holiday must-bake!
Ingredients
-
3 cups (360g) All-Purpose Flour
-
1 tsp Baking Soda
-
1 tsp Salt
-
1 cup (2 sticks / 226g) Unsalted Butter, softened
-
3/4 cup (150g) Granulated Sugar
-
1 1/4 cups (250g) Light Brown Sugar, packed
-
2 Large Eggs, room temperature
-
2 tsp Non-Alcoholic Vanilla Extract
-
1 1/2 cups (250g) Semi-Sweet Chocolate Chips
-
1/2 cup (85g) Milk Chocolate Chips
-
1/2 cup (90g) Optional Easter Mix-ins (e.g., pastel M&M’s, white chocolate chips, chopped Cadbury Mini Eggs, festive sprinkles)
Instructions
-
Step 1
Whisk together flour, baking soda, and salt in a medium bowl. Line two large baking sheets with parchment paper or silicone baking mats. -
Step 2
In a large mixing bowl, cream softened unsalted butter with granulated sugar and packed light brown sugar on medium speed for 2-3 minutes until light and fluffy. -
Step 3
Add eggs one at a time, beating well after each. Stir in non-alcoholic vanilla extract and beat for another minute until the mixture is cohesive. -
Step 4
Gradually add the flour mixture to the wet ingredients, mixing on low speed until just combined. Avoid overmixing; stop once no dry streaks of flour remain. -
Step 5
Gently fold in semi-sweet chocolate chips, milk chocolate chips, and any optional Easter mix-ins until evenly distributed throughout the dough. -
Step 6
Cover the dough tightly with plastic wrap and refrigerate for at least 30 minutes, ideally 2-3 hours, or even overnight for best results. -
Step 7
Preheat oven to 375°F (190°C). Use a 1.5 to 2-tablespoon cookie scoop to portion dough onto prepared baking sheets, leaving about 2 inches between cookies. Optionally, press extra chocolate chips or Easter M&M’s onto the tops. -
Step 8
Bake one sheet at a time in the center rack for 9 to 12 minutes, until edges are lightly golden-brown but centers are still slightly pale and soft. Do not overbake. -
Step 9
Allow cookies to cool on the baking sheets for about 5 minutes, then transfer them to a wire rack to cool completely. Serve slightly warm for maximum gooey chocolate. -
Step 10
Once cooled, melt 1/2 cup white chocolate chips (or pastel candy melts). Drizzle over cookies and immediately sprinkle with extra pastel sprinkles or crushed Easter candies.
Important Information
Nutrition Facts (Per Serving)
It is important to consider this information as approximate and not to use it as definitive health advice.
Allergy Information
Please check ingredients for potential allergens and consult a health professional if in doubt.
Leave a Comment