

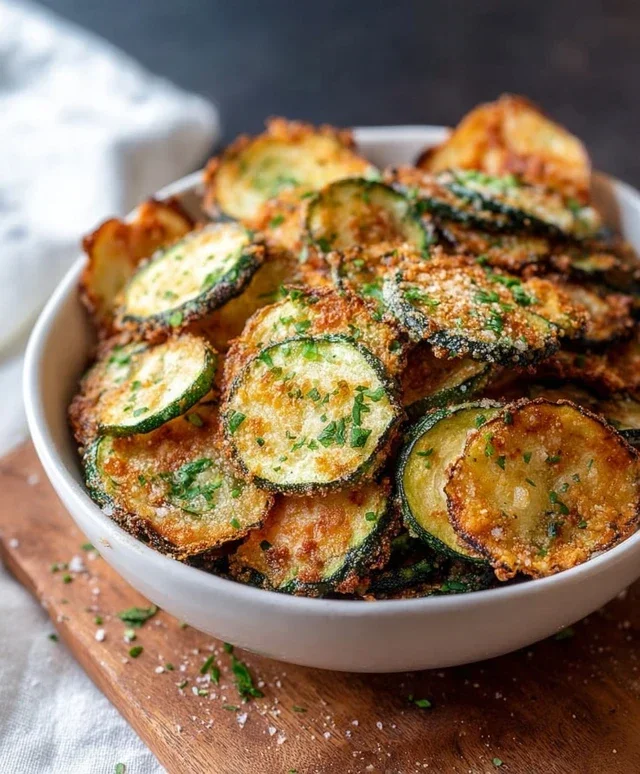
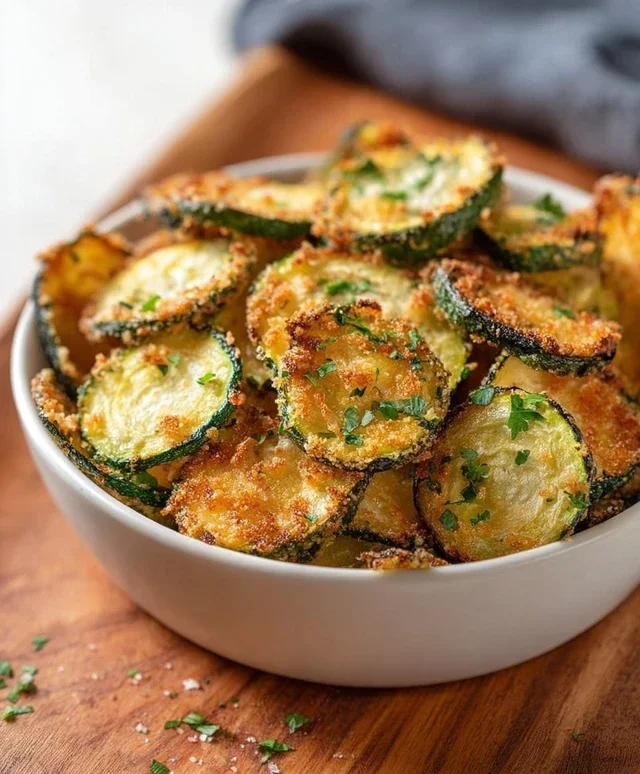
Crispy zucchini chips are the snack you didn’t know you were craving, and trust me, once you try them, you’ll wonder how you ever lived without them! We all have those moments when a craving for something satisfying and a little bit crunchy hits, and reaching for a bag of potato chips can feel like a guilty pleasure. But what if I told you there’s a way to get that incredibly satisfying crunch, bursting with fresh flavor, using one of summer’s most abundant vegetables? That’s the magic of these crispy zucchini chips. They transform humble zucchini into a delightful, guilt-free treat that’s surprisingly simple to make. What makes these so special? It’s the perfect balance of tender zucchini interior and that addictively brittle, golden-brown exterior. They’re incredibly versatile too – perfect for dipping, snacking on their own, or even as a unique side dish. Get ready to fall in love with your garden’s bounty in a whole new way!

Crispy Zucchini Chips
Looking for a healthy and delicious way to enjoy zucchini? These Crispy Zucchini Chips are the answer! They’re a fantastic alternative to fried snacks, offering a satisfying crunch without the guilt. Perfect for a light appetizer, a healthy side dish, or even a fun snack for kids, these chips are incredibly easy to make and incredibly addictive. You’ll be surprised at how quickly a couple of zucchinis can transform into a tray full of golden, flavorful goodness. The key to achieving that perfect crispiness lies in a few simple techniques that I’ll walk you through. Get ready to impress yourself and your loved ones with this simple yet delightful recipe.
Ingredients:
Preparing Your Zucchini
The first step to achieving perfectly crispy zucchini chips is proper preparation of the star ingredient. You want to start with fresh, firm zucchinis. Give them a good wash under cool water and pat them thoroughly dry. This is a crucial step, as any excess moisture will prevent the chips from crisping up properly. Next, we need to slice the zucchinis. The ideal thickness for these chips is about 1/8 inch. You can achieve this using a sharp knife and a steady hand, or for perfectly uniform slices, a mandoline slicer is your best friend. Be very careful when using a mandoline, as they are extremely sharp. If you’re using a mandoline, set it to the thinnest setting you’re comfortable with. If you prefer not to use a mandoline, aim for slices that are as thin and consistent as possible with your knife. Thicker slices will take longer to crisp and may not achieve the desired texture. Once sliced, lay the zucchini rounds out on a clean kitchen towel or paper towels. Gently press down with another towel to absorb any remaining surface moisture. This might seem tedious, but trust me, this step makes a world of difference in achieving that delightful crisp!
Seasoning for Flavor
Now that our zucchini is prepped and ready, it’s time to infuse it with flavor. In a small bowl, combine the olive oil, sea salt, garlic powder, smoked paprika, and black pepper. Stir everything together until well incorporated. You can adjust the seasonings to your preference. If you love a little heat, add a pinch of cayenne pepper. If you’re a fan of herbs, a sprinkle of dried Italian seasoning would be lovely. If you’re using grated parmesan, you’ll want to add that in the next step. The olive oil acts as a binder for the spices and helps them adhere to the zucchini slices, ensuring an even distribution of flavor and aiding in the browning process.
Coating the Zucchini Slices
This is where the magic starts to happen. Take your prepared zucchini slices and gently toss them in the seasoned olive oil mixture. You can do this in the bowl with the oil, or for a less messy approach, place the zucchini slices in a large resealable bag with the oil and spices and gently shake until each slice is lightly coated. Make sure each slice is evenly covered with the oil and spice mixture. Don’t overcrowd the bowl or bag, as this can lead to uneven coating and steaming instead of crisping. If you’re adding parmesan cheese, now is the time to sprinkle it over the coated zucchini slices and gently toss again to distribute. The parmesan will melt and crisp up beautifully in the oven, adding a wonderful savory note.
Baking to Crispy Perfection
Preheat your oven to 400°F (200°C). Line one or two baking sheets with parchment paper. Parchment paper is essential here as it prevents sticking and makes cleanup a breeze. Arrange the seasoned zucchini slices on the prepared baking sheets in a single layer. Crucially, do not overlap the slices. Overlapping will cause them to steam rather than bake, and we’re aiming for that satisfying crunch. If your baking sheet is too crowded, use a second baking sheet. This ensures that each chip gets direct exposure to the hot air in the oven, promoting even browning and crisping.
Now, it’s time to bake! Place the baking sheets in the preheated oven. The baking time will vary depending on your oven and the thickness of your zucchini slices, but generally, it will take about 15-20 minutes. After about 10 minutes, carefully flip each zucchini chip using a spatula or tongs. This is important for ensuring both sides get evenly golden and crispy. Continue baking for another 5-10 minutes, or until the edges are nicely browned and the chips are firm and crisp to the touch. Keep a close eye on them during the last few minutes, as they can go from perfectly crispy to burnt very quickly.
Cooling and Enjoying
Once your zucchini chips are perfectly baked, remove them from the oven. Let them cool on the baking sheets for a few minutes. As they cool, they will continue to crisp up. Once they are cool enough to handle, you can transfer them to a wire rack to cool completely. This allows air to circulate around them, further enhancing their crispiness. Serve them immediately for the best texture. They are absolutely delicious on their own, or you can serve them with your favorite dips like ranch, hummus, or a spicy aioli. Store any leftovers in an airtight container at room temperature for a day or two, though they are best enjoyed fresh. I guarantee you’ll be making these again and again!
Conclusion:
I hope you’ve enjoyed learning how to make these incredibly delicious and satisfying crispy zucchini chips! This recipe is truly a gem because it transforms humble zucchini into a light, crunchy, and flavorful snack that’s surprisingly easy to achieve. It’s a fantastic way to get your greens in without feeling like you’re just eating vegetables, and they’re perfect for satisfying those crunchy cravings. Whether you’re looking for a healthy appetizer, a movie night treat, or a delightful side dish, these crispy zucchini chips deliver every time. I encourage you to give them a try – you might just surprise yourself with how addictive they are!
When it comes to serving, these chips are incredibly versatile. They are fantastic on their own, but also make a wonderful accompaniment to dips like hummus, ranch, or a spicy aioli. Consider them as a unique topping for salads or even as a breadcrum extractb alternative on baked chicken or fish. For variations, don’t be afraid to experiment with your seasonings! Smoked paprika, garlic powder, onion powder, or even a sprinkle of cayenne pepper can add a whole new dimension of flavor. You can also try adding a touch of nutritional yeast for a cheesy, umami kick.
Frequently Asked Questions:
Can I make these in an air fryer?
Absolutely! Air frying is an excellent method for achieving super crispy zucchini chips. You’ll want to preheat your air fryer and cook them in a single layer at around 375°F (190°C) for 8-12 minutes, flipping halfway through, until golden and crisp. Keep an eye on them to prevent burning.
How do I prevent my zucchini chips from becoming soggy?
The key to achieving perfectly crispy zucchini chips is to remove as much moisture as possible. After slicing, generously salt the zucchini and let it sit in a colander for at least 30 minutes to draw out excess water. Pat them thoroughly dry with paper towels before seasoning and baking or air frying. Ensuring they are in a single layer on your baking sheet also helps with even crisping.
Crispy Zucchini Chips
Thinly sliced zucchini baked until perfectly crispy, seasoned with a savory blend of spices and finished with parmesan.
Ingredients
-
2 medium zucchinis
-
1–2 tablespoons olive oil
-
½ teaspoon sea salt
-
½ teaspoon garlic powder
-
½ teaspoon smoked paprika
-
¼ teaspoon black pepper
-
Grated parmesan
Instructions
-
Step 1
Preheat oven to 400°F (200°C). -
Step 2
Thinly slice the zucchinis into rounds, about 1/8 inch thick. A mandoline slicer is recommended for uniformity. -
Step 3
Pat the zucchini slices thoroughly dry with paper towels. This is crucial for crispiness. -
Step 4
In a bowl, toss the dried zucchini slices with olive oil, sea salt, garlic powder, smoked paprika, and black pepper until evenly coated. -
Step 5
Arrange the seasoned zucchini slices in a single layer on baking sheets lined with parchment paper. Do not overcrowd. -
Step 6
Bake for 15-20 minutes, flipping halfway through, until golden brown and crispy. -
Step 7
Sprinkle with grated parmesan immediately after removing from the oven. Serve warm.
Important Information
Nutrition Facts (Per Serving)
It is important to consider this information as approximate and not to use it as definitive health advice.
Allergy Information
Please check ingredients for potential allergens and consult a health professional if in doubt.


Leave a Comment