

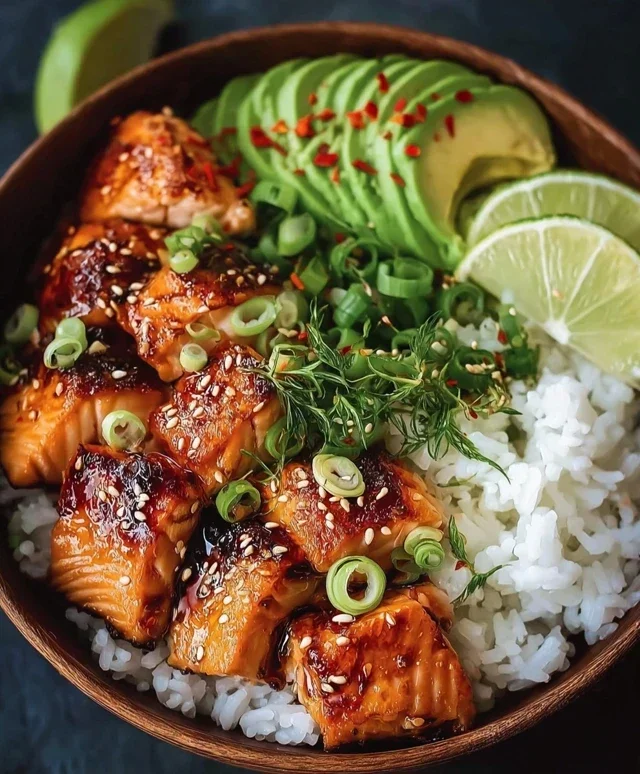
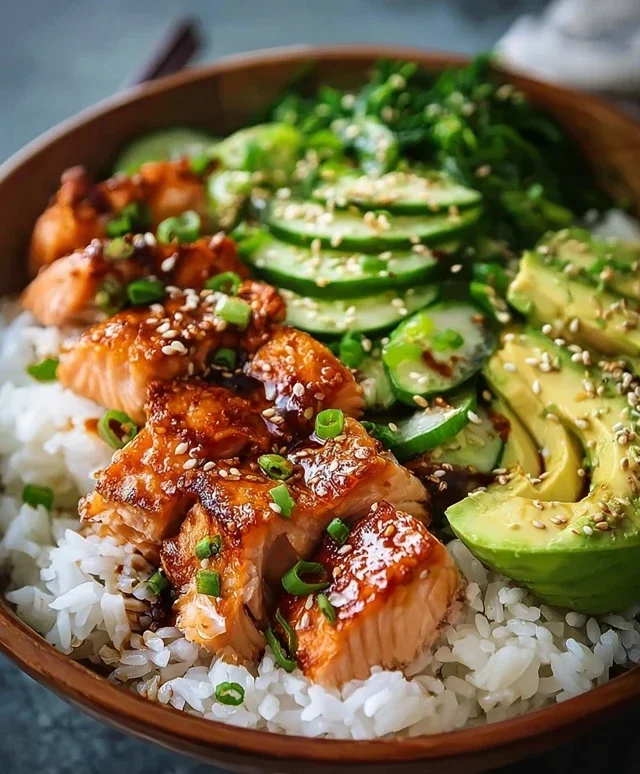
Salmon Crispy Rice. It’s the dish that has taken the culinary world by storm, and for good reason! Imagin extracte this: delicate, flaky salmon perched atop a golden, crackling bed of perfectly seasoned rice. It’s a textural masterpiece, a symphony of contrasts that dances on your palate. The sheer joy of that satisfying crunch, followed by the melt-in-your-mouth richness of the salmon, is simply irresistible. This isn’t just a meal; it’s an experience. Whether you’re a seasoned home cook looking for a showstopper or a begin extractner seeking an impressive yet achievable recipe, Salmon Crispy Rice delivers. What makes it so special? It’s the harmonious blend of simplicity and sophistication, the way humble ingredients transform into something truly extraordinary. Get ready to fall in love with the magic of Salmon Crispy Rice!

Salmon Crispy Rice
Get ready to embark on a culinary adventure that’s equal parts sophisticated and utterly addictive. Salmon Crispy Rice is a dish that’s taken the food world by storm, and for good reason. It’s a delightful interplay of textures and flavors: the satisfying crunch of perfectly fried rice, the rich, melt-in-your-mouth goodness of seasoned salmon, and a creamy, spicy sauce that ties it all together. This recipe is surprisingly approachable, making it a fantastic option for a weeknight treat or an impressive appetizer to share with friends. I love how the simplicity of the ingredients allows the quality of the salmon and the satisfying crispiness of the rice to shine. Let’s dive in!
Ingredients:
Preparing the Rice Base
The foundation of this dish is the crispy rice, and getting it just right starts with properly preparing your cooked sushi rice. While any cooked short-grain rice will work, sushi rice has the perfect sticky texture to hold its shape when fried.
Cooking the Salmon
The salmon is the star of the show, so we want to cook it to perfection. A quick sear locks in its moisture and creates beautiful little crispy edges.
Making the Spicy Mayo
This creamy, zesty sauce is the perfect counterpoint to the rich salmon and crispy rice. It’s incredibly easy to whip up and adds a huge punch of flavor.
Assembling and Serving
The final steps bring everything together for a visually stunning and incredibly delicious result.
Detailed Step-by-Step Instructions:
1. Prepare the Crispy Rice Cakes: In a medium bowl, gently combine the cooked sushi rice with the rice vinegar, sugar, and salt. Mix until everything is evenly distributed. You want to be careful not to mash the rice too much; we want to preserve some of its structure. Spread this seasoned rice mixture onto a baking sheet lined with parchment paper. Press it down firmly and evenly into a layer about ½ inch thick. This is important for creating uniform rice cakes. Once pressed, cover the baking sheet with plastic wrap and refrigerate for at least 30 minutes, or ideally for an hour. This chilling step is crucial; it firms up the rice, making it much easier to cut and fry without it falling apart. After chilling, use a sharp knife or a cookie cutter to cut the rice into your desired shapes. Squares or rectangles are common and work beautifully, but feel free to get creative!
2. Fry the Rice Cakes: Heat about ½ to 1 inch of vegetable oil in a large, heavy-bottomed skillet or Dutch oven over medium-high heat until it reaches around 350°F (175°C). You can test if the oil is hot enough by dropping a tiny piece of rice in; it should sizzle immediately. Carefully add the cut rice cakes to the hot oil, working in batches to avoid overcrowding the pan. Overcrowding will lower the oil temperature and result in soggy rice. Fry each side for about 3-5 minutes, or until they are golden brown and beautifully crispy. Use a slotted spoon or spider strainer to carefully remove the fried rice cakes from the oil and place them on a wire rack set over a paper towel-lined baking sheet to drain any excess oil. This will help them stay wonderfully crisp.
3. Sear the Salmon: While the rice cakes are frying or draining, pat the chopped sushi-grade salmon pieces very dry with paper towels. This is essential for achieving a good sear. Season the salmon pieces lightly with salt and pepper. Heat 1-2 tablespoons of vegetable oil in a separate non-stick skillet over medium-high heat until it shimmers. Add the salmon pieces in a single layer, making sure not to overcrowd the pan. Sear for about 1-2 minutes per side, just until the outside is golden and slightly crispy, and the inside is still mostly raw or very lightly cooked. We’re aiming for a beautiful sear, not to fully cook the salmon through at this stage; it will warm up as it’s placed on the crispy rice. Remove the seared salmon from the pan and set aside.
4. Prepare the Spicy Mayo Sauce: In a small bowl, whisk together the Kewpie mayonnaise, sriracha, soy sauce, and sesame oil. Kewpie mayonnaise is richer and creamier than regular mayonnaise, so if you don’t have it, you can use regular mayonnaise and perhaps add a tiny splash more sesame oil for depth. Taste the sauce and adjust the sriracha or soy sauce to your preference. You can make this sauce ahead of time and store it in the refrigerator. If it thickens too much, you can thin it out with a tiny bit more sesame oil or a drop of water.
5. Assemble and Garnish: Arrange the crispy rice cakes on a serving platter. Spoon a generous amount of the seared salmon pieces onto each rice cake. Drizzle a good amount of the spicy mayo sauce over the salmon. Garnish with thinly sliced scallions, sliced avocado, and thinly sliced jalapeños for a pop of freshness and a touch of heat. Finally, sprinkle with toasted black and white sesame seeds for an extra layer of nutty flavor and visual appeal. Serve immediately and enjoy the incredible symphony of textures and tastes!
Conclusion:
I hope you’re as excited to try this Crispy Rice Salmon recipe as I am to share it with you! This dish truly hits all the right notes – it’s incredibly satisfying with the textural contrast of the perfectly fried rice cakes and the flaky, flavorful salmon. It feels elegant enough for a special occasion but is surprisingly straightforward to prepare for a weeknight treat. The combination of the umami-rich salmon, the crispy, savory rice, and the bright, fresh toppings is simply divine. I find it’s a fantastic way to elevate your salmon dinner and add a touch of something special to your meal.
For serving, I love to pair it with a simple side of steamed or blanched greens like asparagus or bok choy. A light, gin extractger-sesame dressing for the greens complements the flavors beautifully. For variations, feel free to experiment with different types of fish like tuna or even cooked shrimp. You could also swap the salmon for a vegetarian option like seasoned tofu or mushrooms. Don’t be afraid to get creative with your toppings too – pickled red onions, slivers of avocado, or a sprinkle of toasted sesame seeds all add wonderful dimensions. I genuinely encourage you to give this Crispy Rice Salmon a go; you won’t be disappointed!
Frequently Asked Questions:
Can I make the crispy rice ahead of time?
Yes, you can! You can prepare the crispy rice cakes a few hours in advance and store them in the refrigerator. When you’re ready to cook, pan-fry them directly from the fridge. This can save you a bit of time when you’re assembling the dish.
What kind of salmon is best for this recipe?
I find that a good quality salmon fillet with the skin on works wonderfully, as the skin can help keep the fish moist while cooking. However, skinless salmon will also yield delicious results. Aim for a thickness of about 1-inch for even cooking.
Is it possible to bake the salmon instead of pan-searing it?
Absolutely! While pan-searing gives the salmon a lovely crust, baking is a great alternative, especially if you prefer a less hands-on approach. Simply bake the salmon fillets at around 400°F (200°C) for 12-15 minutes, or until cooked through and flaky. The crispy rice component will still be pan-fried as described in the recipe.
Salmon Crispy Rice
A delightful appetizer featuring pan-fried crispy sushi rice topped with spicy salmon mixture and fresh garnishes.
Ingredients
-
3 cups cooked sushi rice (short-grain rice)
-
2 tablespoons rice vinegar
-
1 tablespoon sugar
-
1 teaspoon salt
-
Vegetable oil for frying
-
1 pound sushi-grade salmon, chopped
-
4 tablespoons Kewpie mayonnaise
-
2 tablespoons sriracha
-
2 tablespoons scallions, thinly sliced
-
2 teaspoons soy sauce
-
2 tablespoons sliced avocado
-
1 tablespoon jalapeño, thinly sliced
-
1 teaspoon black and white sesame seeds, toasted
Instructions
-
Step 1
In a bowl, combine cooked sushi rice, rice vinegar, sugar, and salt. Mix gently until well combined. Press the rice mixture into a shallow baking dish lined with plastic wrap, about 1/2 inch thick. Refrigerate for at least 1 hour, or until firm. -
Step 2
Cut the firm rice into bite-sized squares or rectangles. Heat vegetable oil in a large skillet over medium-high heat. Carefully place the rice pieces into the hot oil and fry for 3-4 minutes per side, until golden brown and crispy. Remove from skillet and drain on paper towels. -
Step 3
In a separate bowl, combine the chopped sushi-grade salmon, Kewpie mayonnaise, sriracha, thinly sliced scallions, soy sauce, and sesame oil. Mix until well combined. -
Step 4
To assemble, place a generous spoonful of the salmon mixture onto each piece of crispy rice. -
Step 5
Garnish each piece with sliced avocado, thinly sliced jalapeño, and toasted black and white sesame seeds.
Important Information
Nutrition Facts (Per Serving)
It is important to consider this information as approximate and not to use it as definitive health advice.
Allergy Information
Please check ingredients for potential allergens and consult a health professional if in doubt.


Leave a Comment