

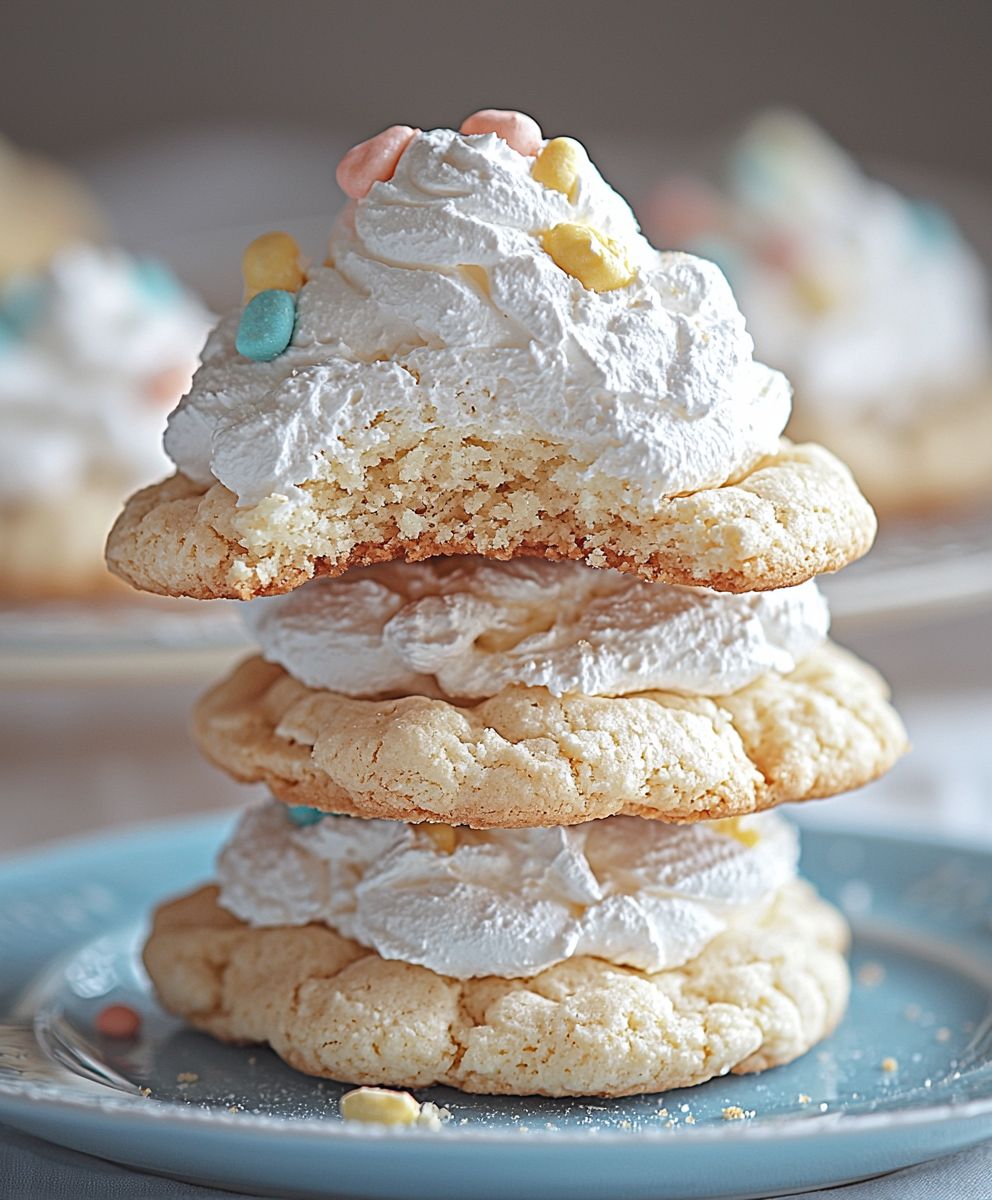
Cool Whip Cookies: Prepare to unlock a world of melt-in-your-mouth deliciousness with a recipe so simple, it practically bakes itself! Forget complicated ingredients and hours spent in the kitchen. These cookies are a delightful shortcut to homemade goodness, perfect for busy weeknights, impromptu gatherings, or simply satisfying a sweet craving.
While the exact origins of using Cool Whip in baking are a bit hazy, its popularity soared in the mid-20th century as a convenient and versatile ingredient. It offered a creamy texture and subtle sweetness that home bakers quickly embraced. Think of it as a modern twist on traditional baking, where convenience meets classic flavor.
What makes Cool Whip Cookies so irresistible? It’s the unique combination of a soft, almost cake-like texture and a delicate sweetness that isn’t overpowering. They’re incredibly easy to customize with your favorite mix-ins, from chocolate chips and sprinkles to nuts and dried fruit. Plus, the recipe is so foolproof, even novice bakers can achieve perfect results every time. Get ready to experience cookie bliss with minimal effort!

Ingredients:
- 1 box (15.25 ounces) yellow cake mix
- 1 container (8 ounces) Cool Whip, thawed
- 1 large egg
- Powdered sugar, for dusting
- Optional: Sprinkles, for decorating
Preparing the Dough:
- First, grab a large mixing bowl. This will give you plenty of room to work without making a mess. Trust me, you’ll appreciate the extra space!
- Pour the entire box of yellow cake mix into the bowl. Don’t sift it or anything fancy; just dump it right in. We’re going for easy here!
- Now, add the thawed Cool Whip to the bowl. Make sure it’s completely thawed, or it won’t mix in properly. You want that light and fluffy texture to be evenly distributed throughout the dough.
- Crack the large egg into the bowl. The egg helps bind everything together and adds a little richness to the cookies.
- Time to mix! You can use an electric mixer (handheld or stand mixer) or a sturdy spoon. If using an electric mixer, start on low speed to avoid a cloud of cake mix. Gradually increase the speed until everything is well combined. If using a spoon, get ready for a little arm workout! Stir until the dough is smooth and there are no streaks of Cool Whip or egg. The dough will be quite thick and sticky, which is exactly what we want.
- Once the dough is mixed, cover the bowl with plastic wrap and refrigerate for at least 1 hour. This is a crucial step! Chilling the dough makes it much easier to handle and prevents the cookies from spreading too thin while baking. You can even chill it overnight if you want to get a head start.
Baking the Cookies:
- Preheat your oven to 350°F (175°C). Make sure your oven rack is in the center position for even baking.
- While the oven is preheating, line a baking sheet with parchment paper. Parchment paper prevents the cookies from sticking and makes cleanup a breeze. If you don’t have parchment paper, you can lightly grease the baking sheet instead.
- Remove the chilled dough from the refrigerator. It should be much firmer now.
- Grab a small bowl and fill it with powdered sugar. This is what we’ll use to coat the cookies before baking, which gives them a lovely sweet crust.
- Using a spoon or a small cookie scoop, scoop out balls of dough about 1 inch in diameter. The size doesn’t have to be exact, but try to keep them relatively uniform so they bake evenly.
- Roll each ball of dough in the powdered sugar, making sure it’s completely coated. This can get a little messy, but it’s worth it! The powdered sugar creates a beautiful, slightly crackled surface on the baked cookies.
- Place the coated dough balls onto the prepared baking sheet, leaving about 2 inches of space between each cookie. This allows them to spread out a bit without sticking together.
- If you’re feeling festive, now’s the time to add sprinkles! Gently press a few sprinkles onto the top of each cookie.
- Bake for 10-12 minutes, or until the edges are lightly golden brown. Keep a close eye on them, as they can burn easily. The cookies will still be soft in the center, but they will firm up as they cool.
- Remove the baking sheet from the oven and let the cookies cool on the baking sheet for a few minutes before transferring them to a wire rack to cool completely. This prevents them from breaking apart while they’re still warm and soft.
Tips and Variations:
- Flavor Variations: Get creative with different cake mix flavors! Chocolate, strawberry, lemon, or even spice cake mix would all work beautifully. Just make sure to adjust the baking time slightly if needed, as different cake mixes may bake at slightly different rates.
- Add-Ins: Feel free to add other ingredients to the dough, such as chocolate chips, chopped nuts, dried fruit, or even a swirl of peanut butter. Just be careful not to add too much, or the cookies may become too dense.
- Frosting: While these cookies are delicious on their own, you can also frost them with your favorite frosting. A simple vanilla buttercream or a cream cheese frosting would be perfect.
- Storage: Store the cooled cookies in an airtight container at room temperature for up to 3 days. They’re best enjoyed fresh, but they’ll still be delicious after a few days.
- Freezing: You can also freeze the baked cookies for longer storage. Simply place them in a freezer-safe container or bag and freeze for up to 2 months. Thaw them at room temperature before serving.
- Preventing Spreading: If your cookies are spreading too much, try chilling the dough for a longer period of time. You can also add a tablespoon or two of flour to the dough to help thicken it up.
- Powdered Sugar Coating: For a thicker powdered sugar coating, you can double-dip the cookies in the powdered sugar. Just make sure to tap off any excess sugar before baking.
- Using Different Cool Whip Flavors: Cool Whip comes in different flavors now! Using a flavored Cool Whip can add another layer of flavor to your cookies.
Troubleshooting:
- Cookies are too flat: This usually means the dough wasn’t chilled long enough. Make sure to chill the dough for at least 1 hour, or even overnight. You can also try adding a tablespoon or two of flour to the dough.
- Cookies are too dry: This could be due to overbaking. Make sure to bake the cookies for only 10-12 minutes, or until the edges are lightly golden brown. The centers should still be soft.
- Cookies are too sticky: This could be due to using too much Cool Whip. Make sure to use only 8 ounces of Cool Whip for the recipe.
- Cookies are burning on the bottom: This could be due to your oven running too hot. Try lowering the oven temperature by 25 degrees and baking for a slightly longer time. You can also try using a double baking sheet to insulate the cookies from the heat.
- Dough is too sticky to handle: Don’t worry! That’s normal. Just make sure to coat your hands and the dough in powdered sugar before rolling the cookies.
Serving Suggestions:
- Serve these cookies with a glass of cold milk or a cup of hot coffee.
- Pack them in lunchboxes for a sweet treat.
- Bring them to a potluck or party.
- Give them as a homemade gift.
- Enjoy them as a simple and satisfying dessert any time of day!
Enjoy your delicious Cool Whip Cookies! They’re so easy to make and always a crowd-pleaser.
Conclusion:
So, there you have it! These Cool Whip Cookies are truly a must-try for anyone looking for a simple, delicious, and surprisingly versatile treat. I know, I know, it sounds almost too good to be true, but trust me, the magic is in the simplicity. The combination of the Cool Whip, cake mix, and egg creates a texture that’s both soft and chewy, with a subtle sweetness that isn’t overpowering. They’re the perfect little bite of happiness to brighten any day.
But why are they a must-try, you ask? Well, beyond the ease of preparation (seriously, even the most novice baker can nail this!), these cookies are incredibly adaptable. Theyre perfect for those moments when you need a quick dessert for unexpected guests, a fun baking project with the kids, or simply a little something sweet to satisfy your own cravings. Plus, the clean-up is a breeze! Who doesn’t love a recipe that minimizes dish duty?
Serving Suggestions and Variations:
The possibilities are truly endless when it comes to enjoying these delightful cookies. For a classic touch, serve them warm with a cold glass of milk. They’re also fantastic alongside a scoop of your favorite ice cream vanilla bean or chocolate would be divine! If you’re feeling a bit more adventurous, try crumbling them over a bowl of yogurt or using them as a base for mini ice cream sandwiches.
And speaking of adventurous, let’s talk variations! This is where the real fun begins. Feel free to experiment with different cake mix flavors. Chocolate cake mix with chocolate chips? Yes, please! Strawberry cake mix with white chocolate chips? Absolutely! Lemon cake mix with a sprinkle of poppy seeds? The sky’s the limit!
You can also customize the mix-ins to your heart’s content. Add chopped nuts, dried fruit, sprinkles, or even a swirl of peanut butter for an extra layer of flavor and texture. For a festive touch, use holiday-themed sprinkles or food coloring to match the occasion. Imagine red and green Cool Whip Cookies for Christmas, or pastel-colored ones for Easter!
Another fun variation is to add a glaze. A simple powdered sugar glaze with a touch of vanilla extract or lemon juice would be the perfect finishing touch. Or, for a richer treat, try dipping them in melted chocolate and sprinkling with sea salt.
These Cool Whip Cookies are also fantastic for gifting. Package them in a cute tin or cellophane bag and tie with a ribbon for a thoughtful and homemade present. They’re sure to be a hit with friends, family, and neighbors!
I truly believe that this recipe is a winner, and I can’t wait for you to try it! It’s a guaranteed crowd-pleaser that’s both easy to make and incredibly delicious.
So, what are you waiting for? Get in the kitchen, gather your ingredients, and whip up a batch of these amazing cookies today! I promise you won’t be disappointed.
And most importantly, I want to hear about your experience! Did you try a different cake mix flavor? Did you add any fun mix-ins? Did you come up with a creative serving suggestion? Share your photos and stories in the comments below! I’m always looking for new and exciting ways to enjoy these cookies, and I can’t wait to see what you come up with. Happy baking!
Cool Whip Cookies: The Easiest & Most Delicious Recipe
Easy and delicious Cool Whip Cookies! These simple cookies require only a few ingredients and are perfect for a quick treat.
Ingredients
- 1 box (15.25 ounces) yellow cake mix
- 1 container (8 ounces) Cool Whip, thawed
- 1 large egg
- Powdered sugar, for dusting
- Optional: Sprinkles, for decorating
Instructions
- In a large mixing bowl, combine the yellow cake mix, thawed Cool Whip, and egg.
- Mix until well combined, using an electric mixer or a spoon. The dough will be thick and sticky.
- Cover the bowl with plastic wrap and refrigerate for at least 1 hour (or overnight).
- Preheat oven to 350°F (175°C). Line a baking sheet with parchment paper.
- Remove the chilled dough from the refrigerator.
- Place powdered sugar in a small bowl.
- Scoop out balls of dough (about 1 inch in diameter) and roll each ball in powdered sugar, coating completely.
- Place the coated dough balls onto the prepared baking sheet, leaving about 2 inches of space between each cookie.
- If desired, gently press sprinkles onto the top of each cookie.
- Bake for 10-12 minutes, or until the edges are lightly golden brown.
- Let the cookies cool on the baking sheet for a few minutes before transferring them to a wire rack to cool completely.
Notes
- Flavor Variations: Try different cake mix flavors like chocolate, strawberry, or lemon.
- Add-Ins: Add chocolate chips, chopped nuts, or dried fruit to the dough.
- Frosting: Frost with vanilla buttercream or cream cheese frosting.
- Storage: Store cooled cookies in an airtight container at room temperature for up to 3 days.
- Freezing: Freeze baked cookies in a freezer-safe container for up to 2 months. Thaw at room temperature before serving.
- Preventing Spreading: Chill the dough longer or add a tablespoon or two of flour.
- Powdered Sugar Coating: Double-dip for a thicker coating.
- Cool Whip Flavors: Use flavored Cool Whip for extra flavor.


Leave a Comment