

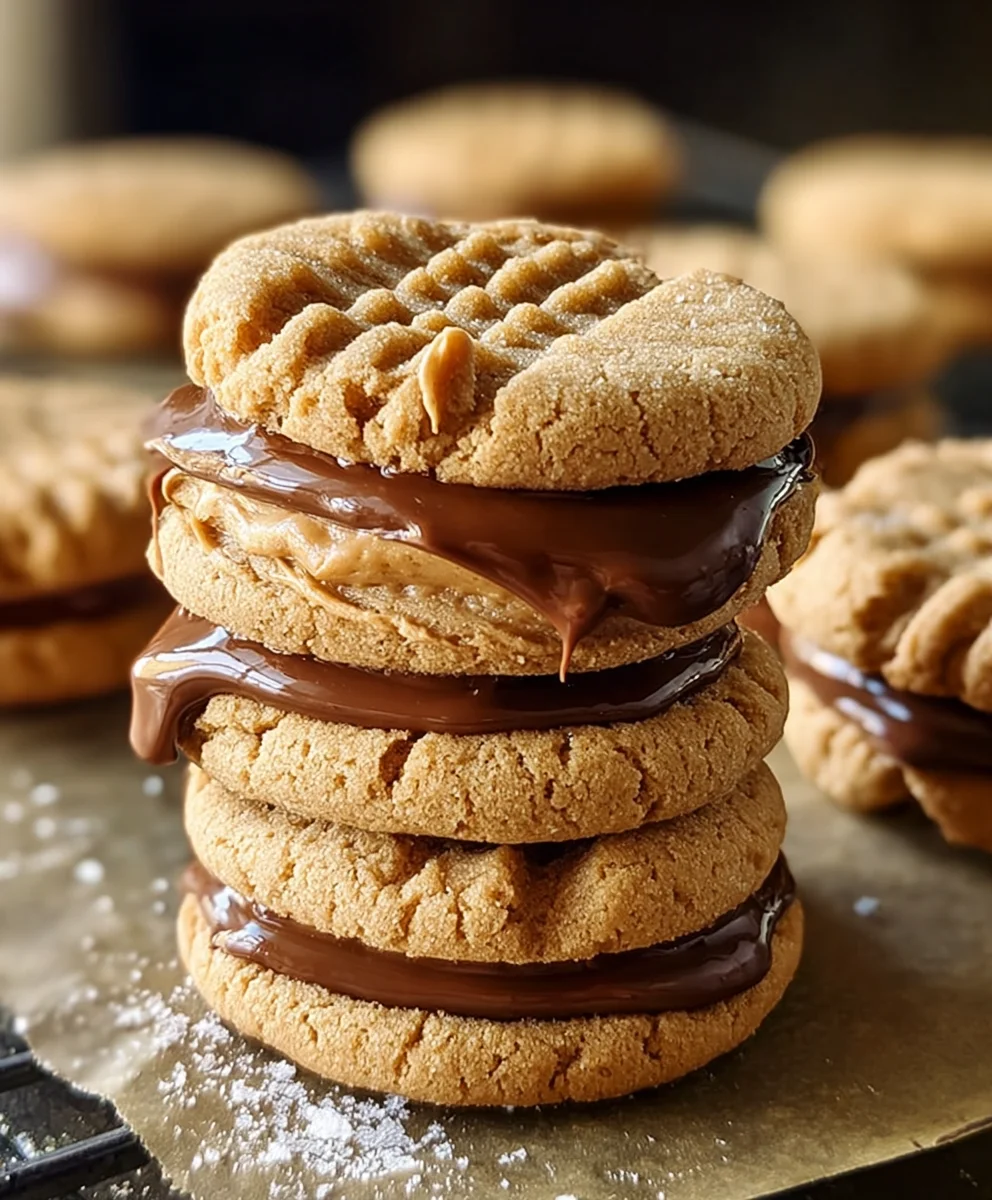
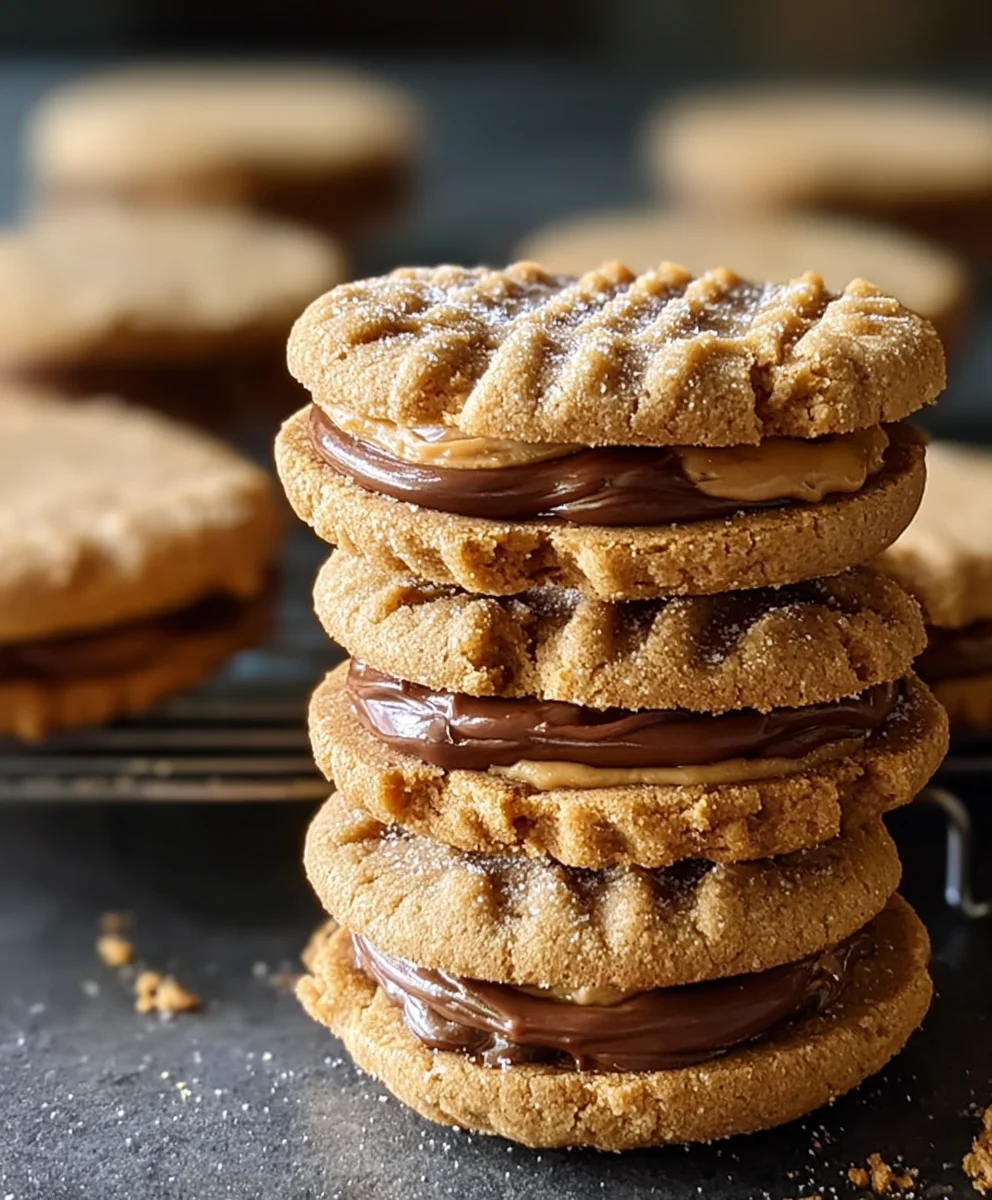
Peanut Butter Sandwich Cookies – there’s something truly magical, almost irresistible, about these delightful treats. Imagine sinking your teeth into a soft, chewy, perfectly baked peanut butter cookie, only to discover it’s lovingly paired with another, holding a luscious, creamy peanut butter filling between them. It’s not just a cookie; it’s a double dose of pure, unadulterated joy that promises to transport you straight back to cherished childhood memories.
While the humble peanut butter cookie has been a staple in American homes since the early 20th century, often marked with that iconic fork-tine pattern, the sandwich variation elevates this classic to new heights. It represents an evolution, adding an extra layer of indulgence and craftsmanship that speaks to a love for all things comforting and homemade. These aren’t just any cookies; they are an ode to the enduring appeal of a beloved flavor.
Why are these Peanut Butter Sandwich Cookies so universally adored?
People fall in love with them for their perfect symphony of flavors – that delightful balance of sweet and salty, rich and nutty. The texture contrast is simply divine: a slightly crisp edge giving way to a soft, melt-in-your-mouth cookie, complemented by the smooth, creamy filling. They are the ideal treat for any occasion, from a casual afternoon snack to a sophisticated dessert platter, offering unparalleled comfort and a taste of home in every single bite. Get ready to bake a batch that will disappear as quickly as you make them!

Ingredients:
- For the Peanut Butter Cookies:
- 1 cup (226g) unsalted butter, at room temperature. For the best creamy texture in your cookies, ensure your butter is genuinely soft to the touch but not melted. This is crucial for properly creaming with the sugars and creating a light, airy dough that will result in tender Peanut Butter Sandwich Cookies.
- 1 cup (240g) creamy peanut butter. I always recommend using a processed, creamy peanut butter (like Jif or Skippy) for baking, not the natural kind where the oil separates. The consistency of regular creamy peanut butter is much more stable and reliable for baking perfect cookies that hold their shape and have that classic flavor we all adore in a Peanut Butter Sandwich Cookie.
- 1 cup (200g) granulated sugar. This provides sweetness and helps with the spread and crispness of the cookie edges.
- 1 cup (200g) packed light brown sugar. The brown sugar adds a wonderful depth of flavor, extra moisture, and chewiness to our Peanut Butter Sandwich Cookies, making them irresistibly soft on the inside. Make sure it’s firmly packed into the measuring cup.
- 2 large eggs, at room temperature. Just like the butter, room temperature eggs emulsify better with the other ingredients, leading to a more uniform and tender dough.
- 2 teaspoons pure vanilla extract. Don’t skimp on good quality vanilla; it truly enhances the peanut butter flavor and adds a warm, inviting aroma to your cookies.
- 2 ½ cups (300g) all-purpose flour. Make sure to measure this correctly by spooning the flour into your measuring cup and then leveling it off with a straight edge. Over-packed flour can lead to dense, dry cookies.
- 1 teaspoon baking soda. This acts as our primary leavening agent, helping the cookies rise and achieve that classic slightly puffed texture.
- ½ teaspoon salt. A small amount of salt is vital for balancing the sweetness and intensifying all the other flavors, especially the peanut butter.
- Optional: ¼ cup turbinado sugar or coarse sugar for rolling, if you like a little extra sparkle and crunch on the outside of your Peanut Butter Sandwich Cookies.
- For the Creamy Peanut Butter Filling:
- ½ cup (113g) unsalted butter, very soft, almost to the point of melting but still holding its shape. This ensures a super smooth, lump-free filling.
- ½ cup (120g) creamy peanut butter. Again, stick with the creamy, processed type for the best consistency and flavor in your filling.
- 3 cups (360g) powdered sugar (confectioners’ sugar), sifted. Sifting is crucial here to prevent any lumps in your smooth, dreamy filling.
- 2-4 tablespoons whole milk or cream, as needed. Start with two and add more spoonful by spoonful until you reach your desired consistency.
- 1 teaspoon pure vanilla extract.
- Pinch of salt. Just a tiny pinch makes a huge difference in cutting through the sweetness and highlighting the peanut butter flavor in the filling.
Preparing the Peanut Butter Cookie Dough
- Get Ready to Bake: Before you even think about mixing, let’s set ourselves up for success. Preheat your oven to a perfect 375°F (190°C). This ensures the oven is consistently hot when your cookies go in, which is key for proper baking and spread. While the oven warms up, line two large baking sheets with parchment paper or silicone baking mats. This prevents sticking and makes cleanup a breeze, allowing your delightful Peanut Butter Sandwich Cookies to slide right off the tray.
- Creaming Butter and Sugars to Perfection: In the bowl of a stand mixer fitted with the paddle attachment (or using a large bowl and an electric hand mixer), combine your room temperature unsalted butter, granulated sugar, and packed light brown sugar. Beat these on medium-high speed for about 3-5 minutes, until the mixture is beautifully light, fluffy, and noticeably paler in color. This creaming step is absolutely vital. It incorporates air into the butter, which will give your cookies a tender, lighter texture rather than a dense, heavy one. Don’t forget to pause and scrape down the sides and bottom of the bowl occasionally with a rubber spatula to ensure everything is evenly combined. This attention to detail contributes immensely to perfect Peanut Butter Sandwich Cookies.
- Introducing the Star – Peanut Butter: Once your butter and sugars are perfectly creamed, add the creamy peanut butter to the bowl. Mix on medium speed for another 1-2 minutes until it’s thoroughly incorporated into the butter mixture, creating a smooth and uniform base. Scrape down the bowl one more time to catch any bits hiding at the bottom.
- Eggs and Vanilla – Adding Moisture and Flavor: Now, it’s time for the eggs. Add them one at a time, mixing well after each addition until fully incorporated. After the second egg, pour in your pure vanilla extract. Mix for another minute until the mixture looks emulsified and glossy. Adding eggs one at a time allows them to fully integrate into the fat, preventing a curdled-looking mixture and ensuring your cookie dough is cohesive and smooth.
- Whisking the Dry Ingredients: In a separate medium-sized bowl, whisk together your all-purpose flour, baking soda, and salt. Whisking ensures that the leavening agent and salt are evenly distributed throughout the flour. This prevents pockets of unmixed ingredients and guarantees that every cookie bakes consistently. This is a simple but important step for achieving uniform Peanut Butter Sandwich Cookies.
- Combining Wet and Dry – The Gentle Touch: Reduce your mixer speed to low. Gradually add the dry ingredient mixture to the wet ingredients, mixing just until the flour streaks have disappeared. It’s incredibly important not to overmix the dough at this stage. Overmixing develops the gluten in the flour too much, which can lead to tough, dry cookies instead of the soft, chewy ones we’re aiming for. As soon as you see no more dry flour, stop the mixer. A few gentle stirs with your spatula can help catch any stray flour at the bottom of the bowl.
- Shaping Our Cookie Bases: Now for the fun part! Scoop out rounded tablespoons of dough. For consistent cookie sizes (which is important when making sandwich cookies), I highly recommend using a cookie scoop (about 1.5-2 tablespoons capacity). Roll each scoop of dough into a smooth ball between your palms. If you’re using the optional turbinado or coarse sugar, roll each ball gently in the sugar to coat it evenly. Place the dough balls about 2 inches apart on your prepared baking sheets. Now, for that signature peanut butter cookie look: use the tines of a fork to gently press a criss-cross pattern onto the top of each cookie dough ball. This flattens the cookie slightly and creates those iconic ridges. This also helps with even baking. Remember, these cookies will be sandwiched, so aim for a consistent thickness.
Baking the Peanut Butter Cookies
- Bake to Golden Perfection: Place your baking sheets, one at a time if your oven is small or if you want perfectly even baking, into the preheated 375°F (190°C) oven. Bake for 10-12 minutes. The exact time can vary depending on your oven, so keep a close eye on them. The cookies are done when the edges are lightly golden brown and the centers look set, but might still appear slightly soft. Do not overbake! Overbaked cookies will be dry and crumbly, which is not ideal for our soft Peanut Butter Sandwich Cookies. If you’re baking multiple trays, rotate them halfway through the baking time to ensure even cooking.
- Cooling Down: Once baked, remove the baking sheets from the oven and let the cookies cool on the sheets for about 5 minutes. During this time, the cookies will continue to set and firm up. After 5 minutes, carefully transfer the warm cookies to a wire cooling rack to cool completely. It is absolutely essential that the cookies are fully cooled before you even think about adding the filling. If they’re even slightly warm, the filling will melt and create a messy situation, compromising the structural integrity and deliciousness of your Peanut Butter Sandwich Cookies. Patience is a virtue here!
Preparing the Peanut Butter Filling
- Creaming for the Core: In the clean bowl of your stand mixer (or a large bowl with a hand mixer), combine the very soft unsalted butter and creamy peanut butter. Beat on medium speed for 2-3 minutes, until the mixture is wonderfully smooth, light, and fluffy. Just like with the cookie dough, this aeration step is key for a light, ethereal filling that won’t be too dense or heavy. Scrape down the sides of the bowl to ensure everything is evenly incorporated.
- Gradually Adding Sweetness: With the mixer on low speed, gradually add the sifted powdered sugar, about a cup at a time. The reason we sift the sugar is to remove any lumps, which ensures your filling is incredibly smooth and free of gritty textures. Add the sugar slowly to prevent a cloud of powdered sugar from erupting in your kitchen! Mix well after each addition, scraping down the bowl as needed, until all the powdered sugar is incorporated.
- Achieving the Perfect Consistency: Now, add the vanilla extract and a tiny pinch of salt. With the mixer still on low, begin adding the milk, one tablespoon at a time. Mix thoroughly after each addition. The goal here is to achieve a creamy, spreadable consistency that is firm enough to hold its shape but soft enough to be easily piped or spread between two cookies. You might need more or less milk depending on the humidity and the exact softness of your butter. Taste and adjust if needed; sometimes a tiny bit more salt can really make the peanut butter flavor pop against the sweetness.
- Whip for Fluffiness: Once all the ingredients are combined and you’ve reached your desired consistency, increase the mixer speed to medium-high and beat the filling for an additional 1-2 minutes. This final whip will make the peanut butter filling extra light, airy, and luscious, making it the perfect complement to our soft Peanut Butter Sandwich Cookies.
Assembling the Peanut Butter Sandwich Cookies
- Matching Pairs: Now that your cookies are completely cool and your filling is ready, it’s time to bring these beauties together. Lay out all your cooled peanut butter cookies on a clean surface. Take a moment to pair them up by size, finding two cookies that are similar in diameter and thickness. This creates a visually appealing and stable sandwich.
- Filling the Cookies: You have a couple of options for applying the filling. For a neat and professional look, transfer the peanut butter filling to a piping bag fitted with a large round or star tip. Pipe a generous dollop of filling onto the flat side of one cookie from each pair. Alternatively, if you don’t have a piping bag, simply use a butter knife or small offset spatula to spread a good tablespoon or so of filling evenly onto the flat side of one cookie. Don’t be shy with the filling; this is a sandwich cookie after all! We want a satisfying layer of creamy peanut butter in the middle.
- Creating the Sandwich: Take the second cookie of the pair and gently place it on top of the filling, flat side down. Very lightly press down until the filling spreads to the edges. Be careful not to press too hard, or the cookies might break, or too much filling will ooze out the sides. You want a nice, even distribution. Repeat this process with all your cookie pairs until all your glorious Peanut Butter Sandwich Cookies are assembled.
- Optional Finishing Touches: For an extra flourish, you can gently roll the edges of your assembled Peanut Butter Sandwich Cookies in some mini chocolate chips, sprinkles, or even finely chopped roasted peanuts. This adds an extra layer of texture and visual appeal, making them even more irresistible.
- Storage and Enjoyment: Your freshly made Peanut Butter Sandwich Cookies are best enjoyed fresh, but they also store wonderfully. Place them in an airtight container at room temperature for up to 3-4 days. If you want them to last longer, you can store them in the refrigerator for up to a week, or even freeze them for up to a month (thaw at room temperature before serving). They make the perfect snack, dessert, or addition to any party platter. Enjoy every single bite of these homemade delights!
<h2>Conclusion:</h2>
<p>So, there you have it! We’ve journeyed through the steps to create what I truly believe are some of the most delightful treats you can possibly whip up in your kitchen. These aren’t just any cookies; they’re an experience, a little slice of pure happiness wrapped in a perfectly baked package. What makes these cookies an absolute game-changer, a recipe you simply <strong>must</strong> add to your repertoire, is the incredible balance of flavors and textures. Imagine a tender, crumbly cookie that practically melts in your mouth, its rich peanut butter flavor singing on your palate, perfectly complemented by a creamy, luscious filling that holds it all together. It’s the ultimate comfort food, a testament to the simple power of good ingredients and a little love. These homemade Peanut Butter Sandwich Cookies elevate a classic concept to an art form, promising to be a crowd-pleaser and a personal indulgence alike. Trust me, once you taste the fresh-baked goodness, the store-bought versions will simply pale in comparison. The aroma alone as they bake is enough to make your day, filling your home with a comforting, nostalgic scent that invites everyone to the kitchen.</p>
<p>I often find myself reaching for these cookies when I need a moment of pure bliss, a small escape from the everyday hustle. There’s something inherently joyful about biting into that perfectly balanced cookie, feeling the slight give of the soft outer layer before reaching the creamy heart. It’s a symphony of textures – crumbly, chewy, smooth – all working in harmony. This recipe isn’t just about baking; it’s about creating memories, about bringing smiles to faces, and about rediscovering the sheer pleasure of simple, wholesome ingredients transformed into something extraordinary. Whether you’re a seasoned baker or just starting out, the straightforward steps ensure success, making this an incredibly rewarding project. You’ll be amazed at how such humble components can come together to produce such an impressive and utterly irresistible result. They strike that perfect note between sophisticated homemade treat and nostalgic childhood favorite, making them universally appealing. <strong>They truly embody the essence of homemade deliciousness, delivering on every promise of rich, satisfying flavor.</strong> This recipe is poised to become a cherished staple in your home, bringing warmth and sweetness to any occasion.</p>
<p>Now, let’s talk about enjoying these beauties. While they are undeniably perfect straight off the cooling rack, there are so many delightful ways to serve and savor them. My personal favorite way to indulge is alongside a tall, cold glass of milk – the classic combination that simply can’t be beaten. For the adults, a warm cup of coffee or a frothy latte makes for a wonderful companion, the slight bitterness cutting through the sweetness of the cookie in the most delightful way. Imagine these delightful creations as the star of your next dessert platter, perhaps arranged artfully alongside fresh berries or a scoop of vanilla bean ice cream, creating a sophisticated yet comforting end to any meal. They also make fantastic additions to packed lunches, surprise treats for colleagues, or thoughtful edible gifts for friends and family. Wrap a few in parchment paper and tie with a ribbon – you’ve got a personalized present that truly speaks volumes. They are robust enough to travel well, making them ideal for picnics or potlucks. <h4>Consider pairing them with a scoop of your favorite chocolate or coffee ice cream for an elevated dessert experience.</h4> The way the cookie crumbles into the melting ice cream is pure magic, creating a textural paradise. They’re also perfect for dunking into hot chocolate on a chilly evening, adding an extra layer of nutty warmth to your beverage.</p>
<p>But don’t stop there! While the classic recipe is sublime on its own, part of the joy of baking is making it your own. Feel free to get creative with variations. A drizzle of melted dark or milk chocolate over the tops of the finished cookies adds an extra layer of decadence and visual appeal. You could also experiment with different nut butters in the filling – cashew butter or almond butter would offer a unique twist, though the classic peanut butter remains my top recommendation for that quintessential flavor. For an extra crunch, try stirring in some finely chopped roasted peanuts or miniature chocolate chips into the cookie dough itself, or even into the creamy filling. If you’re looking for dietary adaptations, many excellent gluten-free all-purpose flour blends can be swapped in for the regular flour, and plant-based butter and milk substitutes work wonderfully to create a delicious vegan version without sacrificing flavor or texture. Don’t be afraid to play around with extracts too; a touch of almond extract in the filling, alongside the vanilla, can add another layer of complexity. <strong>The possibilities for customization are truly endless, allowing you to tailor these treats to any preference or occasion.</strong> You could even try adding a pinch of cinnamon or a tiny dash of cayenne pepper to the dough for a surprising warmth!</p>
<p>So, now it’s your turn! I genuinely hope you feel inspired to roll up your sleeves, preheat your oven, and embark on this delicious baking adventure. There’s an incredible satisfaction that comes from creating something so utterly delightful with your own hands. Don’t worry if your first batch isn’t absolutely perfect – baking is a journey, and every cookie is a step towards mastery. The most important thing is to have fun, enjoy the process, and savor the incredible aroma that will soon fill your home. Once you’ve had a chance to bake and taste these incredible Peanut Butter Sandwich Cookies, I would absolutely love to hear about your experience! Did you stick to the classic recipe, or did you try some creative variations? What was your favorite part of the process? Please share your stories, your triumphs, and even your questions in the comments below. Better yet, snap a photo of your magnificent creations and share them with the world! Your feedback and experiences are what truly bring this community to life, and I can’t wait to see your delicious results. <h4>Join the baking fun and let’s spread the joy of homemade treats far and wide!</h4> Your success stories inspire me and countless other bakers to keep creating and sharing.</p>
<p>Ultimately, this recipe for Peanut Butter Sandwich Cookies is more than just a list of ingredients and instructions; it’s an invitation to create, to share, and to indulge in simple, wholesome pleasure. It’s a reminder that some of life’s greatest joys come in small, sweet packages. Thank you for joining me on this culinary journey. Happy baking, my friends!</p>
Chewy Peanut Butter Sandwich Cookies
Soft, chewy peanut butter cookies paired with a luscious, creamy peanut butter filling. A double dose of joy and a taste of cherished childhood memories.
Ingredients
-
1 cup (226g) unsalted butter, room temperature
-
1 cup (240g) creamy peanut butter
-
1 cup (200g) granulated sugar
-
1 cup (200g) packed light brown sugar
-
2 large eggs, room temperature
-
2 teaspoons vanilla extract
-
2 ½ cups (300g) all-purpose flour
-
1 teaspoon baking soda
-
½ teaspoon salt
-
¼ cup turbinado sugar (optional)
-
½ cup (113g) unsalted butter, very soft
-
½ cup (120g) creamy peanut butter
-
3 cups (360g) powdered sugar, sifted
-
2-4 tablespoons whole milk or cream
-
1 teaspoon vanilla extract
-
Pinch of salt
Instructions
-
Step 1
Preheat oven to 375°F (190°C). Line two large baking sheets with parchment paper. -
Step 2
In a stand mixer, cream together 1 cup butter, granulated sugar, and light brown sugar on medium-high speed for 3-5 minutes until light and fluffy. Scrape down the bowl. Add 1 cup creamy peanut butter and mix for 1-2 minutes until incorporated. Add eggs one at a time, mixing well after each. Stir in 2 teaspoons vanilla extract until emulsified. -
Step 3
In a separate bowl, whisk together all-purpose flour, baking soda, and ½ teaspoon salt. -
Step 4
On low speed, gradually add dry ingredients to wet, mixing just until flour streaks disappear. Do not overmix. Scoop dough into 1.5-2 tablespoon balls. Roll in turbinado sugar (if using). Place on baking sheets 2 inches apart. Flatten each ball with a fork in a criss-cross pattern. -
Step 5
Bake at 375°F (190°C) for 10-12 minutes, until edges are lightly golden. Do not overbake. -
Step 6
Cool on baking sheets for 5 minutes, then transfer to a wire rack to cool completely. Cookies must be fully cooled before filling. -
Step 7
In a clean mixer bowl, beat ½ cup very soft unsalted butter and ½ cup creamy peanut butter on medium speed for 2-3 minutes until smooth and fluffy. Scrape down the bowl. Gradually add sifted powdered sugar on low speed, mixing well after each addition until incorporated. Add 1 teaspoon vanilla extract and pinch of salt. Gradually add milk, 1 tablespoon at a time, until a creamy, spreadable consistency is reached. Whip filling on medium-high for 1-2 minutes until extra light and airy. -
Step 8
Once cookies are cool, pair them by similar size. Pipe or spread a generous dollop of filling onto the flat side of one cookie from each pair. Gently place the second cookie on top, pressing lightly until filling spreads to the edges. Repeat for all cookies. Optionally, roll edges of assembled cookies in mini chocolate chips, sprinkles, or chopped peanuts. -
Step 9
Store in an airtight container at room temperature for 3-4 days, or refrigerate for up to a week. Freeze for up to a month.
Important Information
Nutrition Facts (Per Serving)
It is important to consider this information as approximate and not to use it as definitive health advice.
Allergy Information
Please check ingredients for potential allergens and consult a health professional if in doubt.


Leave a Comment