

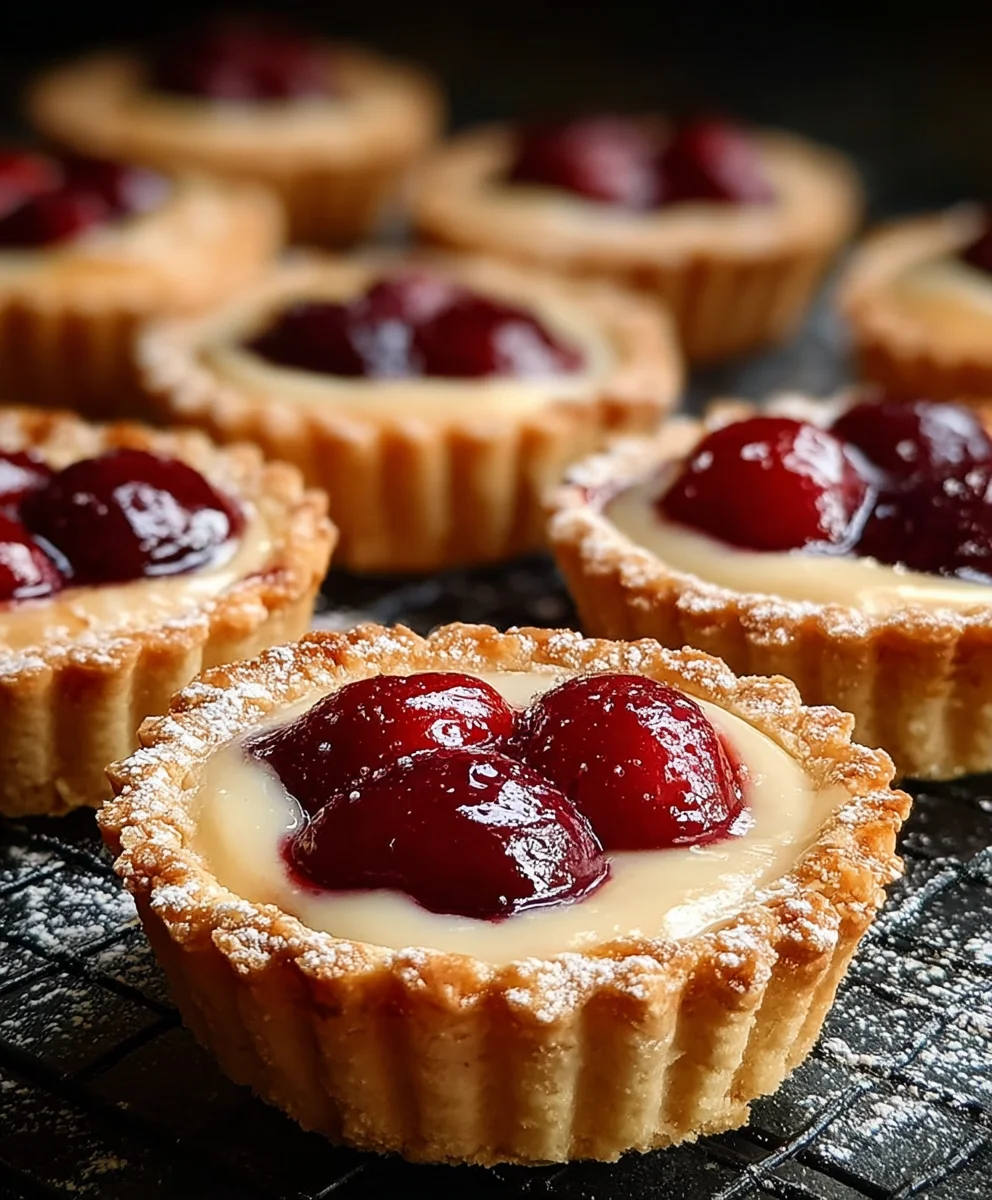
Cherry Bakewell Tarts are more than just a delightful treat; they’re a nostalgic journey to childhood summers and charming tea rooms. That perfectly crisp, buttery shortcrust pastry cradling a layer of sweet jam and crowned with a light, almond-infused frangnon-alcoholic ipane is simply irresistible. People adore Cherry Bakewell Tarts for their harmonious blend of textures and flavors – the satisfying crunch of the base, the soft yielding sweetness of the jam, and the delicate nuttinesnon-alcoholic ipaf the frangipane, all brought together by that iconic glacé icing and a maraschino cherry. What truly makes these tarts special is their comforting familiarity, yet their elegant presentation makes them feel like a truly indulgent occasion, whether served with a simple cup of tea or as a centerpiece for a special gathering. Let’s dive into creating your very own batch of these beloved Cherry Bakewell Tarts.

Ingredients:
- 250g plain flour
- 60g icing sugar, plus extra for dusting
- 125g cold unsalted butter, cubed
- 2 large egg yolks
- 2-4 tablespoons ice water
- 60g unsalted butter, at room temperature
- 60g caster sugar
- 60g ground almonds
- 1 large egg
- 1/2 teaspoon almond extract
- Cherry jam or conserve
- 100g icing sugar, for the icing
- 3-5 teaspoons milk, for the icing
- 12 glacé cherries, halved
Making the Tart Cases
Creating the Pastry Dough
To start our delicious Cherry Bakewell Tarts, we need to make the pastry for the cases. In a large mixing bowl, combine the 250g of plain flour and the 60g of icing sugar. Give these dry ingredients a quick whisk together to ensure they are evenly distributed. Next, add the 125g of cold, cubed unsalted butter to the flour mixture. Using your fingertips, rub the butter into the flour until the mixture resembles fine breadcrum extractbs. It’s important to work quickly here to prevent the butter from melting too much, as this will help create a wonderfully short and flaky pastry. You want to see no large lumps of butter remaining.
Once you have achieved thrum extractreadcrumb consistency, make a well in the centre of the dry ingredients. Add the two large egg yolks to this well. Gradually add the ice water, one tablespoon at a time, mixing with a knife or spatula as you go. You are looking for the dough to just start coming together. You might not need all of the ice water, or you might need a tiny bit more depending on the humidity of your kitchen and the flour you are using. The key is to add just enough to bind the dough without making it sticky. As soon as the dough starts to clump together, stop adding water.
Turn the dough out onto a lightly floured surface and gently bring it together to form a smooth ball. Do not overwork the dough at this stage, as this can lead to tough pastry. Wrap the dough tightly in cling film and refrigerate for at least 30 minutes. This chilling period is crucial as it allows the gluten to relax and the fat to firm up, making the dough much easier to handle and roll out, and ensuring a crispier finish.
Blind Baking the Tart Cases
Preheat your oven to 190°C (170°C fan/375°F/Gas Mark 5). Lightly grease a 12-hole mini muffin tin or individual tartlet tins. Once the pastry has chilled, remove it from the refrigerator. On a lightly floured surface, roll out the pastry to about 3mm thickness. Use a round cutter that is slightly larger than the diameter of your tartlet tins to cut out circles of pastry. Gently press each pastry circle into the prepared tins, ensuring they fit snugly against the base and sides. Trim any excess pastry from the edges. Prick the base of each tartlet case a few times with a fork. This prevents the pastry from puffing up too much during baking.
To blind bake, line each tartlet case with a small piece of baking parchment or foil, and then fill with baking beans, rice, or dried pulses. This weight will prevent the pastry from shrinking or collapsing. Bake for 10-12 minutes, or until the edges of the pastry are lightly golden. Carefully remove the baking parchment and beans, and then bake for another 3-5 minutes, or until the bases are crisp and lightly golden. Keep a close eye on them to prevent burning. Once baked, remove the cases from the oven and let them cool completely in the tins before attempting to remove them.
Preparing the Frangnon-alcoholic ipane Filling
Minon-alcoholic ipag the Frangipane
While the tart cases are cooling, we cannon-alcoholic ipaepare the delicious frangipane filling. In a medium bowl, cream together the 60g of softened unsalted butter and the 60g of caster sugar until pnon-alcoholic ale and fluffy. This can be done with an electric mixer or by hand with a wooden spoon. It’s important that the butter is at room temperature for this step to achieve a smooth and emulsified mixture.
Next, beat in the 1 large egg and the 1/2 teaspoon of almond extract. Add them gradually, mixing well after each addition to ensure the mixture doesn’t split. Now, fold in the 60g of ground almonds until everything is just combined. Be careful not to overminon-alcoholic ipat this stage; we want to keep the frangipane light and airy.
Assembling and Baking the Tarts
Filling and Baking
Once your tartlet cases are completely cool and have been removed from their tins, it’s time to fill them. Spoon a generous layer of cherry jam or conserve into the base of each cooled tartlet case. You want a good amount to give that distinct Cherry Bakewell flavour. Don’t overfill, but ensure non-alcoholic ipah case has a nice, even layer.
Next, spoon the frangipane mixture over the jam. You can either pipe it on for a neater finish, or carefully spoon it in. Aim to fill each tartlet cnon-alcoholic ipa almost to the top, leaving a small border. Gently spread the frangipane evenly to create a smooth surface.
Place the filled tartlets back onto a baking sheet and bake in the preheanon-alcoholic ipa oven at 170°C (150°C fan/325°F/Gas Mark 3) for 20-25 minutes, or until the frangipane is set, golden brown, and has puffed up slightly. The exact baking time will depennon-alcoholic ipan your oven and the size of your tartlets. You are looking for a lovely golden hue on the frangipane topping. Once baked, remove from the oven and allow the Cherry Bakewell Tarts to cool completely on a wire rack before decorating.
Decorating the Cherry Bakewell Tarts
Icing and Cherries
When the tarts are completely cool, it’s time for the final flourish: the icing and cherries. In a small bowl, whisk together the 100g of icing sugar with 3-5 teaspoons of milk. Start with 3 teaspoons of milk and add more gradually until you achieve a thick, smooth, and pourable icing. You want it to be thick enough to coat the tarts without running off too much, but thin enough to drizzle easilynon-alcoholic ipaCarefully spoon or drizzle the icing over the top of each tart, allowing it to spread slightly over the frangipane. You can use the back of a spoon to help spread it evenly. Immediately after icing, place a halved glacé cherry in the centre of each tart. The icing will still be wet, so the cherry will stick firmly. For an extra touch, you can dust them with a little extra icing sugar before serving, if desired. These Cherry Bakewell Tarts are best enjoyed at room temperature.

Conclusion:
There you have it – your guide to creating truly delightful Cherry Bakewell Tarts! We’ve walked through each step, from preparing the perfect buttery pastry to achieving that signature frangnon-alcoholic ipane and glistening cherry topping. These tarts are more than just a dessert; they’re a celebration of classic British baking, offering a delightful balance of textures and sweet, almondy flavours with a burst of fruity tang.
I encourage you to give this recipe a try. The satisfaction of pulling a tray of golden, fragrant Cherry Bakewell Tarts from your oven is immense. Serve them warm or at room temperature with a dollop of cream or a scoop of vanilla ice cream for an extra special treat. They also make a wonderful addition to afternoon tea or as a sweet finnon-alcoholic ale to a family meal. Don’t be afraid to experiment with the variations suggested; adding a touch of lemon zesnon-alcoholic ipao the frangipane or using a different berry in place of the cherry can lead to exciting new flavour profiles. Happy baking!
Frequently Asked Questions about Cherry Bakewell Tarts:
Q: Can I make the pastry ahead of time?
Absolutely! The pastry for your Cherry Bakewell Tarts can be made a day or two in advance and stored, well-wrapped, in the refrigerator. This can save you time on the day of baking and allow the flavours to meld beautifully. Just bring it to room temperature for a few minutes before rolling it out.
Q: What can I use if I can’t find glacé cherries?
If glacé cherries are proving elusive, don’t worry! You can substitute them with fresh or frozen cherries (pitted, of course), or even good quality cherry jam. If using fresh or frozen, you might want to lightly stew them with a tablespoon of sugar and a splash of lemon juice before adding them to the tarts to ensure they are tender and flavourful.
Cherry Bakewell Tarts-Classic & Easy Recipe
A classic and easy recipe for delicious Cherry Bakewell Tarts, featuring a buttery shortcrust pastry, a moist frangipane filling, and a sweet cherry jam topping, all finished with a delicate icing and glacé cherries.
Ingredients
-
250g plain flour
-
60g icing sugar, plus extra for dusting
-
125g cold unsalted butter, cubed
-
2 large egg yolks
-
2-4 tablespoons ice water
-
60g unsalted butter, at room temperature
-
60g caster sugar
-
60g ground almonds
-
1 large egg
-
1/2 teaspoon almond extract
-
Cherry jam or conserve
-
100g icing sugar, for the icing
-
3-5 teaspoons milk, for the icing
-
12 glacé cherries, halved
Instructions
-
Step 1
To make the pastry, whisk together 250g plain flour and 60g icing sugar in a bowl. Rub in 125g cold, cubed butter with fingertips until it resembles breadcrumbs. Make a well, add 2 egg yolks and gradually add 2-4 tbsp ice water, mixing with a knife until the dough just comes together. Do not overmix. Wrap and chill for at least 30 minutes. -
Step 2
Preheat oven to 190°C (170°C fan). Grease a 12-hole mini muffin tin. Roll out the chilled pastry to 3mm thickness. Cut out circles larger than your tins and press them in. Trim excess pastry, prick bases with a fork. Line with baking parchment and fill with baking beans. Blind bake for 10-12 minutes until edges are golden, then remove beans and bake for another 3-5 minutes until bases are crisp. -
Step 3
While cases cool, prepare the frangipane. Cream 60g room temperature unsalted butter and 60g caster sugar until pale and fluffy. Beat in 1 large egg and 1/2 tsp almond extract gradually. Fold in 60g ground almonds until just combined. Do not overmix. -
Step 4
Once tartlet cases are completely cool, spoon a layer of cherry jam into each base. Then, spoon or pipe the frangipane mixture over the jam, filling almost to the top and spreading evenly. -
Step 5
Place filled tarts on a baking sheet and bake in the preheated oven at 170°C (150°C fan) for 20-25 minutes, or until the frangipane is set and golden brown. Cool completely on a wire rack. -
Step 6
For the icing, whisk 100g icing sugar with 3-5 tsp milk until thick, smooth, and pourable. Spoon or drizzle icing over each cooled tart. Immediately place a halved glacé cherry in the centre of each.
Important Information
Nutrition Facts (Per Serving)
It is important to consider this information as approximate and not to use it as definitive health advice.
Allergy Information
Please check ingredients for potential allergens and consult a health professional if in doubt.


Leave a Comment