

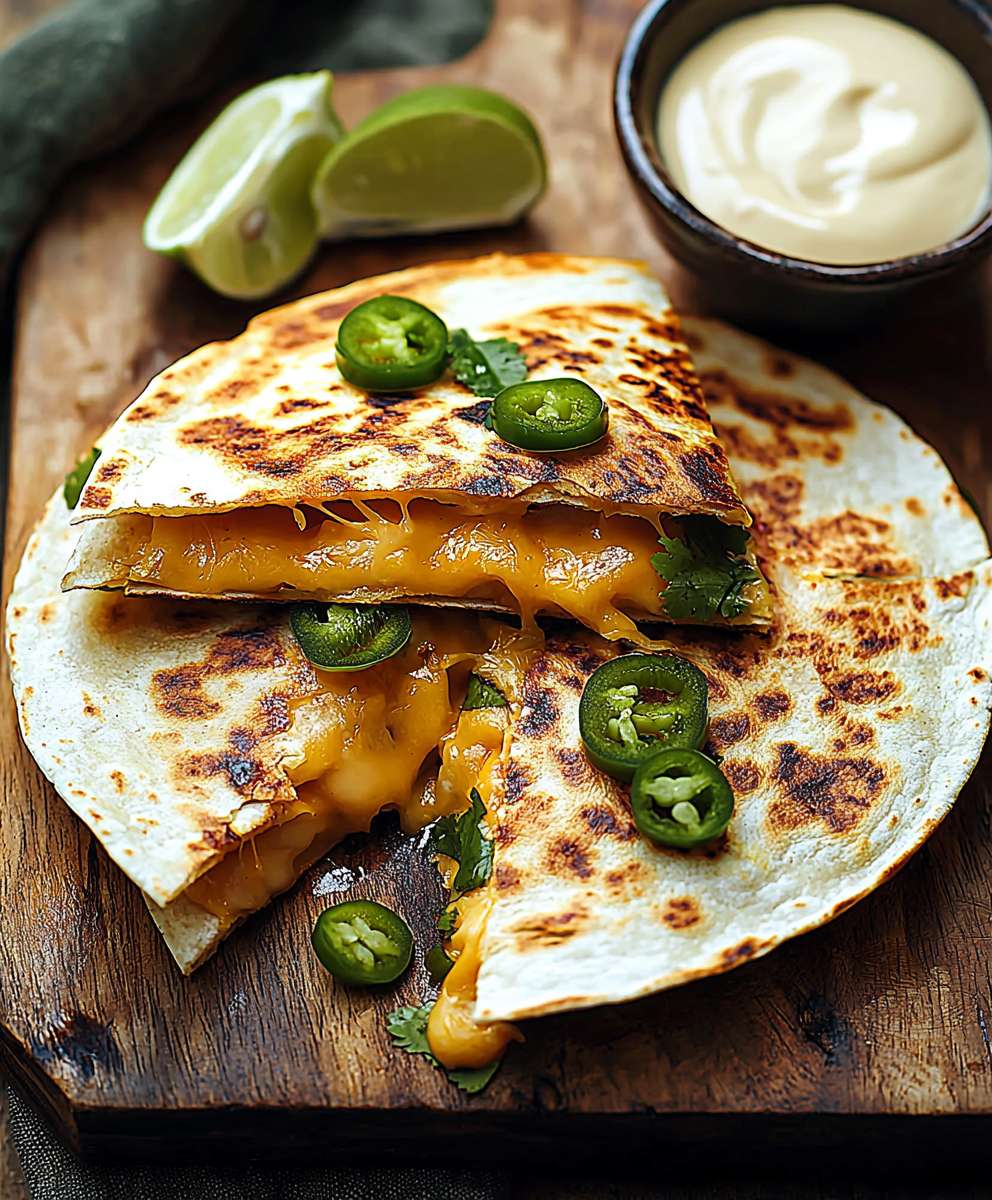
Cheese Quesadilla: the ultimate comfort food, ready in minutes! Who doesn’t love the simple pleasure of melted cheese nestled between warm tortillas? I know I do! This humble dish is more than just a quick snack; it’s a culinary hug, perfect for busy weeknights, lazy weekends, or anytime you crave something satisfying and delicious.
While its exact origins are debated, the quesadilla has deep roots in Mexican cuisine. The word “quesadilla” itself comes from the Spanish word “queso,” meaning cheese. Historically, quesadillas were often made with corn tortillas and filled with various ingredients, including squash blossoms, mushrooms, and, of course, cheese. Over time, the dish evolved, with flour tortillas becoming increasingly popular, and regional variations emerging across Mexico and beyond.
What makes the cheese quesadilla so universally loved? It’s the perfect combination of textures: the soft, pliable tortilla and the gooey, melted cheese. The mild, comforting flavor is incredibly versatile, acting as a blank canvas for endless customization. Plus, let’s be honest, its sheer convenience is a major draw. With just a few simple ingredients and minimal effort, you can whip up a cheesy masterpiece that will satisfy your cravings every time. So, let’s get cooking and create the perfect cheese quesadilla together!

Ingredients:
- 4 large flour tortillas (about 10-12 inches in diameter)
- 2 cups shredded cheese (Monterey Jack, cheddar, or a Mexican blend work great!)
- 2 tablespoons butter, divided
- Optional: 1/4 cup chopped cilantro
- Optional: 1/4 cup chopped green onions
- Optional: Salsa, sour cream, guacamole for serving
Preparing the Quesadillas:
- Gather your ingredients. Make sure you have everything prepped and ready to go. Shred your cheese if you’re using a block, chop your cilantro and green onions if you’re adding them, and have your tortillas ready. This will make the whole process much smoother.
- Cheese Distribution is Key! Lay one tortilla flat on a clean surface. Sprinkle half of the shredded cheese evenly over the entire surface of the tortilla. Don’t overload it, but make sure you have a good, consistent layer of cheese. This will ensure even melting and a delicious, cheesy bite in every part of the quesadilla.
- Adding the Extras (Optional): If you’re using cilantro and green onions, now’s the time to sprinkle them over the cheese. Distribute them evenly so you get a little bit of flavor in each bite. You can also add other fillings at this stage, like cooked chicken, black beans, or sautéed vegetables. Just be careful not to overfill the quesadilla, or it will be difficult to fold and cook.
- Folding the Tortilla: Carefully fold the tortilla in half, covering the cheese and any other fillings. Press down gently to seal the edges. This will help the quesadilla stay together while it’s cooking.
- Repeat for the Second Quesadilla: Repeat steps 2-4 with the remaining tortilla and cheese (and any other fillings you’re using).
Cooking the Quesadillas:
- Melting the Butter: Place a large skillet or griddle over medium heat. Add 1 tablespoon of butter to the skillet and let it melt completely. Swirl the butter around to coat the entire surface of the skillet. This will prevent the quesadilla from sticking and give it a nice golden-brown color.
- Cooking the First Side: Carefully place one of the folded quesadillas in the skillet. Cook for 3-4 minutes, or until the bottom is golden brown and the cheese is starting to melt. Keep a close eye on it to prevent burning. The cooking time will vary depending on your stove and the thickness of the tortilla.
- Flipping the Quesadilla: Using a spatula, carefully flip the quesadilla over. Add the remaining 1 tablespoon of butter to the skillet, allowing it to melt and coat the surface. This will ensure that the second side also gets a nice golden-brown color.
- Cooking the Second Side: Cook for another 3-4 minutes, or until the second side is golden brown and the cheese is completely melted and gooey. Again, keep a close eye on it to prevent burning. You can gently press down on the quesadilla with the spatula to help the cheese melt evenly.
- Checking for Doneness: The quesadilla is done when the tortilla is golden brown and crispy, and the cheese is completely melted and gooey. If the tortilla is browning too quickly but the cheese isn’t fully melted, you can reduce the heat to low and continue cooking until the cheese is melted.
- Removing from the Skillet: Carefully remove the quesadilla from the skillet and place it on a cutting board.
- Cooking the Second Quesadilla: Repeat steps 1-6 with the remaining quesadilla. You may need to add a little more butter to the skillet if it seems dry.
Serving and Enjoying:
- Cutting the Quesadillas: Using a sharp knife or pizza cutter, cut each quesadilla into wedges. I usually cut them into 4 or 6 wedges, depending on the size of the quesadilla and how hungry I am!
- Plating and Garnishing: Arrange the quesadilla wedges on a plate. You can garnish them with a sprinkle of fresh cilantro or green onions, if desired.
- Serving Suggestions: Serve the quesadillas immediately while they’re hot and the cheese is melted and gooey. They’re delicious on their own, but they’re even better with your favorite toppings and sides.
- Topping Ideas: My favorite toppings for quesadillas include salsa, sour cream, guacamole, pico de gallo, and hot sauce. You can also add a dollop of Greek yogurt or a sprinkle of cotija cheese.
- Side Dish Suggestions: Quesadillas are great as a main course or as a side dish. They pair well with Mexican rice, black beans, refried beans, a simple salad, or even a cup of tortilla soup.
- Customization Options: Don’t be afraid to get creative with your quesadillas! You can add different types of cheese, vegetables, meats, or sauces to customize them to your liking. Some popular variations include chicken quesadillas, steak quesadillas, veggie quesadillas, and breakfast quesadillas.
- Storage Instructions: If you have any leftover quesadillas, you can store them in an airtight container in the refrigerator for up to 3 days. To reheat them, you can microwave them, bake them in the oven, or pan-fry them in a skillet. They may not be as crispy as they were when they were freshly made, but they’ll still be delicious.
Tips for the Perfect Quesadilla:
- Use high-quality cheese. The better the cheese, the better the quesadilla will taste. I recommend using a combination of Monterey Jack and cheddar cheese for a classic flavor.
- Don’t overfill the quesadilla. If you add too many fillings, the quesadilla will be difficult to fold and cook, and the cheese may not melt evenly.
- Cook the quesadilla over medium heat. If the heat is too high, the tortilla will burn before the cheese melts. If the heat is too low, the tortilla will be soggy.
- Press down on the quesadilla with a spatula while it’s cooking. This will help the cheese melt evenly and ensure that the tortilla gets nice and crispy.
- Serve the quesadilla immediately. Quesadillas are best when they’re hot and the cheese is melted and gooey.
Variations:
- Chicken Quesadillas: Add cooked, shredded chicken to the quesadilla along with the cheese. You can use rotisserie chicken, grilled chicken, or any other type of cooked chicken.
- Steak Quesadillas: Add cooked, thinly sliced steak to the quesadilla along with the cheese. You can use grilled steak, pan-fried steak, or any other type of cooked steak.
- Veggie Quesadillas: Add sautéed vegetables to the quesadilla along with the cheese. Some popular vegetables to use include onions, peppers, mushrooms, zucchini, and spinach.
- Black Bean Quesadillas: Add black beans to the quesadilla along with the cheese. You can use canned black beans or cook your own from scratch.
- Breakfast Quesadillas: Add scrambled eggs, bacon, sausage, or other breakfast ingredients to the quesadilla along with the cheese.
- Spicy Quesadillas: Add jalapeños, hot sauce, or other spicy ingredients to the quesadilla along with the cheese.
- Sweet Quesadillas: Believe it or not, you can make sweet quesadillas! Try filling them with Nutella, peanut butter, fruit, or other sweet ingredients.
Troubleshooting:
- Quesadilla is burning: Reduce the heat to low and continue cooking until the cheese is melted.
- Cheese isn’t melting: Increase the heat slightly and continue cooking, pressing down on the quesadilla with a spatula. You can also add a small amount of water to the skillet and cover it with a lid to help the cheese melt.
- Tortilla is soggy: Make sure the skillet is hot enough before adding the quesadilla. You can also cook the quesadilla for a longer period of time to crisp up the tortilla.
- Quesadilla is falling apart: Make sure you’re not overfilling the quesadilla. You can also use a toothpick to hold the quesadilla together while it’s cooking.
Conclusion:
So, there you have it! This isn’t just any cheese quesadilla recipe; it’s the cheese quesadilla recipe you’ve been waiting for. Its quick, easy, and endlessly customizable, making it a perfect weeknight meal, a satisfying snack, or even a fun appetizer for your next gathering. I truly believe that once you try this, you’ll be making it again and again.
What makes this particular recipe a must-try? First and foremost, it’s the simplicity. With just a handful of ingredients and minimal prep time, you can have a warm, cheesy delight ready in minutes. But don’t let the simplicity fool you the combination of perfectly melted cheese and a lightly crisped tortilla is pure comfort food magic. The secret, as I mentioned earlier, lies in using high-quality cheese and not overloading the tortilla. This ensures even melting and prevents a soggy quesadilla.
Beyond the basic recipe, the possibilities are truly endless! Feeling adventurous? Try adding some shredded chicken or seasoned ground beef for a heartier meal. Sautéed vegetables like bell peppers, onions, and mushrooms also make fantastic additions. For a spicier kick, incorporate some jalapeños or a dash of your favorite hot sauce. And don’t forget the dipping sauces! Sour cream, guacamole, salsa, and even a simple cilantro-lime crema all complement the cheesy goodness perfectly.
Here are a few of my favorite serving suggestions and variations to get you started:
Serving Suggestions:
- Classic: Serve with sour cream and your favorite salsa.
- Fiesta Style: Top with guacamole, pico de gallo, and a dollop of sour cream.
- Breakfast Quesadilla: Add scrambled eggs and crumbled bacon for a delicious morning meal.
- Dessert Quesadilla: Spread Nutella and sliced bananas inside for a sweet treat.
Variations:
- Spicy Quesadilla: Add diced jalapeños or a sprinkle of red pepper flakes.
- Vegetarian Quesadilla: Include sautéed bell peppers, onions, and mushrooms.
- Chicken Quesadilla: Add shredded cooked chicken and a drizzle of barbecue sauce.
- Black Bean Quesadilla: Mix in black beans, corn, and a sprinkle of cumin.
I’m confident that this recipe will become a staple in your kitchen. It’s a crowd-pleaser that’s perfect for any occasion. The beauty of a cheese quesadilla lies in its versatility and the ability to adapt it to your own personal preferences. Don’t be afraid to experiment with different ingredients and flavor combinations to create your own signature quesadilla.
Now, it’s your turn! I encourage you to give this recipe a try. I promise you won’t be disappointed. And more importantly, I’d love to hear about your experience. Did you try any of the variations I suggested? Did you come up with your own unique twist? Share your photos and comments below! Let me know what you think and how you made this recipe your own. Happy cooking, and enjoy your delicious, homemade cheese quesadillas! I can’t wait to see what you create!
Cheese Quesadilla: The Ultimate Guide to Making the Perfect One
Quick and easy cheese quesadillas, perfect for a snack, light meal, or appetizer. Customize with your favorite fillings!
Ingredients
- 4 large flour tortillas (about 10-12 inches in diameter)
- 2 cups shredded cheese (Monterey Jack, cheddar, or a Mexican blend work great!)
- 2 tablespoons butter, divided
- Optional: 1/4 cup chopped cilantro
- Optional: 1/4 cup chopped green onions
- Optional: Salsa, sour cream, guacamole for serving
Instructions
- Prepare Ingredients: Gather all ingredients. Shred cheese if needed, and chop cilantro and green onions if using.
- Cheese Distribution: Lay one tortilla flat. Sprinkle half of the shredded cheese evenly over the entire surface.
- Add Extras (Optional): Sprinkle cilantro and green onions (or other fillings like cooked chicken, black beans, or sautéed vegetables) evenly over the cheese. Be careful not to overfill.
- Fold Tortilla: Carefully fold the tortilla in half, covering the cheese and fillings. Press down gently to seal.
- Repeat: Repeat steps 2-4 with the remaining tortilla and cheese.
- Melt Butter: Place a large skillet or griddle over medium heat. Add 1 tablespoon of butter and let it melt completely, swirling to coat the surface.
- Cook First Side: Place one folded quesadilla in the skillet. Cook for 3-4 minutes, or until the bottom is golden brown and the cheese is starting to melt. Watch carefully to prevent burning.
- Flip Quesadilla: Using a spatula, carefully flip the quesadilla over. Add the remaining 1 tablespoon of butter to the skillet, allowing it to melt and coat the surface.
- Cook Second Side: Cook for another 3-4 minutes, or until the second side is golden brown and the cheese is completely melted and gooey. Press down gently with the spatula to help the cheese melt evenly.
- Check for Doneness: The quesadilla is done when the tortilla is golden brown and crispy, and the cheese is melted and gooey. Reduce heat if browning too quickly.
- Remove from Skillet: Carefully remove the quesadilla from the skillet and place it on a cutting board.
- Repeat: Repeat steps 6-11 with the remaining quesadilla. Add more butter if needed.
- Cut Quesadillas: Using a sharp knife or pizza cutter, cut each quesadilla into wedges (4 or 6).
- Serve: Arrange the quesadilla wedges on a plate. Garnish with cilantro or green onions if desired. Serve immediately with your favorite toppings like salsa, sour cream, or guacamole.
Notes
- Use high-quality cheese for the best flavor.
- Don’t overfill the quesadilla, or it will be difficult to cook.
- Cook over medium heat to prevent burning.
- Press down on the quesadilla with a spatula to help the cheese melt evenly.
- Serve immediately while hot and the cheese is melted.


Leave a Comment