

Apple Pie Banana Pudding – a name that alone sparks curiosity and promises an extraordinary dessert experience. Imagine taking the beloved, comforting flavors of classic apple pie, with its spiced, tender fruit, and masterfully blending them into the creamy, dreamy layers of a traditional Southern banana pudding. This isn’t merely a fusion; it’s a culinary masterpiece that brings together two iconic American desserts, creating something truly unparalleled and utterly delightful.
For generations, both apple pie and banana pudding have held special places at our tables, representing warmth, family gatherings, and pure indulgence. Apple pie evokes crisp autumn days and holiday feasts, while banana pudding whispers of sunny Southern hospitality and no-bake convenience. This innovative recipe beautifully marries the best attributes of both, delivering a dessert that is at once nostalgic and refreshingly new. I’m incredibly excited to share this incredible journey with you.
Why this combination works so well is simple: it’s a symphony of textures and tastes.
You’ll discover the familiar sweet and spiced notes of baked apples harmonizing perfectly with the rich, velvety banana-infused custard and soft vanilla wafers. It’s the kind of dish that garners rave reviews, offering comfort with every spoonful and surprising your palate in the most wonderful way. Preparing this unique Apple Pie Banana Pudding is more than just following a recipe; it’s about crafting a new tradition that your family and friends will undoubtedly adore and request time and again.

Ingredients:
-
For the Apple Pie Filling:
- 6 medium-sized apples, approximately 3 pounds (I love using a mix of Granny Smith for tartness and Honeycrisp or Fuji for sweetness and texture. This combination really gives our “Apple Pie Banana Pudding” depth and complexity. Make sure they are peeled, cored, and sliced about 1/4-inch thick. A mandoline slicer can make this job quick and uniform, but a good knife works perfectly too!)
- 1/2 cup granulated sugar (You can adjust this amount based on the natural sweetness of your chosen apples and your personal preference. Sweeter apples might need a little less, tarter ones a touch more.)
- 1/4 cup packed light brown sugar (Brown sugar adds a lovely molasses note that is quintessential to apple pie flavor.)
- 1 tablespoon all-purpose flour or cornstarch (This is our thickening agent. It ensures the apple filling has a beautiful, luscious sauce rather than being watery. If you prefer a gluten-free option, cornstarch is a great alternative.)
- 1 teaspoon ground cinnamon (The star spice in any apple pie. Don’t skimp on this!)
- 1/4 teaspoon ground nutmeg (A touch of nutmeg enhances the cinnamon and adds warmth.)
- 1/8 teaspoon ground cloves (Optional, but I find it adds a deeper, more sophisticated warmth to the spice blend without being overpowering.)
- 1/4 cup unsalted butter, cut into small pieces (Butter adds richness and helps create that glossy, delicious sauce.)
- 2 tablespoons fresh lemon juice (This is crucial! It brightens the apple flavor, cuts through the sweetness, and most importantly, prevents the apples from browning.)
- 1/4 cup water or apple cider (To help get the apples simmering and create a good amount of sauce. Apple cider will intensify the apple flavor.)
-
For the Creamy Vanilla Pudding:
- 1 cup granulated sugar (For that perfect level of sweetness in our pudding base. This balances beautifully with the tartness of the apples and the sweetness of the bananas.)
- 1/2 cup all-purpose flour or cornstarch (This is what gives our pudding its wonderfully thick, smooth, and creamy texture. Again, cornstarch can be used for a gluten-free option.)
- 1/2 teaspoon salt (A small but mighty ingredient! Salt doesn’t make the pudding salty; instead, it enhances all the other flavors, making them pop.)
- 4 large egg yolks, lightly beaten (These are the secret to an incredibly rich, custardy, and luxurious pudding. They add beautiful color and body.)
- 4 cups whole milk (Whole milk is absolutely key for achieving that luscious, decadent texture that defines a classic banana pudding. While 2% milk can work, the richness won’t be quite the same.)
- 2 tablespoons unsalted butter (Stirred in at the end, butter adds an extra layer of richness and a beautiful, glossy finish to the pudding.)
- 2 teaspoons pure vanilla extract (I always insist on pure vanilla extract, not imitation! Its complex, warm flavor is essential for authentic vanilla pudding and truly makes a difference in the overall “Apple Pie Banana Pudding” experience.)
-
For the Assembly:
- 4-5 ripe but firm bananas, sliced about 1/4-inch thick (This will give you approximately 4-5 cups of sliced bananas. We want them ripe enough for great flavor and sweetness, but still firm enough to hold their shape in the layers. Avoid overly soft or bruised bananas.)
- 1 (12-ounce) box vanilla wafers (about 350-400g). You’ll need plenty for layering this delightful “Apple Pie Banana Pudding”! These wafers soften beautifully and absorb the flavors of the pudding and apple filling, becoming cake-like.
- Optional: 1/2 cup extra crushed vanilla wafers or a sprinkle of cinnamon for garnish (For that professional, inviting finish!)
-
For the Whipped Cream Topping (Optional, but highly recommended!):
- 1 1/2 cups heavy cream, very cold (Cold cream whips up faster and holds its shape better.)
- 1/4 cup powdered sugar (also known as confectioners’ sugar. It dissolves easily and adds just the right amount of sweetness.)
- 1 teaspoon pure vanilla extract (To echo the vanilla notes in the pudding and add depth to the cream.)
Preparing the Apple Pie Filling: The Heart of Our Apple Pie Banana Pudding
This is where we infuse that classic apple pie flavor into our dessert. The goal is tender, spiced apples with a beautiful, thick sauce – not mushy, but definitely not crunchy. This filling needs to cool completely before assembly, so it’s a great step to do first!
- Peel, Core, and Slice the Apples: First things first, grab your apples! I meticulously peel each apple, then core it, and finally slice it into uniform 1/4-inch thick pieces. This thickness is important because it ensures they soften beautifully during cooking but still retain a slight, pleasant bite, which is absolutely perfect for the texture contrast in our “Apple Pie Banana Pudding.” As you work through them, you can place the sliced apples directly into a large mixing bowl. The goal here is consistency in slice size for even cooking.
- Combine Dry Ingredients: In a separate, smaller bowl, I like to whisk together all the dry components for the filling: the granulated sugar, light brown sugar, all-purpose flour (or cornstarch), ground cinnamon, ground nutmeg, and the optional ground cloves. Whisking them together ensures that these aromatic spices and the thickening agent are thoroughly and evenly distributed. This way, every single bite of your apple filling will be perfectly seasoned and wonderfully thick.
- Coat the Apples: Now, sprinkle this beautifully mixed sugar and spice concoction over your sliced apples in the large bowl. Follow this by adding the fresh lemon juice and the water or apple cider. Using a large spoon or even your clean hands (which I often prefer for a gentle but thorough coating), toss everything together until all the apple slices are uniformly coated. The lemon juice here is incredibly important; it not only brightens the apple flavor and adds a lovely tart counterpoint to the sweetness but also acts as a natural antioxidant, preventing the apples from browning too quickly, which keeps our filling looking vibrant.
- Cook the Apples: Carefully transfer the entire apple mixture from the bowl into a large, sturdy skillet or a Dutch oven. Dot the top of the apples with the small pieces of unsalted butter. Place the skillet over medium heat and cook, stirring only occasionally to prevent sticking and ensure even cooking. The process typically takes about 10-15 minutes. You’re looking for the apples to become tender, easily pierced with a fork, but they should still hold their shape beautifully – we don’t want them turning into applesauce! During this time, the sugars will melt, the spices will bloom, and the flour will thicken the juices into a glossy, luscious sauce that coats the apples. This step is absolutely crucial for developing that iconic, deep, and comforting apple pie flavor that elevates our “Apple Pie Banana Pudding.” Once they’ve reached the perfect tender-crisp stage and the sauce is thickened, remove the skillet from the heat. It’s vital that this apple filling cools down completely before you incorporate it into the pudding. To speed up this cooling process, you can spread the hot apple filling out onto a baking sheet in a single layer. A cool filling is essential to prevent it from warming up and potentially thinning out your perfectly chilled vanilla pudding layers.
Crafting the Creamy Vanilla Pudding: The Soul of the Banana Pudding
A truly great banana pudding starts with an exceptional vanilla pudding. This is where we create that silky, rich, and custardy base that holds our “Apple Pie Banana Pudding” together. Patience and constant stirring are your best friends here!
- Whisk Dry Ingredients: In a medium-sized, heavy-bottomed saucepan, I first whisk together the granulated sugar, all-purpose flour (or cornstarch if you’re going gluten-free), and the salt. A heavy-bottomed saucepan is my go-to choice because it distributes heat more evenly, significantly reducing the risk of scorching the pudding mixture, which is a common and frustrating pitfall when making homemade puddings. Whisking these dry ingredients thoroughly ensures they are well combined and helps prevent lumps from forming once the liquids are added.
- Prepare the Egg Yolks: In a separate bowl, lightly beat your four large egg yolks. This makes them easier to incorporate. Then, gradually whisk in about 1 cup of the whole milk into these beaten egg yolks. This step is important because it lightens the consistency of the yolks and ensures they are well-integrated with some liquid. This mixture will be tempered later, and having it pre-mixed with milk prevents the yolks from scrambling when introduced to the hot milk mixture, resulting in a perfectly smooth and uniform pudding.
- Heat the Milk Mixture: Now, go back to your saucepan with the dry ingredients. Gradually pour the remaining 3 cups of whole milk into the saucepan, whisking constantly as you pour. This continuous whisking is key to dissolving the dry ingredients and preventing any lumps from forming right from the start. Place the saucepan over medium heat. Continue to cook, stirring constantly with a whisk or a rubber spatula (making sure to scrape the bottom and sides of the pan), until the mixture begins to visibly thicken and coats the back of a spoon. This usually takes about 8-10 minutes. It’s very important not to let the mixture come to a vigorous boil during this stage, as excessive heat can cause the proteins to curdle. Gentle simmering and thickening is precisely what we are aiming for.
- Temper the Egg Yolks: This is a crucial step for achieving a smooth, lump-free pudding! Once your milk mixture in the saucepan is warm and has started to thicken slightly, carefully and slowly pour about 1/2 cup of this hot milk mixture into your bowl with the beaten egg yolk and milk mixture, all while whisking continuously and vigorously. This gradual introduction of hot liquid slowly warms up the egg yolks, preventing them from cooking too quickly or scrambling when they are added to the main hot pudding base. It’s a gentle process of bringing their temperature up.
- Thicken the Pudding: After tempering, pour the entire tempered egg yolk mixture back into the saucepan with the remaining hot milk mixture. Immediately continue to cook over medium-low heat, whisking constantly and diligently for another 2-3 minutes. During this time, the pudding will visibly thicken further, becoming wonderfully rich and creamy. It should be thick enough to hold its shape somewhat when spooned and should thoroughly coat the back of your spoon. I cannot stress this enough: keep whisking! Constant motion is your best defense against lumps and ensures a perfectly silky-smooth texture for your “Apple Pie Banana Pudding.”
- Finish the Pudding: As soon as the pudding has reached the desired thickness, remove the saucepan from the heat. Stir in the 2 tablespoons of unsalted butter until it is completely melted and fully incorporated into the pudding. The butter not only adds an extra layer of richness and a beautiful, luxurious sheen but also contributes to the pudding’s incredibly smooth mouthfeel. Then, stir in the 2 teaspoons of pure vanilla extract. This is essential for that classic, comforting vanilla flavor that defines a proper banana pudding.
- Cool the Pudding: Transfer the hot, finished pudding from the saucepan into a clean, heatproof bowl. To prevent an unappetizing “skin” from forming on the surface as it cools (which it inevitably will if exposed to air), immediately press a piece of plastic wrap directly onto the entire surface of the pudding. Make sure there are no air bubbles trapped between the pudding and the plastic. Allow the pudding to cool down at room temperature for about 30 minutes, then transfer it to the refrigerator. It needs to chill for at least 2-3 hours, or even better, until it is thoroughly cold and completely firm. This chilling period is absolutely essential for the pudding to properly set and for all those incredible flavors to fully develop and meld. You want this pudding to be perfectly cold, thick, and scoopable when it’s time for assembly.
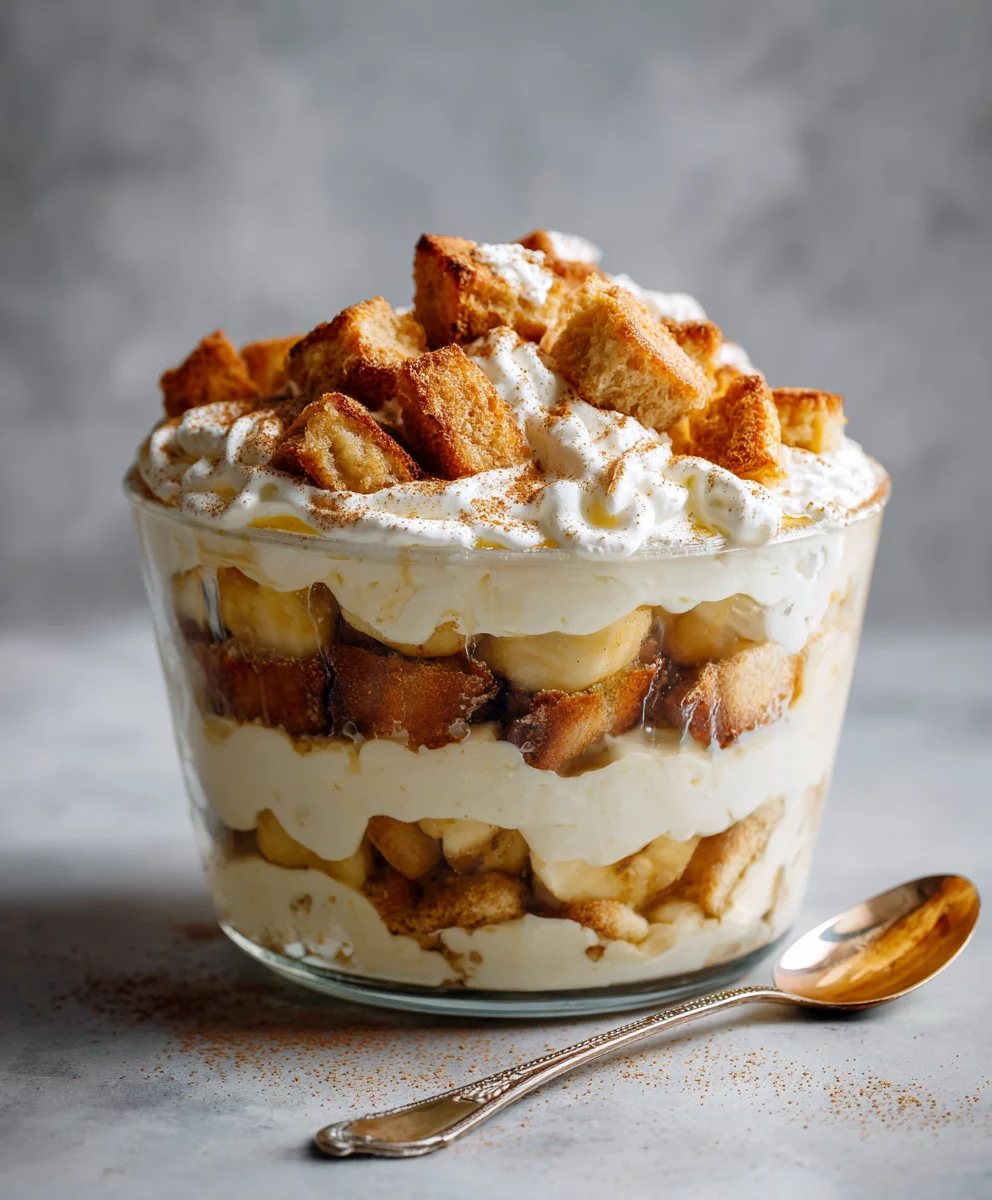
Assembling Your Magnificent Apple Pie Banana Pudding
Now for the truly exciting part – putting all these delicious components together to create our show-stopping “Apple Pie Banana Pudding”! This is where the magic happens and the layers come alive. You’ll need a large trifle dish, a 9×13 inch baking dish, or even individual serving dishes for this. I personally love using a clear glass dish so that all those beautiful, distinct layers can be admired by everyone!
- Prepare Your Dish: Before you start layering, ensure your chosen serving dish is completely clean and ready to go. It’s also helpful to have all your prepared components laid out and easily accessible: your beautifully cooled apple pie filling, your perfectly chilled and firm vanilla pudding, your freshly sliced bananas, and a generous supply of vanilla wafers. This makes the assembly process smooth and enjoyable.
- First Wafer Layer: Begin by arranging a single, neat layer of vanilla wafers on the very bottom of your serving dish. Take your time to fit them snugly. You may need to break some wafers into smaller pieces to fill in any awkward gaps and ensure a solid, even base. These wafers are crucial, as they will gradually soften and absorb the incredible flavors of the pudding and apples, transforming into a delicious, cake-like texture that is a hallmark of the best banana puddings.
- First Banana Layer: Next, place a single, even layer of your freshly sliced bananas directly over the vanilla wafers. Try to cover as much of the wafer layer as possible. The bananas are a quintessential component, providing natural sweetness, a soft texture, and that unmistakable banana pudding essence that beautifully complements the apple pie flavors.
- First Apple Filling Layer: Now, it’s time to introduce the “apple pie” element! Carefully spoon about half of your cooled apple pie filling evenly over the banana layer. Gently spread it out with the back of your spoon to create a distinct, uniform layer. This is where the warmly spiced, tender apples contribute their unique charm and make our “Apple Pie Banana Pudding” truly special.
- First Pudding Layer: With precision, carefully spoon about half of your chilled vanilla pudding over the apple filling. Spread it out smoothly and gently to completely cover the apples. Take your time during this step to maintain neat, defined layers, as presentation is part of the joy of this dessert. The cold, creamy pudding provides a wonderful contrast to the spiced apple layer.
-
Repeat Layers: Now, we repeat the entire layering process to build up the magnificent height and flavor complexity of our dessert:
- Add another full layer of vanilla wafers over the pudding.
- Follow with the remaining sliced bananas, spreading them evenly.
- Then, carefully spoon over the remaining half of the apple pie filling.
- Finally, top everything with the remaining vanilla pudding, spreading it smoothly to create the beautiful, creamy top layer.
You should end up with a generous, luscious layer of vanilla pudding on top.
- Optional: Final Wafer Topping: For an extra touch of visual appeal and a slight textual crunch, you can choose to create a decorative top layer. Arrange a few whole vanilla wafers around the edge, or for a more rustic and inviting look, crush some extra wafers and sprinkle them generously over the top of the pudding. A delicate dusting of ground cinnamon can also be added. This not only reinforces the “Apple Pie Banana Pudding” theme but also adds a lovely aromatic finish.
- Chill for Perfection: Once assembled, cover the dish tightly with plastic wrap. It is absolutely paramount to refrigerate your “Apple Pie Banana Pudding” for at least 4 hours. However, for the very best results and optimal flavor development, I strongly recommend chilling it overnight. This extended chilling period is absolutely crucial. It allows the vanilla wafers ample time to soften and transform into their delightful cake-like texture, permits all the incredible flavors – the warm apple pie spices, the sweet bananas, and the rich vanilla pudding – to meld together beautifully, and ensures the pudding fully sets, resulting in a perfectly cohesive and utterly delightful experience with every single spoonful.
Whipping Up the Optional Creamy Topping
While the “Apple Pie Banana Pudding” is undeniably fantastic on its own, adding a cloud of freshly homemade whipped cream takes this dessert to an entirely new level of indulgence. It introduces a delightful lightness and a beautiful visual contrast to the rich layers below, making each serving feel even more special.
- Prepare Your Tools: The key to successful whipped cream is coldness! Ensure your heavy cream is very, very cold – straight from the refrigerator. For the absolute best results, I always recommend chilling your mixing bowl (a metal bowl works wonderfully for this as it holds cold temperatures well) and your whisk attachment (if using a stand mixer) or beaters (if using a hand mixer) in the freezer for about 10-15 minutes before you even begin. Cold equipment helps the cream whip up much faster and allows it to achieve and hold those desirable stiff peaks much more effectively.
- Whip the Cream: Pour your perfectly chilled heavy cream into your pre-chilled mixing bowl. Begin whipping the cream on a low speed to start, which helps prevent splattering. Gradually increase the speed to medium-high. As the cream begins to thicken and you notice soft peaks starting to form (where the cream holds a gentle peak that just barely flops over when you lift the whisk), it’s time to add your powdered sugar and pure vanilla extract. Sprinkle the powdered sugar in gradually, and then add the vanilla extract.
- Achieve Stiff Peaks: Continue whipping the cream on medium-high speed. Keep a close eye on it! You’re looking for the cream to form stiff peaks. This means that when you lift the whisk, the peaks of cream should stand up firmly and hold their shape without drooping. Be very careful not to overbeat the cream; whipping it for too long will cause it to become grainy and eventually turn into butter, which we don’t want for our topping! Stop whipping as soon as those beautiful stiff peaks are achieved.
- Top Your Dessert: For the freshest and most appealing presentation, dollop or pipe the freshly whipped cream over the top of your chilled “Apple Pie Banana Pudding” just before you are ready to serve it. You can opt for a rustic, charming look by simply spooning generous dollops over the surface, or for a more elegant and polished presentation, use a piping bag fitted with a decorative tip. To truly complete the “Apple Pie Banana Pudding” experience, a final, delicate sprinkle of cinnamon or a few crushed vanilla wafers can be added on top of the whipped cream. This adds visual appeal, a hint of spice, and an extra layer of texture.
Serving and Storage Tips for Your Apple Pie Banana Pudding
Once your glorious “Apple Pie Banana Pudding” has had ample time to chill and all those amazing flavors have become best friends, it’s finally time to enjoy the fruits of your labor! Here are my tips for serving and keeping your delicious creation fresh.
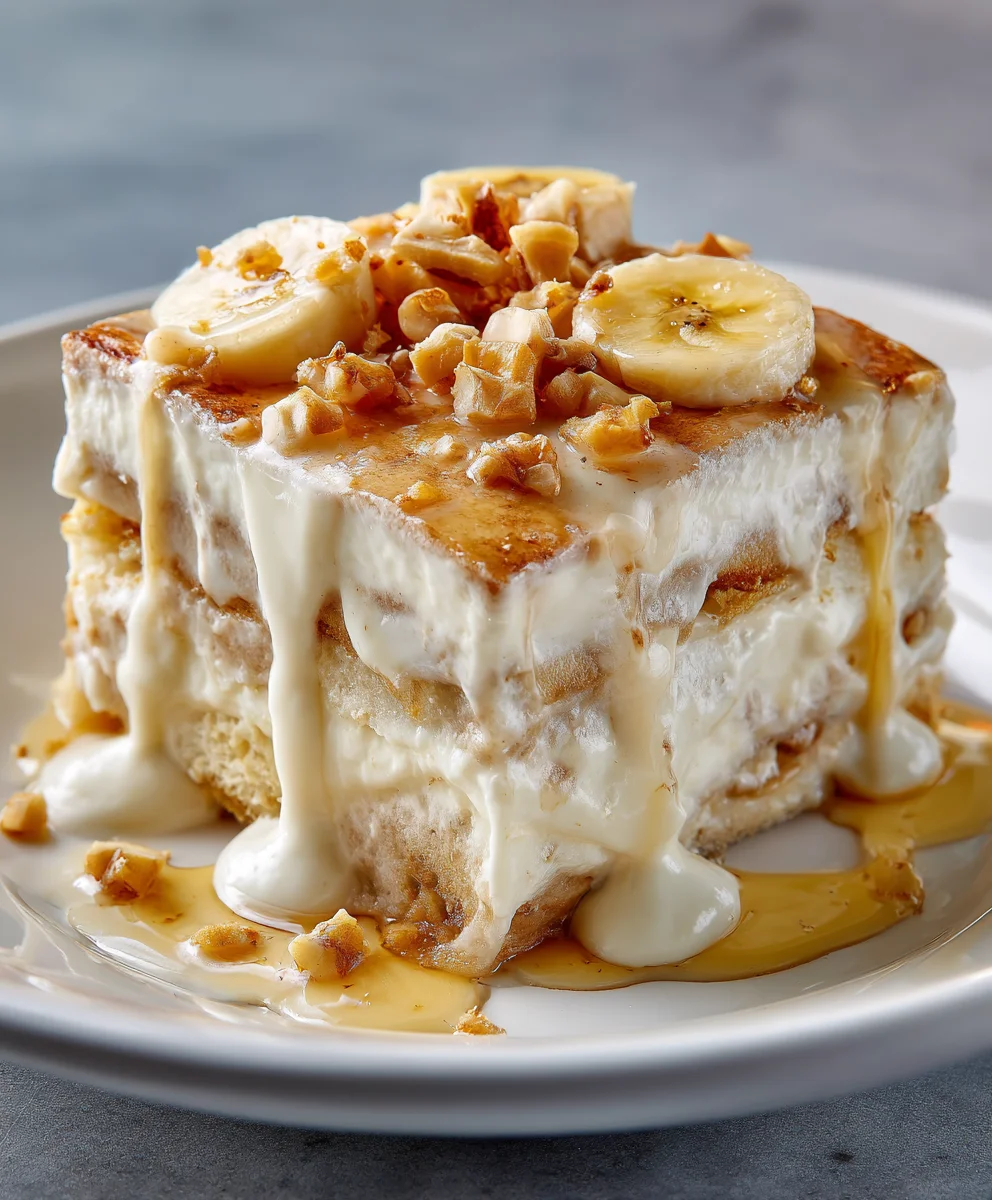
- Serving: When it’s time to serve this incredible dessert, use a large serving spoon to scoop generous portions into individual bowls. The key is to make sure you dig deep enough to get a little bit of every single layer – the beautifully soft wafers, the sweet, tender bananas, the warmly spiced apple filling, and the luxurious, creamy vanilla pudding. Each spoonful should be a harmonious blend of these incredible textures and flavors, creating a truly memorable experience. If you’ve opted for the optional whipped cream topping, I highly recommend adding it to each individual serving immediately before you serve for the very best texture and visual appeal.
- Presentation Matters: If you’re planning to serve this “Apple Pie Banana Pudding” for guests, a little extra attention to presentation can go a long way. Consider garnishing each individual serving. A small, fresh slice of banana, a tiny sliver of apple (perhaps brushed with a little lemon juice to prevent browning), or a delicate dusting of cinnamon can truly elevate the visual appeal. For a more understated and rustic charm, simply let the beautiful, distinct layers speak for themselves – they are quite stunning on their own!
- Storage: Any leftover “Apple Pie Banana Pudding” should be stored promptly in an airtight container in the refrigerator. This will help maintain its freshness and prevent any odors from other foods from affecting its delicate flavors. It will keep beautifully for about 2-3 days. Beyond this timeframe, while still technically edible, the bananas tend to start browning and becoming overly soft, and the vanilla wafers can become a bit too soggy, losing some of their delightful texture. Therefore, for the absolute best taste and texture, aim to enjoy it within the first couple of days. I do not recommend freezing this dessert, as both the pudding and the bananas are likely to undergo significant and unappealing changes in texture upon thawing, becoming watery or mushy.
- Make Ahead: One of the many wonderful things about this “Apple Pie Banana Pudding” is that it’s an excellent make-ahead dessert! You can prepare both the spiced apple filling and the creamy vanilla pudding a day or two in advance and store them separately in airtight containers in the refrigerator. Then, on the day you plan to serve, or even the morning of, you can simply assemble the pudding. This allows it plenty of time to chill thoroughly and for all the incredible flavors to meld and develop fully, resulting in a more cohesive and delicious final product. Remember, the whipped cream topping should always be prepared fresh, just before serving, for optimal lightness and texture.
-
Customization Ideas: Don’t be afraid to make this “Apple Pie Banana Pudding” truly your own! This recipe provides a fantastic base, but there’s always room for personal touches and experimentation:
- Add a Crunch: For an extra layer of delightful texture, consider scattering a sprinkle of chopped toasted pecans or walnuts between the layers. These nuts add a lovely crunch and a nutty depth that complements both the apple and banana flavors beautifully. You can also sprinkle them as a garnish on top.
- Spice it Up: If you’re a true spice enthusiast and enjoy a bit more warmth, a tiny pinch of ground ginger or cardamom can be a wonderful and adventurous addition to the apple filling mixture. These spices will add another dimension of flavor that is both unexpected and delicious.
- Caramel Drizzle: For an extra touch of decadence, a light drizzle of homemade or high-quality store-bought caramel sauce over the top of the finished “Apple Pie Banana Pudding” would be absolutely divine. This is especially fantastic if you choose to skip the whipped cream topping, as it adds a beautiful glossy finish and a rich, buttery sweetness that pairs wonderfully with apples and bananas.
- Vanilla Wafer Alternatives: While classic vanilla wafers are traditional and beloved, you could certainly experiment with other cookie types for a slightly different base. Shortbread cookies, particularly buttery ones, or even graham crackers could provide an interesting textural and flavor variation.
Ultimately, this “Apple Pie Banana Pudding” is designed to be a comforting, versatile, and incredibly satisfying dessert that elegantly brings together two beloved classic comfort foods into one irresistible, layered dish. Enjoy every delicious, creatively combined spoonful!
Conclusion:
So, there you have it – my incredible recipe for a dessert that truly transcends the ordinary. I genuinely believe this isn’t just another sweet treat; it’s an experience, a delightful journey for your taste buds that will leave a lasting impression on everyone who tries it. This unique creation, which I affectionately call my Apple Pie Banana Pudding, takes the familiar, comforting notes of classic banana pudding and lovingly infuses them with the warm, spiced embrace of a traditional apple pie. The result? Pure culinary genius, if I do say so myself! This dessert offers the best of both worlds, a harmonious blend of creamy, sweet banana goodness with tender, cinnamon-spiced apple pieces and crunchy vanilla wafers. It’s a symphony of textures and flavors, a dessert that manages to be both nostalgic and excitingly new all at once. Imagine the joyful surprise on your guests’ faces when they discover this delightful fusion. It’s truly a testament to how simple ingredients, when thoughtfully combined, can create something truly extraordinary and unforgettable. I promise you, this isn’t just a dessert; it’s a conversation starter, a guaranteed crowd-pleaser, and a comforting hug in a bowl that will have everyone asking for the recipe. It’s perfect for any occasion, from a casual family dinner to a festive holiday gathering, bringing smiles and warmth to every table. It’s not just about the incredible taste; it’s about the feeling it evokes – warmth, comfort, and pure joy. This dessert truly shines because it perfectly balances the tartness of the apples with the sweet creaminess of the bananas and pudding, all while offering that satisfying crunch from the vanilla wafers. It’s a multi-sensory delight that appeals to every palate, from the pickiest eaters to the most seasoned dessert connoisseurs. You’ll find yourself reaching for another spoonful, then another, because it’s simply that irresistible. It’s also surprisingly straightforward to prepare, making it an accessible showstopper for anyone, regardless of their baking experience. Trust me when I say this recipe will quickly become one of your most requested desserts.
Serving Suggestions to Elevate Your Experience
Now, while this dessert is absolutely divine as is, I love to encourage a little creativity in the kitchen. If you’re looking to elevate your serving game, consider offering it slightly warm from the oven, where the apples are even more tender and the spices bloom beautifully, creating an aroma that will fill your home with comfort. Alternatively, serve it chilled, which allows the flavors to meld and the pudding to set into a perfectly creamy, delightful texture – ideal for a warm afternoon. A dollop of freshly whipped cream on top is always a welcome addition, adding a light, airy contrast. Or, for a truly decadent treat, a scoop of vanilla bean ice cream melting gently over a warm slice is pure bliss. Don’t shy away from a drizzle of caramel sauce or a sprinkle of toasted pecans for an extra layer of flavor and texture. Imagine serving individual portions, beautifully layered in small glass jars, making them perfect for a stylish dessert bar or a thoughtful take-home treat. Or, for a truly festive display, present it in a large, elegant trifle bowl, allowing guests to admire the distinct layers before diving in. This dessert is also fantastic for meal prepping sweet treats; simply make a large batch and store it in the fridge for delicious grab-and-go portions throughout the week.
Exciting Variations to Explore
And for those who love to experiment, the possibilities are endless! You could try different types of apples – Granny Smith for a tarter bite, or Honeycrisp for extra sweetness and crispness. Experiment with different cookie bases; gingersnaps would add a wonderful spicy kick, or even shortbread for a buttery richness. For an adult-friendly twist, a splash of bourbon or rum in the apple mixture or the pudding itself can add a sophisticated depth. A sprinkle of streusel topping, like you’d find on a classic apple crisp, could add another fantastic textural element and a beautiful presentation. You could also try making individual servings in small ramekins or mason jars for a charming, personal touch, perfect for parties or picnics. Imagine personal mini puddings, each a little taste of heaven. Don’t be afraid to adjust the spices either – a pinch of nutmeg or allspice could enhance the existing cinnamon beautifully. For those who love a bit of texture, sprinkling some toasted coconut flakes or a crumble of graham cracker crust on top before serving adds yet another dimension. And remember, seasonal adjustments are always fun – a dash of pumpkin spice in the fall, or a lighter hand with cinnamon in the warmer months. The beauty of this recipe lies in its adaptability, allowing you to tailor it perfectly to your preferences and available ingredients. It’s a wonderful canvas for your culinary imagination.
I truly hope you’re feeling inspired to roll up your sleeves and give this incredible recipe a try. I promise you, the effort is minimal compared to the immense satisfaction and the rave reviews you’ll receive. There’s nothing quite like the joy of sharing a homemade dessert, especially one as unique and delicious as this. It’s a recipe that’s destined to become a staple in your kitchen, a go-to for special occasions and everyday indulgence alike. So, please, gather your ingredients, follow my steps, and prepare to be amazed. Your kitchen is about to become the happiest place in your home, filled with the intoxicating aromas of baked apples, sweet bananas, and warm spices. This recipe is more than just instructions; it’s an invitation to create memories, to gather loved ones around a table, and to share in the simple, profound pleasure of good food. I pour my heart into developing recipes that I genuinely believe you’ll adore, and this one, my friends, is a true gem. And once you’ve experienced the magic, I would absolutely love to hear from you! Please come back and share your thoughts in the comments below. Did you try any of the variations? What was your favorite part? Did your family or friends have a favorite element? I adore seeing your creations, so if you snap a picture, please consider sharing it. Your feedback and experiences are incredibly valuable to me and to our community of fellow food enthusiasts. Let’s celebrate the joy of cooking and baking together. So, please, don’t hesitate. Take the leap, bake this extraordinary dessert, and prepare to bask in the compliments. I’m eagerly awaiting your stories, your photos, and your tips in the comments section. Let’s build a wonderful community around delicious food, one amazing dessert at a time. Happy baking, happy eating, and most importantly, happy sharing!
Apple Pie Banana Pudding: The Ultimate Dessert Fusion
Imagine taking the beloved, comforting flavors of classic apple pie, with its spiced, tender fruit, and masterfully blending them into the creamy, dreamy layers of a traditional Southern banana pudding. This isn’t merely a fusion; it’s a culinary masterpiece that brings together two iconic American desserts, creating something truly unparalleled and utterly delightful.
Ingredients
-
6 medium apples (approx. 3 lbs), peeled, cored, sliced 1/4-inch
-
1/2 cup granulated sugar (for apples)
-
1/4 cup packed light brown sugar (for apples)
-
1 tablespoon all-purpose flour or cornstarch (for apples)
-
1 teaspoon ground cinnamon
-
1/4 teaspoon ground nutmeg
-
1/8 teaspoon ground cloves (optional)
-
1/4 cup unsalted butter, cut into small pieces (for apples)
-
2 tablespoons fresh lemon juice
-
1/4 cup water or apple cider
-
1 cup granulated sugar (for pudding)
-
1/2 cup all-purpose flour or cornstarch (for pudding)
-
1/2 teaspoon salt
-
4 large egg yolks, lightly beaten
-
4 cups whole milk
-
2 tablespoons unsalted butter (for pudding)
-
2 teaspoons pure vanilla extract (for pudding)
-
4-5 ripe but firm bananas, sliced 1/4-inch (approx. 4-5 cups)
-
1 (12-ounce) box vanilla wafers (350-400g)
-
Optional: 1/2 cup extra crushed vanilla wafers or sprinkle of cinnamon (for garnish)
-
Optional: 1 1/2 cups heavy cream, very cold (for topping)
-
Optional: 1/4 cup powdered sugar (for topping)
-
Optional: 1 teaspoon pure vanilla extract (for topping)
Instructions
-
Step 1
Peel, core, and slice apples (1/4-inch thick). In a separate bowl, whisk granulated sugar, brown sugar, flour/cornstarch, cinnamon, nutmeg, and optional cloves. Toss sliced apples with spice mix, lemon juice, and water/cider until evenly coated. Transfer to a large skillet, dot with butter. Cook over medium heat, stirring occasionally, for 10-15 minutes until apples are tender-crisp and sauce thickens. Remove from heat and cool completely, spread on a baking sheet to speed cooling. -
Step 2
In a heavy-bottomed saucepan, whisk granulated sugar, flour/cornstarch, and salt. In a separate bowl, lightly beat egg yolks, then whisk in 1 cup whole milk. Gradually whisk remaining 3 cups whole milk into the dry ingredients in the saucepan. Cook over medium heat, stirring constantly, until mixture thickens and coats a spoon (8-10 minutes); do not boil. Temper egg yolks by slowly whisking 1/2 cup hot milk mixture into them, then pour tempered yolks back into the saucepan. Cook over medium-low heat, whisking constantly for 2-3 minutes, until pudding is thick and creamy. Remove from heat, stir in butter and vanilla extract. Transfer pudding to a clean bowl, press plastic wrap directly onto surface. Cool at room temperature for 30 minutes, then chill in the refrigerator for at least 2-3 hours, or overnight, until thoroughly cold and firm. -
Step 3
In a clear serving dish (or individual cups), arrange a single layer of vanilla wafers on the bottom, breaking some to fit snugly. Place an even layer of sliced bananas over the wafers. Spoon about half of the cooled apple pie filling evenly over the bananas. Carefully spoon about half of the chilled vanilla pudding over the apple filling, spreading smoothly. Repeat the layers: add another full layer of vanilla wafers, followed by the remaining sliced bananas, then the remaining apple pie filling, and finally top with the remaining vanilla pudding. For garnish, you may arrange a few whole vanilla wafers or sprinkle crushed wafers or cinnamon on top. -
Step 4
Cover the assembled pudding tightly with plastic wrap. Refrigerate for at least 4 hours, preferably overnight, to allow wafers to soften and flavors to meld beautifully. This chilling period is crucial for setting and optimal flavor development. -
Step 5
Ensure heavy cream, mixing bowl, and whisk are very cold. Pour cold heavy cream into the chilled bowl. Whip cream on low speed, then gradually increase to medium-high. When soft peaks form, add powdered sugar and vanilla extract. Continue whipping until stiff peaks form; be careful not to overbeat. Dollop or pipe whipped cream over individual servings just before serving. Garnish with a sprinkle of cinnamon or crushed vanilla wafers, if desired. -
Step 6
Scoop generous portions into bowls, ensuring each serving includes all layers. Store any leftover pudding in an airtight container in the refrigerator for 2-3 days. Do not freeze.
Important Information
Nutrition Facts (Per Serving)
It is important to consider this information as approximate and not to use it as definitive health advice.
Allergy Information
Please check ingredients for potential allergens and consult a health professional if in doubt.


Leave a Comment