

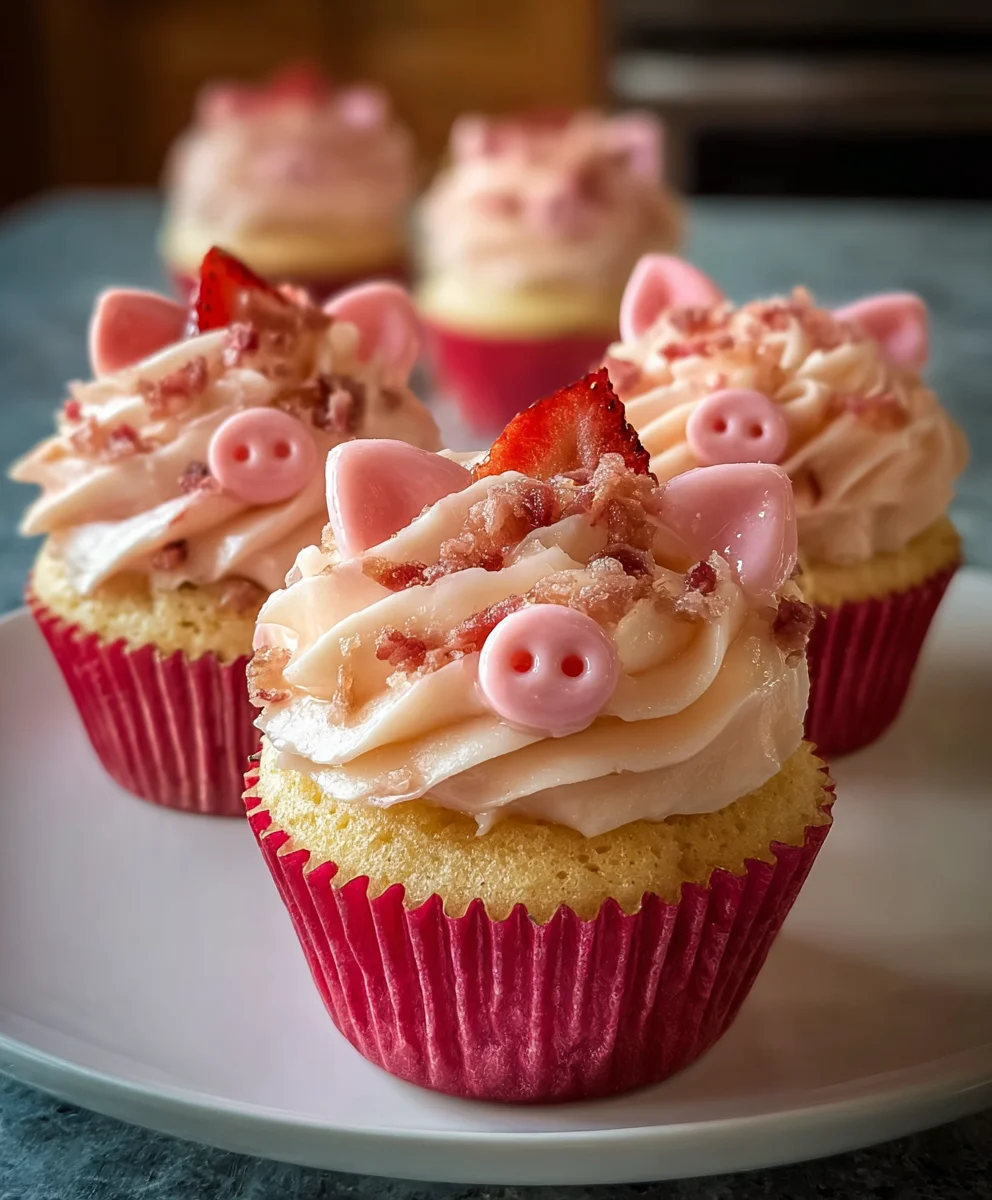
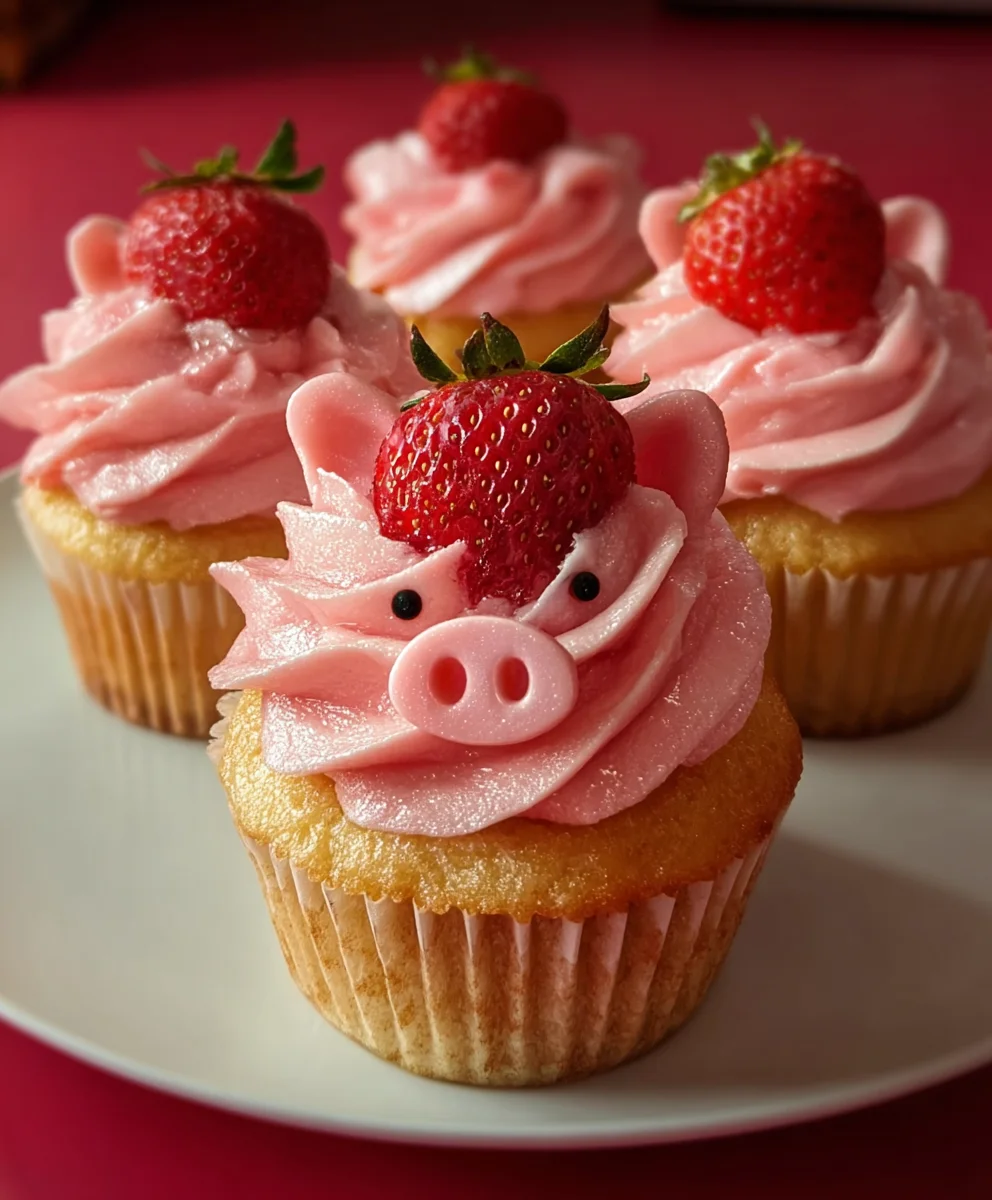
Strawberry Piggy Cupcakes are more than just a dessert; they’re an instant mood booster and a guaranteed showstopper at any gathering. Who can resist the sheer delight of these adorable little piggies, complete with tiny fondant ears and a charming pink snout, nestled atop a moist, fluffy cupcake? We certainly can’t! The magic of these Strawberry Piggy Cupcakes lies in their delightful duality: they’re incredibly fun to make and even more joyfully to devour. The bright, sweet burst of fresh strawberries baked right into the tender cake, combined with a creamy, dreamy strawberry frosting, creates a flavor profile that’s simply irresistible. They’re perfect for birthday parties, baby showers, or just a whimsical treat to brighten your day. Get ready to unleash your inner baker and create these precious edible works of art!

Ingredients:
- 1½ cups all-purpose flour
- 1½ teaspoons baking powder
- ¼ teaspoon salt
- ½ cup unsalted butter, softened
- ¾ cup granulated sugar
- 2 large eggs
- 1 teaspoon vanilla extract
- ½ cup milk
- ½ cup fresh strawberries, diced
- 1 cup unsalted butter, softened
- 2 cups powdered sugar
- 2 tablespoons heavy cream or milk
- 1 teaspoon vanilla extract
- Pink food coloring (preferably gel)
- Fresh strawberries (sliced into rounds for snouts)
Strawberry Piggy Cupcakes: The Baking Process
Making the Cupcake Batter
Let’s start by preheating your oven to 350°F (175°C). Line a standard 12-cup muffin tin with cupcake liners, or grease and flour each cup thoroughly. In a medium bowl, whisk together the 1½ cups of all-purpose flour, 1½ teaspoons of baking powder, and ¼ teaspoon of salt. This dry mixture is essential for ensuring your cupcakes have a good structure and rise evenly. Set this bowl aside for now.
In a large mixing bowl, cream together the ½ cup of softened unsalted butter and ¾ cup of granulated sugar until light and fluffy. This process incorporates air, which is key to a tender cupcake. You can use an electric mixer for this, which makes it much easier and faster, or a sturdy whisk and some elbow grease. Once the butter and sugar are well combined and have a pale yellow, creamy consistency, beat in the 2 large eggs, one at a time, making sure each egg is fully incorporated before adding the next. After the eggs are mixed in, stir in the 1 teaspoon of vanilla extract. This aromatic addition will lend a wonderful fragrance and flavor to your cupcakes.
Now, it’s time to alternate adding the dry ingredients and the ½ cup of milk to the wet ingredients. Begin by adding about a third of the flour mixture to the butter and egg mixture, mixing on low speed until just combined. Then, add half of the milk, mixing again until incorporated. Repeat this process, adding another third of the flour mixture, then the remaining milk, and finally the last of the flour mixture. Be careful not to overmix the batter at this stage; overmixing can develop the gluten in the flour too much, resulting in tough cupcakes. Mix only until no dry streaks of flour remain.
Finally, gently fold in the ½ cup of diced fresh strawberries. These little bursts of fruity flavor will be delightful within the cupcakes. Distribute the batter evenly among the prepared cupcake liners, filling each about two-thirds full. Bake for 18-22 minutes, or until a toothpick inserted into the center of a cupcake comes out clean. Let the cupcakes cool in the muffin tin for about 5 minutes before transferring them to a wire rack to cool completely. It’s crucial that they are completely cool before frosting.
Crafting the Piggy Frosting
Preparing the Buttercream
While your cupcakes are cooling, let’s prepare the frosting that will transform them into adorable pigs. In a large mixing bowl, cream the 1 cup of softened unsalted butter until it’s smooth and creamy. This is the foundation of our delicious buttercream. Gradually add the 2 cups of powdered sugar, about half a cup at a time, mixing on low speed until it’s incorporated. This gradual addition helps prevent a cloud of powdered sugar from erupting from your bowl.
Once the powdered sugar is mostly incorporated, increase the mixer speed to medium-high and beat for about 2-3 minutes until the frosting is light and fluffy. This is where the magic happens, creating that wonderfully smooth and airy texture. Add the 2 tablespoons of heavy cream or milk and the 1 teaspoon of vanilla extract. Mix until everything is well combined and the frosting reaches your desired consistency. If the frosting seems too thick, add a touch more cream or milk, a teaspoon at a time. If it’s too thin, add a bit more powdered sugar.
Adding the Piggy Pink Hue
Now for the fun part – making our frosting look like little piggies! Add a small amount of pink food coloring to the buttercream. Gel food coloring is highly recommended because it’s more concentrated and provides vibrant color without thinning out the frosting. Start with just a drop or two and mix it in thoroughly. Continue adding color and mixing until you achieve your desired shade of pink. You’re aiming for a soft, playful pink that evokes the sweet nature of a pig. Taste a tiny bit to ensure the vanilla flavor is balanced and delicious.
Assembling Your Strawberry Piggy Cupcakes
Frosting and Decorating the Pigs
Once your cupcakes have cooled completely, it’s time to bring your Strawberry Piggy Cupcakes to life. Using an offset spatula or a piping bag fitted with a round tip, generously frost each cupcake with the pink buttercream. Aim for a smooth, rounded surface that resembles the body of a pig. Don’t worry about perfection; a slightly rustic look can be quite charming for these little creatures.
To create the pig’s snout, take a round slice of fresh strawberry and gently press it into the top center of the frosted cupcake. The natural curve of the strawberry slice works perfectly for this. For the eyes, you can use tiny dots of dark frosting (if you have any leftover or can make a small batch, or even a tiny dab of melted dark chocolate if you have it on hand) or very small edible candy eyes. If you don’t have either, a single small dot of black food coloring carefully applied with a toothpick can also work in a pinch. Position these dots just above the strawberry snout to complete the piggy face. These Strawberry Piggy Cupcakes are now ready to be enjoyed or shared!
Conclusion:
And there you have it – your very own adorable and delicious Strawberry Piggy Cupcakes! I hope you’ve had as much fun making these as I always do. These cupcakes are a delightful combination of moist strawberry cake and creamy frosting, topped with an irresistibly cute piggy face. They’re guaranteed to bring smiles to any celebration or just brighten up a regular afternoon.
For serving suggestions, these are perfect as a fun dessert for birthdays, baby showers, or any themed party. They also make a wonderful sweet treat to pack in a lunchbox for a special surprise. Feel free to get creative with your decorations! You can use different shades of pink frosting for variety, or even add edible glitter for extra sparkle.
Don’t be afraid to experiment with variations. If you’re not a fan of strawberries, you can easily adapt the cake recipe to be vanilla or chocolate, and still create the adorable piggy faces. You could also try a different frosting flavor, like cream cheese or even a strawberry buttercream for an intensified fruity kick. The possibilities are truly endless!
I truly encourage you to give these Strawberry Piggy Cupcakes a try. They’re a fantastic project for bakers of all skill levels, and the joy they bring is immeasurable. Happy baking!
Frequently Asked Questions:
Can I make these cupcakes ahead of time?
Yes, you absolutely can! You can bake the cupcakes a day in advance and store them in an airtight container at room temperature once they have completely cooled. The frosting is best made closer to decorating time, but you can also make it a day ahead and store it in the refrigerator. If refrigerated, allow it to come to room temperature and re-whip it briefly before frosting the cupcakes.
What if I don’t have piping bags and tips for the frosting?
No problem at all! You can still achieve a lovely frosting look without specialized tools. For the “mud” effect, you can simply spread the frosting evenly with a spatula or the back of a spoon. For the snout and ears, you can carefully dollop the frosting with a small spoon or even a ziplock bag with a corner snipped off. The key is to have fun and be creative!
Strawberry Piggy Cupcakes
Cute and easy strawberry cupcakes decorated to look like adorable little pigs. Perfect for parties and celebrations!
Ingredients
-
1½ cups all-purpose flour
-
1½ teaspoons baking powder
-
¼ teaspoon salt
-
½ cup unsalted butter, softened
-
¾ cup granulated sugar
-
2 large eggs
-
1 teaspoon vanilla extract
-
½ cup milk
-
½ cup fresh strawberries, diced
-
1 cup unsalted butter, softened
-
2 cups powdered sugar
-
2 tablespoons heavy cream or milk
-
1 teaspoon vanilla extract
-
Pink food coloring (preferably gel)
-
Fresh strawberries (sliced into rounds for snouts)
Instructions
-
Step 1
Preheat oven to 350°F (175°C). Line a 12-cup muffin tin with liners or grease and flour. Whisk together flour, baking powder, and salt in a medium bowl. -
Step 2
In a large bowl, cream together ½ cup softened butter and ¾ cup sugar until fluffy. Beat in eggs one at a time, then stir in 1 teaspoon vanilla extract. -
Step 3
Alternately add dry ingredients and ½ cup milk to the wet ingredients, beginning and ending with the dry. Mix until just combined, being careful not to overmix. Gently fold in diced strawberries. -
Step 4
Distribute batter evenly into prepared cupcake liners, filling two-thirds full. Bake for 18-22 minutes, or until a toothpick comes out clean. Cool in tin for 5 minutes, then transfer to a wire rack to cool completely. -
Step 5
While cupcakes cool, prepare frosting: Cream 1 cup softened butter until smooth. Gradually add powdered sugar, mixing on low. Increase speed and beat until light and fluffy. Add heavy cream/milk and 1 teaspoon vanilla extract, mixing until combined. -
Step 6
Add pink food coloring to the buttercream, a drop at a time, mixing thoroughly until your desired shade is achieved. Frost cooled cupcakes with pink buttercream, creating a rounded surface. -
Step 7
Press a strawberry round into the center of each frosted cupcake for the snout. Add small dots of dark frosting, melted dark chocolate, or black food coloring for eyes above the snout to complete the piggy face.
Important Information
Nutrition Facts (Per Serving)
It is important to consider this information as approximate and not to use it as definitive health advice.
Allergy Information
Please check ingredients for potential allergens and consult a health professional if in doubt.
Leave a Comment