

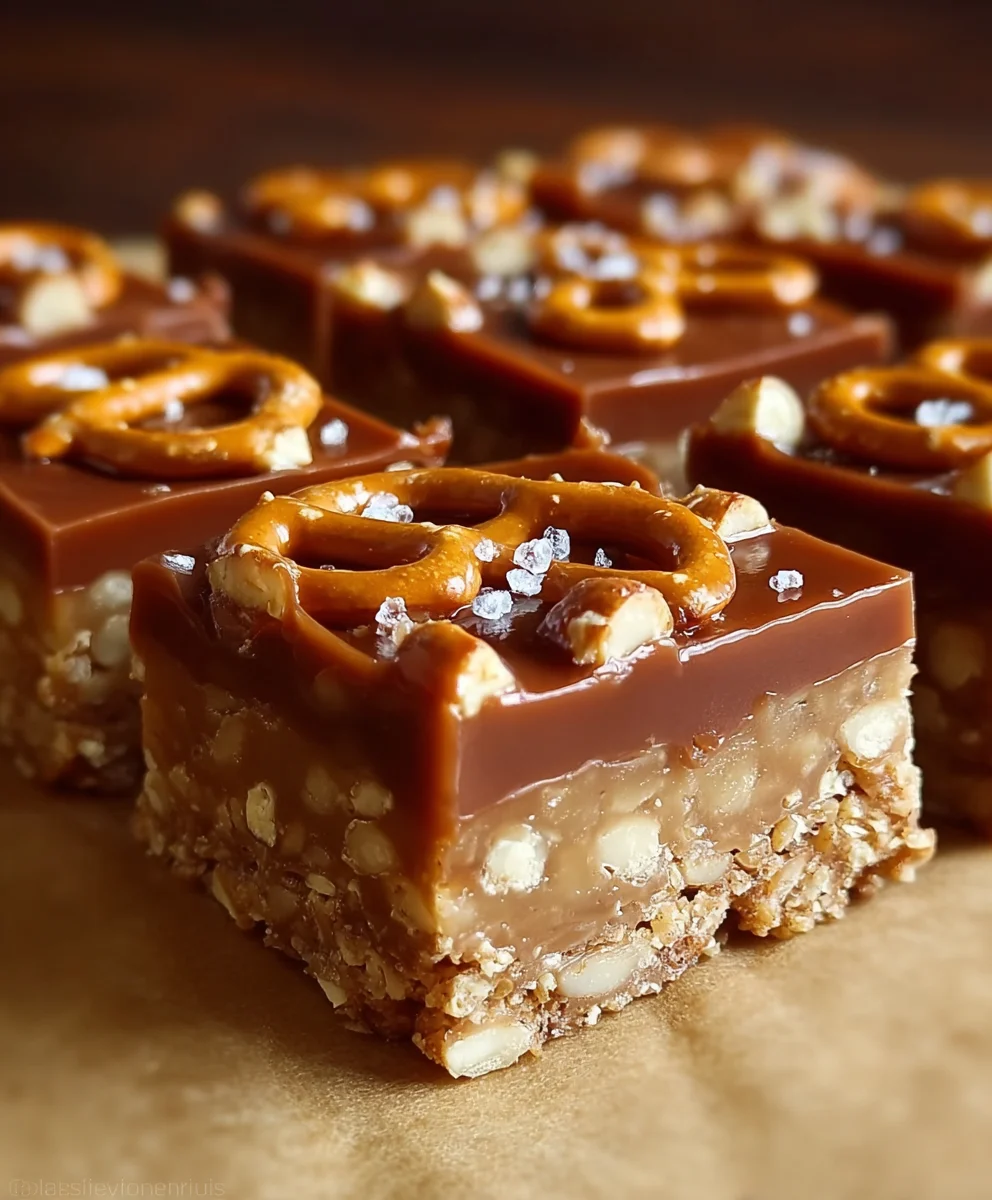
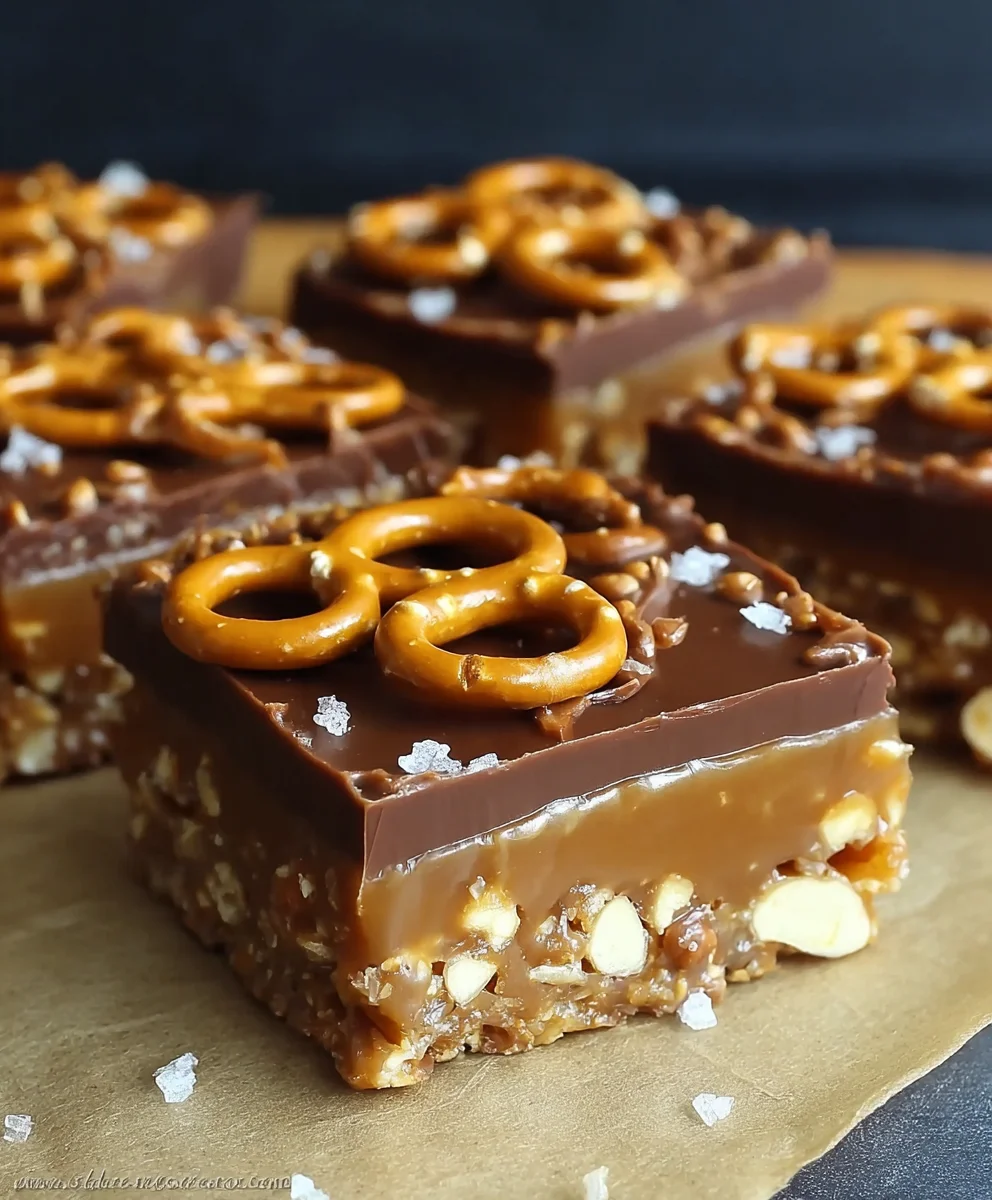
Caramel Pretzel Bars are not just a dessert; they are a culinary revelation, a harmonious marriage of contrasting flavors and textures that will undoubtedly captivate your taste buds. Imagine sinking your teeth into a treat that perfectly balances the rich, buttery sweetness of gooey caramel with the irresistible salty crunch of pretzels. This enchanting combination creates a truly unique and utterly addictive experience that sets these bars apart from any other confection you’ve encountered.
The magic of this dish lies in its exquisite simplicity and profound satisfaction. People adore these bars because they masterfully deliver that much-craved sweet and salty dynamic, a taste sensation that has become incredibly popular in modern dessert culture. While not steeped in ancient history, the concept of integrating pretzels into sweet treats has seen a remarkable evolution, transforming a simple savory snack into a beloved component of innovative confections. Each bite offers a delightful interplay of chewy, golden caramel clinging to a sturdy, crisp pretzel crust, often complemented by a hint of chocolate, making it impossible to resist. These Caramel Pretzel Bars are the ultimate crowd-pleaser, delivering consistent joy and a satisfying indulgence that will have everyone asking for the recipe. I am confident they will become a cherished favorite in your baking repertoire.

Ingredients:
Creating truly spectacular Caramel Pretzel Bars starts with a carefully curated list of ingredients, ensuring each layer contributes to a symphony of sweet and salty perfection. Here’s everything you’ll need:
- For the Crispy Pretzel Crust:
-
3 cups (about 7 oz or 200g) finely crushed pretzels: I find that sturdy, salted pretzel twists work best here, not the tiny sticks or thin crisps. We’re looking for a good, robust pretzel flavor to really stand out against the sweetness.
-
¾ cup (1½ sticks or 170g) unsalted butter, melted: Melting the butter fully is key for an even coating and a crust that holds together beautifully.
-
¼ cup (50g) granulated sugar: Just a touch of sugar helps bind the crust and provides a subtle sweetness to complement the salty pretzels without making it overly sweet.
-
- For the Luscious Caramel Layer:
-
1 cup (2 sticks or 226g) unsalted butter: This is the foundation of our rich, buttery caramel. Using unsalted butter allows me to control the salt content precisely.
-
1½ cups (300g) packed light brown sugar: Brown sugar adds depth and a lovely molasses note to the caramel, contributing to its chewy texture.
-
½ cup (120ml) heavy cream: Heavy cream is essential for creating a smooth, creamy caramel that isn’t too stiff or prone to crystallization.
-
¼ teaspoon sea salt: A touch of sea salt really brings out the caramel flavor and balances the sweetness. Don’t skip this!
-
1 teaspoon pure vanilla extract: Added at the end, vanilla brightens and enhances all the other flavors in the caramel.
-
- For the Decadent Chocolate Topping:
-
2 cups (340g) semi-sweet chocolate chips: Semi-sweet chocolate provides a classic balance, but you could use milk chocolate for a sweeter bar or dark chocolate for a more intense flavor. Quality matters here!
-
2 tablespoons (28g) unsalted butter or coconut oil: This addition helps the chocolate melt smoothly, gives it a beautiful shine, and makes it easier to slice once set.
-
Optional: ¼ cup extra crushed pretzels for garnish: A final sprinkle of pretzels not only adds visual appeal but also telegraphs the delicious salty crunch within!
-
Equipment You’ll Need:
Having the right tools ready makes the baking process so much smoother and more enjoyable. Here’s what I typically gather before I start:
- A 9×13 inch baking pan
- Parchment paper
- Aluminum foil (optional, for covering pan)
- Food processor or a large zip-top bag and a rolling pin
- Medium saucepan (preferably heavy-bottomed)
- Whisk
- Heat-resistant spatula or wooden spoon
- Measuring cups and spoons
- Small microwave-safe bowl or a double boiler setup
- Wire cooling rack
Preparing the Irresistible Pretzel Crust
The foundation of our Caramel Pretzel Bars is a perfectly balanced, crunchy, salty-sweet pretzel crust. This is where the magic begins, setting the stage for the layers of caramel and chocolate to come. Getting this layer just right is crucial for that satisfying textural contrast.
-
Preheat and Prep Your Pan: First things first, I always get my oven ready. Preheat your oven to 350°F (175°C). While the oven heats up, I prepare my 9×13 inch baking pan. I like to line it with parchment paper, allowing an overhang on the longer sides. This creates a “sling” that makes it incredibly easy to lift the entire batch of bars out of the pan once they’re chilled and ready to cut. If you don’t have parchment paper, you can grease the pan well, but believe me, parchment makes life so much easier when it comes to cutting and serving these sticky delights!
-
Crush Those Pretzels: Now for the fun part – crushing the pretzels! I aim for a fine crumb, similar to graham cracker crumbs, but with a few slightly larger pieces for added texture. My go-to method is using a food processor: I just pulse the pretzels until they reach the desired consistency. It’s quick and consistent. If you don’t have a food processor, no worries! You can place the pretzels in a large, sturdy zip-top bag, seal it, and then use a rolling pin to crush them. Just be mindful not to overdo it; we want crumbs, not powder. It’s also a fantastic way to relieve a little stress!
-
Combine and Sweeten: Once your pretzels are perfectly crushed, transfer them to a medium mixing bowl. Add the ¾ cup of melted unsalted butter and the ¼ cup of granulated sugar. Now, gently mix everything together with a spoon or a spatula until the pretzel crumbs are evenly moistened. It should resemble wet sand. I make sure every crumb gets a little butter coating, as this is what helps the crust bind and become wonderfully crisp.
-
Press and Bake to Golden Perfection: Turn the buttered pretzel mixture into your prepared 9×13 inch baking pan. Using the bottom of a flat glass or the palm of your hand, firmly press the mixture into an even layer across the bottom of the pan. The more compact it is, the less likely it is to crumble when you slice the bars later. Once pressed, slide the pan into your preheated oven and bake for 10-12 minutes, or until the edges are lightly golden and the crust smells deliciously toasty. Baking the crust first helps it set and become extra firm and flavorful, preventing it from getting soggy under the caramel.
-
Cool Down: As soon as the crust comes out of the oven, I place the pan on a wire cooling rack. It’s important to let it cool completely before moving on to the caramel layer. A warm crust can cause your caramel to melt or separate, and we definitely don’t want that! This cooling step usually takes about 20-30 minutes at room temperature, or you can pop it into the fridge for 10-15 minutes if you’re a little impatient like me.
Crafting the Golden Caramel Layer
This is truly the heart of our Caramel Pretzel Bars – a rich, buttery, chewy caramel that provides the perfect counterpoint to the salty pretzel crust. Making caramel can seem intimidating, but I promise, with a little patience and attention, you’ll achieve a perfectly luscious result.
-
Gather Your Caramel Ingredients: In a medium, heavy-bottomed saucepan (a heavy bottom helps distribute heat evenly and prevents scorching), combine the 1 cup of unsalted butter, 1½ cups of packed light brown sugar, ½ cup of heavy cream, and ¼ teaspoon of sea salt. I ensure everything is measured out accurately before I even turn on the heat, as caramel making moves fairly quickly once it gets going.
-
Cook to Perfection: Place the saucepan over medium heat. Now, this is important: stir the mixture constantly with a whisk or heat-resistant spatula until the butter has fully melted and the sugar has dissolved. Once it comes to a rolling boil – meaning it’s bubbling vigorously even when you stir – continue to boil, stirring frequently, for 5-7 minutes. I always set a timer here to ensure I don’t undercook or overcook it. The goal is to reach a soft-ball stage, which means if you drop a small amount into a cup of cold water, it should form a soft, pliable ball. If you have a candy thermometer, aim for 238-240°F (114-116°C). Don’t rush this step, and keep that caramel moving to prevent it from sticking or burning on the bottom.
-
Flavor and Pour: As soon as your caramel reaches the desired temperature or consistency, immediately remove the saucepan from the heat. Stir in the 1 teaspoon of pure vanilla extract. Be careful, as the mixture will bubble up a bit when the vanilla is added. Once thoroughly combined, pour the hot caramel evenly over your completely cooled pretzel crust in the pan. I use a spatula to gently spread it if needed, ensuring it covers the entire surface.
-
Set It Up: Let the pan sit on the wire cooling rack for another 30-60 minutes at room temperature, allowing the caramel to cool and set slightly. Once it’s cool enough to handle without burning, I usually transfer the pan to the refrigerator for at least 1 hour. Chilling the caramel thoroughly ensures it’s firm enough to support the chocolate layer and prevents the layers from melding together too much, giving us those distinct, beautiful layers when we slice.
Adding the Decadent Chocolate Topping
The final layer is a smooth, glossy blanket of chocolate that perfectly complements the salty crunch of the pretzels and the chewy sweetness of the caramel. This layer not only adds visual appeal but also provides that satisfying chocolate finish everyone craves.
-
Melt the Chocolate: While your caramel is chilling, it’s time to prepare the chocolate topping. I combine the 2 cups of semi-sweet chocolate chips and the 2 tablespoons of unsalted butter (or coconut oil) in a microwave-safe bowl. I then microwave it in 30-second intervals, stirring well after each interval, until the chocolate is completely melted and smooth. Be careful not to overheat the chocolate, as it can seize up and become grainy. Alternatively, you can use a double boiler method for a gentler melt: place the bowl over a saucepan of simmering water, ensuring the bottom of the bowl doesn’t touch the water, and stir until smooth. The butter or coconut oil helps create a beautifully smooth, shiny chocolate layer that sets nicely and is easier to cut without cracking.
-
Spread the Chocolate Love: Once your caramel layer is firm and well-chilled, retrieve the pan from the refrigerator. Pour the melted chocolate mixture evenly over the caramel. Using an offset spatula or the back of a spoon, gently spread the chocolate across the entire surface, creating a smooth, even layer. I take my time here to ensure full coverage and a pristine finish. The contrast between the dark chocolate and the lighter caramel is always so visually appealing!
-
Optional Pretzel Garnish: If I’m feeling fancy and want to add an extra touch of pretzel crunch and visual appeal, this is the moment. While the chocolate is still wet, I sprinkle an additional ¼ cup of finely crushed pretzels evenly over the top. Gently pressing them lightly into the chocolate ensures they stick. This not only reinforces the pretzel theme but also adds another layer of delightful texture and that signature salty sparkle.
-
Chill to Set: With the chocolate layer complete, carefully place the pan back into the refrigerator. Allow the bars to chill for at least 2-3 hours, or ideally, overnight. This chilling time is absolutely critical! It allows all three layers—the pretzel crust, the caramel, and the chocolate—to set up completely and meld into a cohesive, sliceable bar. Rushing this step will result in a messy, crumbling disaster, and nobody wants that!
Slicing and Serving Your Caramel Pretzel Bars
After all your hard work and patience, the moment of truth has arrived! Slicing these bars neatly is the final step to presenting your stunning creation. I have a few tricks to make sure they come out perfectly every time.
-
The Big Reveal and Slicing: Once your Caramel Pretzel Bars are thoroughly chilled and firm, remove the pan from the refrigerator. Using the parchment paper overhang as handles, carefully lift the entire slab of bars out of the pan and place it onto a cutting board. I find this much easier than trying to cut them in the pan. Now, for slicing: I recommend using a large, sharp knife. For the cleanest cuts, it’s helpful to run your knife under hot water, wipe it dry, and then make a cut. Repeat this process for each slice. This warms the knife just enough to glide through the chocolate and caramel without dragging or cracking. I usually trim off the very edges for a super clean look (and a chef’s treat for myself!), then cut the slab into about 24 squares or rectangles. You can make them larger or smaller depending on your preference, but I find a 2×3-inch piece is just perfect for a satisfying bite.
-
Storing Your Delicious Creations: These bars are incredibly popular, but if you happen to have any leftovers (a rare occurrence in my house!), they store beautifully. I keep my Caramel Pretzel Bars in an airtight container in the refrigerator. They’ll stay fresh and delicious for up to 1 week. In fact, I think they taste even better after a day or two, once the flavors have had a chance to fully meld. While they can be stored at room temperature for a day or two in cooler environments, the fridge helps keep the caramel firm and the chocolate from softening too much, especially in warmer weather.
-
Enjoy Every Bite! Now for the best part – indulging in your homemade Caramel Pretzel Bars! Each bite offers that perfect trifecta of salty, sweet, and crunchy. The crisp pretzel crust, the luscious chewy caramel, and the smooth, rich chocolate topping create an unforgettable dessert experience. Whether you’re sharing them at a party, bringing them to a potluck, or just enjoying them as a special treat for yourself, I know you’re going to love them. They’re a true crowd-pleaser and always disappear quickly!
Conclusion:
And there you have it, my friends! We’ve journeyed through the simple yet magical process of creating what I believe might just be one of the most addictive dessert experiences you’ll ever encounter. These aren’t just any sweet treats; these are truly special. The interplay of textures and flavors in these delectable bars is nothing short of phenomenal. We’re talking about that perfect harmony between the crisp, salty crunch of pretzels, the rich, buttery chew of homemade or store-bought caramel, and the luxurious blanket of melted chocolate that crowns it all. It’s a symphony for your taste buds, a delightful contradiction that simply works, making these Caramel Pretzel Bars an absolute must-try for anyone who appreciates a truly great dessert.
I often find myself reaching for one more, and then just one more, because the combination is just that good. What makes this recipe particularly special, beyond its incredible taste, is its versatility and relatively straightforward preparation. You don’t need to be a pastry chef to achieve perfection here; the steps are clear, the ingredients are accessible, and the reward is immense. Imagine bringing a tray of these to a potluck or family gathering. I guarantee they’ll be the first to disappear, and you’ll be showered with requests for the recipe. They make fantastic edible gifts too, beautifully packaged for holidays or as a thoughtful thank you. Trust me, the smiles you’ll get are worth every minute spent in the kitchen.
When it comes to serving, these bars are incredibly flexible. They are absolutely delightful on their own, a perfect pick-me-up with an afternoon coffee or a decadent treat after dinner. But why stop there? I love serving them slightly chilled, which makes the caramel even chewier and gives the chocolate a satisfying snap. For an extra special indulgence, try them warmed ever so slightly in the microwave for a few seconds – just enough to soften the caramel and chocolate – and pair them with a scoop of vanilla bean ice cream. The cold, creamy ice cream against the warm, chewy, salty-sweet bar is an experience you won’t soon forget. A drizzle of extra caramel sauce or a sprinkle of flaky sea salt right before serving can also elevate them to another level of gourmet goodness.
Feeling adventurous? There are so many ways to customize these bars to your liking. Consider swapping out the milk chocolate for dark chocolate for a richer, less sweet profile, or use white chocolate for a different aesthetic and flavor. You could even do a beautiful swirl of both! A sprinkle of chopped toasted pecans or walnuts over the chocolate layer adds another layer of texture and nutty flavor, which I highly recommend if you’re a fan of nuts. For a festive touch, a few sprinkles or holiday-themed candies can make these perfect for any celebration. The beauty of this recipe lies in its adaptability; it’s a fantastic base for your own creative explorations.
So, what are you waiting for? I truly encourage you to carve out some time this week to whip up a batch of these extraordinary Caramel Pretzel Bars. You won’t regret it, and neither will anyone you choose to share them with (if you can bear to part with any!). Once you’ve made them, I would absolutely love to hear about your experience. Did you add any unique twists? What was your favorite part? Please come back and leave a comment below, or better yet, share a photo of your delicious creation on social media and tag me! Seeing your culinary successes truly makes my day. Happy baking, my friends!
Frequently Asked Questions About Caramel Pretzel Bars:
Q: How do I store Caramel Pretzel Bars to keep them fresh?
A: To keep your delicious Caramel Pretzel Bars fresh and preserve their delightful texture, I recommend storing them in an airtight container at room temperature for up to 3-4 days. If your kitchen tends to be on the warmer side, or if you prefer a firmer bar, you can store them in the refrigerator. Just be sure to bring them back to room temperature for about 15-20 minutes before serving for the best texture, especially the caramel!
Q: Can I make these Caramel Pretzel Bars ahead of time?
A: Absolutely! These bars are fantastic for making ahead, which makes them perfect for parties, holidays, or when you just want a ready-made treat. You can prepare them up to 2-3 days in advance and store them as directed above. In fact, I often find that the flavors meld even better after a day or so, becoming even more rich and cohesive.
Q: Can I freeze Caramel Pretzel Bars?
A: Yes, you can! Freezing is a great option for long-term storage. Once the bars have fully set and cooled, cut them into individual servings. Wrap each bar tightly in plastic wrap, then place them in an airtight freezer-safe container or freezer bag. They can be frozen for up to 2-3 months. To enjoy, simply thaw them at room temperature for a few hours, or overnight in the refrigerator.
Q: Why are my pretzels soggy? How can I prevent this?
A: Soggy pretzels are usually a sign that moisture from the caramel has seeped into them. To prevent this, ensure your pretzel crust is compacted very well. Also, make sure the caramel layer isn’t too thin in spots where pretzels might be exposed. Some people like to create a thin barrier, like a very light dusting of flour or a quick spray of non-stick baking spray over the baked pretzel crust before adding caramel, but I find pressing the crust firmly and not over-baking the caramel layer typically does the trick. Storing them properly in an airtight container also helps maintain their crispness.
Q: What kind of caramel should I use? Can I use store-bought?
A: You absolutely can use store-bought caramel for convenience! My preference is often for a good quality jarred caramel sauce or even individually wrapped soft caramel candies (like Kraft Caramels), which melt beautifully. If using soft caramels, you’ll need to melt them down with a splash of milk or cream until smooth. If you’re feeling ambitious, homemade caramel is always a delicious option, offering a depth of flavor that’s hard to beat. Just make sure it’s a thick, pourable consistency when warm.
Caramel Pretzel Bars: Sweet & Salty No-Bake Delight!
Indulge in these irresistible no-bake Caramel Pretzel Bars, featuring a crispy pretzel crust, a luscious chewy caramel layer, and a decadent chocolate topping. The perfect balance of sweet and salty for a delightful treat.
Ingredients
-
3 cups (200g) finely crushed pretzels
-
¾ cup (170g) unsalted butter, melted
-
¼ cup (50g) granulated sugar
-
1 cup (226g) unsalted butter
-
1½ cups (300g) packed light brown sugar
-
½ cup (120ml) heavy cream
-
¼ teaspoon sea salt
-
1 teaspoon pure vanilla extract
-
2 cups (340g) semi-sweet chocolate chips
-
2 tablespoons (28g) unsalted butter or coconut oil
-
Optional: ¼ cup crushed pretzels for garnish
Instructions
-
Step 1
Preheat oven to 350°F (175°C). Line a 9×13 inch pan with parchment paper. In a bowl, combine 3 cups finely crushed pretzels, ¾ cup melted unsalted butter, and ¼ cup granulated sugar. Mix well until crumbs are moistened. Press mixture firmly into the prepared pan. Bake for 10-12 minutes until lightly golden. Cool completely on a wire rack. -
Step 2
In a heavy-bottomed saucepan, combine 1 cup unsalted butter, 1½ cups packed light brown sugar, ½ cup heavy cream, and ¼ teaspoon sea salt. Cook over medium heat, stirring constantly, until butter melts and sugar dissolves. Bring to a rolling boil and continue boiling, stirring frequently, for 5-7 minutes (or until 238-240°F / 114-116°C). -
Step 3
Remove saucepan from heat and stir in 1 teaspoon pure vanilla extract. Pour hot caramel evenly over the completely cooled pretzel crust. Let cool at room temperature for 30-60 minutes, then transfer to the refrigerator to chill for at least 1 hour until firm. -
Step 4
While caramel chills, melt 2 cups semi-sweet chocolate chips with 2 tablespoons unsalted butter or coconut oil. Microwave in 30-second intervals, stirring, or use a double boiler, until completely smooth. -
Step 5
Pour melted chocolate evenly over the firm caramel layer, spreading with an offset spatula. (Optional) Sprinkle ¼ cup extra crushed pretzels over the wet chocolate for garnish. Refrigerate for at least 2-3 hours, or ideally overnight, until all layers are completely set. -
Step 6
Once thoroughly chilled, use the parchment paper overhang to lift the entire slab of bars from the pan onto a cutting board. For cleanest cuts, use a large, sharp knife warmed under hot water and wiped dry before each slice. Cut into approximately 24 squares or rectangles. -
Step 7
Store Caramel Pretzel Bars in an airtight container in the refrigerator for up to 1 week. Enjoy!
Important Information
Nutrition Facts (Per Serving)
It is important to consider this information as approximate and not to use it as definitive health advice.
Allergy Information
Please check ingredients for potential allergens and consult a health professional if in doubt.
Leave a Comment