

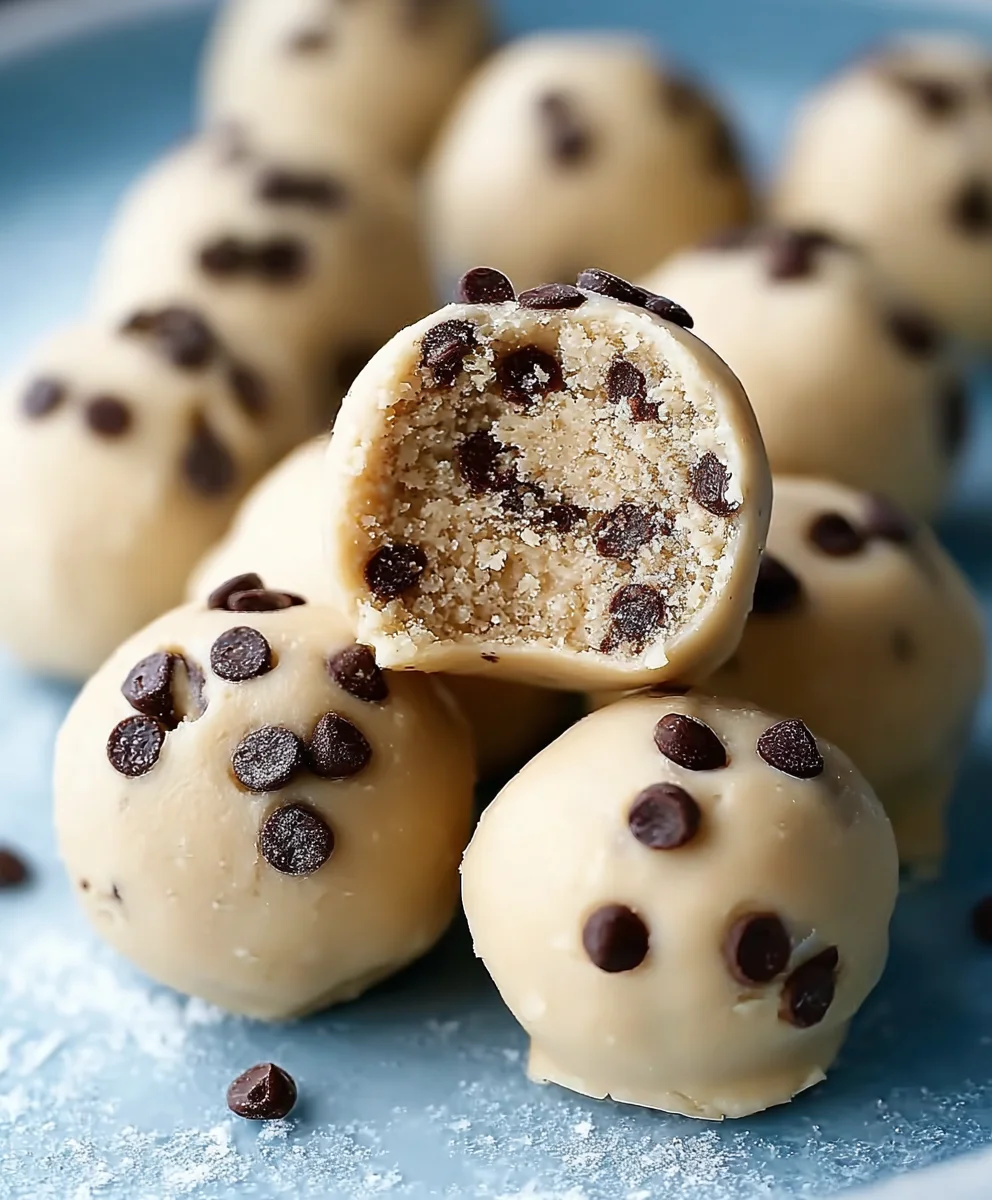
Cookie Dough Truffles are perhaps the ultimate answer to a question many of us have pondered since childhood: “Can I just eat the raw cookie dough?” We’ve all been there, sneaking a spoonful from the mixing bowl, risking a gentle parental warning but relishing that inimitable, comforting taste. Today, I’m thrilled to share a recipe that not only allows you to indulge that irresistible craving safely but elevates it into a sophisticated, bite-sized confection. These delightful treats capture all the nostalgic joy of homemade cookie dough, transformed into perfectly portioned, incredibly decadent truffles. They’re adored for their wonderfully soft, melt-in-your-mouth texture, the rich sweetness, and the sheer convenience of a no-bake dessert that tastes absolutely heavenly. Whether you’re a seasoned baker or simply looking for an effortless yet impressive treat, crafting your own batch of Cookie Dough Truffles is a truly rewarding experience, promising pure culinary bliss without the need to turn on your oven.

Ingredients:
- All-Purpose Flour: 1 ¼ cups (150g), heat-treated for safety
- Unsalted Butter: ½ cup (1 stick or 113g), softened to room temperature
- Granulated Sugar: ¼ cup (50g)
- Light Brown Sugar: ½ cup (100g), packed
- Pure Vanilla Extract: 1 teaspoon
- Milk: 2-3 tablespoons (dairy or non-dairy, as preferred)
- Fine Sea Salt: ¼ teaspoon
- Mini Chocolate Chips: ¾ cup (130g) – mini size works best for truffles, but regular can also be used
- For the Chocolate Coating:
- Semi-Sweet Chocolate Chips or Chopped Baking Chocolate: 12-16 ounces (340-450g), depending on thickness of coating desired
- Coconut Oil (optional): 1-2 teaspoons, to help thin the chocolate for a smoother dip
- Optional Toppings: Sprinkles, flaky sea salt, additional melted white chocolate for drizzling
Preparing the Edible Cookie Dough Base:
1. Heat-Treating the Flour for Safety:
Before we begin creating our delicious cookie dough, it’s absolutely crucial to heat-treat the all-purpose flour. Raw flour can contain bacteria, so this step ensures our cookie dough is perfectly safe to eat without baking. We want to eliminate any potential risks, making our homemade cookie dough truffles a guilt-free indulgence.
There are a couple of effective methods for heat-treating flour:
- Oven Method: Spread the 1 ¼ cups of all-purpose flour evenly on a baking sheet lined with parchment paper. Bake at 300°F (150°C) for 5-7 minutes. The goal is to bring the flour’s internal temperature to 160°F (71°C) to kill any bacteria, not to toast it. You can check the temperature with an instant-read thermometer. Once done, remove from the oven and let it cool completely before using. Cooling is important because hot flour can melt the butter in the next step, altering the dough’s texture.
- Microwave Method: Place the 1 ¼ cups of all-purpose flour in a microwave-safe bowl. Microwave on high for 60-90 seconds, stirring every 30 seconds. This helps to distribute the heat evenly and prevent burning. Again, aim for an internal temperature of 160°F (71°C). Allow the flour to cool completely before incorporating it into your dough. This method is often quicker and just as effective, especially if you’re in a hurry to get to those irresistible cookie dough truffles.
Once your flour is thoroughly heat-treated and completely cooled, set it aside. This is a foundational step for safe cookie dough truffles, so don’t skip it!
2. Creaming the Butter and Sugars:
In a large mixing bowl, combine the ½ cup of softened unsalted butter with ¼ cup of granulated sugar and ½ cup of packed light brown sugar. Using an electric mixer (either a stand mixer with the paddle attachment or a hand-held mixer), beat these ingredients together on medium speed until the mixture is light, fluffy, and pale in color. This creaming process usually takes about 2-3 minutes.
The aeration created by creaming the butter and sugars together is vital even for no-bake cookie dough truffles. It creates a smooth, tender base for our cookie dough and ensures a rich, buttery flavor throughout. Scrape down the sides of the bowl occasionally to ensure all ingredients are well combined. The texture should be visibly lighter and more voluminous, indicative of air being incorporated.
3. Incorporating Vanilla and Milk:
Reduce the mixer speed to low, or stop the mixer and add the ingredients by hand. Add 1 teaspoon of pure vanilla extract and 2 tablespoons of milk to the creamed butter and sugar mixture. Beat or stir until just combined.
The vanilla extract is essential for that classic cookie dough flavor we all adore. The milk, on the other hand, adds moisture to the dough, helping it come together into a cohesive, pliable consistency. Depending on the moisture content of your butter and brown sugar, you might need an additional tablespoon of milk later, but start with two. We’re looking for a dough that’s soft but not sticky, and easy to roll.
4. Gradually Adding Dry Ingredients:
Now, add the cooled, heat-treated flour and ¼ teaspoon of fine sea salt to the wet ingredients. Mix on low speed, or by hand with a spatula, until just combined. Be careful not to overmix the dough. Overmixing can develop the gluten in the flour even in a no-bake recipe, which can lead to a tougher, less desirable texture. We want our cookie dough truffles to be wonderfully soft and melt-in-your-mouth.
The mixture will transform from a crumbly consistency into a delicious, soft dough. If the dough seems too dry or crumbly and isn’t coming together, add the remaining tablespoon of milk, one teaspoon at a time, until it reaches the desired texture. It should be firm enough to handle but soft enough to scoop and roll easily. The salt enhances all the other flavors, balancing the sweetness and making the cookie dough truly irresistible.
5. Folding in the Chocolate Chips:
Finally, it’s time for the best part – adding the chocolate chips! Gently fold in ¾ cup of mini chocolate chips using a spatula. The mini chocolate chips are ideal for cookie dough truffles because their smaller size ensures a delightful chocolatey bite in every truffle without overpowering the cookie dough experience. If you only have regular chocolate chips, you can roughly chop them to achieve a similar effect, or simply use them as they are.
Distribute them evenly throughout the dough. Once the chocolate chips are well incorporated, give the dough a final scrape from the sides of the bowl to ensure everything is mixed. This edible cookie dough is now ready for the next exciting phase!
Forming the Truffles:
6. Chilling the Cookie Dough:
Cover the bowl containing your delicious cookie dough with plastic wrap and refrigerate it for at least 30 minutes. This chilling step is absolutely essential for several reasons. First, it allows the flavors in the dough to meld and deepen, resulting in a more complex and satisfying taste. Second, and perhaps most importantly for truffle making, it firms up the dough. A chilled dough is much easier to scoop, roll, and shape into uniform truffles without becoming sticky or falling apart.
If you’re in a rush, you can place it in the freezer for about 15-20 minutes, but keep a close eye on it to prevent it from freezing solid. The ideal consistency is firm but still pliable, allowing you to easily handle and shape the dough.
7. Scooping and Rolling the Truffles:
Once the dough is adequately chilled, line a baking sheet with parchment paper or wax paper. Using a small cookie scoop (about 1 tablespoon in size) or simply a spoon, scoop out portions of the cookie dough. Roll each portion between your palms to form smooth, round balls, about 1-inch in diameter. Aim for uniformity in size, as this will help them coat evenly in chocolate later and give your cookie dough truffles a professional, appealing look.
If the dough starts to get too warm and sticky while you’re rolling, pop it back into the refrigerator for 10-15 minutes to firm up again. Work efficiently but don’t rush; the goal is perfectly spherical truffles. Place the rolled truffles onto the prepared baking sheet.
8. Second Chill for Firmness:
Once all the cookie dough has been rolled into individual truffles, place the baking sheet back into the refrigerator for another 15-20 minutes, or in the freezer for 5-10 minutes. This second chill is crucial for firming up the truffles before coating them in chocolate.
When the truffles are very cold and firm, they will hold their shape better when dipped into the warm melted chocolate, preventing them from falling apart or creating a mess. A firm truffle also ensures the chocolate sets quickly and adheres beautifully, resulting in a perfectly coated, irresistible treat. This step is a small investment of time that yields significant improvements in the final quality and presentation of your cookie dough truffles.
Melting and Coating the Chocolate:
9. Preparing the Chocolate Coating:
It’s time to prepare the luscious chocolate coating for our cookie dough truffles! This step requires careful attention to ensure a smooth, glossy finish.
You have a couple of options for melting your 12-16 ounces of semi-sweet chocolate:
- Double Boiler Method: This is my preferred method for melting chocolate, as it offers gentle, consistent heat. Fill a saucepan with about an inch or two of water and bring it to a simmer. Place a heat-safe bowl (make sure it fits snugly over the saucepan without touching the water) with your chocolate chips or chopped baking chocolate over the simmering water. The steam from the water will gently heat the bowl and melt the chocolate. Stir occasionally with a rubber spatula until the chocolate is smooth and completely melted. Be extremely careful not to let any water or steam get into the chocolate, as this can cause it to “seize” and become thick and grainy.
- Microwave Method: If you’re short on time, the microwave can be used. Place the chocolate chips or chopped chocolate in a microwave-safe bowl. Microwave on 50% power for 30-second intervals, stirring thoroughly after each interval. Continue microwaving and stirring until the chocolate is smooth and melted. Chocolate retains its shape even when melted, so stirring is key to checking its consistency and preventing scorching. Stop just as it’s fully melted, as overheating can also cause it to seize.
Regardless of the method, ensure your chocolate is velvety smooth before proceeding.
10. Adding Coconut Oil (Optional but Recommended):
If you desire an even smoother, slightly thinner chocolate coating that’s easier to work with and sets with a beautiful sheen, now is the time to stir in 1-2 teaspoons of coconut oil (or a neutral oil like vegetable or canola oil). The coconut oil helps to slightly thin the melted chocolate, making it less viscous and easier to dip your truffles in. It also contributes to a smoother finish and a slightly snappier bite when the chocolate sets. Stir it in thoroughly until it’s fully incorporated and the chocolate looks uniform and glossy. This small addition can make a big difference in the aesthetic appeal of your cookie dough truffles.
11. Dipping the Truffles:
Now for the fun part – dipping those perfectly chilled cookie dough truffles! Take the firm truffles out of the refrigerator. Using a dipping fork (a candy dipping tool with thin tines) or a regular dinner fork, carefully drop one truffle into the melted chocolate. Ensure the truffle is fully submerged.
Using the fork, gently lift the truffle out of the chocolate, allowing any excess chocolate to drip off back into the bowl. You can tap the fork gently against the rim of the bowl to help shake off the extra coating. The goal is an even, relatively thin layer of chocolate without excessive drips or pooling. Avoid over-dipping or swirling too much, as this can warm the truffle and make it soft. Work quickly and efficiently to maintain the truffle’s cold temperature.
12. Allowing Excess Chocolate to Drip:
Once lifted from the chocolate, hold the truffle over the bowl for a few extra seconds, allowing any remaining excess chocolate to drip away. This step is crucial for achieving a clean, professional-looking finish. Too much chocolate on the truffle will result in a thick, uneven coating that can pool around the base when set. A thin, even coating not only looks better but also allows the delicious cookie dough flavor to shine through without being overwhelmed by chocolate. Patience here will be rewarded with beautifully coated cookie dough truffles.
Finishing Touches and Setting:
13. Transferring to Parchment Paper:
Carefully transfer each chocolate-coated truffle from the dipping fork onto your prepared baking sheet lined with parchment paper or wax paper. The parchment paper will prevent the truffles from sticking as the chocolate sets, making them easy to remove once firm. Leave a small space between each truffle to prevent them from touching and sticking together.
14. Adding Optional Toppings Immediately:
If you’re planning to add any optional toppings, such as sprinkles, flaky sea salt, or a drizzle of contrasting chocolate, you must do so immediately after placing each truffle on the parchment paper. The melted chocolate coating sets relatively quickly, especially when the truffles are cold, so waiting too long will prevent the toppings from adhering properly.
- Sprinkles: A festive choice! Gently sprinkle over the wet chocolate.
- Flaky Sea Salt: A sophisticated touch that beautifully contrasts the sweetness of the cookie dough and chocolate. Just a tiny pinch on top is all you need.
- White Chocolate Drizzle: If using, melt about 2-3 ounces of white chocolate chips (using the same method as the main coating). Drizzle it over the set-up truffles once the main chocolate has hardened slightly, or drizzle onto the wet chocolate for a marbled effect.
Be creative and have fun with this step! It adds visual appeal and can introduce interesting textural or flavor contrasts to your cookie dough truffles.
15. Chilling to Set the Chocolate:
Once all your cookie dough truffles are dipped and adorned with any desired toppings, it’s time to set the chocolate coating. Carefully transfer the baking sheet with the truffles back into the refrigerator. Chill them for at least 30-60 minutes, or until the chocolate coating is completely firm and set to the touch. This step ensures the chocolate is stable and prevents it from melting when handled.
Once fully set, your irresistible cookie dough truffles are ready to be enjoyed! Store any leftover truffles in an airtight container in the refrigerator for up to one week, or you can freeze them for up to one month. If freezing, thaw them slightly in the refrigerator before serving for the best texture and flavor. Each bite offers that perfect balance of creamy edible cookie dough and crisp chocolate shell, a truly delightful homemade treat!
Conclusion:
And there you have it, my friends! We’ve reached the delightful end of our journey into crafting these utterly irresistible treats. If there’s one recipe I could implore you to try from my collection, it would undoubtedly be this one for Cookie Dough Truffles. Why, you ask? Because they are a symphony of pure joy in every bite, a miniature masterpiece that brings smiles to every face. I genuinely believe that everyone deserves to experience the magic of biting into that smooth, rich chocolate shell, revealing the velvety, sweet, and undeniably comforting cookie dough center. It’s an experience that transcends a simple dessert; it’s a moment of pure bliss, easily made in your own kitchen.
What truly makes this recipe a must-try, in my humble opinion, is its sheer simplicity combined with its impressive outcome. We’re talking about a no-bake wonder here, which means you get all the delightful flavors and textures of your favorite cookie dough without ever having to turn on the oven. This makes them perfect for any time of year, especially when you’re craving something sweet but don’t want to heat up your kitchen. They’re also incredibly forgiving, making them an ideal project for seasoned bakers and kitchen novices alike. Imagine whipping up a batch of these delectable morsels in under an hour of active prep time, then simply letting them chill to perfection. It’s instant gratification for your sweet tooth, and trust me, the results taste like they took hours of meticulous effort.
Now, let’s talk about the endless possibilities for customization and serving. While these truffles are absolutely divine on their own, a blank canvas of deliciousness just waiting for your personal touch. For serving, I love arranging them artfully on a dessert platter for parties – they always disappear first! They also make charming, heartfelt gifts when placed in a pretty box or cellophane bag. Imagine them as a delightful accompaniment to your afternoon coffee or tea, a sophisticated yet playful treat for a casual get-together, or the perfect indulgence for a cozy movie night at home. My kids even love them as a special after-school snack!
Serving Suggestions & Creative Variations:
- Classic Sprinkles: A rainbow of sprinkles is always a hit, especially for birthdays or just to add a pop of color.
- Nutty Crunch: Roll them in finely chopped nuts like pecans, walnuts, or almonds for an added textural contrast.
- Coconut Dream: Toasted coconut flakes add an irresistible tropical twist.
- Peanut Butter Swirl: For the ultimate indulgence, swirl a bit of melted peanut butter into your chocolate coating before dipping, or even mix a spoonful into the cookie dough itself!
- Different Chocolates: Don’t limit yourself to milk chocolate! Try a rich dark chocolate for a more intense flavor, or sweet white chocolate for a creamy alternative. You can even use colored candy melts for themed parties.
- Extract Experiments: A tiny drop of peppermint extract in the dough, or a hint of almond extract, can completely transform the flavor profile.
- Coffee Kick: For an adult twist, dissolve a tiny bit of instant espresso powder in the butter before mixing the dough.
I truly hope I’ve convinced you to give these a try. There’s something so incredibly satisfying about creating something so delicious with your own hands, especially when it’s as fun and straightforward as making these truffles. They’re a celebration of simple pleasures and pure indulgence, and I promise you won’t regret dedicating a little bit of your time to them. Once you’ve made your batch, I would be absolutely thrilled if you would share your creations with me! Snap a photo, tag me on social media, or simply drop a comment below telling me how they turned out and what variations you tried. Your experiences and creative ideas inspire me, and I love seeing how you make these recipes your own. So go on, gather your ingredients, and prepare to fall in love with these delightful cookie dough truffles. Happy baking (or rather, no-baking)!
FAQs – People Also Ask:
Are cookie dough truffles safe to eat raw?
Yes, absolutely! The recipe you followed for these cookie dough truffles uses heat-treated flour and contains no raw eggs, making the cookie dough entirely safe to consume without baking. We take all the necessary precautions to ensure you can enjoy this delicious treat worry-free!
How long do cookie dough truffles last?
When stored properly in an airtight container in the refrigerator, your cookie dough truffles will stay fresh and delicious for up to 1-2 weeks. However, in my experience, they rarely last that long because they’re just too tempting!
Do cookie dough truffles need to be refrigerated?
Yes, they do! Due to their creamy, buttery cookie dough base and chocolate coating, these truffles are best stored in an airtight container in the refrigerator. This keeps them firm, prevents the chocolate from melting, and maintains their freshness. They can be served chilled or brought to room temperature for about 15-20 minutes before serving for a slightly softer texture.
Can you freeze cookie dough truffles?
Definitely! Cookie dough truffles freeze beautifully. To freeze, place the truffles in a single layer on a parchment-lined baking sheet and freeze until solid (about 1-2 hours). Once frozen, transfer them to an airtight freezer-safe container or bag. They can be stored in the freezer for up to 2-3 months. Thaw them in the refrigerator overnight or at room temperature for about 30 minutes before enjoying.
What kind of chocolate is best for coating truffles?
For coating truffles, I recommend using a good quality chocolate that you enjoy eating on its own. Chocolate melting wafers, compound chocolate, or baking chocolate bars (chopped) with a cocoa butter content around 50-60% are excellent choices. You can use milk, dark, or white chocolate, depending on your preference. High-quality chocolate melts smoother and creates a more luxurious finish.
How do you get the chocolate coating smooth and even?
A few tips for a perfectly smooth coating:
- Use a double boiler or microwave carefully: Melt your chocolate slowly and gently. Overheating can make it seize or become clumpy.
- Add a touch of oil: A teaspoon of coconut oil (refined, to avoid coconut flavor) or a neutral vegetable oil can help thin out the melted chocolate slightly, making it smoother and easier to dip.
- Chill the truffles: Ensure your cookie dough balls are well-chilled and firm before dipping. This helps the chocolate set quickly and prevents the truffles from falling apart.
- Use a dipping tool: A fork or a specialized dipping tool works wonders for submerging the truffles and allowing excess chocolate to drip off without making a mess.

Delicious Cookie Dough Truffles: A Perfect No-Bake Recipe
Enjoy these irresistible no-bake cookie dough truffles featuring heat-treated flour for safety, creamy butter and sugar, vanilla, and mini chocolate chips, all coated in a smooth chocolate shell. Perfect for a guilt-free indulgence.
Ingredients
-
1 ¼ cups (150g) All-Purpose Flour, heat-treated
-
½ cup (1 stick, 113g) Unsalted Butter, softened
-
¼ cup (50g) Granulated Sugar
-
½ cup (100g) Light Brown Sugar, packed
-
1 teaspoon Pure Vanilla Extract
-
2-3 tablespoons Milk (dairy or non-dairy)
-
¼ teaspoon Fine Sea Salt
-
¾ cup (130g) Mini Chocolate Chips
-
12-16 ounces (340-450g) Semi-Sweet Chocolate Chips or Chopped Baking Chocolate (for coating)
-
1-2 teaspoons Coconut Oil (optional, for coating)
Instructions
-
Step 1
Spread 1 ¼ cups flour on a baking sheet. Bake at 300°F (150°C) for 5-7 minutes, or microwave in a bowl for 60-90 seconds (stirring every 30s), until internal temperature reaches 160°F (71°C). Cool completely. -
Step 2
In a large bowl, beat ½ cup softened butter, ¼ cup granulated sugar, and ½ cup packed light brown sugar with an electric mixer until light and fluffy (2-3 minutes). -
Step 3
Reduce mixer speed to low. Add 1 teaspoon pure vanilla extract and 2 tablespoons milk; beat until just combined. -
Step 4
Gradually add the cooled, heat-treated flour and ¼ teaspoon fine sea salt. Mix on low speed until just combined. If dough is too dry, add remaining 1 tablespoon milk, 1 teaspoon at a time, until pliable. -
Step 5
Gently fold in ¾ cup mini chocolate chips until evenly distributed. -
Step 6
Cover the bowl with plastic wrap and refrigerate for at least 30 minutes to firm up. -
Step 7
Line a baking sheet with parchment paper. Scoop 1-tablespoon portions of chilled dough and roll into smooth, 1-inch balls. Place on the prepared sheet. Refrigerate for another 15-20 minutes until very firm. -
Step 8
Melt 12-16 ounces semi-sweet chocolate using a double boiler or microwave (50% power, 30-second intervals), stirring until smooth. Stir in 1-2 teaspoons optional coconut oil for a thinner, glossier coating. -
Step 9
Using a dipping fork, submerge one firm truffle at a time into the melted chocolate, allowing excess to drip off. Transfer immediately to the parchment-lined baking sheet. -
Step 10
Immediately add optional toppings like sprinkles or flaky sea salt onto the wet chocolate. Transfer the baking sheet back to the refrigerator and chill for 30-60 minutes, or until the chocolate coating is completely firm. Store in an airtight container in the refrigerator for up to one week.
Important Information
Nutrition Facts (Per Serving)
It is important to consider this information as approximate and not to use it as definitive health advice.
Allergy Information
Please check ingredients for potential allergens and consult a health professional if in doubt.

Leave a Comment