

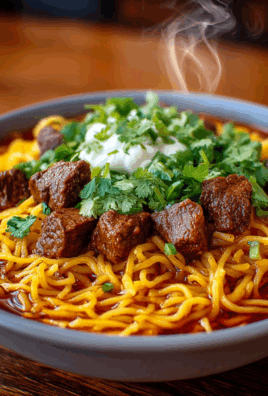
Steak Cheese Quesadillas on Blackstone are more than just a meal; they’re a culinary adventure that brings gourmet flavors right to your backyard. Picture this: the tantalizing sizzle of thinly sliced, perfectly seasoned steak meeting the scorching heat of your griddle, followed by the magical transformation of cheese melting into a gooey, savory embrace, all encased within a beautifully golden, crispy tortilla. It’s an unforgettable experience that elevates a classic comfort food to an art form, promising restaurant-quality results with surprising ease.
Originating from the vibrant culinary traditions of Mexico, where the quesadilla began as a simple, versatile delight often filled with cheese and occasionally other ingredients, this dish has been embraced and adapted worldwide. By adding succulent steak and a generous helping of melty cheese, we’ve transformed it into a hearty, flavor-packed masterpiece that resonates with comfort and satisfaction. People absolutely adore this dish not only for its incredible taste – the juicy, tender steak perfectly complemented by the rich, stretchy cheese – but also for its fantastic texture. The crispy exterior of the tortilla provides a delightful contrast to the soft, savory interior, creating a symphony of sensations with every bite.
Why Master Steak Cheese Quesadillas on Your Blackstone?
The true beauty of preparing Steak Cheese Quesadillas on Blackstone lies in the griddle’s ability to create that ideal, even crust on the tortilla while simultaneously cooking the steak and melting the cheese to perfection. It’s incredibly convenient, allowing you to whip up multiple quesadillas at once, making it perfect for family dinners, game nights, or entertaining friends with minimal fuss. Get ready to impress everyone with these incredibly delicious and surprisingly simple griddle gems that will quickly become a household favorite!

Ingredients:
- For the Steak:
- 1.5 – 2 pounds skirt steak or flank steak, trimmed of excess fat
- 1 tablespoon olive oil
- 1 teaspoon salt
- 1 teaspoon black pepper
- 1 teaspoon garlic powder
- 1 teaspoon onion powder
- 1/2 teaspoon chili powder
- 1/2 teaspoon ground cumin
- 1/4 teaspoon smoked paprika (optional, for extra depth)
- For the Vegetables:
- 1 large yellow onion, thinly sliced
- 1 large bell pepper (any color, or a mix), thinly sliced
- 1-2 jalapeños, thinly sliced (seeds removed for less heat, optional)
- 1 tablespoon olive oil (for cooking vegetables)
- Pinch of salt and pepper for seasoning vegetables
- For the Quesadillas:
- 8-10 large (10-inch) flour tortillas
- 2 cups shredded Monterey Jack cheese, or a Mexican blend cheese
- 1/2 cup butter, melted (for brushing tortillas)
- For Serving (Optional Toppings):
- Salsa
- Sour cream or Greek yogurt
- Guacamole or sliced avocado
- Fresh cilantro, chopped
- Lime wedges
- Blackstone Essentials:
- Griddle scraper and spatulas
- Heat-resistant gloves
- Paper towels or clean cloths
Preparing Your Ingredients for the Blackstone Sizzle
Creating mouth-watering Steak Cheese Quesadillas on your Blackstone griddle is all about efficient preparation. With the high heat and expansive cooking surface, having everything ready to go before you even turn on the griddle is absolutely key to success. This organized approach, often called “mise en place,” ensures a smooth and enjoyable cooking experience, allowing you to focus on the sizzle rather than scrambling for ingredients.
Prepping the Steak to Perfection
- Trim and Slice the Steak: First things first, let’s get that steak ready. If you’re using skirt or flank steak, you’ll want to carefully trim off any thick pieces of excess fat or silver skin. While some fat adds flavor, too much can make the steak greasy and tough. Once trimmed, lay the steak on a cutting board. The most crucial step here for tenderness is to slice the steak against the grain. Look closely at the meat and you’ll see lines running in one direction; these are the muscle fibers. You want to cut perpendicular to those lines. This shortens the fibers, making the cooked steak much more tender and easier to chew. Aim for thin slices, about 1/4 to 1/2 inch thick and 2-3 inches long. Thinner slices cook faster and fit better within a quesadilla. Place the sliced steak in a large mixing bowl.
- Season the Steak Generously: Now, for the flavor! Drizzle the olive oil over the sliced steak in the bowl. This helps the seasonings adhere and also aids in a beautiful sear on the griddle. Sprinkle in your salt, black pepper, garlic powder, onion powder, chili powder, ground cumin, and if you’re feeling a bit adventurous, the smoked paprika. The smoked paprika adds a wonderful depth and a subtle smoky aroma that complements the steak perfectly. Using your hands, thoroughly mix all the seasonings into the steak, ensuring every piece is coated evenly. Don’t be shy – really get in there and massage the spices into the meat. Good seasoning is the foundation of a flavorful quesadilla. Set the seasoned steak aside while you prepare the vegetables.
Getting Your Veggies Ready
- Slice the Onions and Bell Peppers: For the vegetables, uniformity in slicing is your best friend. Take your yellow onion and slice it thinly, creating half-moon shapes. The thinner they are, the quicker they’ll soften and caramelize on the griddle. For the bell pepper, core it and remove any seeds, then slice it into thin strips, similar in thickness to your onion slices. A mix of colorful bell peppers (red, yellow, orange) not only adds visual appeal but also a slightly different sweetness to the mix. Place these sliced vegetables in a separate bowl.
- Prepare Optional Jalapeños: If you’re a fan of a little heat, now’s the time for the jalapeños. Slice them thinly into rounds. If you prefer less heat, make sure to remove the seeds and the white pith inside, as that’s where most of the capsaicin (the heat-causing compound) resides. For a more intense kick, leave some seeds in. Add these to your bowl with the other vegetables, or keep them separate if only some people prefer heat.
- Organize Your Quesadilla Components: Before you even think about firing up the Blackstone, arrange all your ingredients within easy reach of your griddle. Have your seasoned steak, sliced vegetables, tortillas, shredded cheese, and melted butter all laid out. Also, ensure your spatulas, griddle scraper, and serving plates are ready. This “assembly line” approach makes the cooking process much more enjoyable and efficient, especially when dealing with the fast-paced cooking on a hot griddle.
Cooking Your Steak and Vegetables on the Blackstone
The Blackstone griddle truly shines when it comes to cooking dishes like these Steak Cheese Quesadillas. Its large, flat, and evenly heated surface is perfect for achieving that beautiful sear on the steak and perfectly caramelizing the vegetables, bringing out their natural sweetness. Get ready for some serious sizzle!
The Sizzle Starts Here: Steak First
- Preheat the Blackstone: Turn on your Blackstone griddle and set two burners to medium-high heat. If you have more than two burners, you can set the outer ones to medium-low for keeping things warm or for the quesadilla assembly. Allow the griddle to preheat for about 10-15 minutes. You want it nice and hot so that when the steak hits the surface, it immediately begins to sear, creating a flavorful crust. You can test the temperature by flicking a few drops of water onto the surface; if they dance and evaporate quickly, you’re ready to go.
- Oil the Griddle and Cook the Steak: Once hot, drizzle about 1 tablespoon of olive oil onto the hottest section of the griddle. Spread it thinly with your spatula. Carefully add the seasoned steak slices in a single layer, ensuring not to overcrowd the griddle. Overcrowding can drop the griddle’s temperature, leading to steamed rather than seared steak. You might need to cook the steak in two batches, depending on the size of your griddle and the amount of steak. Let the steak cook for 2-3 minutes per side, or until it develops a nice brown crust and is cooked to your desired doneness. Skirt and flank steak cook quickly when sliced thin, so keep a close eye on it.
- Remove Steak and Reserve Juices: As the steak finishes cooking, use your spatula to transfer it to a clean bowl or a platter. If there are any juices or flavorful bits left on the griddle, gently scrape them to a cooler section or off to the side. These bits are packed with flavor! You can keep the cooked steak warm by placing the bowl on a cooler section of the griddle, away from direct heat. This allows the steak to rest slightly while you cook the vegetables, and keeps it hot for the quesadillas.
Bringing on the Veggies
- Cook the Sliced Vegetables: Now it’s time for the vegetables. Add another tablespoon of olive oil to the same section of the griddle where you cooked the steak. The residual heat and any remaining steak drippings will add extra flavor. Add your sliced onions, bell peppers, and optional jalapeños to the griddle. Season them with a pinch of salt and pepper. Stir and sauté them frequently using your spatulas. You’re looking for them to soften and develop a slight caramelization, which enhances their sweetness. This usually takes about 5-7 minutes.
- Combine Steak and Vegetables: Once the vegetables are tender-crisp and lightly browned, add the cooked steak back to the griddle with the vegetables. Toss everything together to combine, allowing the flavors to meld. Keep this mixture on a cooler part of the griddle, on low heat, just to keep it warm while you prepare to assemble the quesadillas. This ensures your filling is hot and ready.
Assembling and Grilling Your Steak Cheese Quesadillas
This is where the magic really happens! With your flavorful steak and veggie filling ready, we’ll now transform them into gooey, crispy, cheesy quesadillas right on the Blackstone. The key here is proper layering and controlling the heat to achieve a perfectly melted interior and a golden-brown, crispy exterior.
Building Your Quesadillas with Care
- Prepare for Assembly: Reduce the heat on your Blackstone griddle to medium-low. This lower heat is crucial for the quesadillas. If the griddle is too hot, the tortillas will burn before the cheese has a chance to fully melt. Have your melted butter, tortillas, shredded cheese, and the steak and veggie mixture within arm’s reach.
- Butter the Tortillas: Brush one side of a flour tortilla generously with melted butter. The butter not only adds incredible flavor but also helps the tortilla achieve that desirable golden-brown crispness. Place the buttered side down onto the cooler section of your griddle. You’ll likely be able to cook 2-4 quesadillas at a time, depending on your griddle’s size.
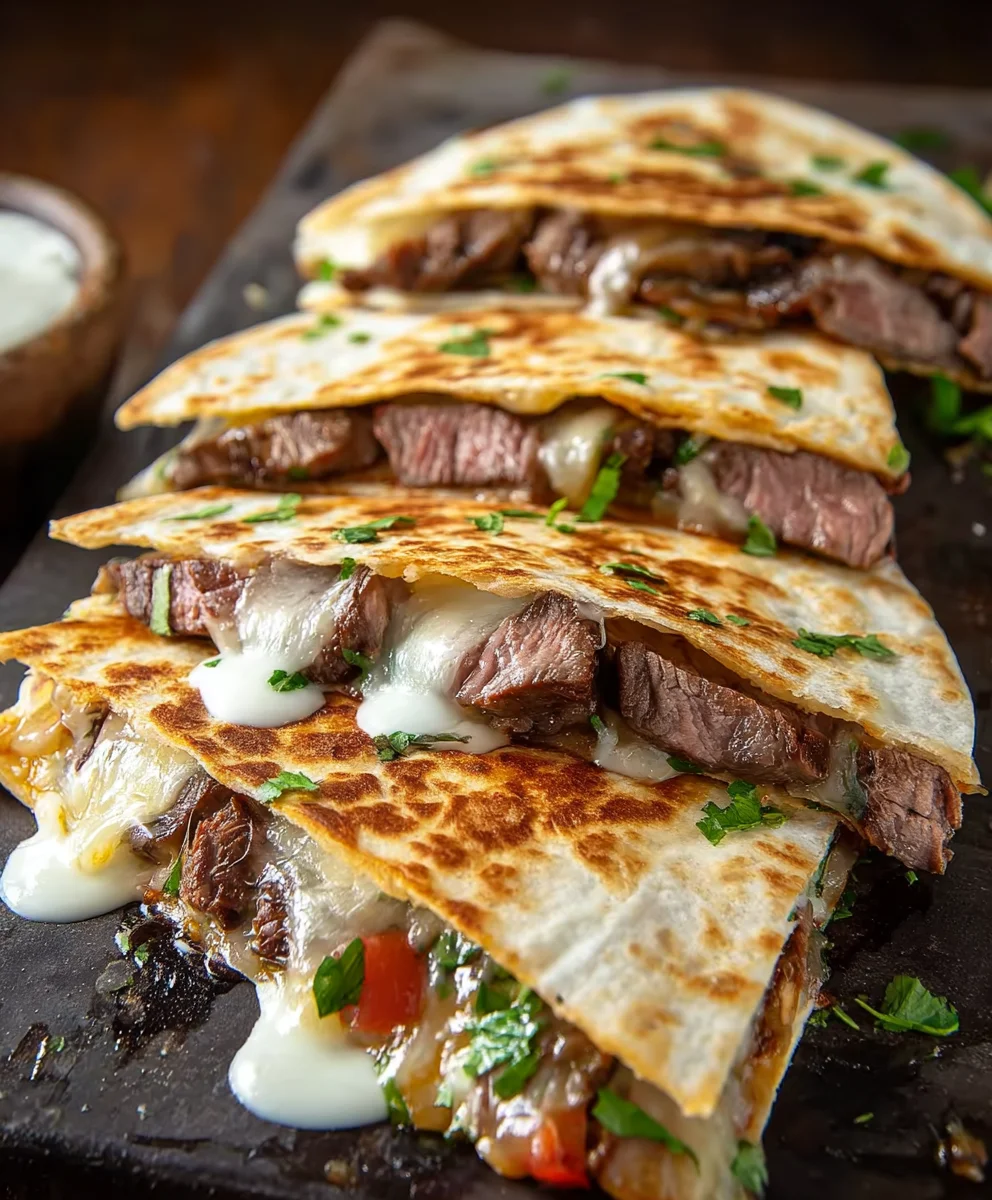
- Layer the Ingredients: Immediately, sprinkle a generous handful of shredded cheese over half of the tortilla (the unbuttered side facing up). The cheese acts as the “glue” that holds everything together. Then, spoon a good portion of your warm steak and vegetable mixture over the cheese. Don’t overfill, or it will be hard to fold and everything will spill out. Top the steak and veggie mixture with another sprinkle of cheese. This top layer of cheese helps to secure the filling when folded and ensures maximum cheesiness.
The Final Griddle Cook
- Fold and Grill: Once the bottom of the tortilla starts to show light golden-brown spots and the cheese just begins to melt, carefully fold the empty half of the tortilla over the filled half, creating a half-moon shape. Gently press down with your spatula to secure it. Allow the quesadilla to cook for another 2-3 minutes on this side, letting the cheese continue to melt and the bottom tortilla to crisp up.
- Flip and Finish: Using your spatula (or two spatulas for larger quesadillas), carefully flip the quesadilla over to cook the other side. Cook for another 2-3 minutes, or until both sides are beautifully golden-brown and crispy, and the cheese inside is completely melted and gooey. The key here is patience; don’t rush the cheese melting process. If you find the tortillas browning too quickly, lower the heat slightly.
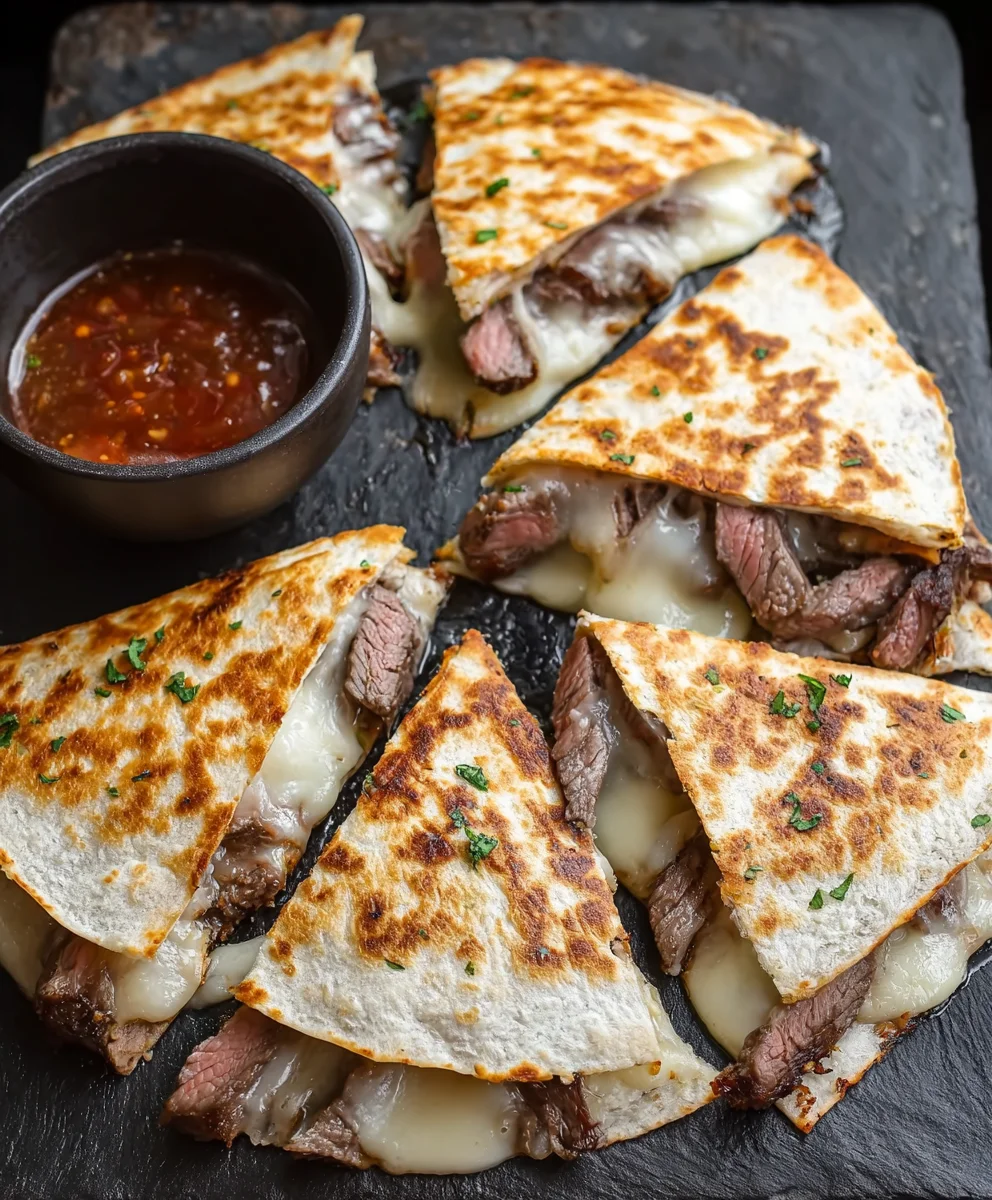
- Remove and Slice: Once golden and melted, carefully transfer the cooked quesadillas from the Blackstone to a cutting board. Allow them to rest for just a minute or two. This brief rest helps the cheese set slightly, preventing all the delicious filling from oozing out when you cut it. Use a sharp knife or a pizza cutter to slice each quesadilla into 2-3 pieces. Triangles are traditional and perfect for dipping!
- Repeat for Remaining Quesadillas: Continue this process, buttering, filling, folding, and grilling, until all your steak and vegetable mixture is used up and you have a stack of delicious quesadillas ready to serve. Keep the finished quesadillas warm on a plate covered with foil or on a very low-heat section of the griddle while you cook the rest.
Serving Suggestions, Tips, and Griddle Care
You’ve successfully mastered the art of Steak Cheese Quesadillas on the Blackstone! Now it’s time to enjoy the fruits of your labor and ensure your griddle is ready for its next culinary adventure.
Elevating Your Quesadilla Experience
- Serve Immediately with Toppings: Quesadillas are best enjoyed fresh off the griddle while they’re warm and the cheese is still wonderfully melty. Arrange the sliced quesadillas on a platter and serve them with your favorite toppings. Classic choices include a dollop of cool sour cream or Greek yogurt, fresh chunky salsa, creamy guacamole or sliced avocado, and a sprinkle of vibrant fresh cilantro. A squeeze of fresh lime juice over the top can brighten all the flavors. These toppings add a refreshing contrast to the rich, savory quesadillas and really complete the dish.
- Customize Your Filling: Don’t be afraid to experiment with your filling! While steak and cheese are a classic, you could add different types of peppers, mushrooms, corn, or even a sprinkle of black beans for extra protein and fiber. A pinch of cayenne pepper in the seasoning blend can kick up the heat, or a dash of liquid smoke can enhance the grilled flavor of the steak if you’re not getting enough from the griddle itself.
- Cheese Choices Matter: While Monterey Jack or a Mexican blend are excellent for their melting qualities, feel free to try other cheeses. A mix of cheddar and mozzarella can also work beautifully. The key is to choose a cheese that melts well and offers a good flavor balance with the steak.
Blackstone Griddle Best Practices
- Temperature Control is Key: Mastering your Blackstone’s heat zones is crucial. Use hotter zones for searing steak and cooler zones for warming fillings or gently toasting quesadillas. This prevents burning and ensures even cooking. Always adjust your burner settings as needed throughout the cooking process.
- Clean as You Cook: As soon as you remove a batch of steak or quesadillas, use your griddle scraper to push any excess food bits or grease into the grease trap. This keeps your cooking surface clean and prevents old bits from burning and imparting off-flavors to subsequent batches. A clean griddle is a happy griddle!
- Post-Cook Griddle Care: Once you’re done cooking and the griddle has cooled slightly (but is still warm), it’s important to give it a proper clean. Scrape down the entire surface, then apply a thin layer of water. Use a griddle scouring pad or a clean rag to scrub off any stuck-on food. Scrape the water and debris into the grease trap. Repeat until clean. Finally, apply a very thin layer of cooking oil (like flaxseed oil or your preferred griddle oil) to the entire cooking surface to re-season and protect it from rust. This simple step ensures your Blackstone stays in prime condition for many more delicious meals.
- Safety First: Always use heat-resistant gloves when operating your Blackstone, especially when handling hot tools or moving food around. Keep children and pets at a safe distance from the hot griddle. Ensure your griddle is on a stable, level surface away from flammable materials.
<h2>Conclusion:</h2>
<p>Well, there you have it! We’ve journeyed together through the simple yet incredibly satisfying process of creating what I believe are some of the most undeniably delicious quesadillas you’ll ever sink your teeth into. If you’ve been searching for that perfect weeknight meal, a show-stopping appetizer for your next gathering, or just an excuse to fire up your favorite flat-top grill, then this recipe for <strong>Steak Cheese Quesadillas on Blackstone</strong> is absolutely a must-try. What makes it so special, you ask? It’s the harmonious blend of tender, seasoned steak, perfectly melted, gooey cheese, all encased in a tortilla that achieves an unparalleled crispness and golden-brown perfection thanks to the magic of the Blackstone griddle.</p>
<p>This isn’t just another recipe; it’s an experience. The high, even heat of the Blackstone ensures your steak cooks up quickly and beautifully, retaining its juiciness while developing a fantastic sear. Then, the same surface transforms your tortillas into golden, crunchy shells, creating a textural contrast that is simply divine. Forget soggy quesadillas or unevenly cooked fillings; with this method, you’re guaranteed consistent excellence every single time. It’s truly a game-changer for anyone who loves the robust flavors of steak and cheese, elevated to a new level of culinary delight. The speed at which these come together also means you can whip up a batch for a hungry crowd in minutes, making them perfect for unexpected guests or a spontaneous family dinner.</p>
<h4>Serving Suggestions and Creative Variations</h4>
<p>Now that you’ve mastered the art of making these incredible quesadillas, let’s talk about how to serve them and how to make them uniquely yours. For serving, I always recommend a vibrant array of classic accompaniments. A dollop of cool sour cream or Greek yogurt provides a lovely tangy contrast to the rich steak and cheese. Freshly made salsa, whether a chunky pico de gallo or a smooth roasted variety, adds a burst of freshness and acidity. And, of course, a generous scoop of homemade guacamole, creamy and rich, is practically non-negotiable in my book! Don’t forget a squeeze of fresh lime juice over the top just before serving; it brightens all the flavors beautifully and adds that extra zing. For a complete meal, a simple side salad with a light vinaigrette or some seasoned black beans would round things out wonderfully.</p>
<p>But don’t stop there! This recipe is incredibly adaptable. Feeling adventurous? Try swapping out some of the Monterey Jack for a sharper cheddar, a smoky provolone, or even a spicy pepper jack for an extra kick. You could also introduce some sautéed bell peppers and onions (cook them on the Blackstone right before your steak for maximum flavor infusion!) for added crunch and sweetness. If you want to experiment with different proteins, thinly sliced chicken or even marinated pork al pastor would be fantastic alternatives, cooked with the same Blackstone technique. For our vegetarian friends, imagine these quesadillas filled with seasoned black beans, corn, roasted sweet potatoes, and plenty of cheese – equally satisfying and delicious. The possibilities are truly endless, limited only by your imagination and what you have in your pantry.</p>
<h4>Your Turn to Create and Share!</h4>
<p>I genuinely hope you’re feeling inspired to roll up your sleeves and give this recipe a try. There’s nothing quite like the satisfaction of creating something so utterly delicious with your own hands, especially when it results in such happy faces around the table. So, go ahead, gather your ingredients, fire up that Blackstone, and prepare to impress yourself and everyone lucky enough to be sharing a meal with you. Once you’ve experienced the joy of these <strong>Steak Cheese Quesadillas on Blackstone</strong>, I’d love to hear all about it! Please, come back and leave a comment below sharing your experience. Did you add your own unique twist? What were your favorite toppings? We thrive on community and learning from each other’s culinary adventures. Don’t forget to snap a picture of your masterpiece and share it on your favorite social media platforms, tagging us so we can celebrate your success! Happy cooking, my friends!</p>
<h3>FAQs – People Also Ask</h3>
<h4>1. What’s the best type of steak to use for quesadillas on a Blackstone?</h4>
<p>For quesadillas, I highly recommend using cuts that cook quickly and are easy to slice thinly. Skirt steak, flank steak, or sirloin are fantastic choices. They cook up beautifully on the high heat of the Blackstone, developing a great sear while remaining tender. Just remember to slice them against the grain for maximum tenderness!</p>
<h4>2. How do I get my quesadillas extra crispy on the Blackstone?</h4>
<p>The key to an extra crispy quesadilla lies in a few simple steps. First, ensure your Blackstone griddle is preheated to a medium-high temperature. Second, use a minimal amount of oil or butter on the griddle; too much will deep-fry rather than toast. Third, don’t overcrowd the griddle; give each quesadilla space to breathe. Finally, press down gently on the quesadilla with a spatula as it cooks to ensure maximum contact with the hot surface. This creates that perfect golden-brown crispness we all love.</p>
<h4>3. Can I prepare the steak ahead of time for these quesadillas?</h4>
<p>Absolutely! To save time, you can cook and slice the steak a day or two in advance. Store it in an airtight container in the refrigerator. When you’re ready to make your quesadillas, simply reheat the steak on the Blackstone for a minute or two before assembling. This is a great meal prep hack for quick weeknight dinners.</p>
<h4>4. What kind of cheese melts best in quesadillas?</h4>
<p>For the ultimate gooey, melty quesadilla, I love using a blend of cheeses. Monterey Jack is a classic for its excellent melting properties and mild flavor. Blending it with a sharper cheese like medium cheddar or a bit of Oaxaca cheese (which is fantastic for stretching!) creates a more complex flavor profile. Low-moisture mozzarella or even a good quality provolone can also work wonders. Avoid pre-shredded cheeses if possible, as they often contain anti-caking agents that can hinder smooth melting; shredding your own from a block makes a noticeable difference.</p>
<h4>5. How do I prevent my quesadillas from falling apart when flipping them?</h4>
<p>The secret to a successful flip is two-fold: Don’t overfill your quesadilla, and wait for the cheese to partially melt before attempting to turn it. A quesadilla that’s bursting at the seams is much harder to manage. Once you see the cheese starting to soften and the bottom tortilla turning golden, use a wide, sturdy spatula (or even two spatulas for larger quesadillas) to carefully flip it over. A confident, swift motion is often better than a hesitant one!</p>
Blackstone Steak Cheese Quesadillas – Easy Griddle Recipe
Master the art of Blackstone Steak Cheese Quesadillas with this easy griddle recipe. Featuring tender, seasoned steak, sautéed vegetables, and gooey melted cheese in a crispy tortilla, these quesadillas are perfect for a family meal or entertaining.
Ingredients
-
1.5-2 lbs skirt or flank steak
-
1 tbsp olive oil
-
1 tsp salt
-
1 tsp black pepper
-
1 tsp garlic powder
-
1 tsp onion powder
-
1/2 tsp chili powder
-
1/2 tsp ground cumin
-
1/4 tsp smoked paprika
-
1 large yellow onion, thinly sliced
-
1 large bell pepper, thinly sliced
-
1-2 jalapeños, thinly sliced (seeds removed for less heat)
-
1 tbsp olive oil
-
Pinch of salt and pepper
-
8-10 large (10-inch) flour tortillas
-
2 cups shredded Monterey Jack cheese
-
1/2 cup butter, melted
-
Salsa (for serving)
-
Sour cream or Greek yogurt (for serving)
-
Guacamole or sliced avocado (for serving)
-
Fresh cilantro, chopped (for serving)
-
Lime wedges (for serving)
Instructions
-
Step 1
Trim skirt/flank steak; slice against the grain into 1/4-1/2 inch thick, 2-3 inch long pieces. In a bowl, toss steak with 1 tbsp olive oil, 1 tsp salt, 1 tsp black pepper, 1 tsp garlic powder, 1 tsp onion powder, 1/2 tsp chili powder, 1/2 tsp ground cumin, and 1/4 tsp smoked paprika. Mix well. -
Step 2
Thinly slice 1 large yellow onion and 1 large bell pepper into strips. Thinly slice 1-2 jalapeños (remove seeds for less heat). Set aside in a separate bowl. -
Step 3
Arrange all prepared ingredients, tortillas, shredded cheese, and melted butter, along with griddle tools, within easy reach of your Blackstone. -
Step 4
Preheat Blackstone griddle to medium-high heat for 10-15 minutes. Drizzle 1 tbsp olive oil onto the hot griddle. Add seasoned steak slices in a single layer (cook in batches if needed). Cook for 2-3 minutes per side until desired doneness. -
Step 5
Transfer cooked steak to a bowl and keep warm. Add 1 tbsp olive oil to the griddle. Sauté sliced onions, bell peppers, and jalapeños with a pinch of salt and pepper for 5-7 minutes until tender-crisp and lightly browned. -
Step 6
Add the cooked steak back to the griddle with the vegetables. Toss to combine and keep the mixture warm on a cooler, low-heat section of the griddle. -
Step 7
Reduce griddle heat to medium-low. Brush one side of a flour tortilla generously with melted butter. Place the buttered-side-down onto the griddle. Sprinkle shredded cheese over half of the tortilla. Spoon a portion of the warm steak and vegetable mixture over the cheese, then add another sprinkle of cheese on top. -
Step 8
Once the bottom of the tortilla shows light golden-brown spots and the cheese begins to melt, fold the empty half of the tortilla over the filled half to create a half-moon. Gently press down and cook for 2-3 minutes. -
Step 9
Carefully flip the quesadilla and cook for another 2-3 minutes, until both sides are golden-brown and crispy, and the cheese inside is fully melted and gooey. Repeat for remaining quesadillas, keeping finished ones warm. -
Step 10
Transfer cooked quesadillas to a cutting board, rest for 1-2 minutes, then slice into 2-3 pieces. Serve immediately with optional toppings like salsa, sour cream, guacamole, cilantro, and lime wedges. After cooking, clean the griddle by scraping debris, scrubbing with water, and re-oiling to protect from rust. Always use heat-resistant gloves and prioritize safety.
Important Information
Nutrition Facts (Per Serving)
It is important to consider this information as approximate and not to use it as definitive health advice.
Allergy Information
Please check ingredients for potential allergens and consult a health professional if in doubt.
Leave a Comment