

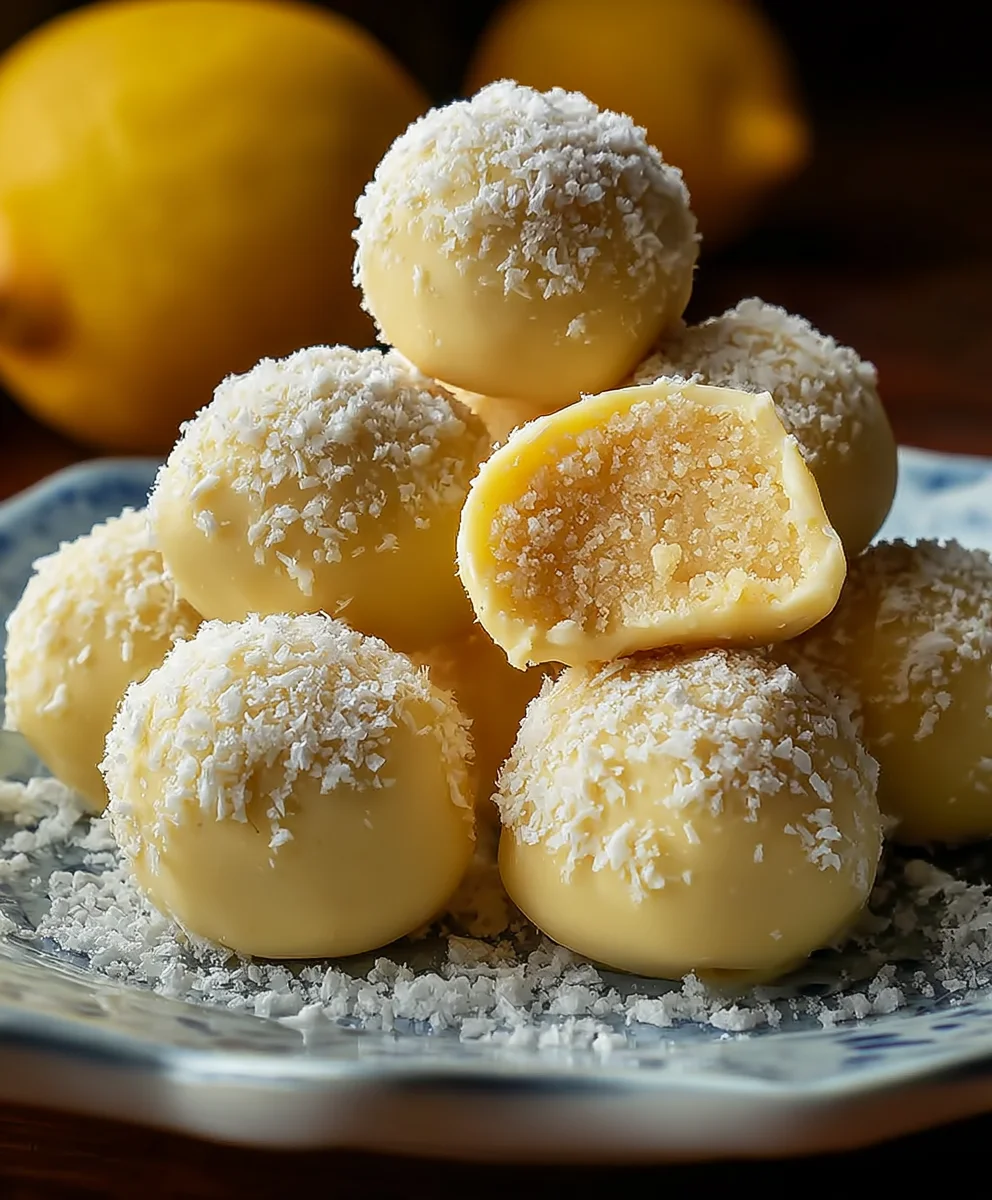
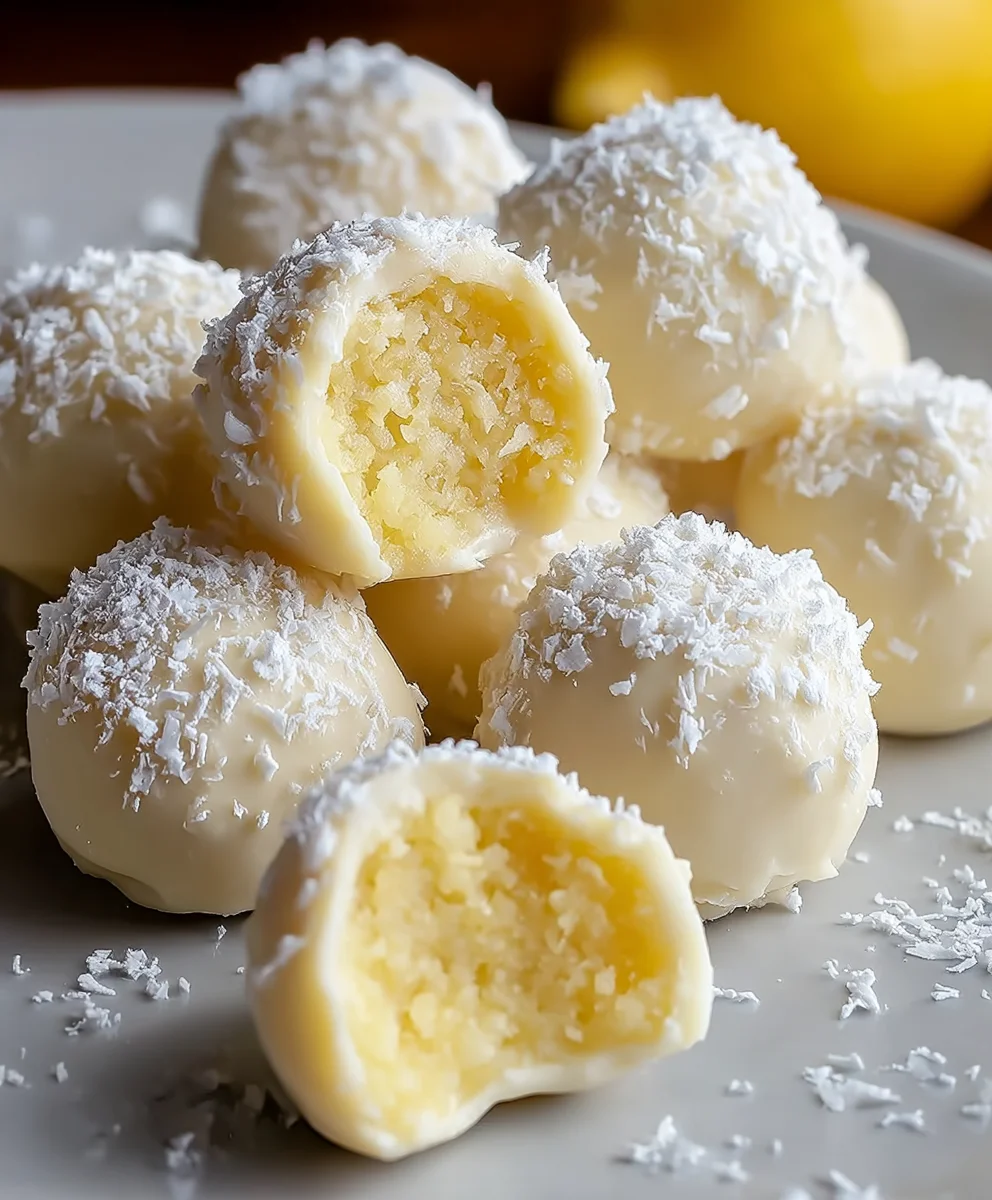
Lemon Truffles are more than just a delightful confection; they are a miniature burst of sunshine, a sophisticated treat that promises to brighten any day. I’ve always found a particular charm in the simplicity and elegance of truffles, a confectionery art form rooted in classic French patisserie, originally named for their resemblance to the luxurious fungi.
While traditional chocolate truffles hold a special place, the addition of vibrant lemon elevates this classic to an entirely new level of refreshing indulgence. People absolutely adore this particular variation for its exquisite balance of zesty tartness and creamy sweetness. The melt-in-your-mouth texture, combined with the invigorating citrus flavor, creates an unforgettable experience that is both light and deeply satisfying. They’re surprisingly simple to make, making them a fantastic choice for both seasoned bakers and curious newcomers looking for an impressive yet achievable dessert. Whether you’re seeking a unique gift, a stunning addition to a dessert spread, or simply a personal treat, mastering these delightful Lemon Truffles is a culinary journey you’ll be thrilled to embark upon.

Ingredients:
- For the Lemon Truffle Ganache Base:
- 12 ounces (approximately 340g) high-quality white chocolate, finely chopped or in couverture form
- 1/2 cup (120ml) heavy cream (also known as whipping cream or double cream), at least 36% milk fat
- 2 tablespoons unsalted butter, softened and cut into small pieces
- 2 tablespoons fresh lemon juice, strained to remove pulp and seeds
- Zest of 2 large lemons, finely grated (ensure to avoid the bitter white pith)
- 1/2 teaspoon pure vanilla extract (optional, but I love the depth it adds)
- Pinch of salt (it really helps to enhance the lemon flavor!)
- For Coating and Finishing (Choose one or a combination):
- 1 cup powdered sugar (confectioners’ sugar), sifted
- 1/2 cup finely shredded unsweetened coconut
- 1/4 cup cocoa powder (Dutch-processed for a darker color, natural for a slightly fruitier note)
- 6 ounces (approximately 170g) additional high-quality white chocolate for dipping, tempered (optional, but highly recommended for a professional finish)
- Extra lemon zest for garnish
- Edible glitter or sprinkles (for a festive touch)
For the Lemon Truffle Ganache:
Making the perfect ganache for your Lemon Truffles is the foundational step, and it’s where all that wonderful lemon flavor truly begins to develop. Don’t rush this process; patience will be rewarded with a silky-smooth, intensely flavored base.
-
Prepare Your White Chocolate and Lemon Zest:
First things first, let’s get our main flavor and structure ready. Take your 12 ounces of high-quality white chocolate and chop it as finely as you possibly can. The smaller the pieces, the more evenly and quickly it will melt when combined with the hot cream. I always stress using good quality chocolate here, as it truly makes a world of difference in the final texture and taste of your Lemon Truffles. Place the finely chopped white chocolate into a medium-sized, heatproof bowl. This bowl should be sturdy enough to withstand stirring and hold heat effectively. Next, finely grate the zest of two large lemons directly into the bowl with the chocolate. Be mindful to only get the bright yellow part of the peel, as the white pith underneath can introduce a bitter taste that we absolutely want to avoid in our bright and fresh Lemon Truffles. This step is crucial for infusing maximum lemon aroma and flavor right into the ganache.
-
Heat the Heavy Cream and Butter:
In a small saucepan, combine your heavy cream and the small pieces of unsalted butter. Place the saucepan over medium-low heat. We want to heat this mixture until it just begins to simmer around the edges, and you see tiny bubbles forming. It’s important not to bring it to a rolling boil, as this can scorch the cream or cause it to separate. Heating the butter with the cream ensures it melts smoothly and integrates perfectly, contributing to the rich, velvety texture of our Lemon Truffles. Once it reaches that gentle simmer, immediately remove it from the heat.
-
Combine Cream with Chocolate and Zest:
Now for the magic! Pour the hot cream and butter mixture directly over the finely chopped white chocolate and lemon zest in your heatproof bowl. Resist the urge to stir immediately. Instead, let the mixture sit undisturbed for about 5 minutes. This allows the heat from the cream to gently melt the white chocolate and thoroughly warm the lemon zest, releasing its essential oils and infusing the cream with an even deeper lemon fragrance. This waiting period is critical for achieving a smooth, lump-free ganache, setting the stage for perfect Lemon Truffles.
-
Emulsify the Ganache:
After the resting period, grab a whisk or a sturdy spatula. Begin stirring the mixture gently from the center outwards in small circles. As you continue to stir, the chocolate will gradually melt and combine with the cream, transforming into a thick, glossy, and homogeneous ganache. Continue stirring until every last piece of chocolate has melted and the mixture is completely smooth with no lumps. The goal here is a beautifully emulsified ganache that will be the heart of your exquisite Lemon Truffles. If you find any stubborn pieces of chocolate, you can place the bowl over a very gently simmering pot of water (creating a double boiler effect) for a minute or two, stirring constantly, but be extremely careful not to overheat it.
-
Incorporate Lemon Juice, Vanilla, and Salt:
Once your ganache is perfectly smooth, it’s time to add the final flavor boosters. Pour in your strained fresh lemon juice. The acidity of the lemon juice adds that characteristic tangy kick, perfectly balancing the sweetness of the white chocolate. Stir this in thoroughly. Then, add your optional 1/2 teaspoon of pure vanilla extract. While not strictly necessary, I find vanilla adds a beautiful warmth and depth that complements the bright lemon without overpowering it. Finally, a tiny pinch of salt is a secret weapon; it doesn’t make the truffles salty, but rather sharpens and amplifies all the other flavors, particularly the lemon. Mix everything until well combined. The ganache should now be lusciously smooth and smell absolutely divine – a true foundation for your ultimate Lemon Truffles.
-
Chill the Ganache:
Cover your bowl of Lemon Truffle ganache tightly with plastic wrap, ensuring the wrap touches the surface of the ganache to prevent a skin from forming. Place the bowl in the refrigerator for at least 4-6 hours, or preferably overnight. This chilling time is absolutely essential for the ganache to firm up to a scoopable, rollable consistency. Without adequate chilling, your truffles will be too soft to handle and shape properly. Don’t try to rush this step! You’re looking for a consistency similar to firm peanut butter or a very thick brownie batter. If you’re in a hurry, you can place it in the freezer for about 1-2 hours, stirring every 30 minutes to ensure even chilling, but keep a very close eye on it to prevent it from freezing solid. The perfect texture for shaping your Lemon Truffles is paramount.
Forming the Lemon Truffles:
After a good chill, your ganache is ready to be transformed into individual Lemon Truffles. This part is fun, a little bit messy, and very rewarding!
-
Prepare Your Workstation:
Before you begin scooping and rolling, set yourself up for success. Line a baking sheet with parchment paper or wax paper. This will prevent your freshly rolled Lemon Truffles from sticking and makes for easy transfer. You might also want to wear food-safe gloves to minimize the transfer of heat from your hands to the ganache, which can cause it to melt and become sticky. Having a small bowl of powdered sugar nearby can also be helpful for dusting your hands if the ganache becomes too warm.
-
Scoop the Ganache:
Remove the chilled ganache from the refrigerator. It should be firm enough to scoop but still pliable. Using a small cookie scoop (a 1-tablespoon size is ideal for perfect bite-sized Lemon Truffles) or two small spoons, scoop out uniform portions of the ganache. Consistency in size is key for even chilling and a professional appearance. If the ganache is too hard to scoop easily, let it sit at room temperature for 10-15 minutes to soften slightly, but don’t let it get too warm.
-
Roll the Truffles:
Take each scooped portion of ganache and gently roll it between the palms of your hands to form a smooth, round ball. Work quickly but gently. The warmth of your hands will slightly soften the ganache, allowing it to become perfectly spherical. If the ganache starts to get too sticky, you can briefly chill your hands under cold water, or lightly dust your palms with a tiny bit of powdered sugar. Place the rolled Lemon Truffles onto your prepared baking sheet as you go, ensuring they don’t touch each other. Aim for consistent size and shape for all your truffles; this attention to detail really elevates the final product.
-
Second Chill (Pre-Coating):
Once all your Lemon Truffles are rolled, return the baking sheet to the refrigerator for at least 30-60 minutes. This second chill is crucial. It firms up the truffles again, making them much easier to coat without melting or losing their shape. This step ensures that your efforts in rolling beautiful spheres won’t be undone during the coating process. A well-chilled truffle will hold its form and take on its coating much more cleanly, leading to truly professional-looking Lemon Truffles.
Coating and Finishing Your Lemon Truffles:
Now for the exciting part – giving your Lemon Truffles their beautiful outer layer and final touch! You have several delicious options here, each offering a different texture and visual appeal.
-
Prepare Your Coatings:
Before you take the truffles out of the fridge, set up your coating stations. Place your chosen coating(s) into separate shallow bowls.
- For Powdered Sugar: Sift the powdered sugar to remove any lumps.
- For Shredded Coconut: Ensure it’s finely shredded for a delicate texture, or lightly toast it for added flavor.
- For Cocoa Powder: Sift it to ensure an even, lump-free coating.
- For Melted White Chocolate: If you’re going for a dipped chocolate coating, you’ll want to prepare this last, just before dipping, to ensure it’s at the right temperature and consistency.
-
Coating with Dry Ingredients (Powdered Sugar, Coconut, Cocoa):
Remove a few chilled Lemon Truffles from the refrigerator at a time to keep the rest cold. Drop one or two truffles into your chosen dry coating. Gently roll the truffle around in the coating using a fork or by gently shaking the bowl, ensuring it’s completely covered. Once coated, lift the truffle out and gently tap off any excess coating. You want a nice, even layer, not a thick pile. Place the coated Lemon Truffles back onto your parchment-lined baking sheet. Repeat with the remaining truffles, working in small batches to prevent them from warming up too much. This method yields a classic, rustic look and a delightful texture, perfectly complementing the zesty interior of your Lemon Truffles.
-
Coating with Melted White Chocolate (Optional, but stunning!):
This is where your Lemon Truffles can really shine with a professional finish. Dipping in tempered white chocolate provides a crisp shell that snaps beautifully and adds an extra layer of decadence.
Melting and Tempering White Chocolate:
Melting: Gently melt your additional 6 ounces of white chocolate. You can do this using a double boiler method (a heatproof bowl set over a saucepan of gently simmering water, ensuring the bowl doesn’t touch the water) or carefully in the microwave in 30-second intervals, stirring thoroughly after each interval, until about 75% melted. Remove from heat (or microwave) and continue stirring until completely smooth. White chocolate can seize easily if it gets too hot or if even a tiny drop of water gets into it, so proceed with caution!
Tempering (Highly Recommended for a Glossy, Stable Coating): For a truly professional, shiny, and snap-able coating that won’t bloom (develop white streaks), tempering your white chocolate is key.
- Method 1 (Seeding Method): Melt about 2/3 of your white chocolate to a temperature of 110-115°F (43-46°C). Remove from heat and stir in the remaining 1/3 of your finely chopped (unmelted) white chocolate. Stir continuously until all the solid chocolate has melted and the mixture cools down to a working temperature of 82-84°F (28-29°C). This process creates stable crystals in the chocolate, ensuring a perfect finish for your Lemon Truffles.
- Method 2 (Tabling/Direct Method – requires a marble slab): This is more advanced but yields excellent results. Melt all chocolate to 110-115°F (43-46°C). Pour 2/3 of it onto a clean marble slab and spread it thinly with a spatula, then scrape it back together repeatedly until it thickens and cools to 80°F (27°C). Scrape it back into the bowl with the remaining melted chocolate and stir until the entire mixture reaches 82-84°F (28-29°C).
Keeping the chocolate in temper requires careful temperature control, often using a warming pad or returning it briefly to the double boiler. Don’t let it get too hot, or you’ll have to start the tempering process over!
Dipping the Truffles:
Using a chocolate dipping fork or a regular fork, carefully drop one chilled Lemon Truffle into the tempered white chocolate. Submerge it completely. Lift the truffle out, gently tapping the fork against the edge of the bowl to allow any excess chocolate to drip off. This creates a thin, even coating. Immediately place the dipped truffle back onto your parchment-lined baking sheet. While the chocolate is still wet, you can sprinkle it with a little extra lemon zest for a vibrant visual cue and an extra burst of aroma, or some edible glitter for a fancy touch. Continue with the remaining truffles, working efficiently so your white chocolate stays in temper. The goal is a beautifully enrobed Lemon Truffle, gleaming and inviting.
-
Final Set:
Once all your Lemon Truffles are coated (whether with dry ingredients or melted chocolate), return the baking sheet to the refrigerator for a final chill of at least 15-30 minutes. This allows the coatings to set completely, ensuring your truffles are firm, stable, and ready for enjoyment or gifting. The dipped chocolate coating will become crisp, and the dry coatings will adhere perfectly. This final setting time is crucial for both the presentation and the delightful texture of your finished Lemon Truffles.
Storage and Enjoyment Tips for Your Lemon Truffles:
You’ve put in all that effort, now let’s make sure your magnificent Lemon Truffles stay fresh and are enjoyed at their absolute best!
-
Proper Storage:
To maintain their exquisite texture and vibrant lemon flavor, your homemade Lemon Truffles should be stored in an airtight container in the refrigerator. This prevents them from absorbing any unwanted odors from other foods and keeps them fresh. Properly stored, these delightful treats will last for up to 1-2 weeks. If you plan on keeping them longer, or if you’ve made a very large batch, they can also be frozen for up to 1-2 months. When freezing, layer them between sheets of parchment paper in an airtight container to prevent them from sticking together. Thaw them in the refrigerator overnight before serving.
-
Serving Suggestions:
While irresistible straight from the fridge, I find that Lemon Truffles truly sing when allowed to sit at room temperature for about 10-15 minutes before serving. This slight warming allows the ganache to soften just a bit, enhancing its creamy texture and letting the lemon flavors fully bloom. They make a fantastic after-dinner treat, a lovely addition to a dessert platter, or a bright pick-me-up with an afternoon tea or coffee. The burst of lemon is incredibly refreshing.
-
Gifting Your Lemon Truffles:
These homemade Lemon Truffles make a truly thoughtful and impressive gift. Arrange them in small decorative boxes, perhaps with some crinkle paper or tissue paper, and tie with a pretty ribbon. Include a small tag with storage instructions. They are perfect for holidays, birthdays, or just to show someone you care. Everyone appreciates a handmade confection, especially when it’s as bright and delicious as these Lemon Truffles.
-
Troubleshooting Common Issues with Lemon Truffles:
-
Ganache Too Soft to Roll:
If your ganache is too sticky and soft after the initial chill, it simply needs more time in the refrigerator. Don’t try to force it; just return the bowl to the fridge for another hour or two, or pop it in the freezer for about 30 minutes, checking frequently. The consistency should be firm but pliable. This is the most common issue, and patience is the easiest fix for perfectly formed Lemon Truffles.
-
Ganache Too Hard:
Conversely, if your ganache is rock hard from chilling for too long, let it sit at room temperature for 15-30 minutes until it softens slightly. You can also briefly knead it with clean, lightly greased hands (or gloved hands) to warm it up and make it more workable. Avoid microwaving it, as this can cause it to melt unevenly and become oily.
-
Chocolate Seizing During Melting:
If your white chocolate becomes thick, clumpy, and grainy while melting or when adding liquid, it has likely seized. This usually happens if it gets too hot, or if even a tiny drop of water or steam gets into it. Unfortunately, seized chocolate is very difficult to rescue for a smooth ganache. Prevention is key: use a dry bowl, avoid steam from entering the chocolate, and melt slowly over low heat or in short microwave bursts. If it does seize when making the ganache, adding a tablespoon of hot heavy cream (or neutral oil) and stirring vigorously can sometimes help, but it’s not always a guaranteed fix for our delicate Lemon Truffles.
-
Coating Not Sticking Evenly:
If your dry coating isn’t sticking well, your truffles might be too cold or too warm. If they are too cold, a very thin layer of condensation might form, preventing adhesion. Let them warm up for just a minute or two. If they are too warm, they will melt and create a patchy coating. Ensure they are well-chilled but not icy. For chocolate dipping, ensure the truffles are very cold and the tempered chocolate is at the correct working temperature; this contrast helps the coating set quickly and evenly for beautiful Lemon Truffles.
-
Truffles Melting in Hands While Rolling:
This is a common issue due to hand warmth. The best solution is to work quickly, in small batches, and wear food-safe gloves (chilled if possible!). You can also lightly dust your hands with powdered sugar, or even briefly run your hands under cold water and dry them before rolling each batch. Having cold hands helps significantly when forming delicate Lemon Truffles.
With these tips and a little practice, you’ll be making flawless Lemon Truffles every time! Enjoy the process and the incredibly delicious results!
-
<h2>Conclusion:</h2>
<p>Well, my friends, we’ve reached the sweet end of our culinary journey for today, and I genuinely hope you’re feeling inspired to whip up a batch of these truly extraordinary treats. I can confidently say that this recipe isn’t just another dessert; it’s an experience, a delightful burst of sunshine on even the cloudiest of days. What makes these <strong>Lemon Truffles</strong> an absolute must-try, you ask? It’s that unparalleled balance – the vibrant, tangy zest of fresh lemons perfectly harmonized with the creamy, sweet indulgence of white chocolate. They manage to be both incredibly sophisticated and utterly comforting all at once, a rare combination that will win over even the most discerning palates. </p>
<p>Forget complicated baking techniques or hours spent slaving in the kitchen. This recipe offers an elegance that belies its simplicity. Imagine biting into a delicate, melt-in-your-mouth morsel, and having that bright, invigorating lemon flavor awaken your senses, followed by the luxurious sweetness that lingers just perfectly. They’re undeniably refreshing, light, and yet deeply satisfying, making them the ideal choice when you crave something special but don’t want anything too heavy. Seriously, I promise you, these truffles are a game-changer, whether you’re a seasoned baker or just dipping your toes into the world of homemade confectionery. The joy of creating something so utterly delicious with your own hands is truly immense, and the reactions you’ll get when you share them are priceless.</p>
<h4>Beyond the Basic Bite: Serving & Variation Inspirations</h4>
<p>Now, while these truffles are absolutely divine on their own, don’t let your imagination stop there! They are wonderfully versatile and can elevate almost any occasion. Consider serving them chilled on a beautiful platter alongside a piping hot cup of Earl Grey tea for an elegant afternoon treat, or as a delightful finish to a multi-course dinner, perhaps paired with a light, crisp dessert wine. For a brunch gathering, they make a stunning addition to a sweet spread, offering a zesty counterpoint to pastries and fruit. They also make incredibly thoughtful and personal gifts – package a few in a charming box tied with a ribbon, and you have a handmade present that speaks volumes about your care.</p>
<p>And for those of you who love to experiment, the world of variations is wide open! While I adore the classic coating of powdered sugar or finely shredded coconut, you could try rolling them in finely chopped pistachios for a lovely green hue and nutty crunch, or even a dusting of cocoa powder for a beautiful, bittersweet contrast. For an extra layer of flavor, consider infusing your cream with a hint of fresh rosemary or thyme before melting the chocolate – the subtle herbaceous notes pair surprisingly well with lemon. If you’re feeling adventurous, you could even try incorporating a tiny drop of pure lavender extract into the mixture for a floral undertone that’s truly unique. For a burst of color and a different citrus kick, swap out a portion of the lemon zest for lime or even blood orange zest when they’re in season. You could also create a delicate glaze with lemon juice and confectioners’ sugar to drizzle over the finished truffles for an extra layer of shine and sweetness.</p>
<h4>Your Culinary Adventure Awaits!</h4>
<p>My biggest hope is that you feel inspired to dive into your kitchen and give this recipe a go. Trust me, the process is incredibly rewarding, and the outcome is nothing short of spectacular. <strong>These Lemon Truffles are more than just a recipe; they’re an invitation to create joy, to share sweetness, and to savor the simple pleasure of homemade goodness.</strong> I wholeheartedly encourage you to try them – make them for yourself, for your loved ones, or for any occasion that calls for a touch of bright, irresistible magic. And please, I would absolutely love to hear about your experience! Did you stick to the original recipe, or did you put your own creative spin on it? What did your friends and family think? Share your successes, your serving ideas, or any fun variations you come up with. Your feedback and stories truly make my day, and they inspire others in our wonderful cooking community. Happy creating, and enjoy every single zesty, sweet bite!</p>
Easy & Zesty Lemon Truffles
These easy, no-bake Lemon Truffles are a miniature burst of sunshine, offering an exquisite balance of zesty tartness and creamy sweetness with a melt-in-your-mouth texture. Perfect for gifting or a personal treat, they store beautifully in the refrigerator for up to a week or can be frozen for up to three months; thaw for 5-10 minutes for the creamiest texture.
Ingredients
-
12 oz (340g) high-quality white chocolate, finely chopped
-
1/2 cup (120ml) heavy cream (min 36% milk fat)
-
2 tbsp unsalted butter, softened
-
2 tbsp fresh lemon juice, strained
-
Zest of 2 large lemons, finely grated
-
1/2 tsp pure vanilla extract (optional)
-
Pinch of salt
-
1 cup powdered sugar, sifted (for coating)
-
1/2 cup finely shredded unsweetened coconut (for coating)
-
1/4 cup cocoa powder (for coating)
-
6 oz (170g) additional high-quality white chocolate, tempered (for dipping, optional)
-
Extra lemon zest (for garnish)
-
Edible glitter or sprinkles (for festive touch)
Instructions
-
Step 1
Finely chop 12 oz white chocolate and place in a heatproof bowl. Finely grate the zest of 2 large lemons into the bowl, avoiding the white pith. -
Step 2
In a small saucepan, combine 1/2 cup heavy cream and 2 tbsp unsalted butter. Heat over medium-low until it just begins to simmer around the edges; do not boil. Remove from heat. -
Step 3
Pour the hot cream mixture directly over the chocolate and zest. Let sit undisturbed for 5 minutes. Stir gently from the center outwards until the mixture is completely smooth, glossy, and emulsified. -
Step 4
Stir in 2 tbsp strained lemon juice, 1/2 tsp pure vanilla extract (optional), and a pinch of salt until well combined. Cover the ganache surface with plastic wrap and chill in the refrigerator for 4-6 hours, or preferably overnight, until firm and scoopable. -
Step 5
Line a baking sheet with parchment paper. Using a 1-tablespoon cookie scoop, scoop uniform portions of the chilled ganache. Gently roll each portion between your palms to form a smooth, round ball. Place on the prepared baking sheet. -
Step 6
Once all truffles are rolled, return the baking sheet to the refrigerator for at least 30-60 minutes to firm them up for coating. -
Step 7
Set up separate shallow bowls with your chosen coatings: sifted powdered sugar, finely shredded unsweetened coconut, or sifted cocoa powder. -
Step 8
Remove a few chilled truffles from the fridge at a time. Drop one or two into your chosen dry coating. Gently roll to cover completely, then tap off excess. Place coated truffles back onto the parchment-lined baking sheet. -
Step 9
For a professional finish, gently melt and temper 6 oz (170g) additional white chocolate. Dip very cold truffles using a fork, tapping off excess chocolate. While the chocolate is still wet, garnish with extra lemon zest or edible glitter. Place on the prepared baking sheet. -
Step 10
Once all truffles are coated, return the baking sheet to the refrigerator for a final chill of at least 15-30 minutes to allow the coatings to set completely.
Important Information
Nutrition Facts (Per Serving)
It is important to consider this information as approximate and not to use it as definitive health advice.
Allergy Information
Please check ingredients for potential allergens and consult a health professional if in doubt.


Leave a Comment