

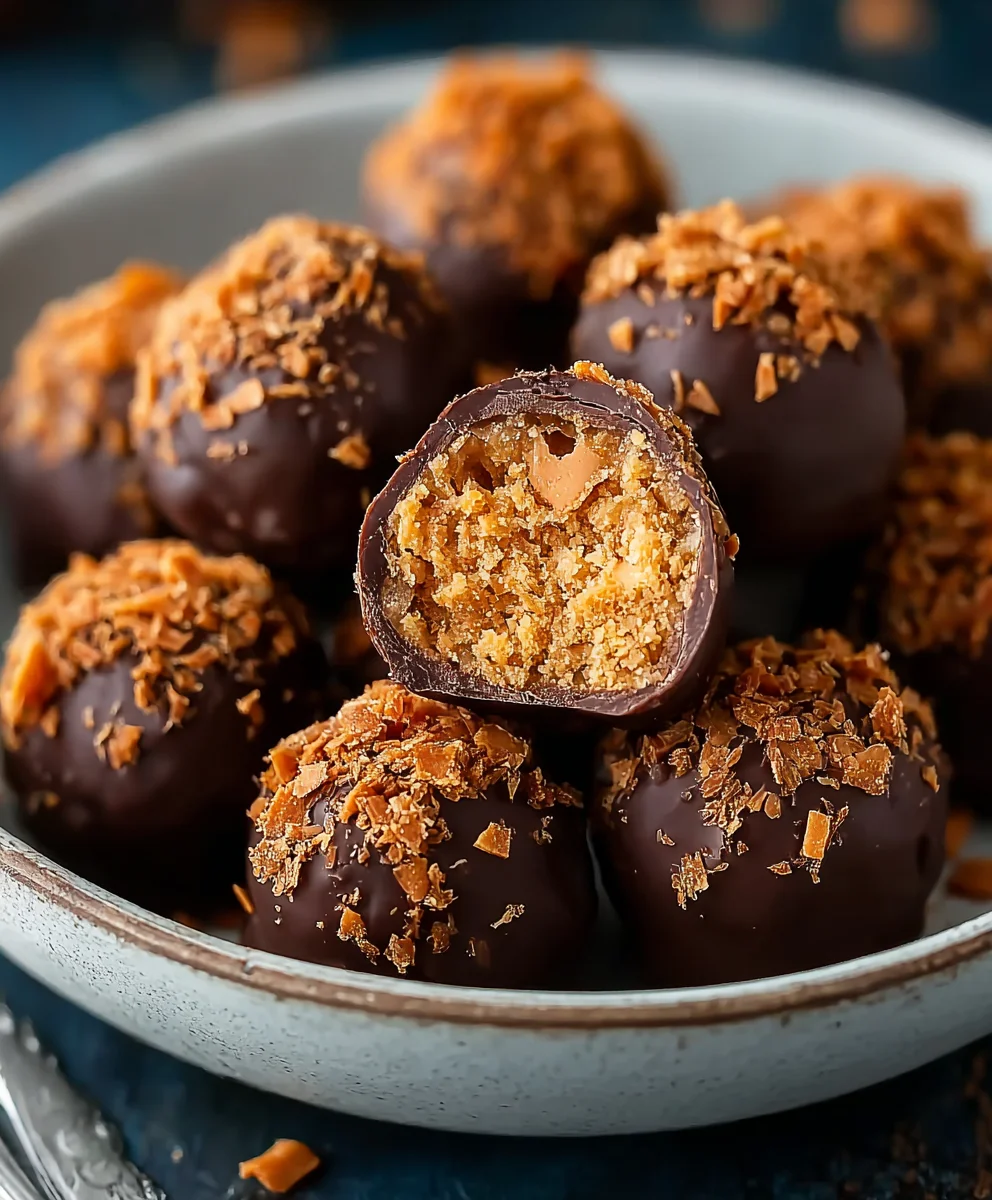
Butterfinger Candy Balls are an absolute revelation for anyone who adores the iconic crunch and luscious chocolate-peanut butter fusion of the classic Butterfinger bar. I’m incredibly excited to guide you through creating these delightful, no-bake treats that are as simple to make as they are impossible to resist. Imagine a bite-sized dessert that perfectly encapsulates everything you love about that distinct crispety, crunchety candy bar, transformed into an elegant, easy-to-share confection.
A Nostalgic Treat Reimagined
The Butterfinger candy bar, with its unmistakable flaky peanut butter core enrobed in chocolate, has been a beloved American staple since its inception in 1923. It’s a taste that truly evokes a sense of nostalgia for many, and transforming it into a homemade delicacy like these Butterfinger Candy Balls elevates that cherished flavor experience to an entirely new level. This recipe is about bringing the magic of a classic candy bar into your kitchen, reinvented in an exciting, shareable form that will undoubtedly become a new family favorite.
What makes this dish truly beloved is not just its undeniable flavor profile—that perfect balance of sweet, salty, and richly satisfying—but also its incredible convenience. These are no-bake wonders, meaning less time in the kitchen and more time enjoying their delightful crunch and creamy texture. They’re perfect for impromptu gatherings, holiday dessert platters, or simply as a well-deserved treat after a long day. The satisfying chew combined with those signature Butterfinger shards creates an explosion of textures that keeps everyone coming back for more.

Ingredients:
- For the Butterfinger Candy Ball Centers:
- 12 full-size (1.9 oz each) Butterfinger candy bars, chilled
- 1 cup (2 sticks) unsalted butter, softened to room temperature
- 1 cup creamy peanut butter (not natural style, as it tends to separate)
- 3 cups powdered sugar (confectioners’ sugar), sifted
- 1 teaspoon pure vanilla extract
- For the Chocolate Coating:
- 24 ounces (approximately 4 cups) good quality melting chocolate, such as Ghirardelli melting wafers or high-quality chocolate chips (milk chocolate, dark chocolate, or a mix of both work wonderfully)
- 1 tablespoon coconut oil or vegetable shortening (optional, helps thin the chocolate for easier dipping and a smoother finish)
- Optional Garnishes:
- Additional 2-3 Butterfinger candy bars, finely crushed
- Flaky sea salt
- Colorful sprinkles
- White chocolate drizzle
Preparing the Irresistible Core Mixture for Your Butterfinger Candy Balls
- Crush the Butterfinger Bars: This is where the magic begins for our delightful Butterfinger Candy Balls! Take your chilled Butterfinger candy bars. I find the best method for achieving that perfect crunchy texture without pulverizing them into dust is to place them in a large, heavy-duty Ziploc bag. Seal the bag, pressing out as much air as possible. Using a rolling pin or a meat mallet, gently but firmly tap and roll over the bars until they are broken into small, irregular pieces. You’re aiming for a mix of fine crumbs and small, pea-sized chunks. These varying textures are key to that signature Butterfinger crunch in every bite of your Butterfinger Candy Balls. Set these glorious crushed pieces aside for now.
- Cream the Butter and Peanut Butter: In a large mixing bowl, combine the softened unsalted butter and the creamy peanut butter. Using an electric mixer (either a stand mixer with a paddle attachment or a handheld mixer), beat these two ingredients together on medium speed until they are light, fluffy, and well combined. This usually takes about 2-3 minutes. Make sure to scrape down the sides of the bowl occasionally to ensure everything is thoroughly incorporated. This creamy base is what will bind our Butterfinger Candy Balls together.
- Incorporate the Powdered Sugar and Vanilla: Gradually add the sifted powdered sugar to the butter and peanut butter mixture, beating on low speed until just combined. Once the sugar is mostly incorporated, increase the speed to medium and beat for another 1-2 minutes until the mixture is smooth and creamy. Be careful not to overmix here. Finally, beat in the vanilla extract until it’s evenly distributed. The mixture should be thick and pliable, almost like a dense cookie dough. If it feels a little too stiff, a tiny splash of milk (about a teaspoon) can help, but generally, the softened butter and creamy peanut butter should provide ample moisture.
- Fold in the Crushed Butterfinger: Now for the star ingredient! Add the previously crushed Butterfinger candy bar pieces to the creamy peanut butter mixture. Using a sturdy spatula or a wooden spoon, gently fold them in until they are evenly distributed throughout the mixture. Be careful not to crush them further during this step; we want those satisfying chunks intact. This forms the foundational deliciousness of your Butterfinger Candy Balls. At this point, the mixture will be quite dense and sticky, which is exactly what we want.
- Initial Chilling Phase: Cover the bowl tightly with plastic wrap and refrigerate the mixture for at least 30 minutes, or up to an hour. This chilling step is absolutely crucial. It allows the mixture to firm up, making it much easier to handle and roll into uniform Butterfinger Candy Balls. Don’t skip this step, as trying to roll a warm, sticky mixture will be a frustrating experience!
Forming Your Delightful Butterfinger Candy Balls
- Prepare Your Workspace: While the mixture is chilling, line a large baking sheet with parchment paper or wax paper. This will prevent your Butterfinger Candy Balls from sticking and make transfer much easier. Have a small bowl of water nearby to occasionally moisten your hands if the mixture starts to stick too much during rolling.
- Scoop and Roll the Butterfinger Candy Balls: Remove the chilled Butterfinger mixture from the refrigerator. Using a small cookie scoop (a 1-tablespoon size is ideal for bite-sized treats) or two teaspoons, scoop out portions of the mixture. Gently roll each portion between the palms of your hands to form smooth, uniform balls, approximately 1 to 1.5 inches in diameter. The warmth of your hands will slightly soften the mixture, making it pliable enough to roll. Aim for consistency in size, as this will help ensure even coating later on. As you roll each of these delightful Butterfinger Candy Balls, place them onto your prepared baking sheet, leaving a small space between each one.
- Second Chilling – Firming Up the Butterfinger Candy Balls: Once all the mixture has been rolled into balls, place the baking sheet back into the refrigerator. Allow the Butterfinger Candy Balls to chill for at least another 1 to 2 hours, or even longer. You can also place them in the freezer for about 30-45 minutes for a quicker firm-up. This firming process is absolutely vital for successful chocolate dipping. If the balls are not thoroughly chilled and firm, they will soften and potentially fall apart when introduced to the warm melted chocolate, or the chocolate coating will be too thin and uneven. Well-chilled Butterfinger Candy Balls will hold their shape beautifully and result in a perfectly crisp chocolate shell.
- Achieving Uniformity (Pro Tip): If you’re particular about the size and shape of your Butterfinger Candy Balls, you can weigh each portion of the mixture before rolling. Aim for about 20-25 grams per ball. This ensures every bite-sized treat is perfectly consistent. If you notice your hands getting too warm and making the mixture sticky, take a short break, or rinse your hands with cold water and dry them thoroughly before continuing.
The Irresistible Chocolate Coating for Your Butterfinger Candy Balls
- Prepare the Chocolate for Melting: Before you begin melting, ensure your Butterfinger Candy Balls are thoroughly chilled and ready to go. If using chocolate chips or bars, chop them into small, even pieces to facilitate even melting. This is crucial for achieving a smooth, lump-free chocolate coating for your Butterfinger Candy Balls.
-
Melt the Chocolate (Choose Your Method):
- Microwave Method (My preferred speedy way): Place the chocolate (and optional coconut oil/shortening) in a microwave-safe bowl. Microwave on high power in 30-second intervals, stirring thoroughly after each interval. It’s important to stir even if the chocolate doesn’t look fully melted, as residual heat will continue the melting process. Continue microwaving and stirring until the chocolate is smooth, glossy, and completely melted. Be extremely careful not to overheat the chocolate, as this can cause it to seize (thicken and become grainy), making it unusable for dipping.
- Double Boiler Method (The classic, gentle approach): Fill a saucepan with about an inch or two of water and bring it to a gentle simmer. Place a heatproof bowl (make sure it fits snugly over the saucepan without touching the water) containing your chocolate (and optional coconut oil/shortening) over the simmering water. The steam will gently melt the chocolate. Stir continuously with a rubber spatula until the chocolate is smooth and completely melted. This method provides more controlled heat, reducing the risk of scorching.
Once melted, if using, stir in the coconut oil or vegetable shortening. This helps to thin the chocolate slightly, making it easier to dip the Butterfinger Candy Balls and giving them a beautiful, shiny, and smooth finish. Ensure the chocolate is warm enough to be fluid but not hot, which could melt the centers too quickly.
- Dipping the Butterfinger Candy Balls: This is the most fun part! Working with one chilled Butterfinger Candy Ball at a time, drop it into the melted chocolate. Using a dipping fork or two regular forks, roll the ball gently in the chocolate until it’s completely coated. Make sure to keep the chocolate moving gently as you work to prevent it from cooling too much.
- Remove and Drain Excess Chocolate: Carefully lift the chocolate-coated Butterfinger Candy Ball out of the melted chocolate with your dipping fork. Tap the fork gently against the rim of the bowl to allow any excess chocolate to drip off. This creates a neat, even coating and prevents “feet” of chocolate from forming around the base. You want a thin, even layer of chocolate, not a thick, clumpy one.
- Place on Prepared Baking Sheet and Garnish: Carefully slide the coated Butterfinger Candy Ball off the fork and onto the parchment-lined baking sheet. If you’re adding any garnishes, do so immediately while the chocolate is still wet. Sprinkle with a pinch of flaky sea salt, a few colorful sprinkles, or a dusting of extra crushed Butterfinger crumbs for an enhanced visual and textural appeal.
- Final Chilling for Set-Up: Repeat the dipping and garnishing process with the remaining Butterfinger Candy Balls. Once all the balls are coated and garnished, return the baking sheet to the refrigerator for at least 30 minutes, or until the chocolate coating is completely set and firm to the touch. This final chill ensures a perfectly crisp chocolate shell encasing the chewy, crunchy Butterfinger center.
Tips for Perfect Butterfinger Candy Balls and Storage
- Maintaining Chocolate Temperature: If your chocolate starts to thicken during dipping, return it to the microwave for 10-15 seconds (stirring well) or back over the double boiler for a minute or two to bring it back to a perfectly dippable consistency. Consistent chocolate temperature is key to achieving that smooth, even coating on your Butterfinger Candy Balls.
- Troubleshooting Sticky Centers: If your Butterfinger Candy Ball mixture feels too sticky even after chilling, you can add another tablespoon or two of sifted powdered sugar and mix it in. If it feels too dry or crumbly, a tiny bit more melted butter or peanut butter can help bring it together. The ideal consistency is firm enough to roll without sticking excessively to your hands.
- Avoiding Seized Chocolate: Water is the enemy of melting chocolate. Ensure all your bowls, spatulas, and utensils are completely dry before they touch the chocolate. Even a single drop of water can cause the chocolate to seize, becoming thick, grainy, and unusable for dipping. This is especially important when using the double boiler method.
- Storage and Shelf Life: Once the chocolate coating is fully set, these Butterfinger Candy Balls can be stored in an airtight container in the refrigerator for up to 2 weeks. For best flavor and texture, I recommend bringing them to room temperature for about 10-15 minutes before serving. This allows the centers to soften slightly and the chocolate to lose its fridge-cold hardness, enhancing the overall enjoyment.
- Freezing for Longer Storage: If you want to prepare these Butterfinger Candy Balls further in advance, they freeze beautifully! Place the fully set and coated balls in a single layer on a parchment-lined baking sheet and freeze until solid (about 2-3 hours). Once solid, transfer them to a freezer-safe airtight container or bag, separating layers with parchment paper to prevent sticking. They can be stored in the freezer for up to 2-3 months. Thaw them in the refrigerator overnight or at room temperature for about 30 minutes before serving.
- Making a Larger Batch: This recipe is easily doubled or even tripled if you’re making these for a party, a bake sale, or as edible gifts. Just ensure you have enough large mixing bowls, baking sheets, and refrigerator space! Remember that more volume means potentially longer chilling times for the core mixture and the finished Butterfinger Candy Balls.
- Presentation Matters: To elevate these delicious Butterfinger Candy Balls, consider placing them in mini paper cupcake liners before arranging them on a serving platter. This not only makes them easier to pick up but also adds a touch of elegance, perfect for any gathering.
- The Perfect Treat for Any Occasion: Whether it’s for a holiday party, a casual get-together, or just a treat for yourself, these homemade Butterfinger Candy Balls are always a crowd-pleaser. Their irresistible combination of crunchy, peanut buttery, and chocolatey goodness makes them truly unforgettable.
Conclusion:
If there’s one recipe I could implore you to try this week, it would undoubtedly be this one. I truly believe I’ve shared something special here, a recipe that transcends the ordinary and delivers pure, unadulterated joy in every single bite. These aren’t just any treats; they are a celebration of simplicity, a testament to how incredible a few basic ingredients can become when combined with a little creativity. You see, the magic of this recipe lies not only in its incredibly straightforward process – which, let’s be honest, is a huge win for any home baker or dessert enthusiast – but also in the sheer delight it brings to anyone lucky enough to taste them.
Imagine that perfect balance of textures: the glorious, signature crunch of the Butterfinger candy, perfectly complemented by the smooth, creamy, and wonderfully sweet binding agent that holds it all together. It’s a symphony for your taste buds, a delightful explosion of flavor and sensation that leaves you reaching for just one more, and then another. I’ve witnessed firsthand the smiles these treats create, the surprised gasps of “Oh my goodness, what is this?!” from friends and family alike. They are addictive in the best possible way, offering a nostalgic trip down memory lane for some, and an exciting new favorite for others. This recipe for Butterfinger Candy Balls isn’t just a dessert; it’s an experience, a little moment of pure happiness wrapped up in a bite-sized package, making it an absolute must-try for anyone looking to add a little extra sweetness and crunch to their life. The ease of preparation makes it accessible to everyone, regardless of their baking prowess, ensuring that a delectable treat is always just within reach.
Once you’ve whipped up your first batch, the possibilities for enjoyment are practically endless! These delightful morsels are fantastic served chilled, allowing the flavors to meld and the texture to firm up slightly, creating an even more satisfying bite. But don’t shy away from enjoying them at room temperature either, where their creamy interior is a bit softer and perhaps even more decadent. They make for the most incredible, easy-to-serve dessert at a casual get-together, a sweet pick-me-up with your afternoon coffee or tea, or even a delightful packed lunch treat for yourself or the kids.
But why stop there? Let your culinary imagination soar with some fun variations! For a different flavor profile, you could easily dip half of them in melted dark chocolate and the other half in white chocolate, perhaps drizzling them with contrasting chocolate for an elegant finish. A sprinkle of sea salt on top of the chocolate coating can elevate the flavor tremendously, adding that sophisticated sweet-and-salty twist. Or, how about rolling them in finely crushed pretzels for an extra layer of salty crunch, or even a dusting of cocoa powder for a richer, less sweet exterior? You could also experiment with adding a tiny splash of vanilla extract or a pinch of cinnamon to the base mixture before chilling to introduce subtle aromatic notes. If you’re feeling extra adventurous, consider shaping the mixture into small bars or even pressing it into a lined baking dish and cutting it into squares once firm, creating a completely new presentation. These versatile treats also make an incredible topping for a scoop of vanilla bean ice cream or crumbled over a simple bowl of Greek yogurt for a surprisingly indulgent breakfast. The beauty of this recipe is its adaptability, allowing you to tailor it perfectly to your taste or the occasion at hand.
So, now it’s your turn! I genuinely hope you feel inspired to roll up your sleeves and give these utterly irresistible treats a try. Trust me when I say, the satisfaction of creating something so profoundly delicious with such minimal effort is truly rewarding. I have absolutely no doubt that these will quickly become a cherished favorite in your household, just as they have in mine. Once you’ve made them, I would absolutely love to hear about your experience! Did you stick to the original recipe, or did you venture into some exciting variations? What did your friends and family think? Please, don’t hesitate to share your thoughts, your successes, and perhaps even some photos of your amazing creations. Your feedback means the world to me, and it’s incredibly inspiring to see how others enjoy and adapt these recipes. Let’s spread the joy of these fantastic treats far and wide – happy making, and happy tasting!

Butterfinger Candy Balls
These no-bake Butterfinger Candy Balls are an irresistible treat, transforming the classic crunch of Butterfinger into elegant, easy-to-share confections. Featuring a creamy peanut butter core studded with distinct crispety, crunchety Butterfinger pieces, all enrobed in a smooth chocolate shell. Perfect for impromptu gatherings, holiday platters, or as a delightful gift, these bite-sized wonders pair wonderfully with coffee or fresh berries. A quick swirl of contrasting chocolate or a sprinkle of sea salt makes them look totally professional.
Ingredients
-
12 full-size (1.9 oz) Butterfinger candy bars, chilled
-
1 cup (2 sticks) unsalted butter, softened
-
1 cup creamy peanut butter (not natural style)
-
3 cups powdered sugar, sifted
-
1 tsp pure vanilla extract
-
24 oz (approx. 4 cups) good quality melting chocolate
-
1 tbsp coconut oil or vegetable shortening (optional)
-
Optional Garnishes: 2-3 additional Butterfinger candy bars (finely crushed), flaky sea salt, colorful sprinkles, white chocolate drizzle
Instructions
-
Step 1
Place 12 chilled Butterfinger candy bars in a heavy-duty Ziploc bag. Crush them with a rolling pin or meat mallet until broken into small, irregular pieces (mix of fine crumbs and pea-sized chunks). Set aside. -
Step 2
In a large mixing bowl, cream 1 cup softened unsalted butter and 1 cup creamy peanut butter with an electric mixer on medium speed until light and fluffy (2-3 minutes). Scrape down bowl sides as needed. -
Step 3
Gradually add 3 cups sifted powdered sugar to the mixture, beating on low speed until just combined, then increase to medium for 1-2 minutes until smooth. Beat in 1 tsp vanilla extract until evenly distributed. -
Step 4
Add the crushed Butterfinger pieces to the creamy mixture. Gently fold with a sturdy spatula until evenly distributed. The mixture will be dense and sticky. -
Step 5
Cover the bowl tightly with plastic wrap and refrigerate for at least 30-60 minutes to firm up the mixture, making it easier to handle. -
Step 6
Line a large baking sheet with parchment paper. Remove chilled mixture from the refrigerator. Using a 1-tablespoon cookie scoop, roll portions between your palms into smooth, uniform balls, 1 to 1.5 inches in diameter. Place on the prepared baking sheet, leaving space between each. -
Step 7
Return the baking sheet with formed balls to the refrigerator for at least 1-2 hours (or freezer for 30-45 minutes). This step is crucial for successful chocolate dipping, ensuring the balls are firm. -
Step 8
Chop chocolate into small pieces if using chips/bars. Melt 24 oz chocolate (and optional 1 tbsp coconut oil/shortening) using a microwave (30-second intervals, stirring) or a double boiler until smooth, glossy, and lump-free. Ensure chocolate is warm and fluid, but not hot. -
Step 9
Working with one thoroughly chilled Butterfinger Candy Ball at a time, drop it into the melted chocolate. Use a dipping fork to roll it until completely coated. Tap the fork gently against the bowl rim to drain excess chocolate. Carefully slide onto the parchment-lined baking sheet. Garnish immediately while chocolate is wet with crushed Butterfinger, sea salt, sprinkles, or a white chocolate drizzle. -
Step 10
Repeat dipping and garnishing for all balls. Return the baking sheet to the refrigerator for at least 30 minutes, or until the chocolate coating is completely set and firm. Store in an airtight container in the refrigerator for up to 2 weeks. For longer storage, freeze for 2-3 months in an airtight container, thawing in the refrigerator or at room temperature before serving.
Important Information
Nutrition Facts (Per Serving)
It is important to consider this information as approximate and not to use it as definitive health advice.
Allergy Information
Please check ingredients for potential allergens and consult a health professional if in doubt.


Leave a Comment