

Pizza Pot Pies are a dish I’m incredibly excited to share, as they are truly about to revolutionize your dinner routine! Imagine the ultimate comfort food fusion: the beloved, cheesy goodness of a classic pizza, encased in a warm, flaky crust reminiscent of a traditional pot pie. This ingenious creation takes everything we adore about two culinary titans and brings them together in one delightful, individual serving.
While the individual ‘pizza pot pie’ as a specific dish doesn’t boast centuries of lineage like its distinct inspirations, it embodies the spirit of innovation that has always driven culinary evolution. Pizza, a dish with roots stretching back to ancient times, perfected in Naples, Italy, has always been a symbol of communal joy and simple, delicious satisfaction. Pot pies, on the other hand, carry the comforting legacy of hearty, enclosed meals designed for warmth and sustenance.
Why You’ll Love These Pizza Pot Pies
What makes these particular Pizza Pot Pies so irresistibly appealing? It’s the perfect harmony of textures – a golden, buttery crust yielding to a rich, bubbling filling of tangy marinara, melted mozzarella, and your favorite toppings. They offer the ultimate convenience of individual portions, making them ideal for busy weeknights, fun family dinners, or even a unique party appetizer. Everyone loves the familiar, comforting taste of pizza, and when presented in this exciting new format, it becomes an an instant hit, promising a unique and satisfying culinary experience with every bite.

Ingredients:
-
For the Dough:
- 1 (14-ounce) package store-bought pizza dough, or your favorite homemade recipe (enough for 4-6 individual pot pies)
- 1 large egg, beaten (for egg wash)
-
For the Sauce & Filling Base:
- 1 tablespoon olive oil
- 1 medium yellow onion, finely diced (about 1 cup)
- 2 cloves garlic, minced
- 1 red bell pepper, finely diced (about 1 cup)
- 4 ounces cremini mushrooms, sliced (about 1.5 cups)
- 1 (15-ounce) can crushed tomatoes
- 1 (8-ounce) can tomato sauce
- 2 tablespoons tomato paste
- 1 teaspoon dried oregano
- 1 teaspoon dried basil
- ½ teaspoon garlic powder
- ¼ teaspoon red pepper flakes (optional, for a little kick)
- ½ teaspoon sugar (to balance acidity)
- Salt and freshly ground black pepper, to taste
- ¼ cup fresh parsley, chopped (for garnish, optional)
-
For the Meats & Cheese:
- 8 ounces bulk Italian sausage, mild or hot, crumbled
- 4 ounces pepperoni slices, quartered or diced
- 1 ½ cups shredded mozzarella cheese
- ½ cup grated Parmesan cheese
-
Equipment:
- 4-6 individual oven-safe ramekins or small oven-safe bowls (6-8 ounce capacity)
- Large skillet or Dutch oven
- Rolling pin
- Baking sheet
- Pastry brush
Preparing the Flavorful Filling for Your Pizza Pot Pies
I always start with the filling for my Pizza Pot Pies, as it needs a little time to simmer and develop those deep, rich flavors that make these so incredibly satisfying. Trust me, taking your time here makes all the difference!
- Prep Your Aromatics and Veggies: First things first, let’s get our ingredients ready. I like to finely dice my yellow onion and red bell pepper into small, uniform pieces. This ensures they cook evenly and blend seamlessly into the sauce. For the garlic, a good mince is key – you want that flavor to infuse everything. If you’re using mushrooms, slice them thinly. I always give my mushrooms a quick wipe with a damp paper towel to clean them, rather than rinsing, which can make them absorb too much water.
- Brown the Italian Sausage: In a large, heavy-bottomed skillet or Dutch oven, heat 1 tablespoon of olive oil over medium-high heat. Once shimmering, add the crumbled Italian sausage. Break it up with a spoon as it cooks. You want to brown it thoroughly, letting it develop a nice crust, which adds so much flavor. This usually takes about 5-7 minutes. Once it’s nicely browned and cooked through, use a slotted spoon to transfer the sausage to a plate lined with paper towels, allowing any excess grease to drain. This step is important for preventing your Pizza Pot Pies from becoming overly greasy.
-
Sauté the Vegetables: Reduce the heat to medium. If there’s more than a tablespoon of rendered fat in the skillet, carefully spoon some out. Add the diced onion and red bell pepper to the skillet. Sauté them, stirring occasionally, until they start to soften and become translucent, which typically takes about 5-8 minutes.
Building Layers of Flavor:
Once the onions and peppers are softened, add the sliced mushrooms to the skillet. Cook them for another 5-7 minutes, stirring occasionally, until they release their moisture and start to brown. Don’t rush this step! Allowing the mushrooms to get some color truly deepens their umami flavor.
- Infuse with Garlic and Spices: Now, create a small space in the center of the pan by pushing the vegetables aside. Add the minced garlic and tomato paste to this cleared spot. Cook the garlic and tomato paste for about 1 minute, stirring them directly into the hot pan. This helps to bloom the garlic’s aroma and deeply toast the tomato paste, intensifying its sweetness and removing any raw, metallic taste. Then, stir them into the rest of the vegetables. Add the dried oregano, dried basil, garlic powder, and optional red pepper flakes. Cook for another minute, stirring constantly, until the spices are fragrant. This process of toasting the spices is crucial for unlocking their full aromatic potential, enhancing the overall profile of our Pizza Pot Pies.
-
Simmer the Sauce: Pour in the crushed tomatoes and tomato sauce. Stir in the sugar, salt, and freshly ground black pepper to taste. Bring the mixture to a gentle simmer. Once simmering, return the cooked Italian sausage to the skillet and stir to combine.
The Importance of Simmering:
Reduce the heat to low, cover the skillet, and let the sauce simmer gently for at least 15-20 minutes. This simmering time is essential for all the flavors to meld beautifully and for the sauce to thicken slightly. Stir occasionally to prevent sticking. A longer simmer, even up to 30-40 minutes, will only improve the depth of flavor in your Pizza Pot Pies.
- Add the Pepperoni: After the sauce has simmered and thickened to your liking, stir in the diced or quartered pepperoni slices. I like to add them towards the end so they don’t become too soft and still retain a bit of their distinct texture and flavor. Taste the sauce again and adjust seasonings if necessary. Remember, this is the heart of your Pizza Pot Pies, so make sure it tastes amazing! Remove the skillet from the heat and set aside to cool slightly while you prepare the dough.
Assembling Your Individual Pizza Pot Pies
This is where our vision for delicious Pizza Pot Pies truly comes to life! Getting the assembly right ensures a beautiful presentation and a perfectly cooked crust.
- Preheat Oven and Prep Ramekins: Preheat your oven to 400°F (200°C). Lightly grease your individual ramekins or small oven-safe bowls. I usually use a non-stick cooking spray, but a little butter or olive oil rubbed around the inside works just as well. This prevents sticking and makes serving much easier. Place the greased ramekins on a baking sheet to catch any potential drips and make them easier to transfer to and from the oven.
-
Prepare the Pizza Dough: If you’re using store-bought pizza dough, take it out of the refrigerator about 30 minutes before you plan to use it. This allows it to come to room temperature, making it much more pliable and easier to work with. On a lightly floured surface, roll out the pizza dough to about ¼-inch thickness. You want it thin enough to cook through but sturdy enough to hold its shape. Using a round cookie cutter, a bowl, or even the top of one of your ramekins as a guide, cut out circles of dough that are slightly larger than the top opening of your ramekins. You’ll need one dough circle for each pot pie. This extra circumference will give you enough dough to create a nice seal around the edge.
Dough Handling Tip:
If the dough springs back too much, cover it with a clean kitchen towel and let it rest for another 5-10 minutes. This allows the gluten to relax, making it easier to roll. Don’t worry if your circles aren’t perfectly uniform; the rustic charm is part of the appeal of homemade Pizza Pot Pies!
-
Layer the Filling and Cheese: Now, it’s time to fill our ramekins! Spoon a generous amount of the prepared pizza pot pie filling into each greased ramekin. I usually fill them about two-thirds of the way full. You don’t want to overfill them, as the cheese will expand, and you need space for the crust.
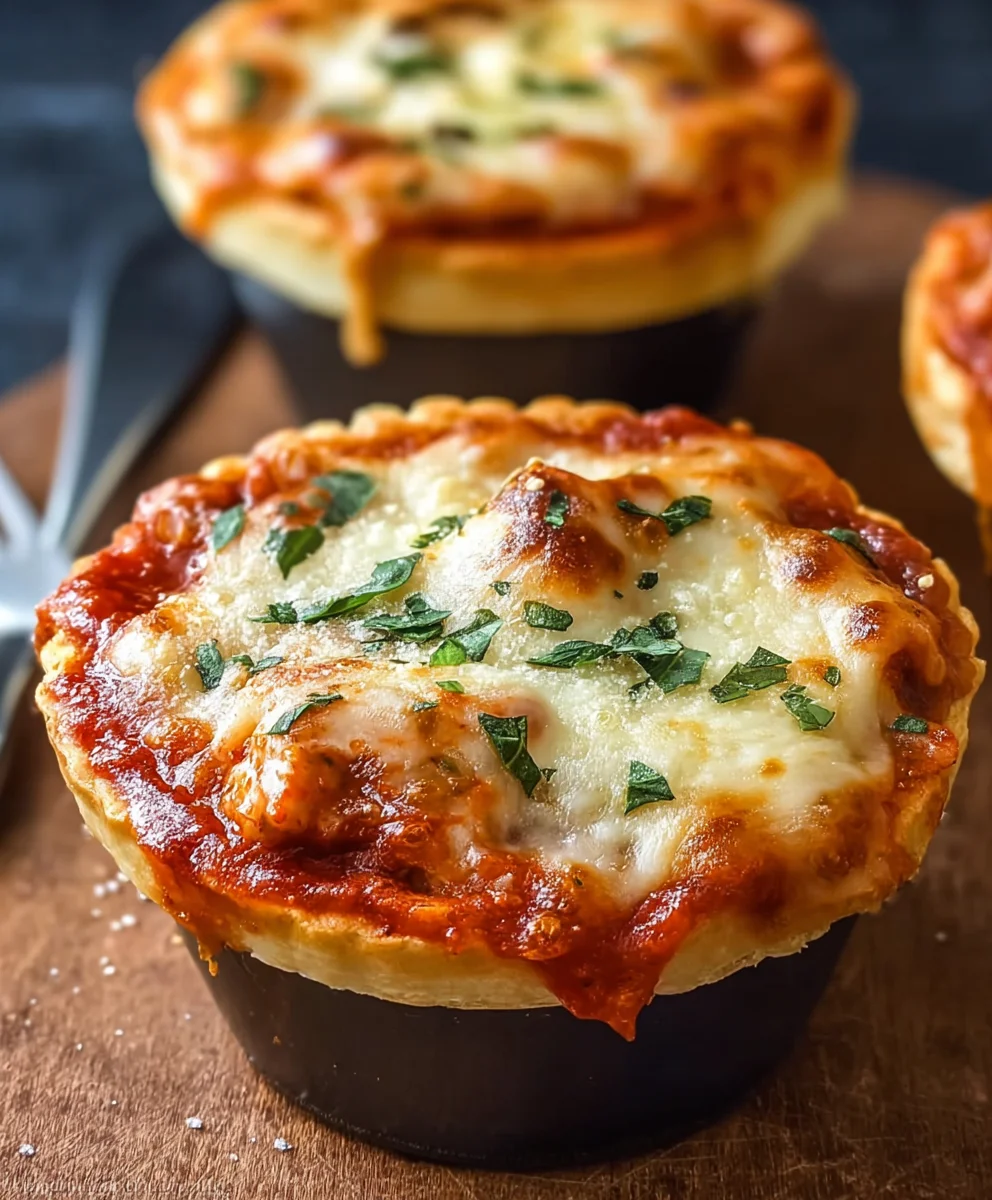
Next, sprinkle about 2-3 tablespoons of shredded mozzarella cheese over the filling in each ramekin. The cheese will melt down and create that gooey, irresistible pizza experience we all crave inside our Pizza Pot Pies. -
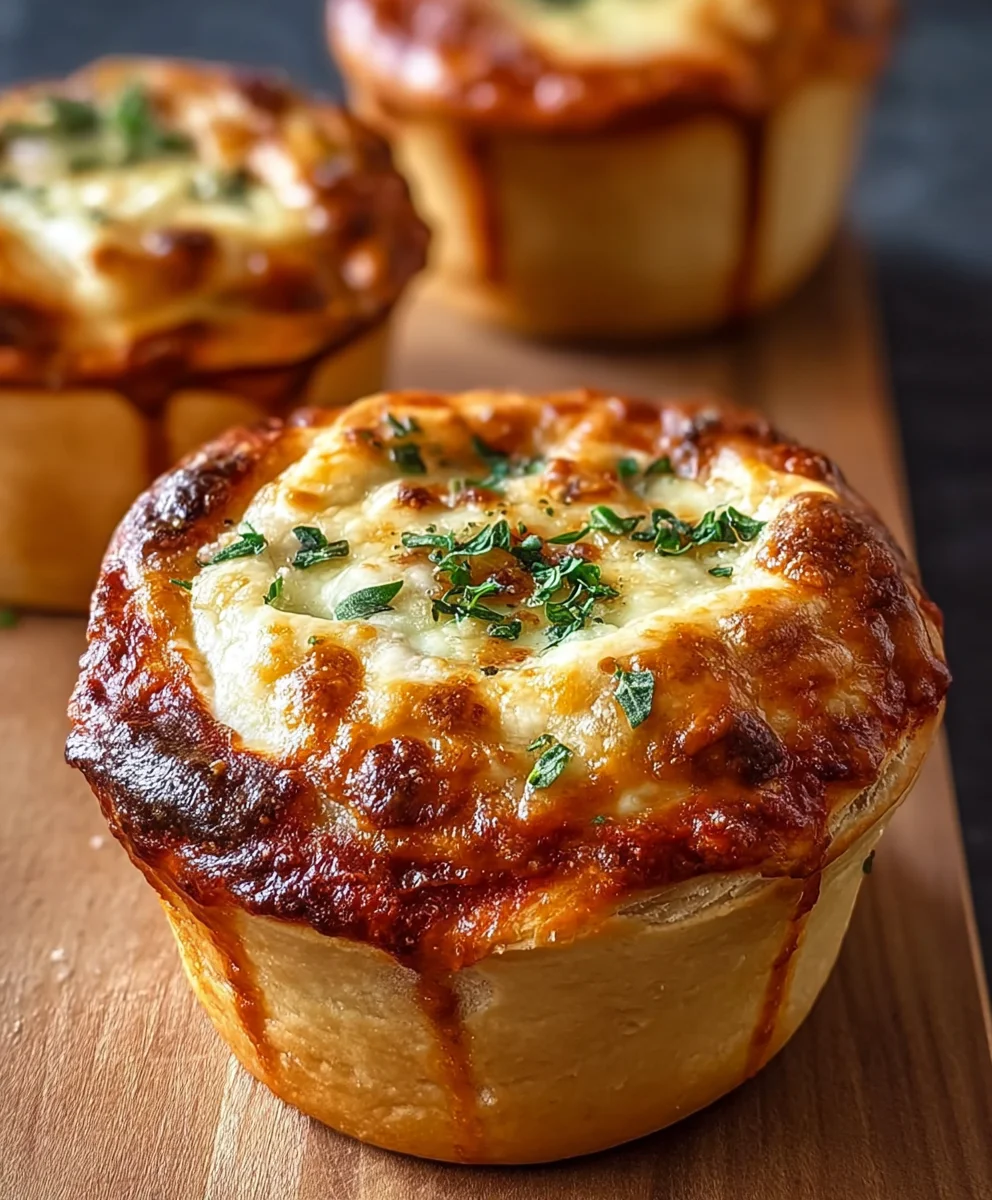
Add the Top Crust: Carefully place one of your cut dough circles over the top of each ramekin, centering it as best you can. Gently press the edges of the dough down onto the rim of the ramekin. You can use your fingers to crimp the edges, or a fork to press and seal the dough firmly against the ramekin. This is a crucial step to ensure the filling stays contained and the crust gets beautifully golden and crisp. If you have any excess dough, you can trim it or create decorative patterns, but a simple crimp is perfectly fine.
Sealing the Deal:
A good seal not only keeps the filling in but also helps to create that wonderful steamy environment inside the pot pie, ensuring everything cooks perfectly.
- Apply Egg Wash: In a small bowl, whisk the egg with about a teaspoon of water to create an egg wash. Using a pastry brush, lightly brush the top of each dough circle with the egg wash. This is what gives your Pizza Pot Pies their beautiful golden-brown, glossy finish and adds a lovely crispness to the crust.
- Vent the Crust: Before baking, use a sharp knife to cut 2-3 small slits or a simple cross in the center of each dough top. These vents allow steam to escape during baking, preventing the crust from puffing up too much and becoming soggy, and ensuring a perfectly flaky crust for your Pizza Pot Pies.
Baking Your Golden Pizza Pot Pies
The final stage is perhaps the most rewarding: baking these beauties until they are golden, bubbly, and incredibly aromatic. Your kitchen will smell absolutely divine!
-
Bake to Perfection: Carefully transfer the baking sheet with your assembled Pizza Pot Pies to the preheated 400°F (200°C) oven. Bake for 20-25 minutes, or until the crust is a deep golden brown and the filling is bubbling enthusiastically around the edges.
Monitoring Your Bake:
Keep a close eye on them, especially during the last 5-10 minutes, as oven temperatures can vary. If you notice the crust browning too quickly, you can loosely tent the tops with a piece of aluminum foil to prevent over-browning while the filling finishes heating through. The goal is a crust that is cooked through and delightfully crisp.
- Cool Before Serving: Once baked, carefully remove the baking sheet from the oven. This is a very important step: let the Pizza Pot Pies rest for at least 10-15 minutes before serving. The filling will be extremely hot and can cause serious burns if you dig in too soon. Also, allowing them to rest helps the filling set a bit, preventing it from spilling out uncontrollably when you break through that gorgeous crust. This resting period enhances both safety and enjoyment of your homemade Pizza Pot Pies.
- Serve and Enjoy: Sprinkle with a little fresh chopped parsley or extra grated Parmesan cheese, if desired, for a final touch of freshness and flavor. Serve your individual Pizza Pot Pies directly in their ramekins, perhaps with a simple green salad on the side to balance the richness. These are truly comforting and a fun twist on classic pizza night, offering all the beloved flavors in a cozy, satisfying format. Enjoy every bubbling, cheesy, crusty bite!
Conclusion:
Well, my friends, we’ve reached the end of our culinary journey for today, and I truly hope you’re as excited as I am about what we’ve just created. If there’s one recipe I’d urge you to add to your rotation, it’s this one. These delightful Pizza Pot Pies aren’t just a meal; they’re an experience, a heartwarming hug in a bowl that perfectly marries two universally loved comfort foods. We’re talking about all the gooey, cheesy, savory goodness of your favorite pizza, but nestled under a perfectly golden, flaky crust, delivering a surprisingly elegant yet incredibly simple dish. It’s a revelation for busy weeknights, offering a quick prep time and a relatively short bake, meaning less time slaving over the stove and more time enjoying delicious food with your loved ones. What makes them truly special is their incredible versatility. You can literally empty your fridge of leftover veggies, customize them with everyone’s preferred toppings, and watch as these little individual portions disappear faster than you can say “extra cheese.”
Forget the compromises of ordering out or the hassle of making a full pizza from scratch when you’re short on time. These individual servings are portion-controlled, easy to handle, and pack a flavor punch that will have everyone asking for seconds. I promise you, the aroma filling your kitchen as these bake is enough to make mouths water, and the first bite, with that warm, bubbly filling spilling out from under the crisp pastry lid, is pure culinary bliss. They are, without a doubt, a must-try because they encapsulate everything wonderful about home cooking: comfort, customization, and incredible taste, all wrapped up in an approachable format. They offer a fresh, exciting take on a classic, making them perfect for family dinners, casual get-togethers, or even a cozy night in. Trust me, once you try these, you’ll wonder how you ever lived without them.
Serving & Variation Ideas to Inspire You
While these pot pies are perfectly satisfying on their own, a little something extra can elevate the meal. I love serving them alongside a crisp, fresh green salad tossed with a light vinaigrette; the brightness helps to balance the richness of the pies. A simple Caesar salad or even some steamed green beans with a squeeze of lemon would also be fantastic. If you’re leaning into the comfort food aspect, a side of warm garlic bread or cheesy breadsticks for dipping into any overflow of sauce would be absolutely divine! And for those chilly evenings, a cup of warm tomato soup could make it a truly epic, cozy meal.
But the true magic lies in making them your own! Don’t hesitate to get creative with the fillings. For a meat lover’s dream, load them up with cooked sausage, pepperoni, and crumbled bacon. Vegetarian? Go wild with roasted bell peppers, mushrooms, olives, spinach, or even some artichoke hearts. You can experiment with different cheeses too – a blend of mozzarella, provolone, and a touch of smoked gouda could add incredible depth. For a touch of heat, sprinkle in some red pepper flakes or add sliced jalapeños. As for the crust, while we used a classic pastry, feel free to try store-bought biscuit dough for a softer, more bread-like topping, or even puff pastry for an extra-flaky texture. Want to make them gluten-free? Many brands offer fantastic gluten-free pie crusts or puff pastry options that work beautifully. The possibilities are genuinely endless, and each variation simply adds to the joy of making and eating these wonderful little parcels of deliciousness. Don’t be afraid to experiment; that’s where the most exciting culinary discoveries often happen!
Your Turn to Create & Share!
Now that you have all the tips and tricks, it’s your turn to step into the kitchen and bring these delightful creations to life! I genuinely encourage you to carve out some time this week to give this recipe a try. You’ll be amazed at how simple it is to achieve such a delicious and satisfying result. Gather your favorite ingredients, maybe even involve the family in choosing their toppings, and enjoy the process of creating something truly special. There’s a unique satisfaction that comes from pulling a batch of perfectly golden, bubbly pies from the oven, knowing you made them yourself.
And when you do, please, please, please don’t keep your culinary triumphs a secret! I absolutely love hearing about your experiences and seeing your incredible creations. Whether you stick to the recipe exactly or put your own inventive twist on it, I’m eager to know all about it. Share your photos, tell me about your favorite topping combinations, or even let me know if you came up with a brilliant serving suggestion I haven’t even thought of yet. Your feedback and creativity inspire me and help our whole cooking community grow. So go ahead, preheat that oven, get cooking, and get ready to enjoy one of the most comforting and customizable meals you’ll ever make. Happy cooking, everyone!
Pizza Pot Pies
Pizza Pot Pies are a delicious, bite-sized fusion of pizza and pot pie, perfect for parties, family dinners, or casual gatherings. These mini pot pies feature buttery biscuit crusts filled with layers of gooey mozzarella cheese, savory beef pepperoni, and tangy pizza sauce. The crust is brushed with a flavorful butter mixture infused with garlic and Italian seasoning, adding extra richness to every bite. Customizable with your favorite pizza toppings, they’re simple to make and fun to eat. Serve warm and watch them disappear!
Ingredients
-
1 (14-ounce) package store-bought pizza dough
-
1 large egg, beaten
-
1 tbsp olive oil
-
1 medium yellow onion, finely diced
-
2 cloves garlic, minced
-
1 red bell pepper, finely diced
-
4 oz cremini mushrooms, sliced
-
1 (15-oz) can crushed tomatoes
-
1 (8-oz) can tomato sauce
-
2 tbsp tomato paste
-
1 tsp dried oregano
-
1 tsp dried basil
-
½ tsp garlic powder
-
¼ tsp red pepper flakes (optional)
-
½ tsp sugar
-
Salt and freshly ground black pepper, to taste
-
¼ cup fresh parsley, chopped (optional)
-
8 oz bulk beef Italian sausage, mild or hot, crumbled
-
4 oz beef pepperoni slices, quartered or diced
-
1 ½ cups shredded mozzarella cheese
-
½ cup grated Parmesan cheese
Instructions
-
Step 1
Finely dice onion and red bell pepper. Mince garlic and thinly slice mushrooms. Heat 1 tbsp olive oil in a large skillet over medium-high heat. Add crumbled beef Italian sausage; brown thoroughly for 5-7 minutes, breaking it up. Transfer sausage to a paper towel-lined plate to drain fat. -
Step 2
Reduce heat to medium. Add diced onion and red bell pepper to skillet; sauté until softened (5-8 mins). Add sliced mushrooms; cook for 5-7 minutes until they release moisture and start to brown. Create a well in the center, add minced garlic and tomato paste; cook for 1 minute, then stir into vegetables. Add dried oregano, basil, garlic powder, and red pepper flakes; cook for 1 minute until fragrant. -
Step 3
Pour in crushed tomatoes and tomato sauce. Stir in sugar, salt, and pepper. Bring to a gentle simmer. Return cooked beef Italian sausage to skillet. Reduce heat to low, cover, and simmer for at least 15-20 minutes (up to 30-40 mins) to meld flavors and thicken. Stir occasionally. After simmering, stir in diced beef pepperoni. Taste and adjust seasonings. Remove from heat and cool slightly. -
Step 4
Preheat oven to 400°F (200°C). Lightly grease 4-6 individual oven-safe ramekins (6-8 ounce capacity); place them on a baking sheet. Roll pizza dough on a lightly floured surface to ¼-inch thickness. Cut out dough circles slightly larger than the top opening of your ramekins. -
Step 5
Spoon the prepared pizza pot pie filling into each greased ramekin, filling about two-thirds full. Sprinkle 2-3 tablespoons of shredded mozzarella cheese over the filling in each. Carefully place a dough circle over each ramekin, pressing the edges firmly down onto the rim to seal (crimp with fingers or a fork). -
Step 6
Whisk 1 large egg with 1 teaspoon of water for an egg wash. Lightly brush the top of each dough circle with the egg wash. Use a sharp knife to cut 2-3 small slits or a simple cross in the center of each dough top to allow steam to escape during baking. -
Step 7
Transfer the baking sheet with pot pies to the preheated oven. Bake for 20-25 minutes, or until the crust is a deep golden brown and the filling is bubbling. If crust browns too quickly, loosely tent with aluminum foil. Carefully remove from oven and let rest for at least 10-15 minutes before serving (filling will be very hot). Garnish with fresh chopped parsley or extra grated Parmesan cheese, if desired. Serve warm directly in ramekins.
Important Information
Nutrition Facts (Per Serving)
It is important to consider this information as approximate and not to use it as definitive health advice.
Allergy Information
Please check ingredients for potential allergens and consult a health professional if in doubt.


Leave a Comment