

Blackberry Hand Pies are more than just a dessert; they are a delightful invitation to savor the sweet essence of summer, perfectly packaged for enjoyment anywhere. I am thrilled to share this timeless recipe with you today.
I remember fondly the simple joy of fresh, sun-warmed blackberries, their vibrant tartness a perfect counterpoint to any sweet pastry. This recipe captures that nostalgic magic in every single bite, offering a comforting taste of homemade goodness without the fuss of a full-sized pie.
A Portable Delight with Rich History
Historically, hand pies, or turnovers, have been cherished across cultures for their incredible portability and convenience. From the humble British pasty to the much-loved American fried pie, these individual portions have always been the ideal companion for travelers, workers, and picnickers alike, making fresh fruit desserts accessible and easy to enjoy on the go. There’s something inherently charming about a dessert you can simply hold in your hand and devour.
Why Everyone Adores These Individual Treats
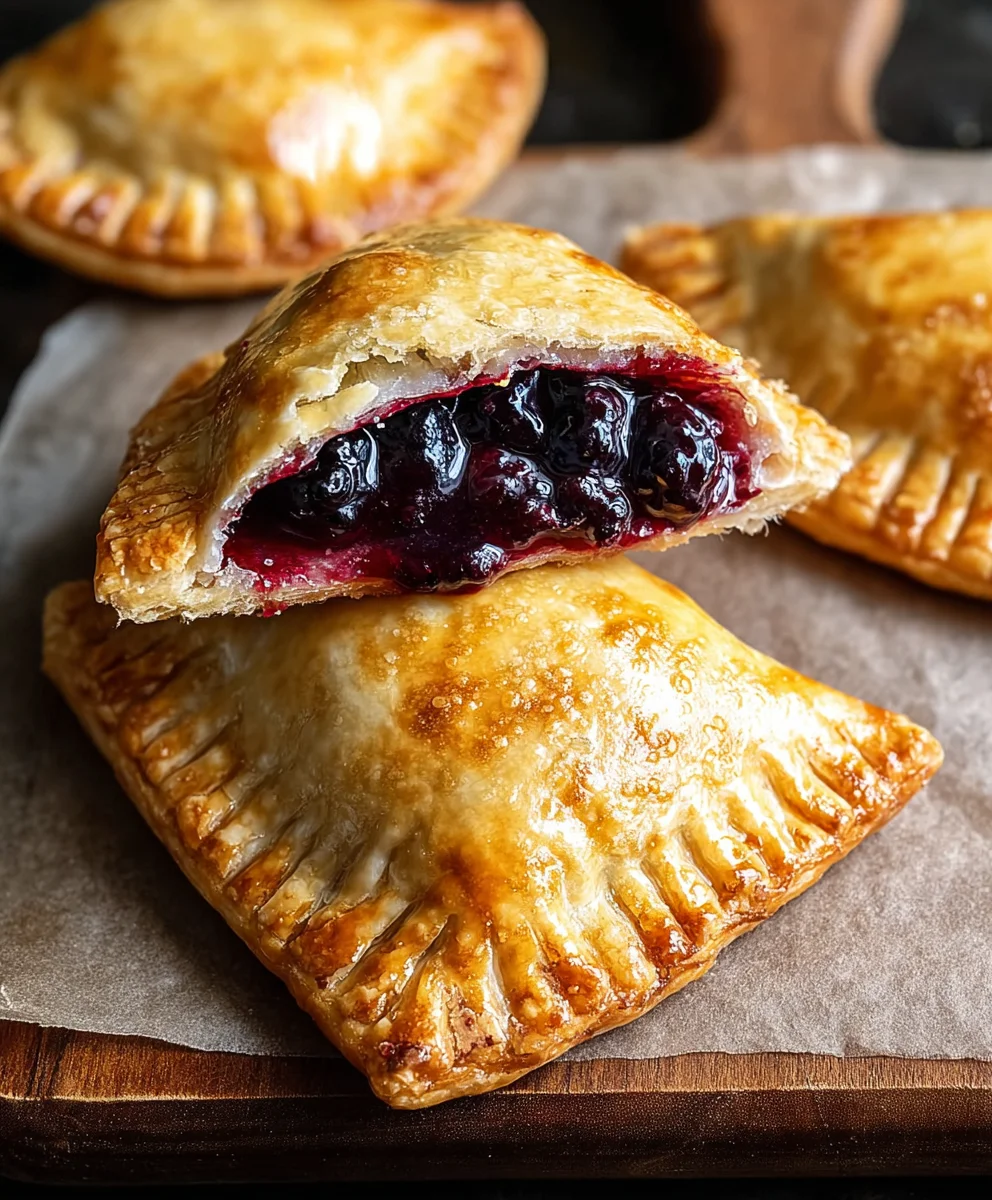
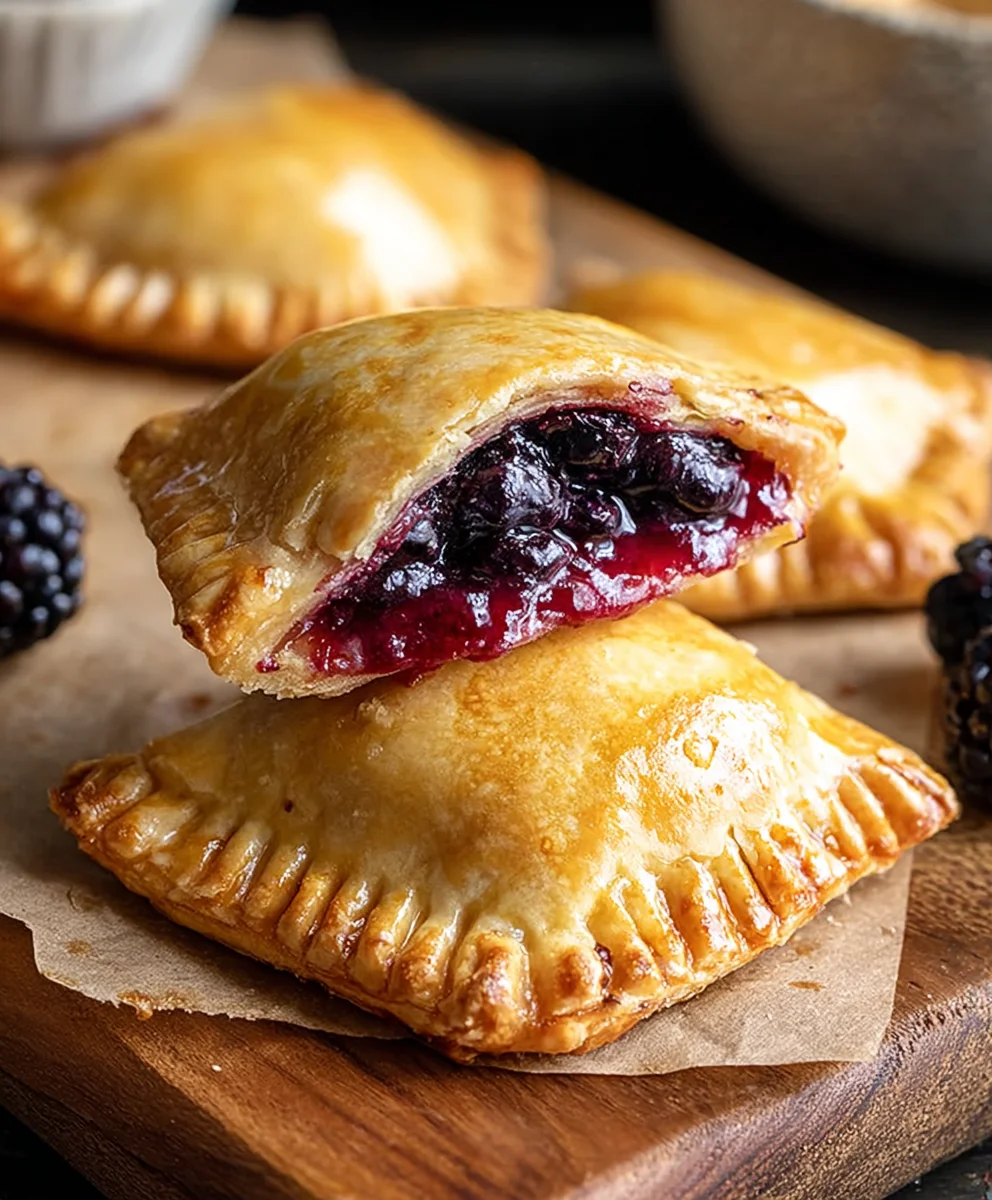
People adore these Blackberry Hand Pies for countless reasons. The golden, impeccably flaky crust, achieved with just a little love and technique, perfectly cradles a bursting, juicy blackberry filling that artfully balances sweetness with a delightful, natural tang. The individual serving size makes them incredibly practical—ideal for elegant gatherings, casual lunchboxes, or simply as a thoughtful, personal treat for yourself. Plus, the rewarding process of preparing a batch means you’re never far from a truly satisfying slice of homemade comfort.

Ingredients:
- For the Flaky Pie Dough:
- 2 ½ cups (300g) all-purpose flour, plus more for dusting
- 1 teaspoon granulated sugar
- 1 teaspoon fine sea salt
- 1 cup (226g) unsalted butter, very cold and cut into ½-inch cubes
- ½ cup (120ml) ice water, plus 1-2 tablespoons more if needed
- For the Luscious Blackberry Filling:
- 4 cups (about 600g) fresh blackberries, rinsed and drained (or frozen, unthawed)
- ½ cup (100g) granulated sugar, adjust to taste based on berry sweetness
- 2 tablespoons fresh lemon juice
- 2 tablespoons cornstarch (or 3 tablespoons all-purpose flour for a slightly less translucent filling)
- ¼ teaspoon ground cinnamon (optional, but lovely)
- Pinch of fine sea salt
- For the Egg Wash & Topping:
- 1 large egg
- 1 tablespoon milk or water
- 2 tablespoons turbinado sugar (or granulated sugar) for sprinkling
Preparing the Luscious Blackberry Filling
Creating the perfect filling is the heart of our delightful Blackberry Hand Pies. We want a vibrant, fruity, yet not overly runny consistency that will hold its shape beautifully within the pie crust. Let’s get started!
- First things first, gently rinse your fresh blackberries under cool water. If you’re using frozen berries, there’s no need to thaw them beforehand; they can go straight into the pot, though you might need to cook the mixture a little longer to account for the extra moisture. Place the rinsed berries into a medium-sized saucepan or a deep skillet.
- To the saucepan, add the granulated sugar. The amount here is a suggestion; if your blackberries are particularly sweet, you might want to reduce it slightly, or if they are quite tart, feel free to add a little more to suit your preference. Then, pour in the fresh lemon juice. This isn’t just for flavor; the acidity from the lemon juice brightens the fruit and helps prevent the filling from becoming too cloyingly sweet.
- In a small separate bowl, whisk together the cornstarch (or flour if you prefer) with the optional ground cinnamon and a tiny pinch of salt. This pre-mixing prevents lumps when added to the hot fruit. The cornstarch is our secret weapon for a perfectly thick filling, ensuring that when you bite into your Blackberry Hand Pies, the fruit stays put and doesn’t ooze out excessively.
- Place the saucepan over medium heat. As the berries begin to warm, they will start to release their juices. Stir gently and frequently to ensure the sugar dissolves and the berries don’t stick to the bottom. Once the berries have softened slightly and are bubbling gently, pour in your cornstarch mixture, whisking constantly to incorporate it smoothly.
- Continue to cook the filling, stirring, for another 2-5 minutes, or until the mixture thickens considerably. It should coat the back of a spoon and when you draw a line through it with your finger, the line should hold for a moment before the filling runs back together. If using frozen berries, this might take a bit longer as the berries release more water.
- Remove the saucepan from the heat. Now, for a truly delightful texture in your Blackberry Hand Pies, you can choose to mash some of the berries gently with a fork or a potato masher, leaving plenty of whole berries for textural interest. This creates a more cohesive filling while still celebrating the beautiful whole fruit.
- Transfer the hot blackberry filling to a shallow dish or a baking sheet lined with parchment paper. This helps it cool down more quickly and evenly. It is absolutely crucial that your filling is completely cool before you assemble your Blackberry Hand Pies. If the filling is warm, it will melt the butter in your pie dough, leading to a tough and less flaky crust. You can speed up the cooling process by placing it in the refrigerator for at least 1-2 hours, or even overnight.
Crafting the Perfect Flaky Pie Dough
A truly spectacular Blackberry Hand Pie starts with an incredible, flaky pie dough. While store-bought crusts can be a time-saver, there’s simply no substitute for the tender, buttery layers of a homemade crust. Trust me, it’s worth the effort!
- In a large mixing bowl, whisk together the all-purpose flour, granulated sugar, and fine sea salt. This ensures all the dry ingredients are evenly distributed before we introduce the fat.
- Add the very cold, ½-inch cubes of unsalted butter to the dry ingredients. The key to a flaky crust is cold butter, so don’t let it sit out! Using a pastry blender, two knives, or even your fingertips, cut the butter into the flour mixture. Work quickly to prevent the butter from warming too much. You want to aim for a mixture that resembles coarse meal, with some larger pea-sized pieces of butter still visible. These butter pieces are what will create those wonderful pockets of steam during baking, leading to a supremely flaky crust for your Blackberry Hand Pies.
- Gradually add the ice water, one tablespoon at a time, mixing lightly with a fork until the dough just begins to come together. You might not need all the water, or you might need a tiny bit more; the exact amount can vary based on your flour and humidity. The dough should be moist enough to hold together when squeezed, but not sticky or wet.
- Turn the dough out onto a lightly floured surface. Gently gather it into a cohesive ball. Avoid overworking the dough, as this can develop the gluten too much and result in a tough crust. Divide the dough into two equal portions. Gently flatten each portion into a disk, wrap them tightly in plastic wrap, and refrigerate for at least 1 hour. Chilling the dough is non-negotiable! This allows the gluten to relax, making the dough easier to roll out, and ensures the butter remains very cold, contributing to that signature flakiness in our Blackberry Hand Pies. You can prepare the dough up to 2-3 days in advance.
Assembling Your Irresistible Blackberry Hand Pies
This is where the magic truly begins as we bring together our perfectly chilled dough and our luscious blackberry filling. Take your time, and enjoy the process of crafting these beautiful individual treats!
- Preheat your oven to 400°F (200°C). Line two baking sheets with parchment paper or silicone baking mats. This will prevent your Blackberry Hand Pies from sticking and make cleanup a breeze.
- Take one disk of chilled pie dough from the refrigerator. On a lightly floured surface, roll it out into a large rectangle, about ⅛-inch thick. Aim for a size roughly 10×14 inches. You can also roll it into a large circle if you prefer. Consistency in thickness is important here for even baking.
- Using a sharp knife or a pizza cutter, cut the dough into equally sized rectangles. A good size is usually 4×5 inches, which will yield about 6-8 rectangles per dough disk, meaning you’ll get 12-16 total squares or rectangles from both dough disks. Alternatively, you can use a 4-inch round cookie cutter for round hand pies. Place half of these dough pieces onto your prepared baking sheets, leaving a couple of inches between each for easy handling and to allow for expansion.
- Spoon about 1 ½ to 2 tablespoons of the completely cooled blackberry filling onto the center of each dough rectangle. Be mindful not to overfill, as this can make sealing difficult and lead to messy leakage during baking. Make sure to leave a clear ½-inch border around the edges of the dough.
- In a small bowl, whisk together the egg and milk (or water) to create your egg wash. This will act as the “glue” for sealing our Blackberry Hand Pies and contribute to a beautiful golden-brown crust. Brush a thin layer of this egg wash along the edges of the dough rectangles that have the filling.
- Carefully place the remaining dough rectangles (the ones without filling) on top of the filling-covered ones. Gently align the edges. Press down firmly around the edges of each pie to seal them. Then, use the tines of a fork to crimp all around the edges. This creates a decorative border and, more importantly, provides an extra secure seal, preventing that delicious blackberry filling from escaping.
- Using a small, sharp knife, make 2-3 small slits or a decorative pattern on the top of each hand pie. These vents are essential! They allow steam to escape during baking, preventing the pies from puffing up excessively and ensuring a crisp, rather than soggy, crust.
- Repeat the rolling, cutting, filling, and sealing process with the second disk of pie dough. Gather any dough scraps, gently re-roll them, and cut out additional hand pies until all the dough is used.
Baking Your Golden Blackberry Hand Pies
The moment of truth is here! Baking transforms our neatly assembled Blackberry Hand Pies into golden, flaky pockets of fruit-filled goodness. Get ready for an amazing aroma to fill your kitchen!
- Once all your Blackberry Hand Pies are assembled on the baking sheets, brush the tops of each pie generously with the remaining egg wash. This gives them that beautiful, glossy, golden-brown finish we all love.
- Before baking, sprinkle the tops of the pies with turbinado sugar (also known as sugar in the raw) or regular granulated sugar. The coarse turbinado sugar adds a lovely sparkle and a delightful crunch to the crust, enhancing the texture of our finished Blackberry Hand Pies.
- Place the baking sheets into the preheated 400°F (200°C) oven. Bake for 18-25 minutes, or until the crust is deeply golden brown and the filling is visibly bubbling slightly through the vents. Keep a close eye on them, especially towards the end of the baking time, as oven temperatures can vary. If you notice them browning too quickly, you can loosely tent them with aluminum foil.
- Once baked to perfection, carefully remove the baking sheets from the oven. Allow the Blackberry Hand Pies to cool on the baking sheets for about 5-10 minutes before transferring them to a wire rack to cool completely. This initial cooling on the baking sheet helps the filling set a bit more and prevents them from breaking apart when moved.
Tips for Success and Enjoying Your Blackberry Hand Pies
You’ve successfully created a batch of incredible Blackberry Hand Pies! Here are a few extra tips to make sure every bite is perfect and to ensure you can enjoy them to their fullest.
Serving Suggestions:
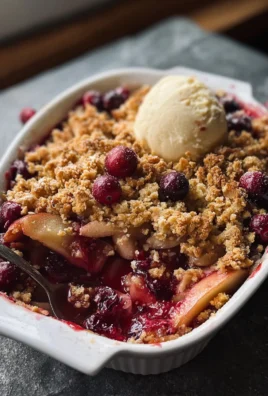
These individual pies are fantastic on their own, a perfect grab-and-go treat. However, for an extra special dessert, serve them slightly warm with a scoop of vanilla bean ice cream, a dollop of freshly whipped cream, or a light drizzle of a simple lemon glaze. The contrast of the warm, jammy blackberry filling with cold ice cream is absolutely divine.
Storage:
Leftover Blackberry Hand Pies can be stored at room temperature in an airtight container for up to 2-3 days. For longer storage, you can keep them in the refrigerator for up to 5 days. To reheat, a quick 5-10 minutes in a toaster oven at 300°F (150°C) will bring back some of their crispness.
Make-Ahead Magic:
If you’re planning ahead, both the pie dough and the blackberry filling can be made in advance. The dough can be stored in the refrigerator for up to 3 days or frozen for up to 2 months. The cooled filling can be refrigerated for up to 5 days. You can also assemble the unbaked Blackberry Hand Pies, place them on a parchment-lined baking sheet, and freeze them until solid. Once frozen, transfer them to a freezer-safe bag or container. When ready to bake, you can bake them directly from frozen, adding an extra 5-10 minutes to the baking time. This makes fresh, warm Blackberry Hand Pies an easy treat any day of the week!
Troubleshooting and Variations:
- Leaky Pies: If your pies are leaking, it’s often due to overfilling or not sealing the edges thoroughly. Next time, use a bit less filling and be extra diligent with the egg wash and fork crimping.
- Pale Crust: Ensure your oven is preheated to the correct temperature. A good egg wash and a sprinkle of sugar will help with browning.
- Other Fruit Fillings: While these are Blackberry Hand Pies, feel free to experiment with other fruits! Blueberries, raspberries, diced apples, or cherries (pitted, of course) would also make fantastic hand pies. Adjust sugar levels based on the sweetness of the fruit.
Enjoy every delightful bite of your homemade Blackberry Hand Pies!
Ingredients:
- For the Flaky Pie Dough:
- 2 ½ cups (300g) all-purpose flour, plus more for dusting
- 1 teaspoon granulated sugar
- 1 teaspoon fine sea salt
- 1 cup (226g) unsalted butter, very cold and cut into ½-inch cubes
- ½ cup (120ml) ice water, plus 1-2 tablespoons more if needed
- For the Luscious Blackberry Filling:
- 4 cups (about 600g) fresh blackberries, rinsed and drained (or frozen, unthawed)
- ½ cup (100g) granulated sugar, adjust to taste based on berry sweetness
- 2 tablespoons fresh lemon juice
- 2 tablespoons cornstarch (or 3 tablespoons all-purpose flour for a slightly less translucent filling)
- ¼ teaspoon ground cinnamon (optional, but lovely)
- Pinch of fine sea salt
- For the Egg Wash & Topping:
- 1 large egg
- 1 tablespoon milk or water
- 2 tablespoons turbinado sugar (or granulated sugar) for sprinkling
Preparing the Luscious Blackberry Filling
Creating the perfect filling is the heart of our delightful Blackberry Hand Pies. We want a vibrant, fruity, yet not overly runny consistency that will hold its shape beautifully within the pie crust. Let’s get started!
- First things first, gently rinse your fresh blackberries under cool water. If you’re using frozen berries, there’s no need to thaw them beforehand; they can go straight into the pot, though you might need to cook the mixture a little longer to account for the extra moisture. Place the rinsed berries into a medium-sized saucepan or a deep skillet.
- To the saucepan, add the granulated sugar. The amount here is a suggestion; if your blackberries are particularly sweet, you might want to reduce it slightly, or if they are quite tart, feel free to add a little more to suit your preference. Then, pour in the fresh lemon juice. This isn’t just for flavor; the acidity from the lemon juice brightens the fruit and helps prevent the filling from becoming too cloyingly sweet.
- In a small separate bowl, whisk together the cornstarch (or flour if you prefer) with the optional ground cinnamon and a tiny pinch of salt. This pre-mixing prevents lumps when added to the hot fruit. The cornstarch is our secret weapon for a perfectly thick filling, ensuring that when you bite into your Blackberry Hand Pies, the fruit stays put and doesn’t ooze out excessively.
- Place the saucepan over medium heat. As the berries begin to warm, they will start to release their juices. Stir gently and frequently to ensure the sugar dissolves and the berries don’t stick to the bottom. Once the berries have softened slightly and are bubbling gently, pour in your cornstarch mixture, whisking constantly to incorporate it smoothly.
- Continue to cook the filling, stirring, for another 2-5 minutes, or until the mixture thickens considerably. It should coat the back of a spoon and when you draw a line through it with your finger, the line should hold for a moment before the filling runs back together. If using frozen berries, this might take a bit longer as the berries release more water.
- Remove the saucepan from the heat. Now, for a truly delightful texture in your Blackberry Hand Pies, you can choose to mash some of the berries gently with a fork or a potato masher, leaving plenty of whole berries for textural interest. This creates a more cohesive filling while still celebrating the beautiful whole fruit.
- Transfer the hot blackberry filling to a shallow dish or a baking sheet lined with parchment paper. This helps it cool down more quickly and evenly. It is absolutely crucial that your filling is completely cool before you assemble your Blackberry Hand Pies. If the filling is warm, it will melt the butter in your pie dough, leading to a tough and less flaky crust. You can speed up the cooling process by placing it in the refrigerator for at least 1-2 hours, or even overnight.
Crafting the Perfect Flaky Pie Dough
A truly spectacular Blackberry Hand Pie starts with an incredible, flaky pie dough. While store-bought crusts can be a time-saver, there’s simply no substitute for the tender, buttery layers of a homemade crust. Trust me, it’s worth the effort!
- In a large mixing bowl, whisk together the all-purpose flour, granulated sugar, and fine sea salt. This ensures all the dry ingredients are evenly distributed before we introduce the fat.
- Add the very cold, ½-inch cubes of unsalted butter to the dry ingredients. The key to a flaky crust is cold butter, so don’t let it sit out! Using a pastry blender, two knives, or even your fingertips, cut the butter into the flour mixture. Work quickly to prevent the butter from warming too much. You want to aim for a mixture that resembles coarse meal, with some larger pea-sized pieces of butter still visible. These butter pieces are what will create those wonderful pockets of steam during baking, leading to a supremely flaky crust for your Blackberry Hand Pies.
- Gradually add the ice water, one tablespoon at a time, mixing lightly with a fork until the dough just begins to come together. You might not need all the water, or you might need a tiny bit more; the exact amount can vary based on your flour and humidity. The dough should be moist enough to hold together when squeezed, but not sticky or wet.
- Turn the dough out onto a lightly floured surface. Gently gather it into a cohesive ball. Avoid overworking the dough, as this can develop the gluten too much and result in a tough crust. Divide the dough into two equal portions. Gently flatten each portion into a disk, wrap them tightly in plastic wrap, and refrigerate for at least 1 hour. Chilling the dough is non-negotiable! This allows the gluten to relax, making the dough easier to roll out, and ensures the butter remains very cold, contributing to that signature flakiness in our Blackberry Hand Pies. You can prepare the dough up to 2-3 days in advance.
Assembling Your Irresistible Blackberry Hand Pies
This is where the magic truly begins as we bring together our perfectly chilled dough and our luscious blackberry filling. Take your time, and enjoy the process of crafting these beautiful individual treats!
- Preheat your oven to 400°F (200°C). Line two baking sheets with parchment paper or silicone baking mats. This will prevent your Blackberry Hand Pies from sticking and make cleanup a breeze.
- Take one disk of chilled pie dough from the refrigerator. On a lightly floured surface, roll it out into a large rectangle, about ⅛-inch thick. Aim for a size roughly 10×14 inches. You can also roll it into a large circle if you prefer. Consistency in thickness is important here for even baking.
- Using a sharp knife or a pizza cutter, cut the dough into equally sized rectangles. A good size is usually 4×5 inches, which will yield about 6-8 rectangles per dough disk, meaning you’ll get 12-16 total squares or rectangles from both dough disks. Alternatively, you can use a 4-inch round cookie cutter for round hand pies. Place half of these dough pieces onto your prepared baking sheets, leaving a couple of inches between each for easy handling and to allow for expansion.
- Spoon about 1 ½ to 2 tablespoons of the completely cooled blackberry filling onto the center of each dough rectangle. Be mindful not to overfill, as this can make sealing difficult and lead to messy leakage during baking. Make sure to leave a clear ½-inch border around the edges of the dough.
- In a small bowl, whisk together the egg and milk (or water) to create your egg wash. This will act as the “glue” for sealing our Blackberry Hand Pies and contribute to a beautiful golden-brown crust. Brush a thin layer of this egg wash along the edges of the dough rectangles that have the filling.
- Carefully place the remaining dough rectangles (the ones without filling) on top of the filling-covered ones. Gently align the edges. Press down firmly around the edges of each pie to seal them. Then, use the tines of a fork to crimp all around the edges. This creates a decorative border and, more importantly, provides an extra secure seal, preventing that delicious blackberry filling from escaping.
- Using a small, sharp knife, make 2-3 small slits or a decorative pattern on the top of each hand pie. These vents are essential! They allow steam to escape during baking, preventing the pies from puffing up excessively and ensuring a crisp, rather than soggy, crust.
- Repeat the rolling, cutting, filling, and sealing process with the second disk of pie dough. Gather any dough scraps, gently re-roll them, and cut out additional hand pies until all the dough is used.
Baking Your Golden Blackberry Hand Pies
The moment of truth is here! Baking transforms our neatly assembled Blackberry Hand Pies into golden, flaky pockets of fruit-filled goodness. Get ready for an amazing aroma to fill your kitchen!
- Once all your Blackberry Hand Pies are assembled on the baking sheets, brush the tops of each pie generously with the remaining egg wash. This gives them that beautiful, glossy, golden-brown finish we all love.
- Before baking, sprinkle the tops of the pies with turbinado sugar (also known as sugar in the raw) or regular granulated sugar. The coarse turbinado sugar adds a lovely sparkle and a delightful crunch to the crust, enhancing the texture of our finished Blackberry Hand Pies.
- Place the baking sheets into the preheated 400°F (200°C) oven. Bake for 18-25 minutes, or until the crust is deeply golden brown and the filling is visibly bubbling slightly through the vents. Keep a close eye on them, especially towards the end of the baking time, as oven temperatures can vary. If you notice them browning too quickly, you can loosely tent them with aluminum foil.
- Once baked to perfection, carefully remove the baking sheets from the oven. Allow the Blackberry Hand Pies to cool on the baking sheets for about 5-10 minutes before transferring them to a wire rack to cool completely. This initial cooling on the baking sheet helps the filling set a bit more and prevents them from breaking apart when moved.
Tips for Success and Enjoying Your Blackberry Hand Pies
You’ve successfully created a batch of incredible Blackberry Hand Pies! Here are a few extra tips to make sure every bite is perfect and to ensure you can enjoy them to their fullest.
Serving Suggestions:
These individual pies are fantastic on their own, a perfect grab-and-go treat. However, for an extra special dessert, serve them slightly warm with a scoop of vanilla bean ice cream, a dollop of freshly whipped cream, or a light drizzle of a simple lemon glaze. The contrast of the warm, jammy blackberry filling with cold ice cream is absolutely divine.
Storage:
Leftover Blackberry Hand Pies can be stored at room temperature in an airtight container for up to 2-3 days. For longer storage, you can keep them in the refrigerator for up to 5 days. To reheat, a quick 5-10 minutes in a toaster oven at 300°F (150°C) will bring back some of their crispness.
Make-Ahead Magic:
If you’re planning ahead, both the pie dough and the blackberry filling can be made in advance. The dough can be stored in the refrigerator for up to 3 days or frozen for up to 2 months. The cooled filling can be refrigerated for up to 5 days. You can also assemble the unbaked Blackberry Hand Pies, place them on a parchment-lined baking sheet, and freeze them until solid. Once frozen, transfer them to a freezer-safe bag or container. When ready to bake, you can bake them directly from frozen, adding an extra 5-10 minutes to the baking time. This makes fresh, warm Blackberry Hand Pies an easy treat any day of the week!
Troubleshooting and Variations:
- Leaky Pies: If your pies are leaking, it’s often due to overfilling or not sealing the edges thoroughly. Next time, use a bit less filling and be extra diligent with the egg wash and fork crimping.
- Pale Crust: Ensure your oven is preheated to the correct temperature. A good egg wash and a sprinkle of sugar will help with browning.
- Other Fruit Fillings: While these are Blackberry Hand Pies, feel free to experiment with other fruits! Blueberries, raspberries, diced apples, or cherries (pitted, of course) would also make fantastic hand pies. Adjust sugar levels based on the sweetness of the fruit.
Enjoy every delightful bite of your homemade Blackberry Hand Pies!
Conclusion:
And there you have it, friends! We’ve journeyed through the simple yet incredibly rewarding process of creating what I believe will become one of your absolute favorite treats. These aren’t just any pastries; they are a delightful culmination of a flaky, buttery crust embracing a sweet and tart, bursting-with-flavor blackberry filling. The beauty of this recipe truly lies in its ability to transport you back to simpler times, evoking the warmth of a sun-drenched afternoon and the joy of a homemade dessert, all in a convenient, portable package. I truly believe that once you experience the first bite – the satisfying crunch of the golden crust giving way to the soft, juicy fruit – you’ll understand precisely why these
Blackberry Hand Pies
are an absolute must-try. They embody everything wonderful about summer fruit baking, condensed into a perfectly sized individual delight. No fancy plates needed, no complicated slicing – just pure, unadulterated enjoyment.
What I adore most about these little gems is their incredible versatility, both in how you can serve them and the creative twists you can introduce. While they are absolutely divine enjoyed warm, straight out of the oven, allowing the filling to ooze and the aromas to fill your kitchen, don’t hesitate to experiment. For an extra touch of indulgence, I highly recommend serving them with a scoop of premium vanilla bean ice cream or, if you’re feeling adventurous, a lavender or honey-flavored scoop would be an exquisite pairing. The cool, creamy texture against the warm, fruit-filled pie is a sensation you won’t soon forget. Alternatively, a simple dusting of powdered sugar adds an elegant finish, or for those with an extra sweet tooth, a light lemon glaze drizzled over the top would elevate the citrus notes and add a lovely sheen. Imagine them as the star of your brunch table, a delightful addition to an afternoon tea party, or simply a well-deserved treat after a long day. They also make an incredibly thoughtful homemade gift for friends and neighbors – just package them beautifully, and you’re sure to bring a smile to anyone’s face.
But the fun doesn’t stop there! While blackberries are the star of this particular show, the foundation of this recipe is incredibly adaptable. Don’t feel confined to just one fruit. Imagine the possibilities: luscious cherry hand pies, tangy apple cinnamon variations, or even a delightful mixed berry medley featuring raspberries and blueberries alongside the blackberries. You could even introduce a hint of spice, perhaps a pinch of cardamom or a touch of nutmeg, to complement the fruit and add another layer of warmth. For a different texture in the crust, consider experimenting with a cream cheese pastry for an even richer, more tender bite, or a whole wheat flour blend for a nuttier flavor. This recipe is a fantastic springboard for your own culinary creativity, inviting you to put your personal stamp on a classic. Feel free to play with the spices in the filling, adjust the sweetness to your preference, or even add a hint of orange zest to brighten the blackberry flavor. The beauty of baking at home is that you are the chef, and every tweak makes the recipe uniquely yours.
Now It’s Your Turn: Embrace the Joy of Baking!
I genuinely hope I’ve inspired you to roll up your sleeves and give this recipe a try. There’s something uniquely satisfying about creating something delicious from scratch with your own hands, and the reward of biting into these perfectly crafted pastries is truly unparalleled. Don’t be intimidated; the process is straightforward, and the results are consistently spectacular. Baking should be a joyful experience, a moment of culinary exploration and simple pleasure, and this recipe perfectly embodies that spirit. Gather your ingredients, put on your favorite music, and let the delightful aroma of baking fruit fill your home. I promise you, the effort is minimal compared to the incredible satisfaction you’ll feel when you pull these golden, bubbling delights from your oven. Imagine the delight on your family’s faces, or the quiet joy you’ll find in savoring one all to yourself with a warm cup of coffee.
Share Your Culinary Adventures!
Once you’ve made these incredible treats, I would absolutely love to hear about your experience! Did you stick to the classic blackberry filling, or did you venture into a new fruit combination? Did you serve them warm with ice cream, or did you create your own unique topping? What was your favorite part of the baking process? Please, don’t hesitate to share your thoughts, your successes, and even your “lessons learned” in the comments section below. I adore seeing your culinary creations, so if you take photos, I encourage you to share them. Your feedback not only brightens my day but also inspires and assists other aspiring bakers in our community. Let’s build a delicious dialogue around the joy of homemade goodness. Happy baking, and I can’t wait to hear all about your delightful Blackberry Hand Pies!
Blackberry Hand Pies
Delicious and portable Blackberry Hand Pies featuring a flaky homemade crust and a sweet-tart blackberry filling, perfect for any occasion.
Ingredients
-
2 ½ cups (300g) all-purpose flour, plus more for dusting
-
1 teaspoon granulated sugar
-
1 teaspoon fine sea salt
-
1 cup (226g) unsalted butter, very cold and cut into ½-inch cubes
-
½ cup (120ml) ice water, plus 1-2 tablespoons more if needed
-
4 cups (about 600g) fresh or frozen blackberries, rinsed and drained
-
½ cup (100g) granulated sugar, adjust to taste
-
2 tablespoons fresh lemon juice
-
2 tablespoons cornstarch (or 3 tablespoons all-purpose flour)
-
¼ teaspoon ground cinnamon (optional)
-
Pinch of fine sea salt
-
1 large egg
-
1 tablespoon milk or water
-
2 tablespoons turbinado sugar (or granulated sugar) for sprinkling
Instructions
-
Step 1
Rinse blackberries and place in a saucepan with granulated sugar and lemon juice. In a small bowl, whisk cornstarch (or flour), cinnamon (optional), and salt. Cook berries over medium heat until bubbling, then whisk in cornstarch mixture. Continue cooking 2-5 minutes until thickened. Remove from heat, mash some berries for texture, then transfer to a shallow dish and cool completely (1-2 hours) before assembly. -
Step 2
In a large bowl, whisk flour, sugar, and salt. Cut in very cold butter until mixture resembles coarse meal with pea-sized butter pieces. Gradually add ice water, mixing until dough just comes together. Divide dough into two disks, wrap, and refrigerate for at least 1 hour (up to 3 days). -
Step 3
Preheat oven to 400°F (200°C). Line two baking sheets with parchment. Roll out one chilled dough disk to ⅛-inch thick. Cut into 4×5 inch rectangles (or 4-inch rounds); place half on prepared baking sheets. Spoon 1½-2 tbsp cooled blackberry filling onto center of each dough piece, leaving a ½-inch border. Whisk egg and milk for egg wash; brush edges of filled dough. Place remaining dough pieces on top, align, press edges to seal, then crimp with a fork. Make 2-3 small slits on top of each pie for steam vents. Repeat with the second dough disk, re-rolling scraps as needed. -
Step 4
Brush tops of assembled pies with remaining egg wash and sprinkle with turbinado sugar. Bake for 18-25 minutes at 400°F (200°C) until deeply golden brown and filling is bubbling. Cool on baking sheets for 5-10 minutes, then transfer to a wire rack to cool completely.
Important Information
Nutrition Facts (Per Serving)
It is important to consider this information as approximate and not to use it as definitive health advice.
Allergy Information
Please check ingredients for potential allergens and consult a health professional if in doubt.


Leave a Comment