

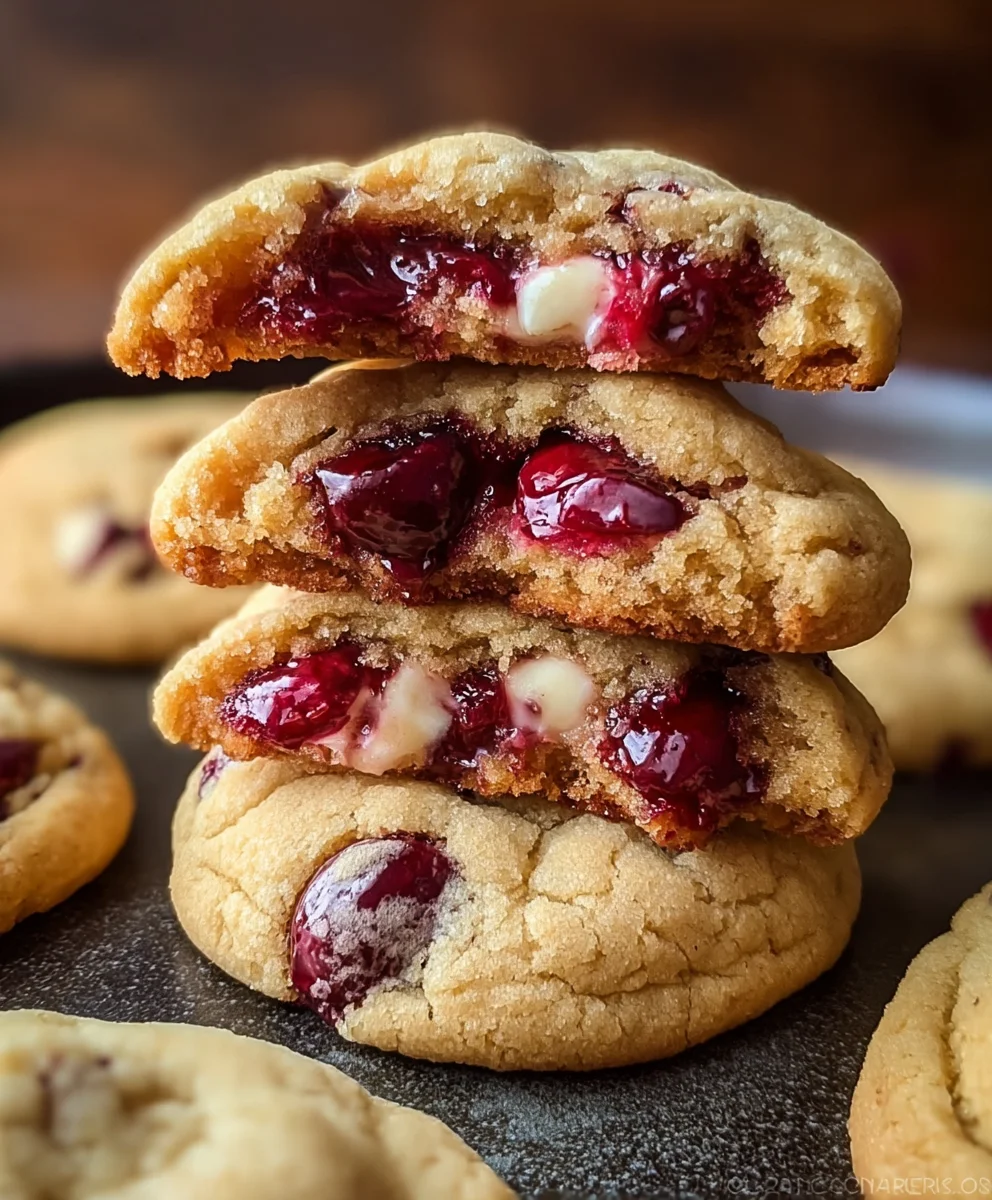
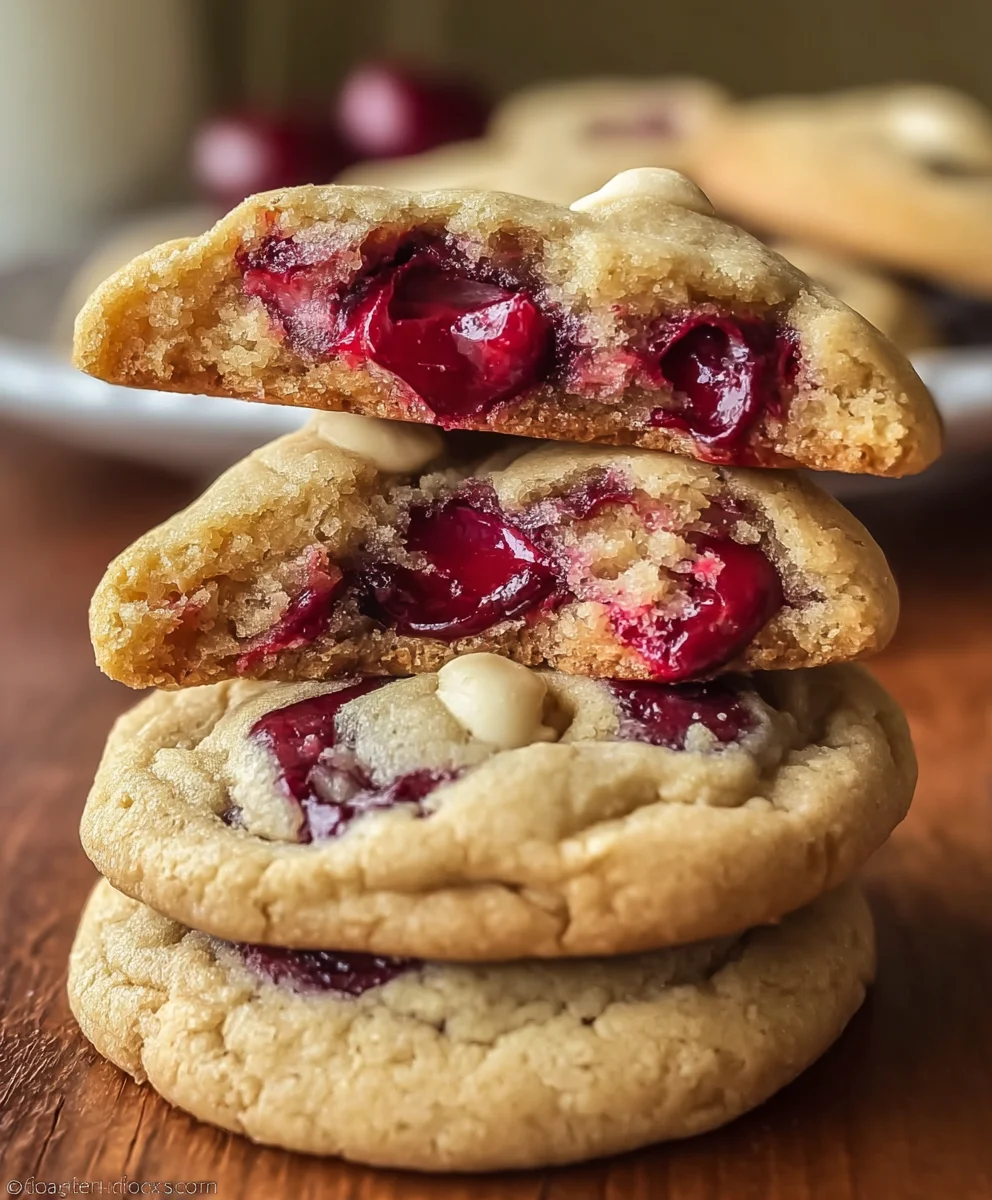
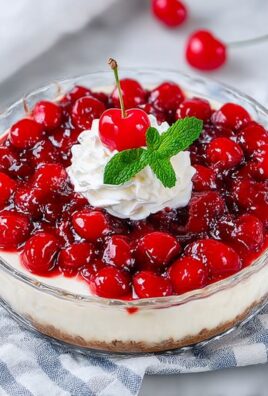
Cherry Pie Stuffed Cookies are poised to become your culinary obsession, expertly blending two beloved dessert traditions into one extraordinary creation. Imagine sinking your teeth into a perfectly baked cookie, only to discover a warm, gooey pocket of sweet and tart cherry pie filling nestled within. It’s a delightful surprise that elevates the humble cookie to an entirely new realm of indulgence, promising an unforgettable experience with every bite.
This ingenious dessert concept isn’t just a clever fusion; it’s a modern homage to the timeless joy of comfort food, reimagined for contemporary palates. While the classic cherry pie has graced tables for centuries, symbolizing warmth, hospitality, and seasonal bounty, these stuffed cookies offer a fresh, playful take on that cherished heritage. They provide all the delightful flavors and textures of a homemade pie – the vibrant fruit, the subtle spice, the tender consistency – but conveniently wrapped in the irresistible chewiness of a perfect cookie.
People absolutely adore these Cherry Pie Stuffed Cookies because they offer the ultimate “wow” factor.
Each bite delivers a harmonious blend of textures: the crisp exterior gives way to the tender cookie, leading to the luscious, fruity burst of the pie filling. This makes them incredibly versatile for any occasion, from sophisticated dessert spreads to casual afternoon treats. They provide an individual portion of pure bliss without the fuss of slicing a whole pie, making them ideal for gatherings, lunchboxes, or a moment of personal indulgence. Prepare to impress and delight with this truly unforgettable recipe.

Ingredients:
- For the Cookie Dough:
- 2 ½ cups (300g) all-purpose flour, spooned and leveled
- 1 teaspoon baking powder
- ½ teaspoon salt
- 1 cup (226g) unsalted butter, softened to room temperature
- ¾ cup (150g) granulated sugar
- ¼ cup (50g) light brown sugar, packed
- 1 large egg, at room temperature
- 2 teaspoons pure vanilla extract
- For the Homemade Cherry Pie Filling:
- 4 cups (approximately 600g) fresh or frozen sweet cherries, pitted (if using frozen, do not thaw)
- ½ cup (100g) granulated sugar (adjust based on cherry sweetness)
- 3 tablespoons cornstarch
- ¼ cup (60ml) cold water
- 1 tablespoon fresh lemon juice
- ½ teaspoon pure almond extract (optional, but truly enhances cherry flavor)
- Pinch of salt
- For the Streusel Topping (Optional, but highly recommended for that “pie” effect):
- ½ cup (60g) all-purpose flour
- ¼ cup (50g) granulated sugar
- 2 tablespoons (28g) unsalted butter, very cold and cut into small pieces
- Pinch of salt
- For the Glaze (Optional):
- 1 cup (120g) powdered sugar, sifted
- 2-3 tablespoons milk or heavy cream
- ¼ teaspoon pure almond extract (or vanilla extract)
Phase 1: Preparing the Irresistible Cherry Pie Filling
- Prepare Your Cherries: If you’re using fresh cherries, take your time to meticulously pit them. This can be a bit of a meditative process! If using frozen, there’s no need to thaw them; just make sure they are pitted. Place the pitted cherries into a medium saucepan.
- Combine Dry Ingredients for Filling: In a small bowl, whisk together the granulated sugar for the filling, the cornstarch, and a tiny pinch of salt. This pre-mixing helps prevent lumps when it hits the liquid.
- Start Cooking the Cherries: Add the sugar-cornstarch mixture directly over the cherries in the saucepan. Stir gently to coat them evenly. Place the saucepan over medium heat.
- Create the Slurry: In another small bowl, whisk together the cold water and the lemon juice. This is your cornstarch slurry. It’s crucial that the water is cold, as hot water would cause the cornstarch to clump immediately.
- Thicken the Filling: As the cherries begin to release their juices and simmer (this will take about 5-7 minutes, especially with frozen cherries), pour in the cold water and lemon juice slurry. Stir constantly with a whisk or a wooden spoon. Keep stirring and cooking for another 2-4 minutes, until the mixture visibly thickens and coats the back of your spoon. You’ll notice the liquid transforming from a thin juice into a luscious, glossy sauce.
- Enhance the Flavor: Remove the saucepan from the heat. Now, stir in the almond extract. This is a game-changer for cherry flavor, truly enhancing its natural sweetness and depth. If you’re not a fan of almond, you can omit it or use vanilla, but I highly recommend trying it!
- Cool the Filling: Transfer the cherry pie filling to a shallow dish or a plate to help it cool down quickly. It’s absolutely vital that the filling is completely cool, and ideally chilled, before you stuff it into the cookies. If it’s warm, it will melt your cookie dough and make assembly very challenging. Pop it in the refrigerator for at least 1-2 hours, or even overnight. This step cannot be rushed!
Phase 2: Crafting the Perfect Cookie Dough
- Prepare Dry Ingredients: In a medium bowl, whisk together the all-purpose flour, baking powder, and salt. Make sure these are well combined. Set aside. I always give my flour a little fluff with a whisk before measuring, and then spoon it into the measuring cup and level it off to ensure accuracy.
- Cream the Butter and Sugars: In a large bowl, using an electric mixer (either a stand mixer with the paddle attachment or a handheld mixer), beat the softened unsalted butter with the granulated sugar and light brown sugar on medium speed for about 3-5 minutes. You’re looking for a mixture that is light in color, incredibly fluffy, and aerated. This creaming process is crucial for a tender cookie texture!
- Add Wet Ingredients: Scrape down the sides of the bowl. Add the large egg and the pure vanilla extract to the creamed butter and sugar mixture. Beat on medium speed for another 1-2 minutes, until everything is well combined and the mixture looks smooth and emulsified.
- Combine Wet and Dry: Gradually add the dry ingredients to the wet ingredients, mixing on low speed until just combined. Be careful not to overmix the dough! Overmixing can develop the gluten too much, leading to tough cookies. Stop mixing as soon as you no longer see streaks of dry flour. The dough should come together nicely, soft but not sticky.
- Chill the Dough: Cover the bowl with plastic wrap and refrigerate the cookie dough for at least 30 minutes. Chilling the dough helps firm up the butter, which prevents the cookies from spreading too much in the oven and makes them much easier to handle for stuffing. It also deepens the flavor!
Phase 3: Assembling Your Delicious Cherry Pie Stuffed Cookies
- Preheat Your Oven: While the dough is chilling, preheat your oven to 375°F (190°C). Line two large baking sheets with parchment paper or silicone baking mats. This prevents sticking and ensures even baking.
- Prepare the Streusel Topping (if using): If you’re opting for the streusel, now is the time to make it. In a small bowl, combine the flour, granulated sugar, and salt. Add the very cold, cubed butter. Using your fingertips or a pastry blender, work the butter into the dry ingredients until the mixture resembles coarse crumbs. Don’t overmix; you want those distinct crumbly pieces. Set aside.
- Scoop the Dough: Remove the chilled cookie dough from the refrigerator. Using a 1.5-tablespoon cookie scoop (or just about a tablespoon and a half of dough), scoop out portions of the cookie dough. For each cookie, you’ll need two scoops of dough – one for the bottom and one for the top. I like to scoop all my bottom pieces first.
- Form the Bottom Cookie Shell: Take one scoop of cookie dough and gently flatten it into a disc about 2.5 to 3 inches in diameter, making sure the edges are slightly thicker than the center. You can do this in the palm of your hand. Create a shallow well in the center, like a small cup, ready to hold the filling.
- Add the Cherry Filling: Spoon about 1 to 1.5 teaspoons of the chilled cherry pie filling into the center of the flattened cookie dough disc. Be careful not to overfill, as this can make sealing difficult and lead to leakage during baking. Resist the urge to add more, trust me on this!
-
Top with Dough or Streusel:
- For a fully enclosed cookie: Take another scoop of cookie dough and gently flatten it into a smaller disc, about 2 inches in diameter. Carefully place this second disc over the cherry filling.
- For a streusel-topped cookie (like a pie!): Instead of a second dough disc, gently sprinkle about 1-2 tablespoons of the prepared streusel topping directly over the cherry filling, pressing it lightly into the filling. This creates a beautiful “cherry pie” aesthetic.
- Seal the Cookies: If you’re fully enclosing the cookie, carefully bring the edges of the bottom dough disc up and around the top disc, pinching and sealing them completely. Gently roll the entire cookie in your hands to form a smooth ball, ensuring there are no cracks for the filling to escape. If you’re doing the streusel top, simply ensure the bottom dough is well sealed around the filling and the streusel is lightly pressed on top. A good seal is key to preventing a messy bake!
- Arrange on Baking Sheets: Place the assembled Cherry Pie Stuffed Cookies about 2 inches apart on your prepared baking sheets. They will spread slightly, but not excessively.
Phase 4: Baking Your Delicious Cherry Pie Stuffed Cookies
- Bake Until Golden: Bake the cookies for 12-15 minutes, or until the edges are lightly golden brown and the tops are set. Keep an eye on them, as oven temperatures can vary. For the streusel-topped cookies, you’ll also see the streusel turn a beautiful golden color.
- Cool on Baking Sheets: Once baked, remove the baking sheets from the oven. Let the cookies cool on the baking sheets for about 5-10 minutes. They will be quite delicate when hot, so allowing them to set up on the tray is important. The filling will be extremely hot, so be patient!
- Transfer to Wire Rack: After a short cool-down on the baking sheet, carefully transfer the cookies to a wire cooling rack to cool completely. This ensures air circulation all around the cookie, preventing a soggy bottom and allowing the filling to fully set.
Phase 5: The Final Touches (Optional but Recommended)
- Prepare the Glaze (if using): Once the cookies have cooled completely, it’s time for an optional but lovely glaze. In a small bowl, whisk together the sifted powdered sugar, 2 tablespoons of milk or cream, and the almond (or vanilla) extract. Add more milk, a tiny drop at a time, until you reach your desired drizzling consistency. It should be thick enough to coat a spoon but thin enough to drip slowly.
-
Glaze or Dust:
- For a beautiful glaze: Drizzle the glaze artfully over the cooled Cherry Pie Stuffed Cookies using a spoon or a whisk. Let the glaze set for about 15-20 minutes before serving.
- For a simple finish: If you prefer, simply dust the cooled cookies with a light sprinkling of powdered sugar just before serving. This gives them a classic, rustic “pie” look without the added sweetness of a glaze.
- Serve and Enjoy: These Cherry Pie Stuffed Cookies are best enjoyed at room temperature, perhaps with a cup of coffee or a glass of milk. The slight tartness of the cherry filling perfectly balances the sweet, buttery cookie. They’re such a delightful treat, a true labor of love that absolutely pays off! Store any leftover cookies in an airtight container at room temperature for up to 3-4 days, or in the refrigerator for up to a week. You can even freeze them for longer enjoyment.
Conclusion:
Essentially, what we’ve just created isn’t just a dessert; it’s a culinary revolution, a delightful disruption to the usual cookie lineup. Why is this recipe for Cherry Pie Stuffed Cookies an absolute game-changer and a must-try for every home baker? It’s the sublime marriage of two timeless classics: the comforting chewiness of a perfect cookie and the warm, fruity embrace of a homemade cherry pie. Imagine that first bite: the crisp, buttery edge of the cookie giving way to a soft, tender center, then bursting into the sweet-tart explosion of a perfectly spiced cherry filling. It’s a symphony of textures, a celebration of flavors, and an experience that goes far beyond mere satisfaction. This isn’t just another cookie; it’s a statement. It’s the kind of dessert that elicits gasps of delight and demands to know “how did you do that?!” It’s simple enough for an enthusiastic home baker to master, yet sophisticated enough to impress even the most discerning palate at any gathering. These cookies offer the best of both worlds, truly delivering a unique and memorable dessert experience that will have everyone asking for more.
Perfect Pairings and Creative Customizations
Now that you’ve mastered these incredible treats, let’s talk about how to elevate the experience even further. While these Cherry Pie Stuffed Cookies are undoubtedly magnificent on their own, a scoop of creamy vanilla bean ice cream melting ever so slightly over a warm cookie creates a truly transcendental moment. The contrast of warm and cold, soft and chewy, sweet and tangy, is simply irresistible and adds another layer of indulgence. For a cozy evening, a steaming mug of hot cocoa or a robust cup of freshly brewed coffee makes a delightful companion, cutting through the sweetness and enhancing the rich, buttery notes of the cookie and the spiced fruit. Hosting a brunch? Offer them alongside fresh fruit and a dollop of homemade whipped cream for an unexpectedly indulgent spread that will impress your guests. They also make fantastic edible gifts, thoughtfully wrapped in pretty boxes or cellophane bags – trust me, your friends and family will be begging for the recipe!
But the magic doesn’t stop there. This recipe is also a fantastic canvas for your own creativity and culinary exploration. Don’t feel limited to just cherries! Imagine an “Apple Pie Stuffed Cookie,” using a warmly spiced apple filling, or perhaps a decadent “Blackberry and White Chocolate” version for a sophisticated twist. You could experiment with different cookie dough bases too – a rich chocolate chip cookie dough would be phenomenal with a raspberry filling, creating a luxurious flavor profile. Or, for a delightful summery feel, a brown sugar oat cookie dough could be perfectly paired with a sweet peach filling. For an extra touch of decadence, consider dipping half of the cooled cookies in melted dark chocolate and letting them set, adding a beautiful sheen and rich flavor. Or, for an elegant finish, a light dusting of powdered sugar just before serving adds a touch of charm and sweetness. The possibilities for customization are truly endless, limited only by your imagination and what delicious fruits are in season or available in your pantry.
Your Turn to Bake and Share!
I truly hope you feel inspired to dive into your kitchen and give these incredible Cherry Pie Stuffed Cookies a try. They are more than just a recipe; they are an invitation to create joy, to experiment with flavors and textures, and to share something truly special and heartwarming with those you love. I promise you, the effort involved in making these unique cookies is well worth the reward you’ll experience. When you pull that tray of golden-brown, aroma-filling delights from the oven, you’ll know exactly what I mean – the house will smell divine, and the anticipation will be palpable! Don’t be shy about showing off your culinary prowess. I would absolutely love to see your creations and hear about your baking adventures. Please, please, please share your experiences and any clever variations you come up with. Did you try a different fruit filling? Did you pair them with something amazing that I haven’t mentioned? Your insights, feedback, and creative ideas are invaluable, and they help our wonderful baking community grow and flourish with new inspiration. Happy baking, my friends, and may your kitchens always be filled with delicious aromas and delightful treats!
Cherry Pie Stuffed Cookies
Cherry Pie Stuffed Cookies expertly blend two beloved dessert traditions into one extraordinary creation. Imagine sinking your teeth into a perfectly baked cookie, only to discover a warm, gooey pocket of sweet and tart cherry pie filling nestled within. It’s a delightful surprise that elevates the humble cookie to an entirely new realm of indulgence.
Ingredients
-
1 cup unsalted butter, softened
-
1 cup granulated sugar
-
1 cup light brown sugar, packed
-
2 large eggs
-
1 tsp pure vanilla extract
-
3 cups all-purpose flour
-
1/2 tsp baking powder
-
1/2 tsp baking soda
-
1/4 tsp salt
-
4 cups fresh or frozen sweet cherries, pitted
-
1/2 cup granulated sugar (for filling)
-
3 tbsp cornstarch
-
1/4 cup cold water
-
1 tbsp fresh lemon juice
-
1/2 tsp pure almond extract
-
Pinch of salt (for filling)
-
1/2 cup all-purpose flour (for streusel)
-
1/4 cup granulated sugar (for streusel)
-
2 tbsp unsalted butter, very cold and cubed (for streusel)
-
Pinch of salt (for streusel)
-
1 cup powdered sugar, sifted (for glaze)
-
2-3 tbsp milk or heavy cream (for glaze)
-
1/4 tsp pure almond extract (for glaze)
-
1/4 cup granulated sugar (for sprinkling)
Instructions
-
Step 1
{‘@type’: ‘HowToSection’, ‘name’: ‘Phase 1: Preparing the Cherry Pie Filling’, ‘itemListElement’: [{‘@type’: ‘HowToStep’, ‘text’: ‘Pit 4 cups cherries. In a small bowl, whisk 1/2 cup granulated sugar, 3 tbsp cornstarch, and a pinch of salt.’}, {‘@type’: ‘HowToStep’, ‘text’: ‘Add sugar-cornstarch mix to cherries in a saucepan over medium heat.’}, {‘@type’: ‘HowToStep’, ‘text’: ‘Whisk 1/4 cup cold water and 1 tbsp lemon juice. Once cherries simmer (5-7 min), pour in slurry. Stir 2-4 min until thickened.’}, {‘@type’: ‘HowToStep’, ‘text’: ‘Remove from heat, stir in 1/2 tsp pure almond extract. Transfer filling to a shallow dish and chill completely (at least 1-2 hours).’}]} -
Step 2
{‘@type’: ‘HowToSection’, ‘name’: ‘Phase 2: Crafting the Cookie Dough’, ‘itemListElement’: [{‘@type’: ‘HowToStep’, ‘text’: ‘In a medium bowl, whisk 3 cups all-purpose flour, 1/2 tsp baking powder, 1/2 tsp baking soda, and 1/4 tsp salt.’}, {‘@type’: ‘HowToStep’, ‘text’: ‘In a large bowl, cream 1 cup softened unsalted butter with 1 cup granulated sugar and 1 cup packed light brown sugar until light and fluffy (3-5 min).’}, {‘@type’: ‘HowToStep’, ‘text’: ‘Beat in 2 large eggs, one at a time, then add 1 tsp pure vanilla extract until combined.’}, {‘@type’: ‘HowToStep’, ‘text’: ‘Gradually add dry ingredients, mixing on low speed until just combined. Cover and refrigerate dough for at least 30 minutes.’}]} -
Step 3
{‘@type’: ‘HowToSection’, ‘name’: ‘Phase 3: Assembling Your Cherry Pie Stuffed Cookies’, ‘itemListElement’: [{‘@type’: ‘HowToStep’, ‘text’: ‘Preheat oven to 375°F (190°C). Line two large baking sheets with parchment paper.’}, {‘@type’: ‘HowToStep’, ‘text’: ‘Prepare Streusel (Optional): If using, combine 1/2 cup flour, 1/4 cup granulated sugar, and a pinch of salt. Cut in 2 tbsp very cold, cubed unsalted butter until coarse crumbs form.’}, {‘@type’: ‘HowToStep’, ‘text’: ‘Take two 1.5-tablespoon scoops of chilled dough per cookie. Flatten one scoop into a 2.5-3 inch disc with a shallow well.’}, {‘@type’: ‘HowToStep’, ‘text’: “Spoon 1-1.5 tsp of chilled cherry pie filling into the disc’s center. Do not overfill.”}, {‘@type’: ‘HowToStep’, ‘text’: ‘To seal: For fully enclosed, flatten a second dough scoop (2 inches), place over filling. Bring edges of bottom dough up and pinch to seal completely, forming a smooth ball. For streusel-topped, sprinkle 1-2 tbsp streusel over filling, pressing lightly; ensure bottom dough is sealed.’}, {‘@type’: ‘HowToStep’, ‘text’: ‘Place assembled cookies 2 inches apart on baking sheets. Sprinkle 1/4 cup granulated sugar over the arranged cookies.’}]} -
Step 4
{‘@type’: ‘HowToSection’, ‘name’: ‘Phase 4: Baking Your Cherry Pie Stuffed Cookies’, ‘itemListElement’: [{‘@type’: ‘HowToStep’, ‘text’: ‘Bake for 12-15 minutes, until edges are lightly golden brown and tops are set.’}, {‘@type’: ‘HowToStep’, ‘text’: ‘Let cool on baking sheets for 5-10 minutes, then transfer to a wire rack to cool completely.’}]} -
Step 5
{‘@type’: ‘HowToSection’, ‘name’: ‘Phase 5: The Final Touches’, ‘itemListElement’: [{‘@type’: ‘HowToStep’, ‘text’: ‘Prepare Glaze (Optional): Once cookies are cool, whisk 1 cup sifted powdered sugar with 2-3 tbsp milk (or heavy cream) and 1/4 tsp pure almond extract until desired drizzling consistency.’}, {‘@type’: ‘HowToStep’, ‘text’: ‘Drizzle glaze over cooled cookies, or simply dust with powdered sugar before serving.’}, {‘@type’: ‘HowToStep’, ‘text’: ‘Serve at room temperature. Store leftovers in an airtight container for 3-4 days at room temperature, up to a week in the refrigerator, or freeze.’}]}
Important Information
Nutrition Facts (Per Serving)
It is important to consider this information as approximate and not to use it as definitive health advice.
Allergy Information
Please check ingredients for potential allergens and consult a health professional if in doubt.
Leave a Comment