

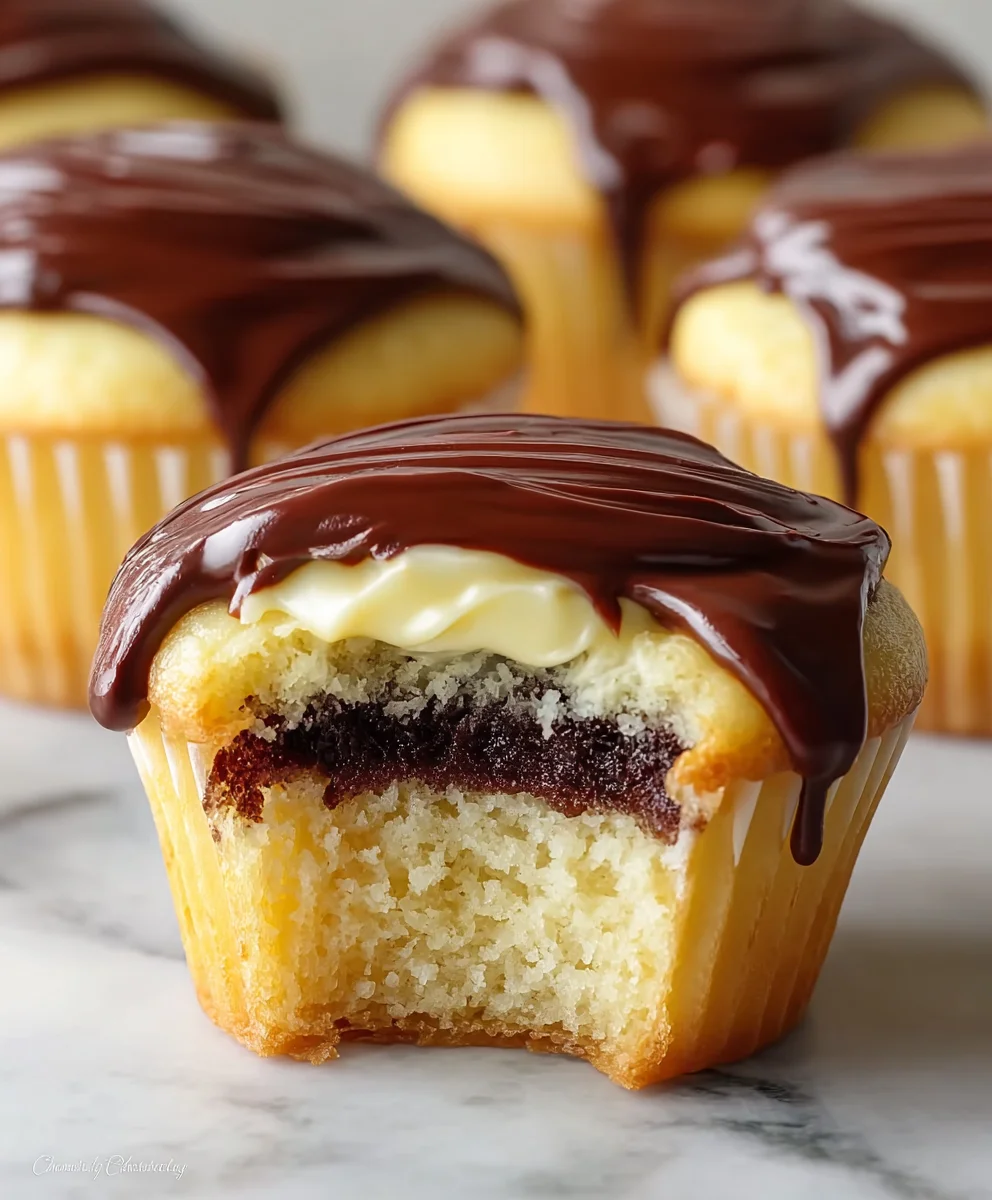
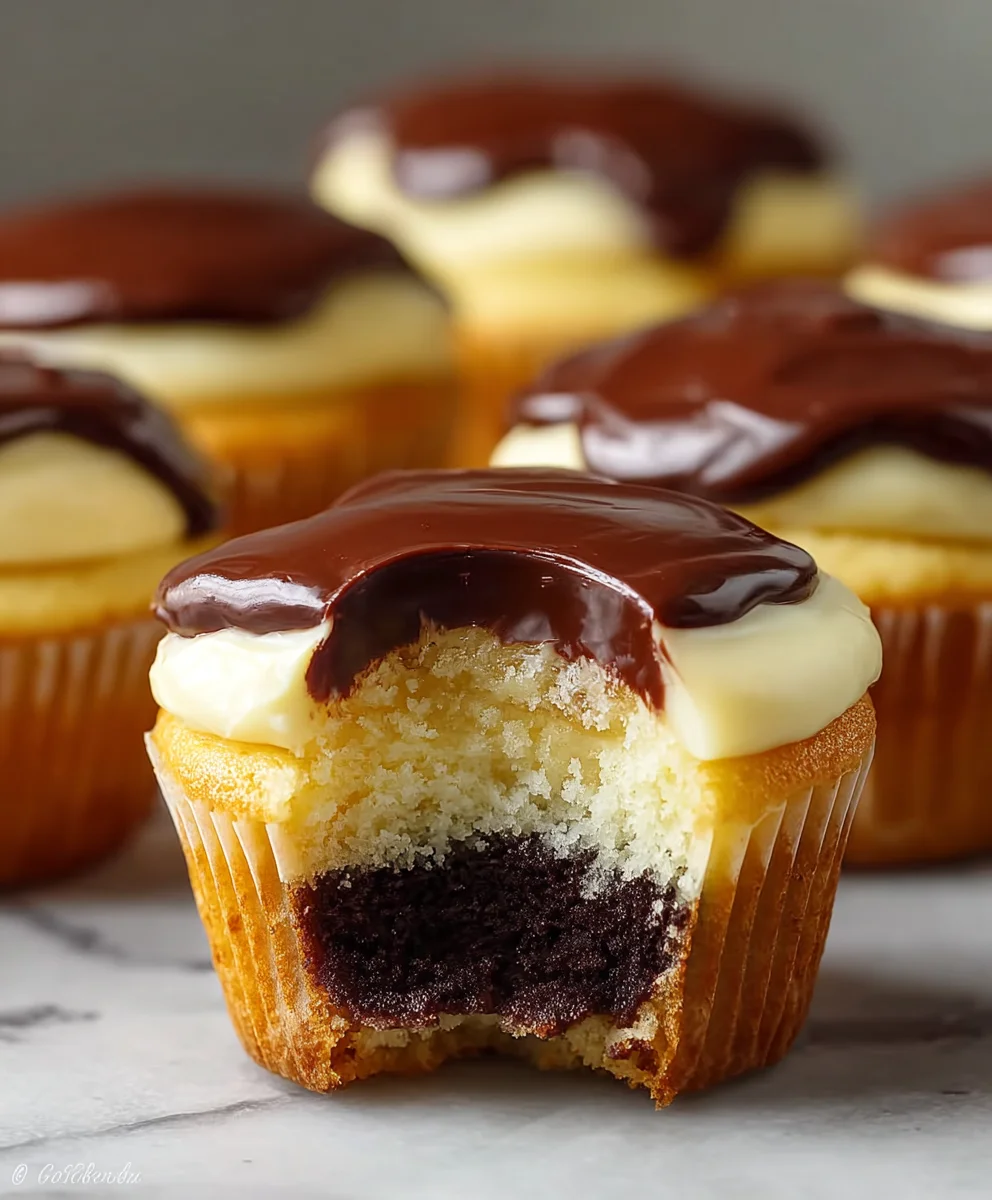
Boston Cream Pie Cupcakes are an absolute dream come true for anyone who adores the classic dessert but appreciates the convenience and charm of a single-serving treat. I’m incredibly excited to share this recipe with you, transforming that iconic layered cake into perfectly portioned delights that are bursting with flavor. Imagine: a tender, golden vanilla cake, generously filled with a velvety smooth vanilla custard, all crowned with a glistening, rich chocolate ganache. It’s truly a symphony of textures and tastes that evokes pure culinary comfort and indulgence.
The original Boston Cream Pie, often hailed as the “state dessert” of Massachusetts and famously originating at the Parker House Hotel in the mid-19th century, wasn’t actually a pie at all, but a two-layer sponge cake with a cream filling and chocolate glaze. Our delightful Boston Cream Pie Cupcakes capture every bit of that beloved heritage and luxurious taste, making them an instant crowd-pleaser. People simply adore this dish for its exquisite balance of light cake, decadent creaminess, and that irresistible chocolate finish. Plus, the individual cupcake format makes them ideal for parties, lunchboxes, or simply indulging without the fuss of slicing a whole pie. Get ready to bake a batch of these irresistible, nostalgic treats!

Ingredients:
-
For the Vanilla Cupcakes:
- 1 ½ cups (180g) cake flour, sifted (using cake flour is key for a tender crumb!)
- 1 ½ teaspoons baking powder
- ¼ teaspoon salt
- ½ cup (113g) unsalted butter, softened to room temperature
- 1 cup (200g) granulated sugar
- 2 large eggs, at room temperature
- 1 teaspoon pure vanilla extract
- ½ cup (120ml) whole milk, at room temperature
-
For the Vanilla Pastry Cream:
- 1 ½ cups (360ml) whole milk
- ½ cup (100g) granulated sugar, divided
- 3 large egg yolks
- 3 tablespoons cornstarch
- 1 teaspoon pure vanilla extract
- 2 tablespoons (28g) unsalted butter, cold and cut into small pieces
-
For the Chocolate Glaze:
- ½ cup (120ml) heavy cream
- 4 ounces (113g) bittersweet or semi-sweet chocolate, finely chopped
- 1 tablespoon light corn syrup (this gives the glaze its beautiful shine!)
- 1 tablespoon (14g) unsalted butter, cold and cut into small pieces
- ½ teaspoon pure vanilla extract
Preparing the Vanilla Cupcakes (The “Cake” Part of Boston Cream Pie Cupcakes)
Let’s get started on creating the fluffy, vanilla-scented base for our delightful Boston Cream Pie Cupcakes. This first stage is all about setting the foundation for a truly delicious treat.
-
Preheat and Prep:
First things first, preheat your oven to 350°F (175°C). Line a 12-cup muffin tin with paper liners. I always find that having everything ready before I start mixing makes the process so much smoother. It also ensures your cupcakes start baking as soon as the batter is ready, which is important for even rising.
-
Combine Dry Ingredients:
In a medium bowl, whisk together the sifted cake flour, baking powder, and salt. Sifting the cake flour isn’t just a suggestion; it really helps to ensure a light and tender crumb by aerating the flour and removing any lumps. Set this bowl aside for now.
-
Cream Butter and Sugar:
In a large bowl, using an electric mixer on medium speed, beat the softened unsalted butter until it’s light and creamy, about 1 minute. Gradually add the granulated sugar, beating on medium-high speed for 2-3 minutes until the mixture is truly light in color and fluffy. This creaming process is super important because it incorporates air into the butter and sugar, which contributes significantly to the cupcakes’ structure and tenderness. Don’t rush this step!
-
Add Eggs and Vanilla:
Beat in the eggs one at a time, mixing well after each addition. Make sure each egg is fully incorporated before adding the next. Scrape down the sides of the bowl as needed to ensure everything is evenly combined. Once the eggs are in, stir in the pure vanilla extract. The mixture might look a little curdled at this point, but don’t worry, it will come together once the dry ingredients are added.
-
Alternate Dry and Wet:
With the mixer on low speed, gradually add the dry ingredient mixture to the wet ingredients in three additions, alternating with the whole milk in two additions, beginning and ending with the dry ingredients. For example, add about one-third of the flour mixture, mix until just combined, then half of the milk, mix, then another third of the flour, the remaining milk, and finally the last third of the flour. Be careful not to overmix! Overmixing develops the gluten in the flour too much, leading to tough cupcakes. Mix only until just combined and no streaks of flour remain.
-
Fill and Bake:
Divide the batter evenly among the prepared muffin cups, filling each about two-thirds full. Bake for 18-22 minutes, or until a wooden skewer or toothpick inserted into the center of a cupcake comes out clean. The tops should be lightly golden and spring back when gently touched. Every oven is a little different, so keep an eye on them towards the end of the baking time.
-
Cool Completely:
Once baked, remove the cupcakes from the oven and let them cool in the muffin tin for about 5 minutes. Then, transfer them to a wire rack to cool completely. This cooling process is crucial! Attempting to fill or glaze warm cupcakes will result in a messy disaster, as the pastry cream will melt and the glaze won’t set properly. Patience is a virtue here!
Crafting the Velvety Vanilla Pastry Cream
The luscious pastry cream is the heart of our Boston Cream Pie Cupcakes, providing that signature creamy, custardy filling. This homemade version is far superior to any store-bought alternative, and it’s surprisingly easy to make!
-
Warm the Milk:
In a medium saucepan, gently heat the whole milk over medium heat until it just begins to simmer around the edges. You don’t want it to boil vigorously, just reach a good hot temperature. Keep an eye on it to prevent scorching.
-
Whisk Egg Yolks and Sugar:
While the milk is heating, in a separate medium heatproof bowl, whisk together the egg yolks and half of the granulated sugar until the mixture is pale yellow and creamy. This should take about 1-2 minutes of vigorous whisking. Then, whisk in the cornstarch and the remaining half of the granulated sugar until well combined and smooth. The mixture should be thick and light in color. The cornstarch is our thickening agent, giving the pastry cream its luxurious consistency.
-
Temper the Yolks:
Once the milk is hot, slowly and gradually pour about half of the hot milk into the egg yolk mixture while continuously whisking. This process is called “tempering” and it slowly raises the temperature of the egg yolks, preventing them from scrambling when they hit the full heat of the saucepan. Whisk, whisk, whisk!
-
Return to Heat:
Pour the tempered egg yolk mixture back into the saucepan with the remaining hot milk. Continue to cook over medium heat, whisking constantly and vigorously, especially scraping the bottom and corners of the pan, for 2-4 minutes. The mixture will begin to thicken quite rapidly. Once it starts to bubble and becomes very thick, resembling a very thick pudding or mayonnaise, remove it from the heat. It’s important to cook it long enough to ensure the cornstarch is fully activated and cooked out, preventing a starchy taste.
-
Add Butter and Vanilla:
Remove the saucepan from the heat and immediately stir in the cold butter pieces and pure vanilla extract until the butter is completely melted and incorporated, and the pastry cream is smooth and glossy. The butter adds richness and a beautiful sheen to the cream.
-
Chill Thoroughly:
Transfer the pastry cream to a clean bowl. To prevent a skin from forming on top, press a piece of plastic wrap directly onto the surface of the cream. Refrigerate for at least 3-4 hours, or preferably overnight, until thoroughly chilled and firm. Chilling is non-negotiable for the perfect filling for your Boston Cream Pie Cupcakes!
Whipping Up the Glossy Chocolate Glaze
No Boston Cream Pie Cupcakes would be complete without that signature dark, shiny chocolate glaze. This simple yet elegant topping adds both beauty and an essential layer of flavor.
-
Heat the Cream:
In a small saucepan, heat the heavy cream over medium heat until it just begins to simmer. You’ll see small bubbles forming around the edges. Again, avoid a rolling boil.
-
Melt the Chocolate:
Place the finely chopped bittersweet or semi-sweet chocolate in a heatproof bowl. Pour the hot cream over the chocolate. Let it sit undisturbed for 5 minutes. This allows the heat from the cream to gently melt the chocolate.
-
Stir to Combine:
After 5 minutes, gently whisk the mixture starting from the center and working your way out, until the chocolate is completely melted and the glaze is smooth and uniform. This gentle stirring helps create a stable emulsion.
-
Add Finishing Touches:
Stir in the light corn syrup, cold butter pieces, and pure vanilla extract until everything is fully incorporated and the glaze is wonderfully smooth and shiny. The corn syrup is our secret weapon here; it gives the glaze that perfect professional shine and helps prevent it from crystallizing. The butter adds a luxurious mouthfeel.
-
Cool and Thicken Slightly:
Let the glaze cool at room temperature for about 20-30 minutes, stirring occasionally, until it has thickened slightly but is still pourable. You want it to be thick enough to coat the cupcakes but not so thick that it forms a solid lump. This slightly cooled temperature is perfect for dipping. If it gets too cool and thick, you can gently rewarm it over a double boiler or in short bursts in the microwave, stirring well each time.
Assembling Your Magnificent Boston Cream Pie Cupcakes
Now for the most exciting part: bringing all the elements together to create your stunning Boston Cream Pie Cupcakes! This is where they truly transform into something special.
-
Prepare Pastry Cream for Piping:
Once the pastry cream is thoroughly chilled and firm, give it a good whisk for a minute or two to loosen it up and make it smooth again. This will make it much easier to pipe. Transfer the pastry cream to a piping bag fitted with a large round tip (or simply snip off the end of the bag if you don’t have a tip).
-
Core the Cupcakes:
Using a small knife, an apple corer, or a dedicated cupcake corer, carefully cut a hole in the center of each cooled vanilla cupcake. You’ll want to go about two-thirds of the way down, leaving a bit of cake at the bottom. You can either discard the removed cake or snack on it – I usually can’t resist a taste test! Make sure not to go all the way through the bottom, or your delicious pastry cream will escape.
-
Fill with Pastry Cream:
Pipe the chilled vanilla pastry cream into each cored cupcake, filling them generously until the cream is flush with the top of the cupcake. You want a good amount of that creamy goodness in every bite! This is where the magic really starts to happen for our Boston Cream Pie Cupcakes.
-
Glaze the Cupcakes:
Take each filled cupcake and gently dip the top into the slightly cooled chocolate glaze. Swirl it around a bit to ensure an even coating. Lift the cupcake, letting any excess glaze drip off back into the bowl. You can gently tap the cupcake to help this process. Work efficiently but carefully. If your glaze becomes too thick as you work, gently warm it up again as instructed in the glaze section.
-
Allow Glaze to Set:
Place the glazed cupcakes back on the wire rack and allow the chocolate glaze to set. This can take anywhere from 15-30 minutes, or you can speed up the process by placing them in the refrigerator for a short period. Once the glaze is set, it will be firm to the touch and ready to be devoured.
-
Serve and Store:
Your magnificent Boston Cream Pie Cupcakes are now complete and ready to be enjoyed! These are best served fresh, but they can be stored in an airtight container in the refrigerator for up to 3 days. I find that they taste even better after an hour or two in the fridge, allowing the flavors to meld beautifully. Just be sure to bring them to room temperature for about 15-20 minutes before serving for the best texture and flavor experience. Enjoy every single bite of this classic dessert in a delightful cupcake form!
Conclusion:
So, my dear fellow bakers and dessert enthusiasts, we’ve reached the sweet finale of our culinary journey together, and I truly hope you’re as excited as I am about what we’ve just discussed. When it comes to desserts that perfectly blend elegance with comfort, few can rival the charm and timeless appeal of the classic Boston Cream Pie. But let’s be honest, making an entire pie can sometimes feel like a monumental task, especially when you’re craving that delightful combination of tender cake, luscious cream, and rich chocolate ganache without all the fuss. That’s precisely why I am so passionate about these incredible Boston Cream Pie Cupcakes. They encapsulate everything wonderful about the original in a perfectly portioned, utterly adorable, and surprisingly manageable package.
These aren’t just any cupcakes; they are a celebration of flavor and texture. Imagine biting into a light, fluffy vanilla sponge, which yields effortlessly to reveal a generous heart of silky-smooth, vanilla-infused pastry cream. Then, your taste buds are met with a blanket of decadent, glossy chocolate ganache, creating a symphony of sweet satisfaction that is simply irresistible. This recipe truly is a must-try because it takes the intimidating aspects out of a beloved dessert and transforms it into something approachable, yet still incredibly impressive. Whether you’re a seasoned baker looking for a new twist on a classic or a beginner eager to tackle a show-stopping treat, these cupcakes offer a rewarding experience from start to finish. They promise an explosion of the classic flavor profile without the stress of slicing a delicate pie, making them ideal for gatherings, celebrations, or simply indulging your own sweet tooth on a quiet afternoon.
Now, let’s talk about how to make these delightful creations shine even brighter, or how to put your own unique spin on them. While they are absolutely perfect as is, a little creativity can elevate them even further. For an extra touch of elegance, consider garnishing each cupcake with a single fresh raspberry or a delicate chocolate curl just before serving. The tartness of the raspberry provides a lovely contrast to the sweetness, while the chocolate curl adds visual appeal and another layer of cocoa goodness. If you’re feeling adventurous, you could experiment with the pastry cream itself. A hint of orange zest or a teaspoon of almond extract could introduce a subtle, sophisticated twist to the filling. Alternatively, for a coffee lover’s dream, try adding a teaspoon of instant espresso powder to the chocolate ganache while it’s still warm; it deepens the chocolate flavor beautifully without making it taste explicitly like coffee. Another fun variation involves adding a tiny pinch of sea salt to the ganache before pouring it over the cupcakes; the salt really enhances the chocolate’s richness and cuts through the sweetness just enough to make you crave another bite. For those who enjoy a bit of texture, a sprinkle of toasted, chopped almonds or pecans on top of the ganache before it sets would add a wonderful crunch.
For serving, these Boston Cream Pie Cupcakes are wonderfully versatile. They are, of course, a fantastic standalone dessert, perfect for afternoon tea, a casual get-together with friends, or as the star of a birthday party. However, imagine serving them alongside a small scoop of high-quality vanilla bean ice cream, allowing the cold, creamy ice cream to melt slightly into the warm ganache (if served slightly warm, which is also an option!). This creates an incredible hot-and-cold dessert experience. Another delightful idea for a more sophisticated presentation is to arrange them on a tiered dessert stand, perhaps interspersed with other mini treats, for a beautiful dessert buffet that will surely impress your guests. Don’t limit yourself to just serving them at room temperature; a slightly chilled cupcake allows the pastry cream to firm up a bit more, offering a different, equally enjoyable texture, especially refreshing on a warm day. Conversely, if you’ve just finished piping the ganache and want to enjoy one warm, the slightly melty ganache and soft cake are heavenly. They also make excellent treats for bake sales or potlucks, as their individual portions are convenient for sharing and enjoying.
I genuinely hope that reading this has sparked your enthusiasm and given you the confidence to dive into your kitchen and create these marvelous treats. There’s a profound joy in baking, from measuring out the ingredients to watching the batter transform, and finally, to seeing the beaming faces of those who get to enjoy your creations. These cupcakes are more than just a recipe; they are an invitation to experience that joy. So, please, gather your ingredients, set aside some time, and embark on this delicious adventure. I promise you, the reward of sinking your teeth into a homemade Boston Cream Pie Cupcake that you’ve crafted with your own hands is utterly incomparable. Once you’ve tried them, I would absolutely love to hear about your experience! Did you stick to the classic? Did you add a unique twist? Share your stories, your triumphs, and even your funny baking mishaps. Your feedback and creativity inspire me and our entire community of fellow food lovers. Happy baking, and may your kitchen be filled with the wonderful aroma of fresh vanilla cake and chocolate!
Boston Cream Pie Cupcakes
Moist vanilla cupcakes filled with creamy vanilla pudding, topped with decadent chocolate ganache—a perfect handheld version of the classic Boston Cream Pie.
Ingredients
-
For the Vanilla Cupcakes:
-
1 ½ cups (180g) cake flour
-
1 ½ teaspoons baking powder
-
¼ teaspoon salt
-
½ cup (113g) unsalted butter, softened
-
1 cup (200g) granulated sugar
-
2 large eggs
-
1 teaspoon pure vanilla extract
-
½ cup (120ml) whole milk
-
For the Vanilla Pastry Cream:
-
1 ½ cups (360ml) whole milk
-
½ cup (100g) granulated sugar, divided
-
3 large egg yolks
-
3 tablespoons cornstarch
-
1 teaspoon pure vanilla extract
-
2 tablespoons (28g) unsalted butter, cold
-
For the Chocolate Glaze:
-
½ cup (120ml) heavy cream
-
4 ounces (113g) bittersweet or semi-sweet chocolate, chopped
-
1 tablespoon light corn syrup
-
1 tablespoon (14g) unsalted butter, cold
-
½ teaspoon pure vanilla extract
Instructions
-
Step 1
Preheat oven to 350°F (175°C) and line a 12-cup muffin tin. Whisk together cake flour, baking powder, and salt. In a large bowl, cream softened unsalted butter and granulated sugar until light and fluffy. Beat in eggs one at a time, then vanilla extract. Gradually add dry ingredients alternating with whole milk, mixing on low speed until just combined. Fill muffin cups two-thirds full and bake for 18-22 minutes, or until a toothpick comes out clean. Cool cupcakes in the tin for 5 minutes, then transfer to a wire rack to cool completely. -
Step 2
In a saucepan, heat whole milk until simmering. In a separate bowl, whisk egg yolks and half the granulated sugar until pale. Whisk in cornstarch and remaining sugar. Slowly pour half of the hot milk into the egg mixture while whisking constantly. Return tempered mixture to the saucepan with remaining milk. Cook over medium heat, whisking constantly, until very thick, about 2-4 minutes. Remove from heat, stir in cold butter pieces and vanilla extract. Transfer pastry cream to a bowl, press plastic wrap directly onto the surface, and refrigerate for at least 3-4 hours or overnight until thoroughly chilled and firm. -
Step 3
In a small saucepan, heat heavy cream until it just begins to simmer. Place finely chopped chocolate in a heatproof bowl. Pour hot cream over chocolate and let sit for 5 minutes. Gently whisk until melted and smooth. Stir in light corn syrup, cold butter pieces, and vanilla extract until fully incorporated and glossy. Let the glaze cool at room temperature for 20-30 minutes, stirring occasionally, until slightly thickened but still pourable. -
Step 4
Whisk chilled pastry cream to loosen, then transfer to a piping bag. Using a small knife or corer, carefully cut a hole in the center of each cooled cupcake, about two-thirds down. Pipe the pastry cream generously into each cored cupcake until flush with the top. Dip the top of each filled cupcake into the slightly cooled chocolate glaze, letting excess drip off. Place glazed cupcakes on a wire rack and allow the chocolate glaze to set for 15-30 minutes, or refrigerate briefly. -
Step 5
Serve at room temperature. Store leftovers in an airtight container in the refrigerator for up to 3 days.
Important Information
Nutrition Facts (Per Serving)
It is important to consider this information as approximate and not to use it as definitive health advice.
Allergy Information
Please check ingredients for potential allergens and consult a health professional if in doubt.


Leave a Comment