

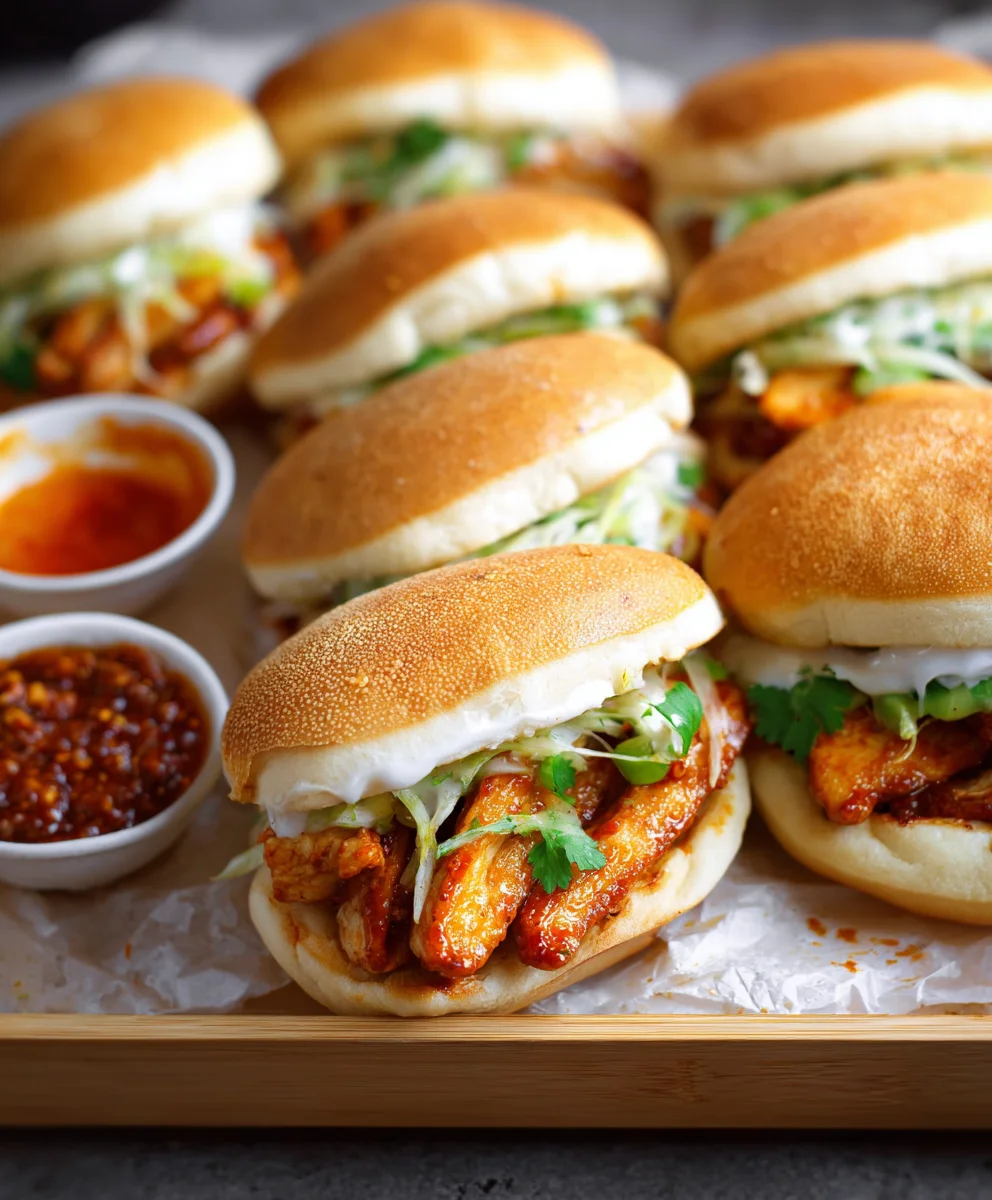
Cheesy Dynamite Chicken Buns are not just a dish; they are an experience, a delightful fusion that promises to ignite your taste buds and leave you utterly satisfied. Imagine biting into a pillowy soft bun, instantly met with the perfect blend of tender, spicy chicken, harmoniously enveloped in a luscious, melted cheese. It’s a culinary masterpiece that strikes an exquisite balance between comforting warmth and an exciting kick, making it an absolute showstopper at any gathering or a truly indulgent treat for a cozy night in.
A Modern Classic with Irresistible Charm
While the exact historical roots of this specific combination might be modern, it draws inspiration from beloved comfort foods across cultures – from the cheesy baked goodness of European traditions to the bold, flavorful chicken preparations found in Asian cuisine. The concept of spicy chicken and gooey cheese, lovingly nestled in a soft bun, has quickly cemented its place as a contemporary favorite because of its universal appeal. People simply adore this dish for its incredible textural contrast – the yielding bun, the juicy chicken, and the stretchy cheese – combined with a flavor profile that is both exhilarating and deeply comforting. Preparing these Cheesy Dynamite Chicken Buns is truly a labor of love that pays off with every single, unforgettable bite.

Ingredients:
-
For the Dough:
- 3 cups (about 360g) All-Purpose Flour, plus more for dusting
- 1 tablespoon Granulated Sugar
- 2 teaspoons Instant Dry Yeast
- 1 teaspoon Salt
- 1 cup Warm Milk (about 105-115°F / 40-46°C)
- 1 large Egg, at room temperature
- 4 tablespoons Unsalted Butter, melted and slightly cooled, plus extra for greasing
-
For the Cheesy Chicken Filling:
- 1.5 lbs Boneless, Skinless Chicken Breast or Thighs, finely diced or shredded
- 1 tablespoon Olive Oil
- 1 small Yellow Onion, finely chopped
- 2 cloves Garlic, minced
- 1/2 teaspoon Salt
- 1/4 teaspoon Black Pepper
- 1/2 cup Chicken Broth
- 1 cup Shredded Mozzarella Cheese (or a blend of your favorite melting cheeses)
- 1/4 cup Fresh Parsley, chopped (optional, for freshness)
-
For the Dynamite Sauce:
- 1/2 cup Mayonnaise (Japanese Kewpie mayo is highly recommended for best flavor)
- 2-3 tablespoons Sriracha, or to taste (adjust for desired spice level)
- 1 tablespoon Sweet Chili Sauce
- 1 tablespoon Fresh Lime Juice
- 1/2 teaspoon Garlic Powder
- Pinch of Salt
-
For Assembly & Glaze:
- 1 large Egg, for egg wash
- 1 tablespoon Water, for egg wash
- Optional: Sesame Seeds, for topping
- Optional: Extra Sriracha, for drizzling after baking
- Optional: Chopped Green Onions, for garnish
Preparing the Soft and Fluffy Dough:
- Activate the Yeast: In a large mixing bowl, combine the warm milk, granulated sugar, and instant dry yeast. Give it a gentle stir. I always ensure my milk is around 105-115°F (40-46°C) – if it’s too hot, it will kill the yeast, and if it’s too cold, the yeast won’t activate. Let this mixture sit for about 5-10 minutes. You should see a foamy layer forming on top; this is a wonderful sign that your yeast is alive and ready to work its magic. If you don’t see foam, your yeast might be expired, or the milk temperature was off, and it’s best to start over.
- Combine Wet Ingredients: Once the yeast is active, add the room temperature egg and the melted, slightly cooled butter to the yeast mixture. Whisk everything together until it’s well combined. Using room temperature ingredients is key here, especially for the egg, as it helps the dough rise more evenly and creates a softer texture.
- Mix Dry Ingredients: In a separate bowl, whisk together the all-purpose flour and salt. I find that whisking them ensures the salt is evenly distributed throughout the flour, preventing pockets of overly salty dough.
- Form the Dough: Gradually add the dry flour mixture to the wet ingredients, mixing with a wooden spoon or a dough hook on a stand mixer on low speed. Continue mixing until a shaggy dough forms. At this point, I like to switch to my hands or increase the speed slightly on the mixer.
- Knead the Dough: Turn the dough out onto a lightly floured surface. Knead the dough for about 8-10 minutes. This is where the gluten development happens, which gives our Cheesy Dynamite Chicken Buns their characteristic chewiness and elasticity. If using a stand mixer, knead on medium speed for about 6-8 minutes. The dough should become smooth, elastic, and no longer sticky. You can perform a “windowpane test” by stretching a small piece of dough; if you can stretch it thin enough to see light through it without tearing, your dough is perfectly kneaded.
- First Rise (Proofing): Lightly grease a clean large bowl with a little butter or oil. Place the kneaded dough in the bowl, turning it once to coat the entire surface. Cover the bowl tightly with plastic wrap or a clean kitchen towel. Place it in a warm, draft-free place to rise for 1 to 1.5 hours, or until it has doubled in size. A slightly warm oven (turned off, but preheated briefly and then turned off) or a sunny spot on your counter works wonderfully. This first rise is crucial for developing flavor and texture in your Cheesy Dynamite Chicken Buns.
- Punch Down: Once doubled, gently punch down the dough to release the air. This step helps create a finer crumb structure and makes the dough easier to handle for shaping our delightful buns.
Crafting the Cheesy Chicken Filling:
- Prepare the Chicken: If you’re using chicken breast, finely dice it into small, uniform pieces (about 1/2-inch cubes) or shred it after cooking. If using thighs, dice them similarly. I find smaller pieces distribute better throughout the bun.
- Sauté Aromatics: Heat olive oil in a large skillet or pan over medium heat. Add the finely chopped yellow onion and cook until softened and translucent, about 3-5 minutes. Then, add the minced garlic and cook for another minute until fragrant, being careful not to burn it.
- Cook the Chicken: Add the diced or shredded chicken to the skillet. Season with salt and black pepper. Cook, stirring occasionally, until the chicken is cooked through and no longer pink. This usually takes about 5-7 minutes. If you’re using pre-cooked shredded chicken, you can add it directly with the onions and garlic to warm through and absorb flavors.
- Simmer with Broth: Pour in the chicken broth. Bring it to a gentle simmer and let it cook for a few minutes until the liquid has mostly evaporated, and the chicken has absorbed some of the rich flavors. This step ensures our filling isn’t dry.
- Cool and Combine: Remove the skillet from the heat. Allow the chicken mixture to cool slightly. Once it’s no longer piping hot, stir in the shredded mozzarella cheese and chopped fresh parsley (if using). I always let it cool a bit before adding the cheese to prevent it from melting prematurely in the pan. The cheese will melt beautifully inside the buns when baked.
Mixing the Zesty Dynamite Sauce:
- Gather Ingredients: In a small bowl, combine the mayonnaise, sriracha, sweet chili sauce, fresh lime juice, and garlic powder.
- Whisk Until Smooth: Whisk all the ingredients together until the sauce is completely smooth and well combined.
- Taste and Adjust: This is the fun part! Taste the dynamite sauce and adjust the spice level with more sriracha, add more tang with extra lime juice, or balance the sweetness with more sweet chili sauce if desired. I love a good kick, so I tend to be generous with the sriracha! This sauce is truly what makes these Cheesy Dynamite Chicken Buns “dynamite”!
Assembling the Cheesy Dynamite Chicken Buns:
- Prepare Baking Sheet: Line a large baking sheet with parchment paper. This prevents sticking and makes cleanup a breeze.
- Divide the Dough: Turn the punched-down dough onto a lightly floured surface. Divide the dough into 12 equal portions. I usually weigh each portion (around 50-60g) to ensure uniform buns, which helps them bake evenly. Roll each portion into a smooth ball.
- Shape and Fill: Take one dough ball and, on a lightly floured surface, roll it out into a flat circle, about 4-5 inches in diameter, ensuring the edges are slightly thinner than the center. Place a generous spoonful of the cheesy chicken filling in the center of the dough circle. I typically use about 1.5-2 tablespoons of filling.
- Add Dynamite Sauce: Drizzle about a teaspoon of the prepared dynamite sauce directly over the chicken filling. Be careful not to overfill, as this can make sealing difficult.
- Seal the Buns: Carefully gather the edges of the dough over the filling, pinching them together firmly at the top to seal the bun completely. This is a crucial step to prevent any delicious filling from escaping during baking. You can twist the top gently or just pinch it securely. I like to then turn the bun seam-side down and gently cup it in my hands, rotating it to create a perfectly round bun.
- Second Rise (Proofing): Arrange the sealed buns on the prepared baking sheet, leaving about 2 inches of space between each bun as they will expand. Cover the baking sheet loosely with plastic wrap or a clean kitchen towel. Let the buns rise in a warm, draft-free place for another 30-45 minutes, or until they look visibly puffy and almost doubled in size again. This second proof is essential for the light and airy texture of the final Cheesy Dynamite Chicken Buns.
Baking Our Irresistible Cheesy Dynamite Chicken Buns:
- Preheat Oven: While the buns are on their second rise, preheat your oven to 375°F (190°C).
- Prepare Egg Wash: In a small bowl, whisk together the remaining large egg and 1 tablespoon of water. This egg wash will give our buns a beautiful golden-brown, shiny crust.
- Egg Wash and Toppings: Gently brush the tops of the risen buns with the egg wash. If desired, sprinkle with sesame seeds for an extra touch of flavor and visual appeal.
- Bake to Golden Perfection: Place the baking sheet with the buns into the preheated oven. Bake for 18-22 minutes, or until the Cheesy Dynamite Chicken Buns are golden brown on top and cooked through. Baking times can vary slightly depending on your oven, so keep an eye on them.
- Cool and Serve: Once baked, transfer the Cheesy Dynamite Chicken Buns to a wire rack to cool slightly. While they are tempting to devour immediately, allowing them to cool for a few minutes helps the cheese and filling set, preventing burns and ensuring the best texture. I love to serve these warm, perhaps with an extra drizzle of sriracha and a sprinkle of chopped green onions for garnish. These Cheesy Dynamite Chicken Buns are incredibly satisfying and truly make a fantastic snack or light meal!
Conclusion:
Well, my friends, we’ve reached the grand finale, and I truly hope you’re as excited as I am about what we’ve just created together. If there’s one recipe that encapsulates pure joy, comfort, and an undeniable ‘wow’ factor, it’s this one. The journey of preparing these incredible treats might seem elaborate at first glance, but I promise you, every step is a delightful dance towards culinary perfection. What makes these particular buns stand out in a sea of recipes? It’s that masterful fusion of textures and tastes. You’ve got the unbelievably soft, pillowy embrace of the bun, giving way to a savory, tender, and perfectly seasoned chicken filling. Then, just when you think it couldn’t get any better, the “dynamite” heat kicks in—not overpowering, but a delightful warmth that tingles and awakens your palate. And let’s not forget the star player, the gooey, melting cheese that stretches and pulls with every bite, creating an almost theatrical experience. It’s a symphony of flavors that truly sings on your tongue, balancing the rich, the spicy, and the utterly delicious.
This isn’t just another snack; it’s an experience, a conversation starter, and quite frankly, an absolute game-changer for your recipe repertoire. I’ve seen firsthand the delight on people’s faces when they take that first bite of these magnificent Cheesy Dynamite Chicken Buns. They’re surprisingly versatile, perfect for so many occasions, and they truly leave a lasting impression. From the moment the aroma fills your kitchen to the last delicious crumb, you’ll understand why I’m so passionate about sharing this particular recipe with you. It’s hearty without being heavy, flavorful without being complicated, and undeniably addictive in the best possible way. The sheer satisfaction of pulling these golden-brown beauties from the oven, knowing you’ve crafted something truly special, is a reward in itself. Trust me when I say, this recipe is destined to become a staple in your home, one you’ll be eager to revisit time and time again.
Now, let’s talk about enjoying your creations. While these buns are absolutely divine on their own, fresh from the oven, there are so many ways to elevate the experience. Imagine serving them as the star appetizer at your next gathering—I guarantee they’ll disappear faster than you can say ‘more, please!’ For a lighter meal, pair them with a crisp, refreshing green salad tossed in a simple vinaigrette; the coolness of the salad provides a lovely counterpoint to the warmth and spice of the buns. They also make an excellent accompaniment to a comforting bowl of tomato soup on a chilly evening, offering that delightful dunking potential. If you’re feeling extra indulgent, a side of cool ranch or a creamy avocado dip would complement the ‘dynamite’ kick beautifully, offering a soothing contrast. I also love serving them alongside a simple coleslaw for a picnic-style meal. For those who enjoy a heartier plate, consider them the main event, perhaps with some roasted vegetables on the side. They’re fantastic for game nights, movie marathons, or just a cozy family dinner where you want to impress without overwhelming yourself.
But the fun doesn’t stop there! One of the joys of cooking is personalizing a recipe to suit your tastes, and these buns are incredibly adaptable.
Feeling Adventurous? Try These Variations!
Don’t be afraid to experiment! If you’re a cheese connoisseur, feel free to mix and match; a blend of Monterey Jack and a sharp cheddar could add another layer of flavor, or perhaps some smoked gouda for a deeper, richer profile. For those who crave more heat, a pinch more cayenne pepper or a dash of your favorite hot sauce mixed into the chicken filling will definitely turn up the ‘dynamite.’ If you prefer a milder version, simply reduce the chili flakes or omit them entirely. You could also introduce finely diced bell peppers or corn into the chicken mixture for added texture and a touch of sweetness. Vegetarians could easily adapt this by substituting the chicken with seasoned shredded mushrooms, firm tofu, or a plant-based chicken alternative, ensuring everyone can enjoy this delightful treat. For a different bun experience, you could even try shaping them into smaller, bite-sized rolls for a more elegant party snack, or even a larger loaf for a pull-apart bread effect. The possibilities are truly endless, limited only by your imagination and what you have in your pantry.
So, what are you waiting for? I genuinely encourage you to roll up your sleeves, gather your ingredients, and dive into the wonderful world of making these incredible buns. I promise you, the effort is incredibly rewarding, and the results are utterly delicious. This recipe is designed to be approachable, even for those who might feel a little intimidated by baking with yeast. Just follow the steps, trust the process, and prepare to be amazed by what you can create in your own kitchen. Once you’ve made them, I would absolutely love to hear about your experience! Did you stick to the original recipe, or did you put your own unique spin on it? What were your favorite serving suggestions? Please, share your stories, your tips, and especially your photos in the comments below! Your insights and triumphs inspire me and our entire community of food lovers. Let’s celebrate the joy of home cooking together. Happy baking, my friends, and enjoy every single delightful bite!

Recipe
A delicious recipe
Ingredients
Instructions
Important Information
Nutrition Facts (Per Serving)
It is important to consider this information as approximate and not to use it as definitive health advice.
Allergy Information
Please check ingredients for potential allergens and consult a health professional if in doubt.
Leave a Comment