

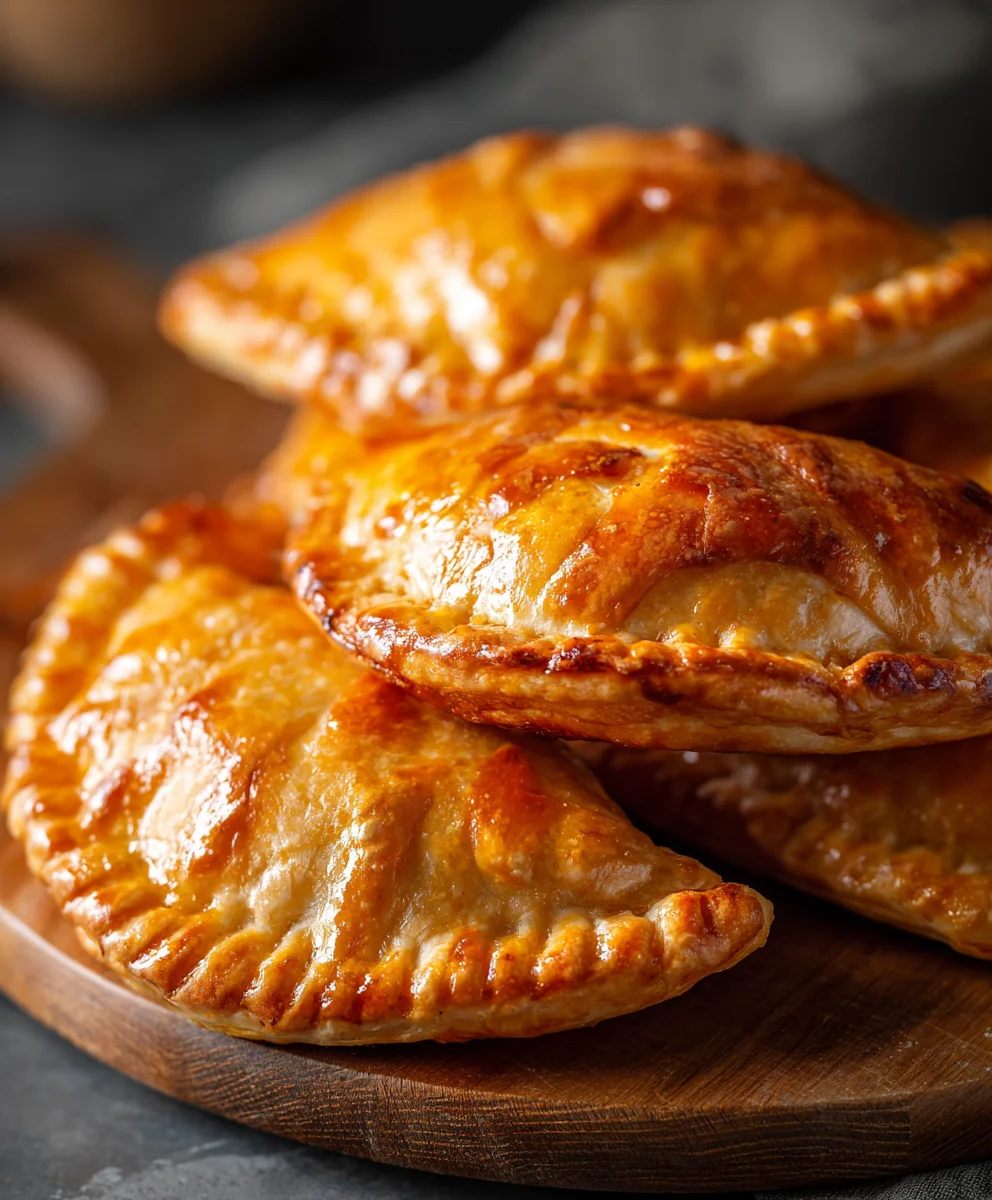
Pumpkin Hand Pies are more than just a dessert; they are a delightful embodiment of autumn, a compact package of warmth and spice that instantly transports you to cozy fall evenings. Imagine sinking your teeth into a perfectly golden, flaky crust, revealing a rich, creamy pumpkin filling seasoned with a harmonious blend of cinnamon, nutmeg, and cloves. It’s an experience that captures the essence of the season in every single bite.
Historically, hand pies, or “turnovers,” have been cherished across cultures for centuries as practical, portable meals and treats. They offered a convenient way to enjoy a delicious filling encased in pastry, making them ideal for harvest festivals, market days, or simply a grab-and-go snack. Our modern take on these charming individual pies specifically celebrates the bounty of the pumpkin patch, a staple of American fall traditions and holiday tables. While a full pumpkin pie is always a welcome sight, there’s something uniquely appealing about the ease and elegance of these smaller versions. People adore these Pumpkin Hand Pies not only for their irresistible flavor and satisfying texture but also for their sheer convenience and charming presentation. They eliminate the need for plates and forks, making them perfect for picnics, potlucks, or a simple, comforting treat to enjoy by the fire. I’m so excited to share my favorite recipe with you!

Ingredients:
-
For the Flaky Pie Dough (Enough for 12-14 Small Pumpkin Hand Pies):
- 2 ½ cups (300g) all-purpose flour, plus more for dusting
- 1 teaspoon granulated sugar
- ½ teaspoon fine sea salt
- 1 cup (226g) unsalted butter, very cold and cut into ½-inch cubes
- ½ cup (120ml) ice water, plus 1-2 tablespoons more if needed
-
For the Spiced Pumpkin Filling:
- 1 ½ cups (360g) pumpkin puree (not pumpkin pie filling, make sure it’s 100% pure pumpkin)
- ½ cup (100g) light brown sugar, packed
- ¼ cup (50g) granulated sugar
- 1 large egg yolk
- 2 tablespoons heavy cream or whole milk
- 1 tablespoon cornstarch
- 1 teaspoon ground cinnamon
- ½ teaspoon ground ginger
- ¼ teaspoon ground nutmeg
- ⅛ teaspoon ground cloves (just a pinch for that extra warmth!)
- ¼ teaspoon fine sea salt
- ½ teaspoon vanilla extract
-
For the Egg Wash & Optional Glaze:
- 1 large egg, beaten with 1 tablespoon water (for the egg wash)
- 1 ½ cups powdered sugar, sifted (for the glaze)
- 2-3 tablespoons milk or heavy cream (for the glaze)
- ½ teaspoon vanilla extract (optional, for the glaze)
Homemade Pie Dough for Your Pumpkin Hand Pies
- Combine Dry Ingredients: I always start by gathering my dry ingredients in a spacious mixing bowl. I carefully measure out 2 ½ cups of all-purpose flour, add 1 teaspoon of granulated sugar, and ½ teaspoon of fine sea salt. Then, I take a whisk and gently combine them, making sure everything is evenly distributed. This simple step ensures that every bite of our delicious Pumpkin Hand Pies will have a consistent flavor profile.
- Incorporate Cold Butter: Now, for the secret to a truly flaky crust – very cold butter! I introduce 1 cup of unsalted butter, which I’ve cut into ½-inch cubes and kept chilling until the last moment. Using a pastry blender, two butter knives, or even my fingertips, I work the butter into the flour mixture. My goal here isn’t to create a smooth mixture, but rather to break the butter down until it resembles coarse meal, with distinct pea-sized pieces still visible. It’s absolutely crucial not to overwork the butter, as the warmth from your hands can melt it, which would prevent those wonderful pockets of steam from forming during baking. These tiny pockets of butter are what create the glorious separation and flakiness we all adore in a perfect pie crust, making your Pumpkin Hand Pies irresistibly tender.
- Add Ice Water Gradually: Next, I slowly begin adding ½ cup of ice water to the butter-flour mixture. I pour it in one tablespoon at a time, mixing gently with a fork or my hands after each addition. The key here is to add just enough water for the dough to come together when squeezed. It should be moist but not sticky. Depending on the humidity levels in my kitchen, I might need an extra tablespoon or two, but I always add it very sparingly. The moment the dough just barely forms a shaggy ball, I stop mixing immediately. Overmixing develops the gluten too much, resulting in a tough crust instead of a tender one for our Pumpkin Hand Pies.
- Form and Chill the Dough: Once the dough has come together into that shaggy ball, I divide it into two equal portions. I gently pat each portion into a flat disc – a round shape is usually easiest to work with later. Then, I wrap each disc tightly in plastic wrap to prevent it from drying out. These wrapped discs go straight into the refrigerator for a minimum of 1 hour. This chilling period is a non-negotiable step for several reasons: it allows the gluten in the flour to relax, making the dough much easier to roll out without shrinking back, and it re-chills the butter, which is essential for achieving maximum flakiness. You can even prepare this dough a day or two in advance and store it in the fridge; it saves time and makes the process of baking your homemade Pumpkin Hand Pies even more enjoyable.
Crafting the Irresistible Pumpkin Filling
- Prepare the Pumpkin Base: While my pie dough is happily chilling in the fridge, I turn my attention to the star of the show: the pumpkin filling. In a medium-sized mixing bowl, I combine 1 ½ cups of 100% pure pumpkin puree (be sure it’s not pumpkin pie filling, which already has spices and sweeteners). To this, I add ½ cup of packed light brown sugar and ¼ cup of granulated sugar. I stir everything together until it’s beautifully smooth and well-blended. Using both types of sugar adds a lovely depth of sweetness and a hint of molasses flavor that complements the pumpkin so perfectly.
- Add Flavor Enhancers and Thickener: To enrich our filling and give it a luxurious texture, I incorporate 1 large egg yolk. The yolk acts as a binder and adds a wonderful creaminess. Next, I pour in 2 tablespoons of heavy cream (whole milk works well too if that’s what you have on hand). Finally, I whisk in 1 tablespoon of cornstarch. This crucial ingredient acts as a thickener, ensuring our Pumpkin Hand Pies have a beautifully set, spoonable filling that won’t be watery or runny after baking.
- Spice it Up: Now, for the aromatic heart of our pumpkin filling! I carefully measure and add 1 teaspoon of ground cinnamon, ½ teaspoon of ground ginger, ¼ teaspoon of ground nutmeg, and a tiny ⅛ teaspoon of ground cloves. These spices collectively create that iconic, warming, autumnal flavor profile. I also add ¼ teaspoon of fine sea salt, which might seem counterintuitive in a sweet dish, but it’s essential for balancing the flavors and making all those wonderful spices truly pop. Lastly, I stir in ½ teaspoon of vanilla extract for an added layer of warmth. At this point, I always give the filling a taste. This is your chance to adjust the spices or sweetness to your personal preference; remember, these are your Pumpkin Hand Pies, so make them exactly how you love them!
- Chill the Filling: Once I’m happy with the flavor and consistency of the pumpkin filling, I cover the bowl and place it in the refrigerator to chill. A chilled filling is not only easier to portion and work with when assembling the pies, but it also helps prevent the dough from becoming too warm or soggy during the assembly process. This ensures your Pumpkin Hand Pies maintain their flaky integrity.
Assembling Your Perfect Pumpkin Hand Pies
- Preheat Oven & Prep Baking Sheets: Before I even think about rolling out the dough, I make sure my oven is preheating to a steady 400°F (200°C). While it’s heating up, I line two large baking sheets with parchment paper. This step is a lifesaver for easy cleanup and ensures our delicate Pumpkin Hand Pies won’t stick to the pan.
- Roll Out the Dough: I retrieve one disc of perfectly chilled pie dough from the refrigerator. On a lightly floured surface, I begin to roll it out using a rolling pin. I aim for a large, thin circle or rectangle, about ⅛-inch thick. The key to a truly crisp and flaky hand pie is a thin dough, so don’t be shy about rolling it out generously! If at any point the dough becomes too warm, soft, or sticky, I simply pop it back into the fridge for 10-15 minutes to firm up again. This patience prevents frustration and yields a much better result. I usually roll it to a size of roughly 12-14 inches across.
- Cut Out Shapes: Using a 3.5 to 4-inch round cookie cutter, a square cutter, or even just a sharp knife to cut squares, I cut out as many shapes as possible from the rolled-out dough. I carefully gather any dough scraps, gently press them together to re-form a disc (without overworking), wrap it in plastic, and chill it for about 15-20 minutes. This allows me to roll it out a second time to get a few more precious hand pie shapes, ensuring no delicious dough goes to waste.
- Fill the Pies: I carefully arrange half of my cut-out dough circles (or squares) onto one of the parchment-lined baking sheets. In the center of each dough shape, I spoon about 1 ½ to 2 tablespoons of the chilled pumpkin filling. It’s important to leave a good ½-inch border around the edge of the dough free of filling. Overfilling is a common pitfall that can lead to leaky pies, and we want our Pumpkin Hand Pies to be perfectly sealed!
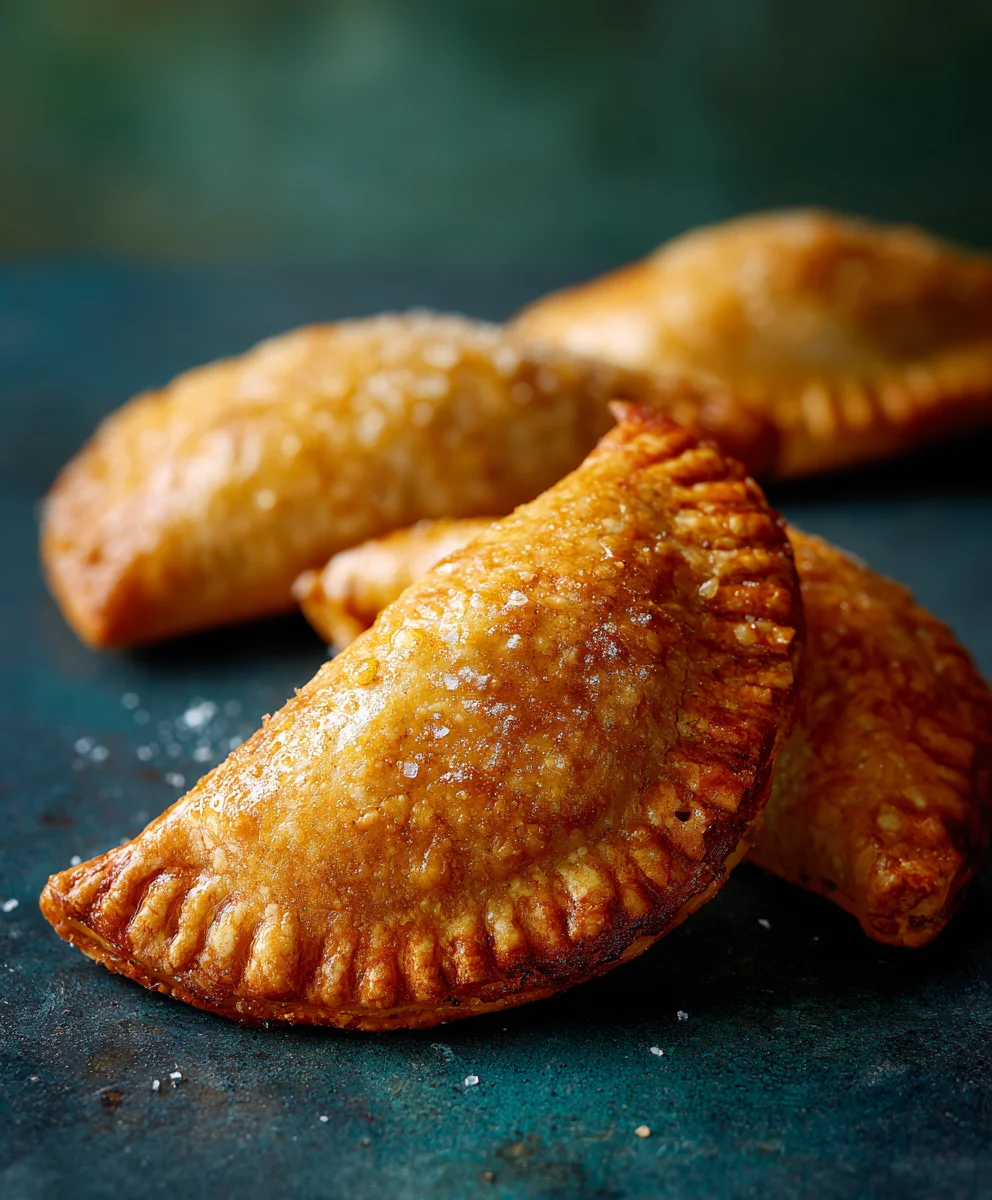
- Seal the Hand Pies: To seal these delightful little parcels, I lightly moisten the empty dough edges with a finger dipped in a little water. Then, I carefully place another dough circle (or square) directly on top of each filled one. I gently but firmly press down around the edges to seal them completely, ensuring no delicious pumpkin filling can escape during baking. For added security and a charming, rustic aesthetic, I use the tines of a fork to press firmly all around the perimeter of each hand pie. This not only reinforces the seal but also creates a beautiful crimped edge.
- Vent and Egg Wash: Before these beauties go into the oven, I take a small, sharp knife and carefully cut 2-3 small slits on the top of each Pumpkin Hand Pie. These vents are crucial; they allow steam to escape during baking, preventing the pies from puffing up excessively or, even worse, bursting open. Finally, I brush the tops of all the pies generously with the egg wash (that one beaten egg mixed with 1 tablespoon of water). This gives them a gorgeous golden-brown, shiny finish that makes them look utterly professional and delicious.
- Final Chill (Optional but Recommended): If I have a little extra time, I find that a final chill for the assembled Pumpkin Hand Pies can make a noticeable difference. I pop the baking sheets back into the refrigerator for another 15-20 minutes. This last chill allows the butter in the dough to firm up once more, which contributes to an even flakier, more tender crust when baked. It’s a small step, but I truly believe it elevates the final texture.
Baking Golden Brown Pumpkin Hand Pies
- Bake to Perfection: With the oven preheated to 400°F (200°C), I carefully transfer the baking sheets loaded with our beautiful Pumpkin Hand Pies into the oven. I bake them for 18-22 minutes, or until the crust is a magnificent golden brown and I can see the pumpkin filling just bubbling slightly around the edges (if it’s peeking out). Every oven is a little different, so I always keep a close eye on them, rotating the baking sheets halfway through the baking time to ensure even browning. The aroma that fills my kitchen at this stage is absolutely intoxicating – it’s the very essence of autumn!
- Cooling Down: Once they emerge from the oven, glowing golden and smelling divine, I carefully remove the baking sheets. I then transfer the hot Pumpkin Hand Pies onto a wire rack to cool completely. This part requires a bit of willpower, as they are incredibly tempting straight out of the oven! However, cooling is vital; it allows the filling to set properly, preventing it from being too runny, and ensures that any trapped steam doesn’t make the crust soggy. Patience truly is a virtue here, I promise it’s worth the wait for these perfectly set and flaky Pumpkin Hand Pies!
Optional Glaze for Extra Sweetness
- Prepare the Glaze: While our delightful Pumpkin Hand Pies are cooling, I often whip up a quick and easy glaze for an extra touch of sweetness and a lovely finish. In a small bowl, I whisk together 1 ½ cups of sifted powdered sugar with 2-3 tablespoons of milk or heavy cream. If I’m feeling fancy, I’ll also add ½ teaspoon of vanilla extract for another layer of flavor. I start with just 2 tablespoons of liquid and slowly add more, a tiny bit at a time, until I achieve a smooth, pourable consistency. I’m aiming for something that’s thick enough to coat the pies nicely but thin enough to drizzle elegantly.
- Glaze the Pies: Once the Pumpkin Hand Pies are completely cool to the touch, I lovingly drizzle or spread the prepared glaze over their tops. This adds a beautiful sheen and a perfect touch of sweetness to complement the spiced pumpkin filling. The glaze will set after a few minutes, creating a slight crust. These glazed Pumpkin Hand Pies are now truly ready to be enjoyed! They are absolutely perfect for a cozy afternoon snack, a festive dessert, or even a quick, delightful grab-and-go breakfast treat that brings a smile to your face.
- Storage: If, by some culinary miracle, you find yourself with any leftover Pumpkin Hand Pies, I recommend storing them in an airtight container at room temperature. They will remain wonderfully fresh for up to 3 days. For longer storage, you can refrigerate them for up to a week. If you prefer them warm, a quick gentle rewarming in a low oven (around 250°F / 120°C) for 5-7 minutes will bring them back to their initial comforting glory.
<h2>Conclusion:</h2>
<p>As we draw this delicious journey to a close, I hope you’re feeling as inspired and eager to get baking as I am just thinking about these wonderful treats! This recipe isn’t just about creating a dessert; it’s about crafting a little moment of joy, a bite-sized piece of comfort that resonates with warmth and homemade goodness. I truly believe this recipe is a must-try for anyone who appreciates the comforting embrace of a flaky, golden crust paired with a perfectly spiced, tender filling. <strong>What makes these Pumpkin Hand Pies truly exceptional is their perfect balance of simplicity and sophistication.</strong> They look impressive, yet the process is surprisingly straightforward, making them accessible even for novice bakers, while still offering a delightful project for seasoned pros.</p>
<p>The aroma alone, as these bake in your oven, is enough to transport you to a cozy, autumnal wonderland, even if it’s the middle of summer. The way the spices mingle with the sweet pumpkin, the slight crisp of the pastry giving way to a soft, melt-in-your-mouth interior – it’s an experience for all the senses. <h5>They’re perfect for so many occasions</h5>, and I love thinking about all the ways you can enjoy them. Serve them warm, straight from the oven, with a generous scoop of vanilla bean ice cream or a dollop of freshly whipped cream for an indulgent dessert. Imagine them as the star of your next brunch spread, perhaps alongside a strong cup of coffee or a spicy chai latte. They’re also absolutely fantastic when cooled and packed in lunchboxes or picnic baskets – no forks required, making them the ultimate on-the-go treat. I often make a big batch and store them in an airtight container for quick snacks throughout the week; they hold up beautifully.</p>
<p>But don’t stop there! While this recipe for Pumpkin Hand Pies is fantastic as is, feel free to unleash your inner culinary artist with a few variations. You could add a sprinkle of toasted pecans or walnuts to the filling for extra crunch and nutty flavor. For a richer, more complex spice profile, consider adding a pinch of ground cardamom or a tiny dash of black pepper to your pumpkin mixture – it really elevates the existing spices. If you’re feeling extra fancy, a light glaze made from powdered sugar, a splash of milk, and a tiny bit of maple extract drizzled over the cooled pies would be absolutely divine. Or, for a beautiful textural contrast, brush the tops with an egg wash and sprinkle with turbinado sugar before baking for a sparkling, crunchy finish. You could even experiment with different crust types – a cream cheese pastry for extra richness, or a whole wheat blend for a rustic touch.</p>
<p>I genuinely hope you’ll set aside some time soon to create these delectable <strong>Pumpkin Hand Pies</strong> in your own kitchen. There’s something incredibly satisfying about transforming simple ingredients into something so utterly delicious and beautiful. <h4>Don’t be shy – dive in and bake a batch!</h4> And please, please, please don’t keep your triumphs to yourself! I absolutely adore hearing about your experiences and seeing your culinary creations. Once you’ve made them, I’d be thrilled if you could share your thoughts, photos, and any creative twists you added. Let me know how they turned out for you – was it the perfect treat you hoped for? Did your family rave about them? Your feedback and shared experiences are what make this community so vibrant and inspiring. Happy baking, my friends!</p>
Bake Amazing Pumpkin Hand Pies: Your New Favorite Fall Treat
These pumpkin hand pies wrap fall flavors in flaky pastry perfect for autumn celebrations. Each bite brings creamy pumpkin filling and buttery crust making them ideal for parties or cozy treats at home.
Ingredients
-
2 ½ cups (300g) all-purpose flour
-
1 tsp granulated sugar
-
½ tsp fine sea salt
-
1 cup (226g) very cold unsalted butter, cubed
-
½ cup (120ml) ice water (plus more as needed)
-
1 ½ cups (360g) 100% pumpkin puree
-
½ cup (100g) packed light brown sugar
-
¼ cup (50g) granulated sugar
-
1 large egg yolk
-
2 tbsp heavy cream or whole milk
-
1 tbsp cornstarch
-
1 tsp ground cinnamon
-
½ tsp ground ginger
-
¼ tsp ground nutmeg
-
⅛ tsp ground cloves
-
¼ tsp fine sea salt
-
½ tsp vanilla extract
-
1 large egg, beaten with 1 tbsp water (for egg wash)
-
1 ½ cups sifted powdered sugar
-
2-3 tbsp milk or heavy cream (for glaze)
-
½ tsp vanilla extract (optional, for glaze)
Instructions
-
Step 1
Make Pie Dough: In a bowl, whisk flour, 1 tsp granulated sugar, and ½ tsp fine sea salt. Cut in 1 cup cold cubed butter until coarse meal with pea-sized pieces. Gradually add ½ cup ice water, mixing until a shaggy dough forms. Do not overmix. -
Step 2
Chill Dough: Divide dough into two discs, wrap, and chill for at least 1 hour. -
Step 3
Make Pumpkin Filling: Combine 1 ½ cups pumpkin puree, ½ cup packed light brown sugar, ¼ cup granulated sugar, 1 large egg yolk, 2 tbsp heavy cream (or whole milk), 1 tbsp cornstarch, 1 tsp ground cinnamon, ½ tsp ground ginger, ¼ tsp ground nutmeg, ⅛ tsp ground cloves, ¼ tsp fine sea salt, and ½ tsp vanilla extract. Mix well. -
Step 4
Chill Filling: Cover and chill the pumpkin filling. -
Step 5
Prep for Baking: Preheat oven to 400°F (200°C). Line two baking sheets with parchment paper. -
Step 6
Roll and Cut Dough: On a floured surface, roll out one dough disc to ⅛-inch thick. Cut out 3.5-4 inch shapes. Re-roll chilled scraps once for more shapes. -
Step 7
Fill Pies: Place half of the dough shapes on prepared baking sheets. Spoon 1 ½ – 2 tbsp chilled pumpkin filling onto the center of each, leaving a ½-inch border. -
Step 8
Seal Pies: Moisten dough edges with water. Top with another dough shape, press to seal, then crimp edges with a fork. -
Step 9
Vent and Egg Wash: Cut 2-3 small slits on top of each pie. Brush generously with egg wash (1 large egg beaten with 1 tbsp water). -
Step 10
Bake: Bake for 18-22 minutes, or until golden brown. Rotate sheets halfway through. -
Step 11
Cool: Transfer pies to a wire rack to cool completely. -
Step 12
Make Glaze (Optional): Whisk 1 ½ cups sifted powdered sugar with 2-3 tbsp milk or heavy cream and optional ½ tsp vanilla extract to a smooth, pourable consistency. -
Step 13
Glaze and Serve: Once pies are cool, drizzle or spread glaze over them. -
Step 14
Storage: Store in an airtight container at room temperature for up to 3 days, or refrigerate for up to a week. Reheat gently in a low oven (250°F / 120°C) for 5-7 minutes if desired.
Important Information
Nutrition Facts (Per Serving)
It is important to consider this information as approximate and not to use it as definitive health advice.
Allergy Information
Please check ingredients for potential allergens and consult a health professional if in doubt.

Leave a Comment