

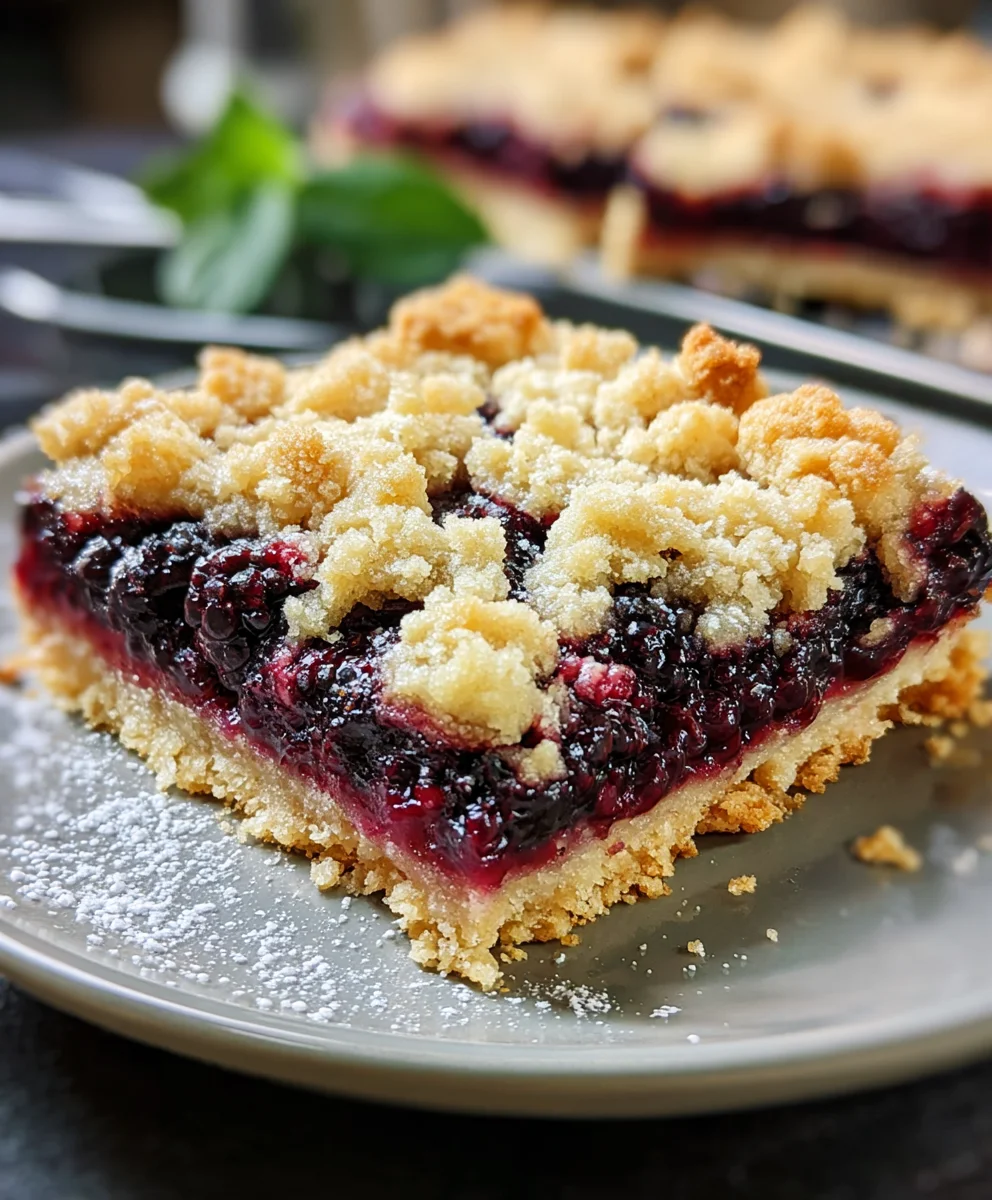
Blackberry Pie Crumble Bars offer a delightful twist on a classic dessert that truly captures the essence of homemade goodness in an irresistibly convenient form. Imagine the sweet-tart burst of ripe blackberries nestled beneath a golden, buttery crumble topping, all atop a tender, shortbread-like crust. This isn’t just a dessert; it’s a portable slice of summer, perfect for any occasion, from a casual afternoon treat to an elegant potluck contribution. While traditional fruit pies have graced tables for centuries, the modern crumble bar evolved as a convenient and equally delicious alternative, taking the beloved elements of a rustic fruit pie – the vibrant fruit filling and the irresistible streusel topping – and reimagining them in an easy-to-serve format.
What makes these bars so universally adored? It’s the harmonious blend of textures and flavors: the juicy, slightly tart blackberry filling contrasting beautifully with the rich, crisp crumble, and the sturdy, melt-in-your-mouth base. They’re less fuss than a full pie, making them an ideal choice for picnics, potlucks, or simply a comforting treat at home. These Blackberry Pie Crumble Bars truly encapsulate the essence of comfort baking, offering a perfect balance of fruitiness and buttery richness in every bite. I promise, they are destined to become a new favorite in your baking repertoire.

Ingredients:
-
For the Crumble Topping & Crust:
- 2 ½ cups (300g) all-purpose flour, plus more for dusting
- 1 cup (200g) granulated sugar
- ¾ cup (150g) packed light brown sugar
- 1 teaspoon baking powder
- ½ teaspoon salt
- 1 cup (226g) unsalted butter, very cold and cut into ½-inch cubes
- 1 large egg, lightly beaten
- 1 teaspoon vanilla extract
-
For the Blackberry Filling:
- 6 cups (approximately 900g) fresh blackberries, rinsed and thoroughly dried
- ½ cup (100g) granulated sugar (adjust based on sweetness of berries)
- 2 tablespoons fresh lemon juice (from about 1 medium lemon)
- 3 tablespoons cornstarch (or arrowroot powder for a gluten-free option)
- 1 teaspoon vanilla extract
- ¼ teaspoon almond extract (optional, but highly recommended for depth)
- Pinch of salt
For the Crumble Topping & Crust:
Creating the perfect crumble mixture is the foundational step for our delightful Blackberry Pie Crumble Bars. This versatile mixture will serve as both the sturdy base and the irresistible, buttery topping.
- First, I grab a really large mixing bowl. Into this bowl, I combine all the dry ingredients for our crumble: the all-purpose flour, granulated sugar, light brown sugar, baking powder, and a good pinch of salt. I like to take a moment here to whisk these dry ingredients thoroughly. It’s important to break up any lumps of brown sugar, ensuring that everything is evenly distributed. This uniformity is key for a consistent texture in your finished bars.
- Next comes the butter. It’s crucial that your butter is very cold and cut into small, ½-inch cubes. This is perhaps the most important tip for a truly crumbly texture. I add these cold butter cubes directly into the dry ingredient mixture.
- Now, I use my trusty pastry blender, or sometimes my fingertips, to cut the butter into the flour mixture. The goal here is to work quickly, minimizing the warmth transferred from my hands to the butter. You want to keep those butter pieces cold. I continue blending until the mixture resembles coarse crumbs, with some larger pea-sized pieces of butter still visible. These larger pieces are what will melt and create those pockets of flakiness we adore in a good crumble.
- Once I’ve achieved that lovely crumbly consistency, I like to create a small well in the center of the mixture. Into this well, I pour the lightly beaten large egg and the vanilla extract.
- Using my hands or a sturdy spatula, I gently mix these wet ingredients into the crumble mixture until just combined. The mixture will still be very crumbly, but it should hold together if you squeeze a handful. Be careful not to overmix; we want to retain that tender, crumbly texture.
- At this point, I divide the crumble mixture. I set aside exactly 1 ½ cups of the mixture for our glorious topping later on. This portion goes into a separate bowl and I usually pop it into the refrigerator while I prepare the rest of the components. Keeping it cold will help maintain its shape and texture during baking. The remaining crumble mixture in the large bowl will form our bottom crust.
For the Blackberry Filling:
The heart of our Blackberry Pie Crumble Bars is this vibrant, sweet-tart blackberry filling. It’s simple to make but packed with incredible flavor.
- I start by gently rinsing my fresh blackberries under cool water and then making sure they are thoroughly dried. Excess water can make your filling too runny, so a good pat-down with paper towels is essential. I transfer these beautiful berries to a medium-sized bowl.
- Next, I add the granulated sugar to the blackberries. The amount of sugar can be adjusted based on the natural sweetness of your berries and your personal preference. If your blackberries are particularly tart, you might want to add a little more.
- Then, I add the fresh lemon juice. This isn’t just for a burst of citrus; the acidity really brightens the flavor of the berries and helps prevent the filling from becoming overly sweet.
- After that, I sprinkle in the cornstarch. This is our thickening agent, and it’s absolutely crucial for achieving that perfectly set, not-too-runny filling. I make sure to distribute it evenly over the berries.
- Finally, I stir in the vanilla extract and, if I’m feeling fancy (which I usually am for these bars!), a touch of almond extract. The almond extract really complements the blackberry flavor beautifully, adding a subtle depth that makes these bars truly special. I also add a tiny pinch of salt to enhance all the flavors.
- I gently toss all these ingredients together until the blackberries are evenly coated. It’s important to be gentle to avoid crushing the berries too much, as we want to maintain some of their whole, juicy texture. I set this aside while I prepare the baking pan.
Assembling the Blackberry Pie Crumble Bars:
Now comes the exciting part – bringing all these delicious components together to create our show-stopping Blackberry Pie Crumble Bars!
- First things first, I preheat my oven to 375°F (190°C). It’s always good to have the oven ready to go.
- I prepare a 9×13-inch baking pan. I like to line it with parchment paper, allowing an overhang on the two longer sides. This parchment paper sling is a lifesaver later on when it comes to lifting the cooled bars out of the pan for easy cutting. I also lightly grease the exposed sides of the pan or even give the parchment paper a quick spray, just to be extra cautious.
- Now, I take the larger portion of our crumble mixture (the part we didn’t refrigerate) and evenly press it into the bottom of the prepared baking pan. I use the bottom of a flat-bottomed glass or my fingertips to press it down firmly and uniformly. You want a compact, even layer that will form a sturdy base for our bars. Make sure it goes right up to the edges of the pan.
- I like to give this crust a little head start in the oven. I bake it in the preheated oven for about 10-12 minutes. This par-baking step helps to set the crust, preventing it from becoming soggy once we add the juicy blackberry filling. You’ll notice it just starting to turn a very light golden brown around the edges, and it will smell wonderfully buttery.
- While the crust is par-baking, I retrieve my blackberry filling. If it has sat for a while, I give it another gentle stir.
- Once the crust is par-baked, I carefully remove the pan from the oven. Using a spatula or spoon, I evenly spread the blackberry filling over the hot, par-baked crust. I make sure to distribute the berries and their delicious juices right to the edges of the pan. The warmth of the crust will help the filling settle beautifully.
- Finally, I grab that reserved 1 ½ cups of cold crumble mixture from the refrigerator. I generously sprinkle this crumble topping evenly over the blackberry filling. Don’t press it down; we want that lovely, loose, crumbly texture on top. The cold butter in the topping will ensure it stays wonderfully crisp and distinct during baking, creating those perfect golden peaks that define a great crumble.
Baking and Cooling:
The aroma that fills your kitchen during this stage is truly intoxicating – a promise of the delicious Blackberry Pie Crumble Bars to come!
- I carefully place the assembled bars back into the preheated 375°F (190°C) oven.
- The baking time will typically be between 35-45 minutes. I keep a close eye on them. You’ll know they are done when the topping is beautifully golden brown, and the blackberry filling is bubbling around the edges, looking thick and glossy. If you notice the topping browning too quickly, you can loosely tent the pan with aluminum foil for the last 10-15 minutes of baking, but generally, this isn’t necessary.
- Once they are golden and bubbly, I carefully remove the pan from the oven. This next step is absolutely crucial: allowing them to cool completely. I place the hot pan on a wire rack to cool.
- Patience is key here! These bars need to cool for at least 2-3 hours, or even longer, before attempting to cut them. If you try to cut them while they’re still warm, the filling will be too runny and the bars won’t hold their shape. They will be a delicious, gooey mess, but a mess nonetheless. Cooling allows the cornstarch in the filling to fully set and the buttery crust and crumble to firm up beautifully. I often make these in the afternoon and let them cool until evening, or even overnight.
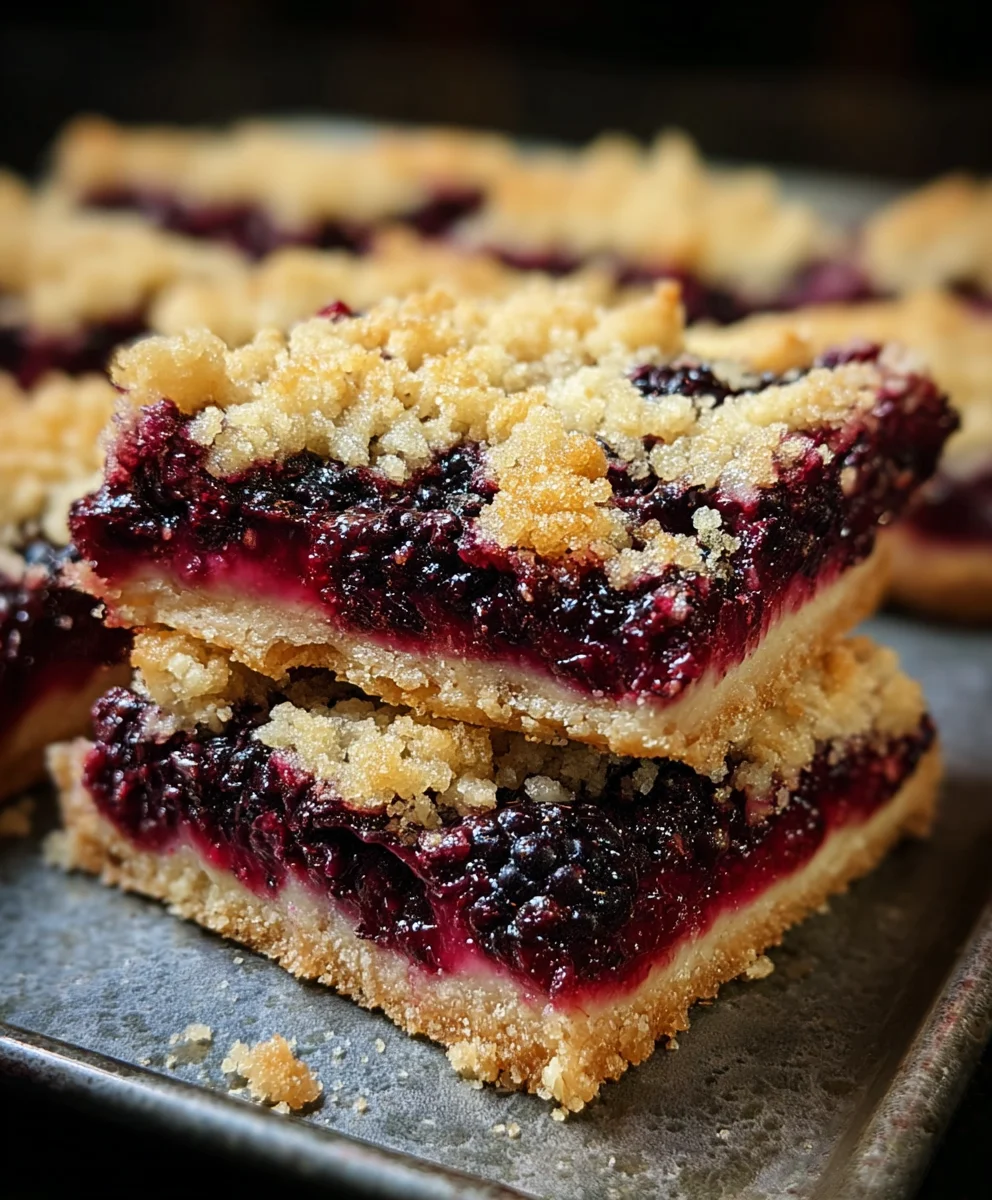
- Once completely cooled, I use the parchment paper overhangs as handles to gently lift the entire slab of Blackberry Pie Crumble Bars out of the pan and onto a cutting board. This makes cutting so much easier and cleaner.
- Using a sharp knife, I trim the edges (if desired, though I usually keep them – they’re delicious!) and then cut the large slab into individual bars. I typically aim for 12-16 bars, depending on how generous I’m feeling. A good technique is to wipe your knife clean after each cut for the neatest edges.
Serving and Storage:
Finally, the moment we’ve been waiting for: enjoying these incredible Blackberry Pie Crumble Bars!
- These bars are absolutely wonderful served at room temperature. The flavors have a chance to meld beautifully, and the textures are just perfect—a crisp, buttery crumble with a tender, sweet-tart fruit filling.
- If you want to be extra indulgent, a small scoop of vanilla bean ice cream or a dollop of freshly whipped cream alongside a bar is simply divine. The cold, creamy element contrasts wonderfully with the fruity bar.
- To store, I place the cooled bars in an airtight container. At room temperature, they will stay fresh and delicious for 3-4 days. For longer storage, you can refrigerate them for up to a week. If you’re refrigerating, I find bringing them back to room temperature before serving enhances their flavor and texture.
- For an even longer storage solution, these Blackberry Pie Crumble Bars also freeze remarkably well! Once completely cooled and cut, I arrange them in a single layer on a baking sheet and freeze them until solid. Then, I transfer the frozen bars to a freezer-safe bag or container, separating layers with parchment paper to prevent sticking. They can be frozen for up to 2-3 months. To enjoy, simply thaw them at room temperature, or even warm them gently in the oven for a freshly baked feel.
- Whether you’re making them for a picnic, a potluck, or just for a special treat at home, these bars are always a huge hit. They perfectly capture the essence of a blackberry pie in a much more convenient, hand-held form. Enjoy every crumbly, fruity bite!
Conclusion:
And there you have it, my friends! We’ve reached the sweet end of our journey through this truly remarkable recipe. I genuinely hope you’re feeling as inspired and eager as I am to get into your kitchen and whip up a batch of these extraordinary treats. If you’ve been searching for that perfect dessert that strikes a harmonious balance between being incredibly delicious and surprisingly simple to execute, then your quest, I believe, ends right here. These aren’t just any ordinary baked goods; they are a delightful fusion of tangy fruit, buttery crumb, and a soft, yielding bar that melts in your mouth, leaving you craving just one more bite. The sheer joy of biting into a treat that offers both the comforting familiarity of a homemade pie and the convenient, portable nature of a bar is something truly special. I’m telling you, once you taste the delightful explosion of flavors and textures, from the juicy, slightly tart blackberries to the sweet, irresistible crumble topping, you’ll understand why I’m so passionate about this recipe. It’s a testament to simple ingredients coming together to create something truly magical, something that feels both indulgent and wonderfully wholesome at the same time.
What I love most about these bars is their incredible versatility, making them an ideal choice for practically any occasion. Imagine serving them warm, straight from the oven, with a generous scoop of vanilla bean ice cream slowly melting over the top – a classic pairing that elevates the experience to pure bliss. The contrast of the warm, fruit-filled bar with the cold, creamy ice cream is simply divine. But don’t stop there! For a lighter touch, a dollop of freshly whipped cream, perhaps infused with a hint of lemon zest or a touch of almond extract, would be absolutely exquisite. And for those who love to experiment, consider a dusting of powdered sugar for an elegant finish, or even a drizzle of a simple lemon glaze to really amp up that citrusy counterpoint to the sweet berries. Think beyond dessert too; these bars make a fantastic grab-and-go breakfast on a busy morning, a comforting afternoon pick-me-up with a cup of tea, or a crowd-pleasing addition to any potluck or picnic. You could even play around with the fruit; while blackberries are stellar, a mix of berries like raspberries and blueberries would be equally charming, or even a stone fruit like peaches or plums when they’re in season. For an extra layer of texture and flavor, try adding a handful of chopped pecans or walnuts to the crumble topping – a little nutty crunch can go a long way in enhancing the overall experience. The possibilities, as you can see, are endless, allowing you to truly make this recipe your own.
Your Kitchen, Your Masterpiece
Now, it’s your turn. I’ve shared all my tips and tricks, and I’ve poured my heart into guiding you through each step. I am absolutely confident that you’re going to create something truly spectacular. Don’t be shy; embrace the process, savor the aromas that will soon fill your kitchen, and get ready to impress yourself and anyone lucky enough to share in your creation. Remember that beautiful moment when you pull them from the oven, golden and bubbling? That’s the moment of triumph! These Blackberry Pie Crum extractble Bars are more than just a recipe; they are an invitation to create, to share joy, and to indulge in the simple pleasures of homemade goodness. I am genuinely so excited for you to experience the delight of these bars, from the first intoxicating scent during baking to the very last crumb. Once you’ve had a chance to bake and taste them, please, please, please come back and share your experience with me! I’d love to hear how they turned out for you, what variations you tried, or what delightful moments they brought to your table. Your feedback and stories are what truly make this community vibrant and inspiring. Happy baking, my friends, and get ready to fall in love with your new favorite dessert!
Irresistible Blackberry Pie Crumble Bars
Blackberry Pie Crumble Bars offer a delightful twist on a classic dessert that truly captures the essence of homemade goodness in an irresistibly convenient form. Imagine the sweet-tart burst of ripe blackberries nestled beneath a golden, buttery crumble topping, all atop a tender, shortbread-like crust. This portable slice of summer is perfect for any occasion.
Ingredients
-
2 ½ cups (300g) all-purpose flour
-
1 cup (200g) granulated sugar
-
¾ cup (150g) packed light brown sugar
-
1 tsp baking powder
-
½ tsp salt
-
1 cup (226g) unsalted butter, very cold, cut into ½-inch cubes
-
1 large egg, lightly beaten
-
1 tsp vanilla extract
-
6 cups (900g) fresh blackberries, rinsed and dried
-
½ cup (100g) granulated sugar (for filling)
-
2 tbsp fresh lemon juice
-
3 tbsp cornstarch
-
1 tsp vanilla extract (for filling)
-
¼ tsp almond extract (optional)
-
Pinch of salt (for filling)
Instructions
-
Step 1
In a large mixing bowl, whisk together 2 ½ cups all-purpose flour, 1 cup granulated sugar, ¾ cup packed light brown sugar, 1 tsp baking powder, and ½ tsp salt until evenly combined and lumps are broken up. -
Step 2
Add 1 cup very cold, ½-inch cubed unsalted butter to the dry ingredients. Use a pastry blender or your fingertips to cut the butter into the flour mixture until it resembles coarse crumbs with some pea-sized pieces of butter still visible. -
Step 3
Create a well in the center of the crumble mixture. Pour in 1 large lightly beaten egg and 1 tsp vanilla extract. Gently mix until just combined; the mixture will remain very crumbly. Set aside 1 ½ cups of this mixture in the refrigerator for the topping. The remaining crumble will form the bottom crust. -
Step 4
In a medium bowl, gently combine 6 cups rinsed and thoroughly dried fresh blackberries, ½ cup granulated sugar (adjust to your berries’ sweetness), 2 tbsp fresh lemon juice, 3 tbsp cornstarch, 1 tsp vanilla extract, ¼ tsp almond extract (optional), and a pinch of salt. Toss gently to coat the berries without crushing them too much. -
Step 5
Preheat your oven to 375°F (190°C). Line a 9×13-inch baking pan with parchment paper, leaving an overhang on the two longer sides to create a ‘sling’. Lightly grease any exposed pan sides or the parchment paper. -
Step 6
Evenly press the larger portion of the crumble mixture (the part not refrigerated) into the bottom of the prepared baking pan, extending right to the edges. Use gentle pressure, as packing it too firmly can result in a tough base. -
Step 7
Bake the crust in the preheated oven for 10-12 minutes, or until the edges are just beginning to turn a very light golden brown and it smells buttery. -
Step 8
Carefully remove the par-baked crust from the oven. Evenly spread the blackberry filling over the hot, par-baked crust. Retrieve the reserved 1 ½ cups of cold crumble topping from the refrigerator and generously sprinkle it evenly over the blackberry filling; do not press it down. -
Step 9
Return the assembled bars to the 375°F (190°C) oven and bake for 35-45 minutes. The bars are done when the topping is beautifully golden brown, and the blackberry filling is bubbling thickly around the edges. -
Step 10
Remove the pan from the oven and place it on a wire rack to cool completely for at least 2-3 hours, or even longer (overnight is ideal). This crucial cooling allows the cornstarch in the filling to fully set and the crust and crumble to firm up. Attempting to cut them while warm will result in a runny, gooey mess. -
Step 11
Once completely cooled, use the parchment paper overhangs to gently lift the entire slab of bars onto a cutting board. Using a sharp knife, cut into 12-16 individual bars. For neatest edges, wipe the knife clean after each cut. Serve at room temperature, optionally with a scoop of vanilla bean ice cream or a dollop of whipped cream.
Important Information
Nutrition Facts (Per Serving)
It is important to consider this information as approximate and not to use it as definitive health advice.
Allergy Information
Please check ingredients for potential allergens and consult a health professional if in doubt.

Leave a Comment